背景
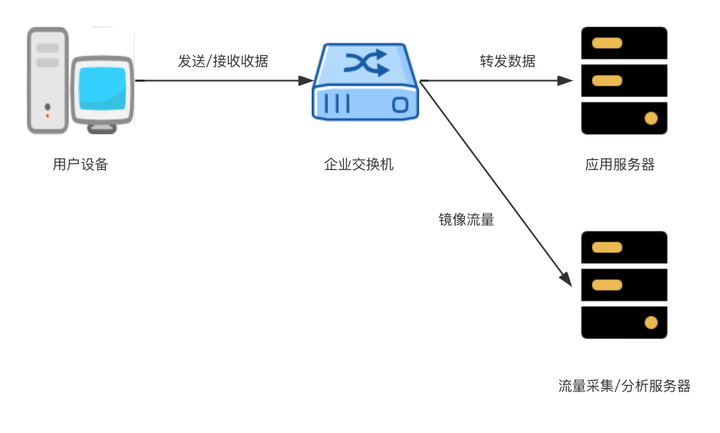
在流量采集和分析的场景中,一种常见架构如下所示:
![]()
编辑切换为居中
添加图片注释,不超过 140 字(可选)
在上述架构中,交换机通过流量镜像的方式,将用户与应用服务器之间的流量“复制”给流量采集/分析服务器。流量服务器上部署的采集探针负责协议数据包的重组,以及一部分流量分析工作,比如判断数据包是否触发某些规则。此时,需要对流量采集探针进行两方面的测试工作:
- 性能测试:如果采集探针重组和分析数据包的性能不够高,那么将导致丢包,进而影响后续的进一步分析
- 功能测试:从大量的流量中,准确地识别出风险事件、敏感数据等是流量分析的基础工作,如果无法做好这些工作,那么流量采集和分析将失去其意义
为进行性能测试,需要在模拟的用户和应用服务器之间,发送大量请求。为进行功能测试,需要在模拟的用户和应用服务器之间发送多种具有特定特征的流量。当前最主流的应用层协议非 HTTP 莫属。接下来将讲述如何使用 Lua 语言扩展 Nginx 和 Wrk,实现针对 HTTP 协议的性能测试和功能测试。
![]()
编辑切换为居中
添加图片注释,不超过 140 字(可选)
测试环境
- 操作系统:CentOS 7.9
安装 Openresty
Openresty 是完全成熟的 Web 应用服务器,它捆绑了标准的 Nginx 核心,大量的第三方模块,以及它们的大部分外部依赖。
安装依赖包
sudo yum install -y pcre pcre-devel openssl openssl-devel perl make gcc curl zlib zlib-devel
下载源码包
去官网的 Download 页面,下载 Openrestry 源码包。本文使用的是 openresty-1.19.9.1.tar.gz。
wget https://openresty.org/download/openresty-1.19.9.1.tar.gz
安装
tar zxf openresty-1.19.9.1.tar.gz
cd openresty-1.19.9.1/
./configure –with-luajit –with-http_iconv_module
make -j8 && sudo make install
Openresty 默认被安装到 /usr/local/openresty/。
验证
/usr/local/openresty/bin/openresty -V
安装 Wrk
wrk 是现代的 HTTP 基准测试工具,当在单个多核 CPU 上运行时,能够产生显著的负载。它结合多线程设计和可扩展的事件通知系统,比如 epoll 和 kqueue。 可选的 LuaJIT 脚本可以执行 HTTP 请求生成、响应处理和自定义报告。
安装依赖包
sudo yum install -y gcc openssl openssl-devel git curl
克隆源码
git clone https://github.com/wg/wrk.git wrk
编译
编译完成后,生成的二进制可执行文件 wrk 被保存当前目录中。可以将其移动到 PATH 中的某个目录下。
验证
Wrk 脚本简介
概览
Wrk 支持在三个不同阶段期间执行 LuaJIT 脚本:Setup、Running 和 Done。每个 Wrk 线程拥有独立的脚本环境,Setup 和 Done 阶段在单独的环境中执行,该环境不参与 Running 阶段。
公有 Lua API 包含全局表和多个全局函数:
wrk = {
scheme = “http”,
host = “localhost”,
port = nil,
method = “GET”,
path = “/”,
headers = {},
body = nil,
thread = <userdata>,
}
function wrk.format(method, path, headers, body)
wrk.format 返回由传入参数与 wrk 表中的值合并得到的 HTTP 请求字符串。
function wrk.lookup(host, service)
wrk.lookup 返回包含 host 和 service 对的所有已知地址的表。与 POSIX getaddrinfo() 函数对应。
function wrk.connect(addr)
如果能够连接到 addr,wrk.connect 返回 true,否则返回 false。addr 必须是从 wrk.lookup 返回的地址。 如下全局变量是可选的,如果定义,那么必须是函数:
- global setup — 在线程 Setup 期间调用
- global init — 在线程启动时调用
- global delay — 用于获取请求延迟
- global request — 用于生成 HTTP 请求
- global response — 使用 HTTP 响应数据调用
- global done — 使用运行结果调用
Setup
在已解析目标 IP 地址,并且所有线程已初始化,但尚未启动之后,Setup 阶段开始。 为每个线程,调用一次 setup(),该函数接收代表线程的 userdata 对象。
- thread.addr – 获取或设置线程的服务端地址
- thread:get(name) – 获取线程环境中的全局变量的值
- thread:set(name, value) – 设置线程环境中的全局变量的值
- thread:stop() – 停止线程
只有布尔值、nil、number 和字符串值或相同的表可以通过 get()/set() 传递,thread:stop() 只能在线程运行时调用。
Running
function init(args)
function delay()
function request()
function response(status, headers, body)
Running 阶段从对 init() 的单次调用开始,接下来为每个请求周期调用 request() 和 response()。 init() 函数为脚本接受额外的命令行参数,必须用 “–” 将其与 wrk 参数隔开。
delay() 返回延迟发送下个请求的毫秒数。 request() 返回包含 HTTP 请求的字符串。在测试高性能服务器时,每次都构建新请求代价很大。一个方案是在 init() 中预生成所有请求,然后在 request() 中进行快速查询。
使用 HTTP 响应状态码、头和体调用 response()。解析头和体代价很大,因此如果在调用 init() 后,response 全局变量是 nil,wrk 将忽略头和体。
Done
function done(summary, latency, requests)
done() 函数接收包含结果数据,以及代表每个请求延迟和每个线程请求速率的两个统计对象的表。持续时间和延迟都是微秒值,而速率以每秒的请求数来衡量。
- latency.min — 所见的最小值
- latency.max — 所见的最大值
- latency.mean — 所见的平均值
- latency.stdev — 标准偏差
- latency:percentile(99.0) — 百分之 99 的值
- latency(i) — 原始值和计数
summary = {
duration = N, — 运行持续时间,单位为微秒
requests = N, — 已完成的请求总数
bytes = N, — 接收的总字节数
errors = {
connect = N, — Socket 连接错误总数
read = N, — Socket 读取错误总数
write = N, — Socket 写错误总数
status = N, — 大于 399 的 HTTP 状态码总数
timeout = N — 请求超时总数
}
}
使用 Python 生成随机图片
图片是非常常见的资源类型,常见图片格式包括 JPG、PNG、GIF 等。测试过程中,可能希望模拟的服务端返回具有指定宽度和高度的图片。Pillow 是 Python 中强大的图片处理库,接下来使用 Pillow 生成随机的 JPG、PNG、GIF 图片。
首先,需要安装 Pillow:
下面是实现代码:
import string
import typing
from optparse import OptionParser
import random
import os
from PIL import Image, ImageDraw
def generate_jpg(width: int, height: int, output: str) -> None:
“””
生成一张随机的 JPG 图片
:param width: 生成的图片的宽度
:param height: 生成的图片的高度
:param output: 输出文件名称
“””
img: Image = Image.new(“RGB”, (width, height))
pixels = img.load()
for x in range(width):
for y in range(height):
r = random.randint(0, 255)
g = random.randint(0, 255)
b = random.randint(0, 255)
pixels[x, y] = (r, g, b)
img.save(output, format=”JPEG”)
print(f”the generated JPEG image is stored in {output}, file size is {os.stat(output).st_size / 1024} KB”)
def generate_png(width: int, height: int, output: str) -> None:
“””
生成一张随机的 PNG 图片
:param width: 生成的图片的宽度
:param height: 生成的图片的高度
:param output: 输出文件名称
“””
img: Image = Image.new(“RGBA”, (width, height))
draw: ImageDraw = ImageDraw.Draw(img)
for x in range(width):
for y in range(height):
alpha = random.randint(0, 255)
r = random.randint(0, 255)
g = random.randint(0, 255)
b = random.randint(0, 255)
draw.point((x, y), fill=(r, g, b, alpha))
img.save(output, format=”PNG”)
print(f”the generated PNG image is stored in {output}, file size is {os.stat(output).st_size / 1024} KB”)
def generate_gif(width: int, height: int, num_frames: int, output: str) -> None:
“””
生成一张随机的 GIF 图片
:param width: 生成的图片的宽度
:param height: 生成的图片的高度
:param num_frames: 生成的图片的桢数
:param output: 输出文件名称
“””
frames: typing.List[Image] = []
for _ in range(num_frames):
# 生成每一帧的随机图像
image = Image.new(“RGB”, (width, height))
for x in range(width):
for y in range(height):
r = random.randint(0, 255)
g = random.randint(0, 255)
b = random.randint(0, 255)
image.putpixel((x, y), (r, g, b))
# 将当前帧添加到帧列表中
frames.append(image)
# 保存图像
frames[0].save(output, format=”GIF”, append_images=frames[1:], save_all=True, duration=200, loop=1)
print(f”the generated GIF image is stored in {output}, file size is {os.stat(output).st_size / 1024} KB”)
def generate_text(size: int, output: str) -> None:
“””
生成特定长度的随机文本
:param size: 生成的随机文本的长度
:param output: 输出文件名称
“””
with open(output, “wb”) as fd:
current_size: int = size
while current_size > 0:
# 每次生成 4K
batch: int = min(4096, current_size)
fd.write(“”.join([random.choice(string.printable) for _ in range(batch)]).encode())
current_size -= batch
print(f”the generated text is store in {output}, file size is {os.stat(output).st_size / 1024} KB”)
def main() -> None:
parser: OptionParser = OptionParser(usage=”python %prog options…”)
parser.add_option(“-t”, “–type”, dest=”type”, default=”txt”, type=str,
help=”the type of generated file, including jpg, png, gif, txt”)
parser.add_option(“-w”, “–width”, dest=”width”, default=200, type=int,
help=”the width of image, if type is image”)
parser.add_option(“-H”, “–height”, dest=”height”, default=200, type=int,
help=”the height of image, if type is image”)
parser.add_option(“-s”, “–size”, dest=”size”, default=1024, type=int,
help=”the size of generated file, in bytes”)
parser.add_option(“-o”, “–output”, dest=”output”, default=”a”, type=str,
help=”output file name”)
parser.add_option(“-n”, “–num-frames”, dest=”num_frames”, default=10, type=int,
help=”the frame number of generated GIF image”)
options, _ = parser.parse_args()
_, ext = os.path.splitext(options.output)
if options.type.lower() == “jpg”:
if ext not in [“.jpg”, “jpeg”, “.jfif”]:
options.output += “.jpg”
generate_jpg(options.width, options.height, options.output)
return
if options.type.lower() == “png”:
if ext not in [“.png”]:
options.output += “.png”
generate_png(options.width, options.height, options.output)
return
if options.type.lower() == “gif”:
if ext not in [“.gif”]:
options.output += “.gif”
generate_gif(options.width, options.height, options.num_frames, options.output)
return
if options.type.lower() == “txt”:
if ext not in [“.txt”]:
options.output += “.txt”
generate_text(options.size, options.output)
if __name__ == “__main__”:
main()
比如,执行如下命令将生成 100×100 的 GIF 图片:
python3 generate_image.py -t gif -o 100×100.gif –width 100 –height 100 –num-frames 20
测试项目
下文假定以 root 用户进行操作,工作目录是 /root/demo/。
创建测试项目
.
├── generate_image.py
├── nginx.conf
└── wrk.lua
创建 static/ 目录,用于存储图片、文本等静态文件:
创建 logs/ 目录,用于保存 Nginx 的日志文件等:
将 Nginx conf/ 目录下的 mime.types 文件拷贝到当前目录:
cp /usr/local/openresty/nginx/conf/mime.types .
使用如下命令生成 wrk.lua 中使用的图片和文本文件:
python3 generate_image.py -t gif -w 100 -H 100 -o static/100×100.gif
python3 generate_image.py -t png -w 100 -H 100 -o static/100×100.png
python3 generate_image.py -t txt -s 131072 -o static/128k.txt
wrk.lua 的内容如下:
local counter = 1
local threads = {}
function setup(thread)
thread:set(“id”, counter)
table.insert(threads, thread)
counter = counter + 1
end
— 在 init 中预生成所有请求,在 request 中顺序选择
function init(args)
current_index = 0
— 保存所有预生成请求的表
pregenerated_requests = {}
table.insert(
pregenerated_requests,
wrk.format(
“GET”,
“/path/1”,
{
[“X-Predefined-Strategy”] = “png,100×100.png”
}
)
)
table.insert(
pregenerated_requests,
wrk.format(
“POST”,
“/path/2”,
{
[“X-Predefined-Strategy”] = “gif,100×100.gif”,
[“Content-Type”] = “application/x-www-form-urlencoded”
},
“foo=bar&baz=quux”
)
)
table.insert(
pregenerated_requests,
wrk.format(
“PUT”,
“/path/3/arbitrary/here”,
{
[“X-Predefined-Strategy”] = “text,128k.txt”,
[“Content-Type”] = “application/x-www-form-urlencoded”
},
“foo=bar&baz=quux”
)
)
table.insert(
pregenerated_requests,
wrk.format(
“GET”,
“/path/4”,
{
[“Content-Type”] = “application/json;charset=utf8”
},
[[
{
“headers”: {“x-header-a”: “a”, “content-type”: “text/plain”},
“status_code”: 200,
“body”: “this is a very very simple text body, but it maybe meet some rules.”
}
]]
)
)
end
function request()
current_index = current_index + 1
return pregenerated_requests[current_index%#pregenerated_requests+1]
end
nginx.conf 的内容如下:
worker_processes auto;
error_log logs/error.log;
error_log logs/error.log notice;
error_log logs/error.log info;
pid logs/nginx.pid;
events {
worker_connections 4096;
}
http {
include mime.types;
default_type application/octet-stream;
log_format main ‘$remote_addr – $remote_user [$time_local] “$request” ‘
‘$status $body_bytes_sent “$http_referer” ‘
‘”$http_user_agent” “$http_x_forwarded_for”‘;
access_log logs/access.log main;
sendfile on;
tcp_nodelay on;
keepalive_timeout 15;
open_file_cache max=2048 inactive=30s;
open_file_cache_valid 10s;
open_file_cache_min_uses 1;
open_file_cache_errors on;
# 请求体不能超过该设置。
# 如果客户端需要传递更大的请求体,那么调整该设置
client_max_body_size 10m;
# 预置策略。
# 预置策略通过名称进行唯一标识。
# 预置策略封装响应码、响应头和响应体(可选),可避免客户端重复传输这些内容。
# 客户端通过请求头指定使用的策略。
# 如此一来,客户端可以同时自由地定制请求和响应,只多出用于指定所用策略的请求头。
# 服务端使用紧跟在策略名称后面的磁盘文件名称,获取响应体。
# 因此,需要提前将生成的响应体存储到磁盘文件。
# 如果未提供文件名称,并且策略中存在响应体,那么使用策略中的响应体。
# 如果都未提供,那么返回空响应体。
# 请求头类似 X-Predefined-Strategy: png,100×100.png 或 X-Predefined-Strategy: forbidden。
# 注意:
# 1. 预置的响应体不能太大,否则将占用太多的共享内存
# 2. 预置策略名称不能包含 “,”
# 3. 预置策略中指定的响应头名称不会被规范化,因此设置时,需要注意
lua_shared_dict predefined_stategies 128m;
init_by_lua_block {
— 保存策略
local function save_strategy(name, status_code, headers, body)
if name == nil then return ngx.log(ngx.ERR, “no strategy name provided”) end
local t = {
status_code = status_code or ngx.HTTP_OK,
headers = {},
body = body or “”
}
for name, value in pairs(headers or {}) do t.headers[name] = value end
local cjson = require(“cjson.safe”)
local j = cjson.encode(t)
if j == nil then return end
local s = ngx.shared.predefined_stategies
local suc, err = s:set(name, j)
if suc then ngx.log(ngx.INFO, “setting strategy ” .. name .. ” succeeded”)
else ngx.log(ngx.ERR, “setting strategy ” .. name .. ” failed with ” .. err) end
end
— 按需添加策略
save_strategy(“png”, ngx.HTTP_OK, {[“Content-Type”]=”image/png”})
save_strategy(“jpeg”, ngx.HTTP_OK, {[“Content-Type”]=”image/jpeg”})
save_strategy(“gif”, ngx.HTTP_OK, {[“Content-Type”]=”image/gif”})
save_strategy(“ico”, ngx.HTTP_OK, {[“Content-Type”]=”image/x-icon”})
save_strategy(“text”, ngx.HTTP_OK, {[“Content-Type”]=”text/plain”})
save_strategy(“json”, ngx.HTTP_OK, {[“Content-Type”]=”application/json;charset=utf8″})
save_strategy(
“forbidden_default”,
ngx.HTTP_FORBIDDEN,
{[“Content-Type”]=”text/plain”},
“forbidden”
)
save_strategy(
“notfound_default”,
ngx.HTTP_NOT_FOUND,
{[“Content-Type”]=”text/plain”},
“not found”
)
}
server {
listen 80;
server_name localhost;
location /static {
alias static/;
}
location / {
content_by_lua_block {
local cjson = require “cjson.safe”
— 规范化响应名称
local normalize_header = function(name)
— 1. _ 替换成 –
name = string.gsub(name, “_”, “-“)
— 2. 第一个字符大写
name = string.gsub(name, “%w”, function(m) return string.upper(m) end, 1)
— 3. – 后面的字符大写
return string.gsub(name, “-%w”, function(m) return string.upper(m) end)
end
— 生成指定长度的随机字符串
local function generate_random_string(length)
local chars = “abcdefghijklmnopqrstuvwxyzABCDEFGHIJKLMNOPQRSTUVWXYZ0123456789”
— 使用当前时间作为随机种子
math.randomseed(os.time())
local r = “”
for _ = 1, length do
local idx = math.random(1, #chars)
r = r .. string.sub(chars, idx, idx)
end
return r
end
— 当指定的策略或路径不存在时,返回该响应码
local strategy_not_found_status = ngx.HTTP_NOT_FOUND
local strategy
local path
local predefined_strategy_hdr = ngx.var.http_x_predefined_strategy
— 如果客户端指定策略
if predefined_strategy_hdr ~= nil then
local start_pos, end_pos = string.find(predefined_strategy_hdr, “,”, 1, true)
if start_pos == nil then
strategy = predefined_strategy_hdr
else
strategy = string.sub(predefined_strategy_hdr, 1, start_pos-1)
path = string.sub(predefined_strategy_hdr, end_pos+1)
end
— 获取策略
local s = ngx.shared.predefined_stategies
strategy = s:get(strategy)
— 如果策略不存在,那么返回错误
if strategy == nil then
ngx.status = strategy_not_found_status
ngx.header.content_type = “text/plain”
ngx.say(“the provided stategy not found”)
return ngx.exit(ngx.HTTP_OK)
end
— 根据策略设置响应
strategy = cjson.decode(strategy)
ngx.status = strategy.status_code
for name, value in pairs(strategy.headers or {}) do
ngx.header[name] = value
end
— 设置响应体
if path == nil then
ngx.print(strategy.body)
return ngx.exit(ngx.HTTP_OK)
end
— 发起子请求,从磁盘获取响应体
local res = ngx.location.capture(“/static”..”/”..path)
if res.status == ngx.HTTP_OK then
ngx.print(res.body)
else
ngx.status = strategy_not_found_status
ngx.header.content_type = “text/plain”
ngx.say(“the provided path not found”)
end
return ngx.exit(ngx.HTTP_OK)
end
— 非策略模式用于构建期望的响应
— 当请求体不合法时,返回该响应码
local bad_request_status_code = ngx.HTTP_BAD_REQUEST
— 读取请求体
ngx.req.read_body()
local body_raw = ngx.req.get_body_data()
— 解析请求体
local body, err = cjson.decode(body_raw)
— 解析请求体失败
if err ~= nil then
ngx.status = bad_request_status_code
ngx.say(err)
return ngx.exit(ngx.HTTP_OK)
end
— 设置响应码
local status_code = body[“status_code”]
if status_code == nil then status_code = ngx.HTTP_OK end
ngx.status = status_code
— 设置响应头
for name, value in pairs(body[“headers”] or {}) do
ngx.header[normalize_header(name)] = value
end
— 设置响应体
if body[“body”] then
— 使用客户端指定的响应体
ngx.print(body[“body”])
else
— 使用客户端指定的随机响应体长度生成响应体。
— 指定的长度越长,生成随机字符串的效率越低,请设置合理的长度
if body[“random_body_length”] then
ngx.print(generate_random_string(tonumber(body[“random_body_length”])))
else
— 返回空响应体
ngx.print(“”)
end
end
return ngx.exit(ngx.HTTP_OK)
}
}
}
}
关于 generate_image.py 的内容,请参阅前一章节。
启动 Openresty
/usr/local/openresty/bin/openresty -p . -c nginx.conf
注意参数 -p .,其中 . 代表工作目录 /root/demo/。 使用类似下面的命令测试 Openresty 是否启动成功:
curl \
-w ‘url effective: %{url_effective}\nhttp code:%{http_code}\ntime total: %{time_total}\ntime namelookup: %{time_namelookup}\ntime connect: %{time_connect}\ntime appconnect: %{time_appconnect}\ntime pretransfer: %{time_pretransfer}\ntime redirect: %{time_redirect}\ntime starttransfer: %{time_starttransfer}\nsize download: %{size_download}\nsize request: %{size_request}\n’ \
-X POST \
-H “content-type: application/json” \
-d ‘{“headers”: {“x-header-a”: “a”, “x-header_b”: “b”}, “status_code”: 200, “random_body_length”: “65536”}’ \
-v -o /dev/null \
http://127.0.0.1/path
使用 Wrk 进行压测
Wrk 的命令行选项如下:
- -c/–connections:保持打开的 HTTP 连接总数,每个线程处理 N = connections/threads
- -d/–duration:测试的持续时间,比如 2s、2m、2h
- -t/–threads:使用的线程总数
- -s/–script:LuaJIT 脚本
- -H/–header:添加到请求的 HTTP 头,比如 “User-Agent: wrk”
- –latency:打印详细的延迟统计
- –timeout:如果在此时间内未收到响应,则记录超时时间
使用如下命令进行测试:
wrk -s wrk.lua –latency -t 16 -c 1600 -d 300s http://127.0.0.1
请按照机器配置适当调整线程数和连接数。这里使用的测试服务器的配置是 8C/16G。 在响应大小(单位是字节)如下的情况下:
“GET /path/1 HTTP/1.1” 200 40181
“POST /path/2 HTTP/1.1” 200 141424
“PUT /path/3/arbitrary/here HTTP/1.1” 200 131086
“GET /path/4 HTTP/1.1” 200 78
测试结果下:
Running 5m test @ http://127.0.0.1
16 threads and 1600 connections
Thread Stats Avg Stdev Max +/- Stdev
Latency 18.22ms 27.01ms 1.84s 94.58%
Req/Sec 6.00k 0.96k 16.17k 72.14%
Latency Distribution
50% 11.36ms
75% 19.14ms
90% 30.21ms
99% 133.45ms
28642285 requests in 5.00m, 2.04TB read
Requests/sec: 95443.39
Transfer/sec: 6.97GB


发表评论
您还未登录,请先登录。
登录