

0x01 前言
网络上的资源对我们来说都是公开的,为了获取及整合网络上的各种资源,网络爬虫也就应运而生。现在爬虫的工具,方法及各种语言的库越来越多,在爬虫与反爬虫中也是在斗智斗勇当中。我们这篇文章主要介绍下Headless Chrome在爬虫方面的应用,在Headless Chrome开放之后,PhantomJS 的开发者 Vitaly Slobodin都放弃了维护。
0x02 headless chrome
1.介绍
headless chrome,相对于传统的chrome浏览器,是可以在服务器环境用命令行操作浏览器的工具,包括加载网页,提取元数据(例如DOM)和从页面内容生成位图 ,使用Chromium和Blink提供的所有现代Web平台功能。对于爬虫编写以及web自动化测试都有很大的作用。
2.安装
这里只介绍了在linux下的安装,其他平台安装方式的见这里。以下测试结果都是在kali下完成的。
debian 安装方式:
sudo apt-get update
sudo apt-get install chromium chromium-l10n
测试运行:
chromium --headless https://www.anquanke.com
报错:
Running as root without --no-sandbox is not supported
解决方案:
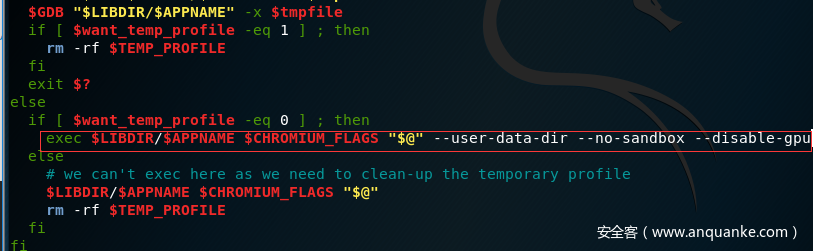
which chromium
nano /usr/bin/chromium
找到exec $LIBDIR/$APPNAME $CHROMIUM_FLAGS "$@"在后面添加参数: --user-data-dir --no-sandbox --disable-gpu
测试结果:
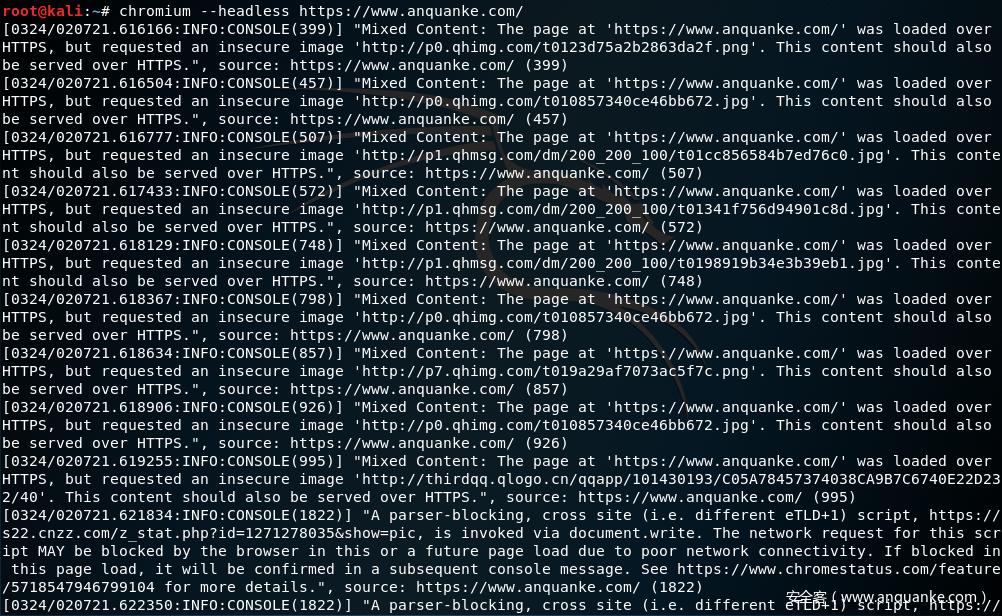
这样就表示headless chrome 环境已经配好了,看下帮助信息:
chromium [-h|--help] [-g|--debug] [--temp-profile] [options] [URL]

        -g or --debug              Start within /usr/bin/gdb
        -h or --help               This help screen
        --temp-profile             Start with a new and temporary profile
        --enable-remote-extensions Allow extensions from remote sites

 Other supported options are:
       Chromium has hundreds of undocumented command-line flags that are added
       and removed at the whim of the developers.   Here,  we  document  rela‐
       tively stable flags.

       -h or --help
              Show help output.

       -g or --debug
              Start a debugging session within /usr/bin/gdb.

       --temp-profile
              Use a throw-away/temporary profile for this session.

       --enable-remote-extensions
              Allow installation and updates of remote extensions.

       --user-data-dir=DIR
              Specifies  the directory that user data (your "profile") is kept
              in.  Defaults to ~/.config/chromium  .   Separate  instances  of
              Chromium must use separate user data directories; repeated invo‐
              cations of chromium-browser will reuse an existing process for a
              given user data directory.

       --app=URL
              Runs URL in "app mode": with no browser toolbars.

       --incognito
              Open in incognito mode.

       --new-window
              If PATH or URL is given, open it in a new window.

       --proxy-server=host:port
              Specify the HTTP/SOCKS4/SOCKS5 proxy server to use for requests.
              This overrides any environment variables or settings picked  via
              the  options  dialog.   An  individual proxy server is specified
              using the format:

                [<proxy-scheme>://]<proxy-host>[:<proxy-port>]

              Where <proxy-scheme> is the protocol of the proxy server, and is
              one of:

                "http", "socks", "socks4", "socks5".

              If  the  <proxy-scheme>  is omitted, it defaults to "http". Also
              note that "socks" is equivalent to "socks5".

              Examples:

                --proxy-server="foopy:99"
                    Use the HTTP proxy "foopy:99" to load all URLs.

                --proxy-server="socks://foobar:1080"
                    Use the SOCKS v5 proxy "foobar:1080" to load all URLs.

                --proxy-server="socks4://foobar:1080"
                    Use the SOCKS v4 proxy "foobar:1080" to load all URLs.

                --proxy-server="socks5://foobar:66"
                    Use the SOCKS v5 proxy "foobar:66" to load all URLs.

              It is also possible to specify a separate proxy server for  dif‐
              ferent URL types, by prefixing the proxy server specifier with a
              URL specifier:

              Example:

                --proxy-server="https=proxy1:80;http=socks4://baz:1080"
                    Load https://* URLs using the HTTP proxy "proxy1:80".  And
              load http://*
                    URLs using the SOCKS v4 proxy "baz:1080".

       --no-proxy-server
              Disables  the proxy server.  Overrides any environment variables
              or settings picked via the options dialog.

       --proxy-auto-detect
              Autodetect proxy configuration.  Overrides any environment vari‐
              ables or settings picked via the options dialog.

       --proxy-pac-url=URL
              Specify  proxy autoconfiguration URL.  Overrides any environment
              variables or settings picked via the options dialog.

       --password-store=<basic|gnome|kwallet>
              Set the password store to use.  The default is to  automatically
              detect  based  on  the  desktop  environment.  basic selects the
              built in,  unencrypted  password  store.   gnome  selects  Gnome
              keyring.  kwallet selects (KDE) KWallet.  (Note that KWallet may
              not work reliably outside KDE.)

       --version
              Show version information.

       As a GTK+ app, Chromium also obeys GTK+  command-line  flags,  such  as
       --display.  See the GTK documentation for more:

              <http://library.gnome.org/devel/gtk/stable/gtk-running.html>

              <http://library.gnome.org/devel/gtk/stable/gtk-x11.html>

 See 'man chromium' for more details
参数很多,举几个小例子:
#监听端口:
chromium --headless --remote-debugging-port=9222 https://www.anquanke.com/
然后访问http://localhost:9222

#获取网页源码
chromium --headless --dump-dom https://www.anquanke.com/

#获取网页转换成PDF
chromium --headless --print-to-pdf https://www.anquanke.com/

#截图
chromium --headless --screenshot --window-size=1280,1696 https://www.anquanke.com/
3.使用
与这个API相关的python 库有:
1.pychrome
3.chromote
更多其他语言库见这里。我这里就使用puppeteer 来调用Headless Chrome API,来对玄武实验室的每日推送做一个抓取(其实开始准备用python的,但是python的库是真的不好用!)。
npm i --save puppeteer #安装
Caution: Puppeteer requires at least Node v6.4.0, but the examples below use async/await which is only supported in Node v7.6.0 or greater.
README当中有提示要 Node v7.6.0 +,因为大量使用了async/await,所以运行以下的测试代码,会在当前目录下产生一个名为screen.png的截图文件,就表示环境正常了。:
const puppeteer = require('puppeteer');

(async () => {
  const browser = await puppeteer.launch({args: ['--no-sandbox', '--disable-setuid-sandbox']});
  const page = await browser.newPage();
  await page.goto('https://www.anquanke.com');
  await page.screenshot({path: 'screen.png'});

  await browser.close();
})();
开始爬取内容:
1.先获取当天的推送内容条数,每条内容当中都是有category,代表属于哪个方面的内容,所以我们就以这个标签来获取当天的内容总数 。
    let eleCount = await page.evaluate((sel) => {
        return document.getElementsByClassName(sel).length;
    }, 'category');
2.遍历<p>标签,获取内容。
      let htmlArray = await page.evaluate((sel, eleCount) => {
            let element = document.querySelectorAll(sel);
            let htmlArray = [];
            for(let i = 0; i <= eleCount; i++){
                htmlArray[i] = element[i].innerText;
            }
            htmlArray.shift();
            return htmlArray;
        }, 'p', eleCount);
完整源代码(这里只爬取了一天,你可以写个循环,把过去到现在为止的内容都爬下来,可以方便自己搜索想要的内容。):
const puppeteer = require('puppeteer');

(async () => {

    const browser = await puppeteer.launch({args: ['--no-sandbox', '--disable-setuid-sandbox']});
    const page = await browser.newPage();

    await page.goto('https://xuanwulab.github.io/cn/secnews/2018/03/30/index.html');
    //count
    let eleCount = await page.evaluate((sel) => {
        return document.getElementsByClassName(sel).length;
    }, 'category');


    if(eleCount != 0){
      let htmlArray = await page.evaluate((sel, eleCount) => {
            let element = document.querySelectorAll(sel);
            let htmlArray = [];
            for(let i = 0; i <= eleCount; i++){
                htmlArray[i] = element[i].innerText;
            }
            htmlArray.shift();
            return htmlArray;
        }, 'p', eleCount);
      console.log(htmlArray);
    }


    browser.close();
})();
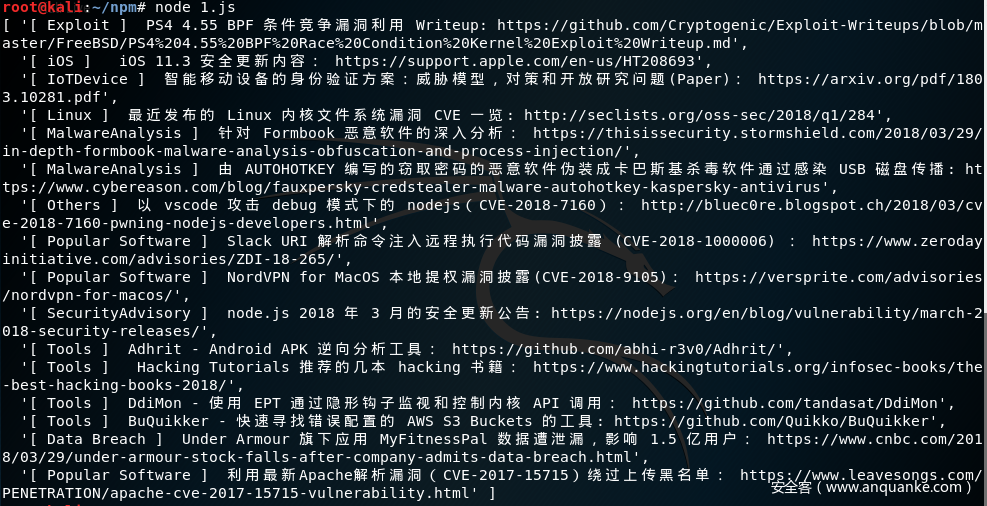
最后结果如图:
Github 的登录:
1.先使用page.type(selector, text[, options]),获取到登录位置。
2.page.click()点击登录,在page.waitForNavigation()等网站响应内容,我后面做的是截图操作,其实可以在这里爬取github上的项目内容。
源代码如下:
const puppeteer = require('puppeteer')
const screenshot = 'www.github.com.png';
(async () => {
  const browser = await puppeteer.launch({headless: true})
  const page = await browser.newPage()
  await page.goto('https://github.com/login')
  await page.type('#login_field', 'GITHUB_USER')
  await page.type('#password', 'GITHUB_PWD')
  await page.click('[name="commit"]')
  await page.waitForNavigation()
  await page.screenshot({ path: screenshot })
  browser.close()
  console.log('See screenshot: ' + screenshot)
})()
其中还有很多函数的使用,根据应用场景不同都会使用到,API文档中都有详细使用方法。但是其中有些功能不完善,例如忽略SSL错误,可以看下这篇文章。
4.反爬虫
我们都知道爬虫与反爬虫都是在一起迅速的发展,上面我们使用两个例子介绍了headless chrome的基本用法,但我觉得headless chrome最重要的是可以绕过很多反爬虫的一些规则与检测。
1).检测了浏览器UA
page.setUserAgent(userAgent)
2).检测了浏览器浏览器分辨率
page.setViewport(viewport)
3).检测了浏览器浏览器插件和语言的,都是利用navigator.plugins.length === 0 and navigator.languages == '' ,所以我们在页面加载之前修改 navigator 对象。
Object.defineProperty(navigator, 'languages', {
  get: function() {
    return ['en-US', 'en'];
  },
});

// overwrite the `plugins` property to use a custom getter
Object.defineProperty(navigator, 'plugins', {
  get: function() {
    // this just needs to have `length > 0`, but we could mock the plugins too
    return [1, 2, 3, 4, 5];
  },
});
0x03 总结
headless chrome 确实给爬虫带来更好的一种选择,尽管它现在有些功能不完善,例如不支持扩展,我觉得后面这些问题都会慢慢解决,更新也会很快(毕竟GOOGLE),比PhantomJS 而言使用 Headless Chrome 稳定、可靠、快速,也基本上满足了对爬虫的需求,例如漏洞测试等。
0x04 参考
https://chromium.googlesource.com/chromium/src/+/lkgr/headless/README.md
https://github.com/GoogleChrome/puppeteer/blob/master/docs/api.md


发表评论
您还未登录,请先登录。
登录