前言
IDA pro 对二进制文件解析能力毋庸置疑,并且支持Python脚本与IDC结合起来,可以基于此做很多有意思的事情。
最近在做终端安全检测,经常会遇到编译好的二进制程序,就想试试通过IDA Python来做相关的安全检测工作。
由于IDA pro 支持 x86/x86-64/arm/arm64/mips等文件格式的解析,所以检测脚本也可以支持Android/iOS/macOS/Windows/Linux等众多平台的二进制程序。
本文基于 IDA pro 7.0,IDA pro 在6.8以后的版本都自带了IDA Python,而更早的版本则需要手动安装:https://github.com/idapython
IDA Python基础
本部分参考:IDA-python学习小结 IDA Python由三个独立模块组成:
idc:idc函数的兼容模块,包含IDA内置函数声明和内部定义
idautils:实用函数模块
idaapi:用于访问更多底层数据的模块
常用函数功能示例:
指令处理
获取当前指令地址:ea=here() print “0x%x %s”%(ea,ea)
获取当前的汇编指令:idc.GetDisasm(ea)
获取当前处于的段:idc.SegName()
获取该段程序最低和最高地址:hex(MinEA()) hex(MaxEA())
获取下(上)一条汇编指令地址:ea = here() ; next_instr = idc.NextHead(ea) PrevHead(ea)
函数操作
获取程序所有函数的名称:
for func in idautils.Functions():
print hex(func), idc.GetFunctionName(func)
计算当前函数有多少条指令:
ea = here()
len(list(idautils.FuncItems(ea)))
获取当前IDB中记录的所有有名字函数的地址和名称: idautils.Names() 返回的是一个以元组组成的列表,函数的起始地址指向了其plt表img
指令操作
给定地址,打印指令 idc.GetDisasm(ea)
给定函数中一个地址,得到整个函数的指令列表 idautils.FuncItems(here())
获取函数的一些flag信息: idc.GetFunctionFlags(func)
对一条汇编指令进行拆解: 获取指令的操作:idc.GetMnem(here()) 获取指令的操作数:idc.GetOpType(ea,n) 根据返回的数值,可以判断操作数类型(普通寄存器、常量字符串等)
对汇编指令中用到的操作数,求取其引用的地址,也就是双击该操作数后跳转到的地址 hex(idc.GetOperandValue(here(),1))
交叉引用
指令从哪个地方来:idautils.CodeRefsTo(here(),0)
指令下一步去到哪儿:idautils.CodeRefsFrom(here(),0)
数据从哪个地方来:idautils.DataRefsTo(here(),0)
数据下一步去到哪儿:idautils.DataRefsFrom(here(),0)
较为通用的一种获取xref:idautils.XrefsTo(here(),flag) 其中flag=0时,所有的交叉引用都会被显示
更多详细函数信息参考IDA官方手册: https://www.hex-rays.com/products/ida/support/idapython_docs/
IDA Python 检测功能脚本
IDA Python检测功能脚本是在IDA pro环境下执行,语法基于python2.7,与电脑本地配置环境无关。
危险函数检测
Intel SDL List of Banned Functions
《SDL List of Banned Functions》是Intel于2016年出的SDL流程里面的c语言危险函数列表,本文使用该列表函数为示例,参考: https://github.com/intel/safestringlib/wiki/SDL-List-of-Banned-Functions 另外还可以参考: IBM 于2000年出的《防止缓冲区溢出》 https://www.ibm.com/developerworks/cn/security/buffer-defend/index.html 微软 于2011年出的 《MSDN article: SDL Banned Function Calls》: http://msdn.microsoft.com/en-us/library/bb288454.aspx
| 危险函数 | 安全替换函数 | 说明 |
| alloca(), _alloca() | malloc(), new() | alloc()是在栈上分配内存因此容易导致栈结构损坏,而malloc()和new()则是在堆上分配内存因此安全性要高于 alloc() |
| scanf(), wscanf(), sscanf(), swscanf(), vscanf(), vsscanf() | fgets() | |
| strlen(), wcslen() | strnlens(), wcsnlens() | |
| strtok(), strtok_r(), wcstok() | strtok_s() | |
| strcat(), strncat(), wcscat(), wcsncat() | strcats(), strncats(), strlcat(), wcscats(), wcsncats() | |
| strcpy(), strncpy(), wcscpy(), wcsncpy() | strcpys(), strncpys(), strlcpy(), wcscpys(), wcsncpys() | |
| memcpy(), wmemcpy() | memcpys(), wmemcpys() | |
| stpcpy(), stpncpy(), wcpcpy(), wcpncpy() | stpcpys(), stpncpys(), wcpcpys(), wcpncpys() | |
| memmove(), wmemmove() | memmoves(), wmemmoves() | |
| memcmp(), wmemcmp() | memcmps(), wmemcmps() | |
| memset(), wmemset() | memsets(), wmemsets() | |
| gets() | fgets() | |
| sprintf(), vsprintf(), swprintf(), vswprintf() | snprintf() 或其他安全字符串库中的特殊版本 | |
| snprintf(), vsnprintf() | – | 应使用避免vargs构造的包装函数,并对传递给snprintf()的参数进行编译时检查 |
| realpath() | – | 仍使用realpath(),但第二个参数必须使用NULL,这会强制在堆上分配缓冲区 |
| getwd() | getcwd() | getcwd()会检查buffer大小 |
| wctomb(), wcrtomb(), wcstombs(), wcsrtombs(), wcsnrtombs() | – | 宽字符wide-character到多字节multi-byte的字符串转换可能会造成缓冲区溢出,但目前没有替代方案 |
危险函数检测脚本
危险函数的检测,通过匹配Functions列表中函数完成,除了获取函数的定义位置,还可以获取到调用位置:
#危险函数列表,参考自: https://github.com/intel/safestringlib/wiki/SDL-List-of-Banned-Functions
danger_func = ["alloca","_alloca","scanf","wscanf","sscanf","swscanf","vscanf","vsscanf","strlen","wcslen","strtok","strtok_r","wcstok","strcat","strncat","wcscat","wcsncat","strcpy","strncpy","wcscpy","wcsncpy","memcpy","wmemcpy","stpcpy","stpncpy","wcpcpy","wcpncpy","memmove","wmemmove","memcmp","wmemcmp","memset","wmemset","gets","sprintf","vsprintf","swprintf","vswprintf","snprintf","vsnprintf","realpath","getwd","wctomb","wcrtomb","wcstombs","wcsrtombs","wcsnrtombs"]
#IDA解析的函数通常都会在最前面加上"_",所以在函数列表基础上还需要给每个函数最前面添加"_"
_danger_func = danger_func
s = '_'
for i in xrange(len(danger_func)):
    _danger_func[i] = s + danger_func[i]
total_danger_func = danger_func + _danger_func

#获取Functions列表,并匹配是否存在危险函数
for func in Functions():
    func_name = GetFunctionName(func)
    if func_name in total_danger_func:
#按指定格式输出危险函数定义位置
        print "danger_func_define: ".ljust(8),"\t", func_name.ljust(8), "\t", hex(func)[:-1]
#回溯并输出函数调用地址
        xrefs = CodeRefsTo(func, False)
        i=0
        for xref in xrefs:
#x86调用函数多使用call,而arm则多使用BL
            if GetMnem(xref).lower() == "call" or "BL":
                if func_name in total_danger_func:
                    i=i+1
                    print format(i,'>5.0f')+".","\t","danger_func_call:".ljust(8),"\t", func_name.ljust(8),"\t", hex(xref)[:-1].ljust(8),"\t", GetFuncOffset(xref)
使用方式:
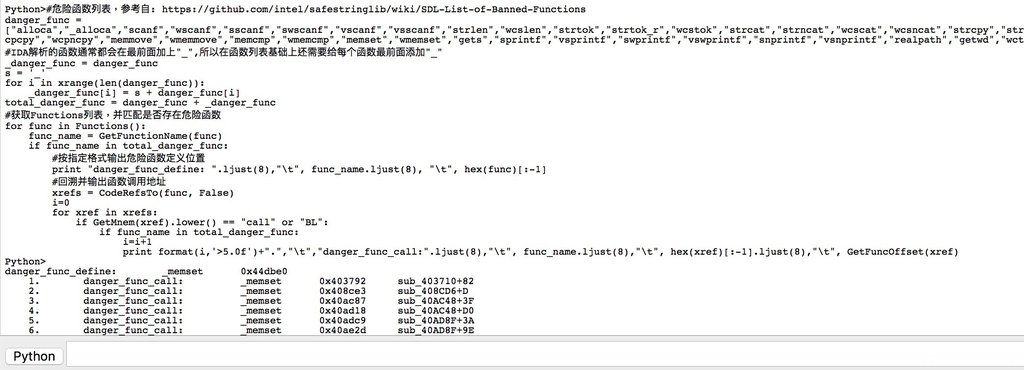
等ida解析完程序后,将上述代码复制到IDA pro的python命令栏中执行即可,效果如下图: 对危险函数的定义位置,和相关调用位置都进行了检测。
iOS弱随机数&NSLog调用检测
由于IDA pro支持各种二进制格式,所以也可以检测如iOS、Android应用,比如在iOS中的弱随机数和比如在iOS中的弱随机数和NSLog调用调用。
在iOS中常见的随机数函数有rand()、srand()、random()、arc4random(),而rand()和random()实际并不是一个真正的伪随机数发生器,在使用之前需要先初始化随机种子,否则每次生成的随机数一样。
NSLog是iOS的日志输出函数,在一些有安全需求的场景下,通常都会禁止使用日志输出信息。
对于这两个检测项,同样需要对Functions列表中的函数进行匹配,并输出相应函数定义位置和调用位置:
iOS_NSlog = ["NSLog","_NSLog"]
iOS_pseudo_random = ["rand","random","_rand","_random",]
for func in Functions():
func_name = GetFunctionName(func)
#iOS弱随机数检测
if func_name in iOS_pseudo_random:
print "iOS_pseudo_random_define: ".ljust(8),"\t", func_name.ljust(8), "\t", hex(func)[:-1]
xrefs = CodeRefsTo(func, False)
i=0
for xref in xrefs:
if GetMnem(xref).lower() == "call" or "BL":
if func_name in iOS_pseudo_random:
i=i+1
print  format(i,'>5.0f')+".","\t","iOS_pseudo_random_call:".ljust(8),"\t", func_name.ljust(8),"\t", hex(xref)  [:-1].ljust(8),"\t",GetFuncOffset(xref)
#iOS NSlog函数检测
if func_name in iOS_NSlog:
print "iOS_NSlog_define: ".ljust(8),"\t", func_name.ljust(8), "\t", hex(func)[:-1]
xrefs = CodeRefsTo(func, False)
i=0
for xref in xrefs:
if GetMnem(xref).lower() == "call" or "BL":
if func_name in iOS_NSlog:
i=i+1
print  format(i,'>5.0f')+".","\t","iOS_NSlog_call:".ljust(8),"\t", func_name.ljust(8),"\t",hex(xref)[:-1].ljust(8),"\t", GetFuncOffset(xref)
执行结果如下:
Windows CreateProcessAsUserW函数
根据微软关于CreateProcessAsUserW的文档(https://docs.microsoft.com/en-us/windows/win32/api/processthreadsapi/nf-processthreadsapi-createprocessasusera):
The lpApplicationName parameter can be NULL. In that case, the module name must be the first white space–delimited token in the lpCommandLine string. If you are using a long file name that contains a space, use quoted strings to indicate where the file name ends and the arguments begin; otherwise, the file name is ambiguous.
在路径中含有空格且不带引号的情况下可能导致歧义: 如路径名c:\program files\sub dir\program name.exe 系统将优先解析为c:\program.exe
不过由于CreateProcessAsUserW的地址参数都是动态传递,静态难以检测,故这里只检测是否调用该函数。动态的地址参数可以考虑使用angr符号执行来检测,这会在以后的工作中来进行。
idapython检测代码如下,CreateProcessAsUserW函数是由系统库提供,故需检测imports导入表:
imports_name = ["CreateProcessAsUserW"]
implist = idaapi.get_import_module_qty()
for i in range(0, implist):
name = idaapi.get_import_module_name(i)
def imp_cb(ea, name, ord):
if name in imports_name:
print "danger_func_define:".ljust(8),"\t", "%08x: %s (ord#%d)" %(ea,name,ord)
xrefs = CodeRefsTo(ea, False)
i=0
for xref in xrefs:
if GetMnem(xref).lower() == "call" or "BL":
i=i+1
print format(i,'>5.0f')+".","\t","danger_func_call:".ljust(8),"\t", name.ljust(8),"\t", hex(xref)[:-1].ljust(8),"\t", GetFuncOffset(xref)
return True
idaapi.enum_import_names(i, imp_cb)
检测结果:
栈缓冲区溢出检测
缓冲区溢出检测代码参考,以strcpy函数为例: Introduction to IDAPython for Vulnerability Hunting Introduction to IDAPython for Vulnerability Hunting – Part 2
主要内容从函数调用的地址向后跟踪推送到栈中的参数,并返回与指定参数对应的操作数。然后确定eax在被推入堆栈时是否指向栈缓冲区,存在可能造成栈缓冲区溢出的利用点。
def twos_compl(val, bits=32):
"""compute the 2's complement of int value val"""
# 如果设置了符号位,如8bit: 128-255
if (val & (1 << (bits - 1))) != 0:
#计算负值
val = val - (1 << bits)
#返回正值
return val

#对ida7.0以上的兼容
def is_stack_buffer(addr, idx):
inst = DecodeInstruction(addr)
# IDA < 7.0
try:
ret = get_stkvar(inst[idx], inst[idx].addr) != None
# IDA >= 7.0
except:
from ida_frame import *
v = twos_compl(inst[idx].addr)
ret = get_stkvar(inst, inst[idx], v)
return ret

def find_arg(addr, arg_num):
# 获取函数所在段的起始地址
function_head = GetFunctionAttr(addr, idc.FUNCATTR_START)
steps = 0
arg_count = 0
# 预计检查指令在100条以内
while steps < 100:
steps = steps + 1
# 向前查看指令
addr = idc.PrevHead(addr)
# 获取前一条指令的名称
op = GetMnem(addr).lower()
# 检查一下是否存在像ret,retn,jmp,b这样可以中断数据流的指令
if op in ("ret", "retn", "jmp", "b") or addr < function_head:
return
if op == "push":
arg_count = arg_count + 1
if arg_count == arg_num:
# 返回被push到堆栈的操作数
return GetOpnd(addr, 0)
def strcpy_buffer_check():
print "-----------------------------------------------------------------"
print "Do strcpy stack buffer check.."
for functionAddr in Functions():
# 检查所有函数
if "strcpy" in GetFunctionName(functionAddr):             xrefs = CodeRefsTo(functionAddr, False)
# 遍历交叉引用,追踪函数执行过程
for xref in xrefs:
# 检查交叉引用是否是函数调用
if GetMnem(xref).lower() == "call":
# 找到函数的第一个参数
opnd = find_arg(xref, 1)                     function_head = GetFunctionAttr(xref, idc.FUNCATTR_START)
addr = xref
_addr = xref
while True:
_addr = idc.PrevHead(_addr)
_op = GetMnem(_addr).lower()
if _op in ("ret", "retn", "jmp", "b") or _addr < function_head:
break
elif _op == "lea" and GetOpnd(_addr, 0) == opnd:
# 检查目标函数的缓冲区是否在堆栈当中
if is_stack_buffer(_addr, 1):
print "STACK BUFFER STRCOPY FOUND at 0x%X" % addr
break
# 如果检测到要定位的寄存器是来自其他寄存器,则更新循环,在另一个寄存器中继续查找数据源
elif _op == "mov" and GetOpnd(_addr, 0) == opnd:
op_type = GetOpType(_addr, 1)
if op_type == o_reg:
opnd = GetOpnd(_addr, 1)
addr = _addr
else:
break
print "Strcpy stack buffer check over.."
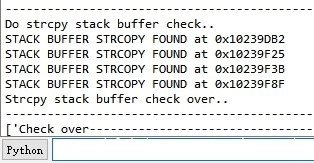
执行结果如下:
Python 后台批量检测脚本
后台批量检测
后台批量检测基于idat指令,用法: idat -Llog.txt -c -A -Scheck_list.py bin
该指令只能一次检测一个文件,所以需要先将idapython检测代码写进check_list.py脚本,再单独写一个main.py:
遍历当前文件夹 解压所有zip包 识别目录下所有bin文件32或者64位格式 并执行相应的idat或者idat64指令进行检测
遍历当前目录并解压zip文件
本代码位于main.py文件
由于iOS/Android应用ipa和apk实际都是ZIP包格式,因此在执行检测之前,需要对zip文件进行解压,代码如下:
import os
import magic
import subprocess
from zipfile import ZipFile
import sys

#分析文件路径,当前文件夹
_path = "."

#获取当前系统
system = sys.platform

#macOS/Linux解压
def unzip_zipfile():
print ("Unzip file...")
#遍历当前文件夹,识别文件类型
for path,dir_list,file_list in os.walk(_path):
for file_name in file_list:
full_file_name = path+'/'+file_name
file_type = magic.from_file(full_file_name)
#利用magic库来获取文件类型
if "Zip archive data" in file_type:
print ("unzip Zip file",full_file_name,"to",full_file_name[:-4],"...")
#对zip文件进行解压到当前目录
zp = ZipFile(full_file_name,"r")
zp.extractall(full_file_name[:-4])
#Windows解压
def win_unzip_zipfile():
print ("Unzip file...")
for path,dir_list,file_list in os.walk(_path):
for file_name in file_list:
full_file_name = path+'\\'+file_name
file_type = magic.from_file(full_file_name)
if "Zip archive data" in file_type:
print ("unzip Zip file",full_file_name,"to",full_file_name[:-4],"...")
zp = ZipFile(full_file_name,"r")
zp.extractall(full_file_name[:-4])
def main():
print ("System is:",system)
if system == "win32":
win_unzip_zipfile()
else:
unzip_zipfile()

if __name__ == "__main__":
main()
识别文件类型并批量执行检测
本代码位于main.py文件
主要为遍历当前文件夹,识别目录下所有bin文件32或者64位格式,并执行相应的idat或者idat64指令,最后在当前目录下生成带路径文件名的log文件:
# -*- coding: utf-8 -*-
import os
import magic
import subprocess
import sys

#idapython脚本路径
script_path = ".\check_list.py"
#分析文件路径
g = os.walk(r".")
#ida路径
#ida32_path = "/Applications/IDA\ Pro\ 7.0/ida.app/Contents/MacOS//idat"
#ida64_path = "/Applications/IDA\ Pro\ 7.0/ida.app/Contents/MacOS//idat64"
ida32_path = "idat"
ida64_path = "idat64"
system = sys.platform

#macOS/Linux分析
def binary_file_list():
bin_file = ["PE32","ELF","Mach-O"]
for path,dir_list,file_list in os.walk(_path):
for file_name in file_list:
full_file_name = path+'/'+file_name
file_type = magic.from_file(full_file_name)
for e in bin_file:
if e in file_type:
if "64" in file_type:
print ("Analysis",full_file_name,"ing...")
#fat Mach-O 优先用64位ida
cmd = '{} -L{}_ida.log -c -A -S{} {}'.format(ida64_path,full_file_name.replace("/","_").replace(".","_"),script_path,full_file_name)
p = subprocess.Popen([cmd],shell=True)
p.wait()
print ("out:",full_file_name.replace("/","_").replace(".","_")+'_ida.log')
print('\n')
else:
print ("Analysis",full_file_name,"ing...")
cmd = '{} -L{}_ida.log -c -A -S{} {}'.format(ida32_path,full_file_name.replace("/","_").replace(".","_"),script_path,full_file_name)
p = subprocess.Popen([cmd],shell=True)
p.wait()
print ("out:",full_file_name.replace("/","_").replace(".","_")+'_ida.log')
print('\n')
#win分析
def win_binary_file_list():
bin_file = ["PE32","ELF","Mach-O"]
for path,dir_list,file_list in os.walk(_path):
for file_name in file_list:
full_file_name = path+'\\'+file_name
file_type = magic.from_file(full_file_name)
for e in bin_file:
if e in file_type:
if "64" in file_type:
cmd = '{} -L{}_ida.log -c -A -S{} {}'.format(ida64_path,full_file_name.replace("\\","_").replace(".","_"),script_path,full_file_name)
print ("Analysis",full_file_name,"ing...")
p = subprocess.Popen(cmd,shell=True)
p.wait()
print( "out:",full_file_name.replace("\\","_").replace(".","_")+'_ida.log')
print('\n')
else:
cmd = '{} -L{}_ida.log -c -A -S{} {}'.format(ida32_path,full_file_name.replace("\\","_").replace(".","_"),script_path,full_file_name)
print ("Analysis",full_file_name,"ing...")
p = subprocess.Popen(cmd,shell=True)
p.wait()
print( "out:",full_file_name.replace("\\","_").replace(".","_")+'_ida.log')
print('\n')

def main():
if system == "win32":
win_binary_file_list()
else:
binary_file_list()

if __name__ == "__main__":
main()
执行效果:
整合log
本代码位于main.py文件
如果检测文件过多,生成的log文件也会太多,导致阅读困难
故本次还会对log文件进行提取,将关键部分提取到同一个log中
代码如下:
def rwrite_log():
for path,dir_list,file_list in os.walk(_path):
for file_name in file_list:
full_file_name = path+'/'+file_name
file_type = magic.from_file(full_file_name)
content = []
recording = False
if "_ida.log" in full_file_name:
with open(full_file_name,'rb') as read_file:
for line in read_file:
line = line.strip()
if "File" in line.decode():
print(line.decode()[:-48],file=f)
if begin in line.decode():
recording = True
if recording :
content.append(line.decode())
if over in line.decode() :
break
print('\n'.join(content),file=f)
print('\n',file=f)
print('\n',file=f)

def win_rwrite_log():
for path,dir_list,file_list in os.walk(_path):
for file_name in file_list:
full_file_name = path+'\\'+file_name
file_type = magic.from_file(full_file_name)
content = []
recording = False
if "_ida.log" in full_file_name:
with open(full_file_name,'rb') as read_file:
for line in read_file:
line = line.strip()
if "File" in line.decode():
print(line.decode()[:-48],file=f)
if begin in line.decode():
recording = True
if recording :
content.append(line.decode())
if over in line.decode() :
break
print('\n'.join(content),file=f)
print('\n',file=f)
print('\n',file=f)
其他文件检测功能
iOS编译选项检测
本代码位于main.py文件
iOS编译选项需要使用macOS平台的otool指令,目前尚无win和linux 版工具
检测方式:判断当前系统是否是macOS,如果是则遍历当前目录,并对所有Mach-O文件执行相应otool指令检测对应选项
def iOS_compile_parameters_check():
print ("-----------------------------------------------------------------")
print ("-----------------------------------------------------------------",file=f)
print ("iOS file compile parameters check...")
for path,dir_list,file_list in os.walk(_path):
for file_name in file_list:
full_file_name = path+'/'+file_name
file_type = magic.from_file(full_file_name)
if ("Mach-O" in file_type) and ("arm" in file_type):
cmd_pie = 'otool -hv {} | grep PIE'.format(full_file_name)
pie = subprocess.Popen([cmd_pie],shell=True,stdout=subprocess.PIPE)
pie.wait()
p = pie.stdout.read()
if "PIE".encode() in p:
file_pie = "PIE ON!"
else:
file_pie = "PIE OFF!"
cmd_ssp = 'otool -Iv {} | grep stack'.format(full_file_name)
ssp = subprocess.Popen([cmd_ssp],shell=True,stdout=subprocess.PIPE)
ssp.wait()
s = ssp.stdout.read()
if ("stack_chk_guard".encode() in s) or ("stack_chk_fail".encode() in s):
file_ssp = "SSP ON!"
else:
file_ssp = "SSP OFF!"
cmd_arc = 'otool -Iv {} | grep objc_releas'.format(full_file_name)
arc = subprocess.Popen([cmd_arc],shell=True,stdout=subprocess.PIPE)
arc.wait()
a = arc.stdout.read()
if "objc_releas".encode() in a:
file_arc = "ARC ON!"
else:
file_arc = "ARC OFF!"
print (file_pie.ljust(8),"\t",file_ssp.ljust(8),"\t",file_arc.ljust(8),"\t",full_file_name)
print (file_pie.ljust(8),"\t",file_ssp.ljust(8),"\t",file_arc.ljust(8),"\t",full_file_name,file=f)

def main():
if system == "darwin":
iOS_compile_parameters_check()

if __name__ == "__main__":
main()
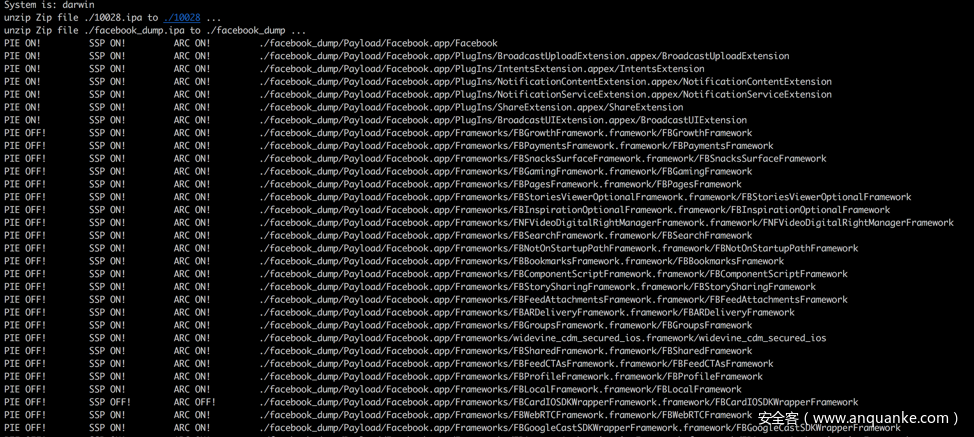
执行结果如下:
Windows文件Everyone访问权限检测
本代码位于main.py文件
检查win程序的文件访问权限,主要是检查是否存在Everyone用户的权限
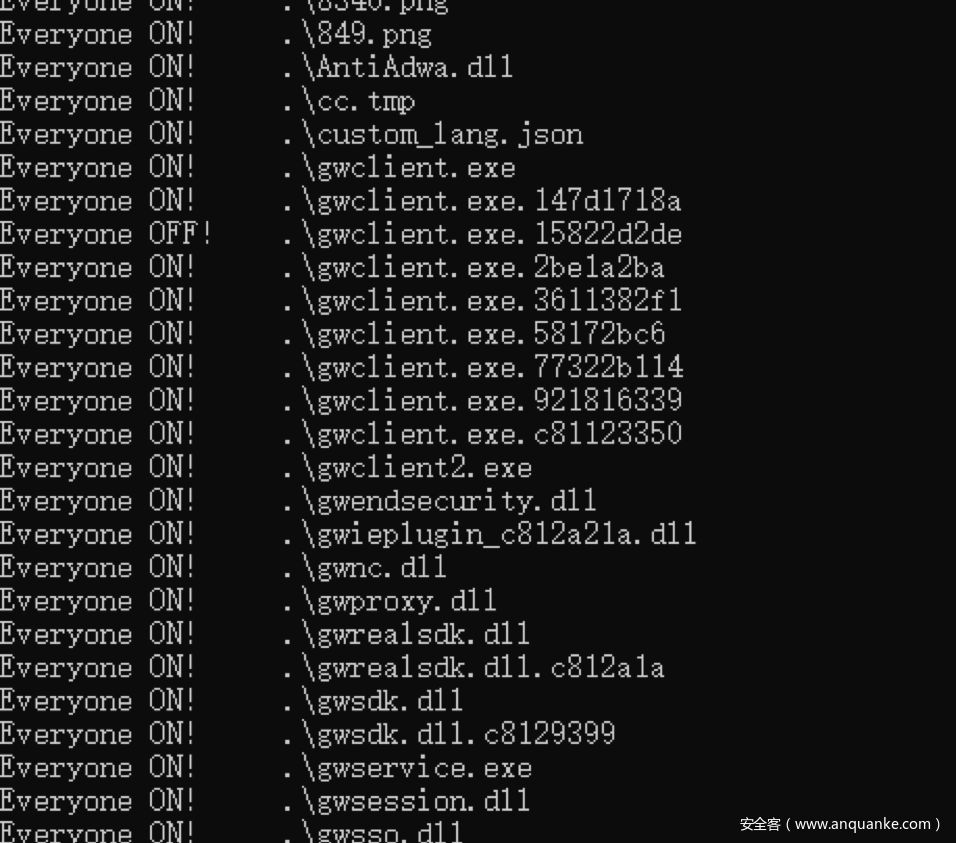
检测方式依赖cacle命令,执行结果如下(手动添加的Everyone权限,非xmind原本就有):
检测代码如下:
def win_file_check():
print ("Win file check... ")
for path,dir_list,file_list in os.walk(_path):
for file_name in file_list:
full_file_name = path+'\\'+file_name
file_type = magic.from_file(full_file_name)
cmd = 'cacls {}'.format(full_file_name)
p = subprocess.Popen(cmd,shell=True,stdout=subprocess.PIPE)
p.wait()
a = p.stdout.read()
if "Everyone".encode() in a:
everyone = "Everyone ON!"
else:
everyone = "Everyone OFF!"
print (everyone.ljust(8),"\t",full_file_name)
执行结果如下:
其他检测计划
除了以上这些,基于IDA Python其实还可以做更多的检测项,比如:
- 格式化字符串检测
- 危险函数中,可以根据每个函数产生问题方式写不同检测代码
- 栈缓冲区溢出检测,实际只检测了strcpy这一个函数,且也只检查了该函数是否写入栈缓冲区,而并未检查在写入时是否有长度检查等待,这些工作都可以在后续展开
- 对已知漏洞检测,如Android三方Android-gif-Drawable开源库1.2.18以下版本存在远程代码执行漏洞,该漏洞位于so中,最基本的方式即检测so版本,但通常Android so文件都缺少版本信息,因此需要根据漏洞具体代码写对应检测规则
代码安全审计更多依赖于相关安全tips,个人对这些了解得还很少,还在学习中,故本文只列出少量示例以供抛砖引玉。


发表评论
您还未登录,请先登录。
登录