
作者:prowes5@360GearTeam
近期Google官方开放了Tsunami扫描器的源代码,研究并试用了一下。有什么不对的地方,还请各位大佬指正。
系统:Ubuntu 18.04
项目地址:https://github.com/google/tsunami-security-scanner
Tsunami插件地址:https://github.com/google/tsunami-security-scanner-plugins
0x00 环境搭建
搭建这里其实Readme中已经写的比较清楚了。
依赖要求:
nmap >= 7.80
ncrack >= 0.7
接下来就是对tsunami进行安装,也很方便,一条命令即可,不过好像需要挂代理。
bash -c "$(curl -sfL https://raw.githubusercontent.com/google/tsunami-security-scanner/master/quick_start.sh)"
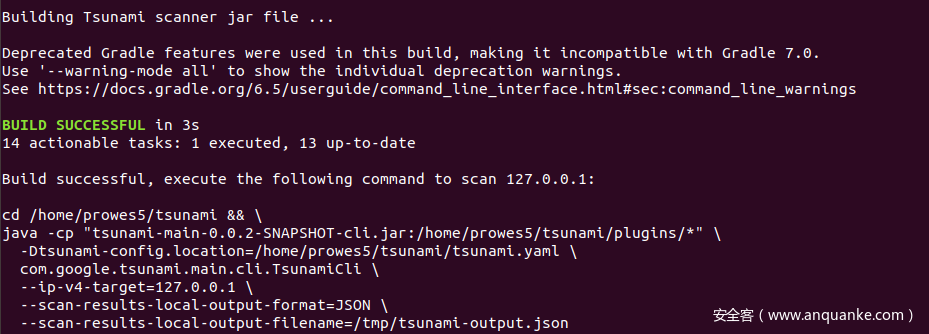
安装成功后大概是这个样子,会打印出来如何使用的命令。
关于Readme中的第二步,其实是启动了一个靶场之类的docker容器,用来测试给出的扫描器插件。
0x01 工作流程
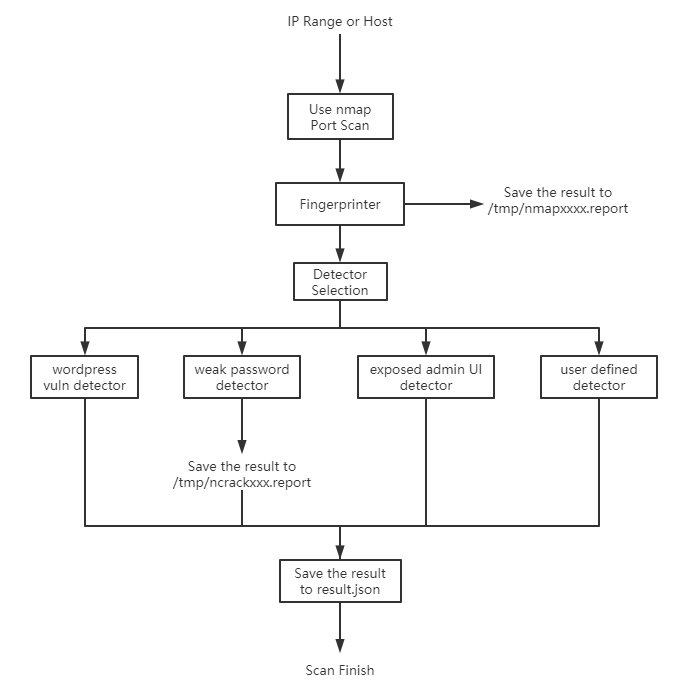
当使用者传入IP段或者某个IP后,扫描器会加载plugins下的所有插件。首先会执行nmap插件进行目标端口扫描并指纹识别,生成报告保存到/tmp/nmapxxxx.report。之后会将探测到的端口传递到其他插件,传递到weak password插件对有认证登录相关的服务进行弱口令探测,保存到/tmp/ncrackxxxx.report,传递到检测Web漏洞的插件进行Web服务探测。最终将所有生成的报告汇总到用户指定的report路径。

0x02 简单使用
cd /home/prowes5/tsunami && \
java -cp "tsunami-main-0.0.2-SNAPSHOT-cli.jar:/home/prowes5/tsunami/plugins/*" \
  -Dtsunami-config.location=/home/prowes5/tsunami/tsunami.yaml \
  com.google.tsunami.main.cli.TsunamiCli \
  --ip-v4-target=127.0.0.1 \
  --scan-results-local-output-format=JSON \
  --scan-results-local-output-filename=/tmp/tsunami-output.json
简单看一下启动命令的各个参数,可以更加方便我们灵活的使用这个工具。
可以看到,build的过程会将目录拷贝到用户家目录下,所以使用之前需要切换目录到家目录下的tsunami目录。
tsunami-main-0.0.2-SNAPSHOT-cli.jar       扫描器本身
冒号后边的/home/prowes5/tsunami/plugins/*   加载插件的路径
-Dtsunami-config.location                 tsunami的配置文件路径
--ip-v4-target                            要扫描的IP或者网段
--scan-results-local-output-format        输出的报告格式(目前发现两种格式,JSON和BIN_PROTO。BIN_PROTO输出为PDP11架构下的可执行文件)
--scan-results-local-output-filename      输出的最终报告的路径
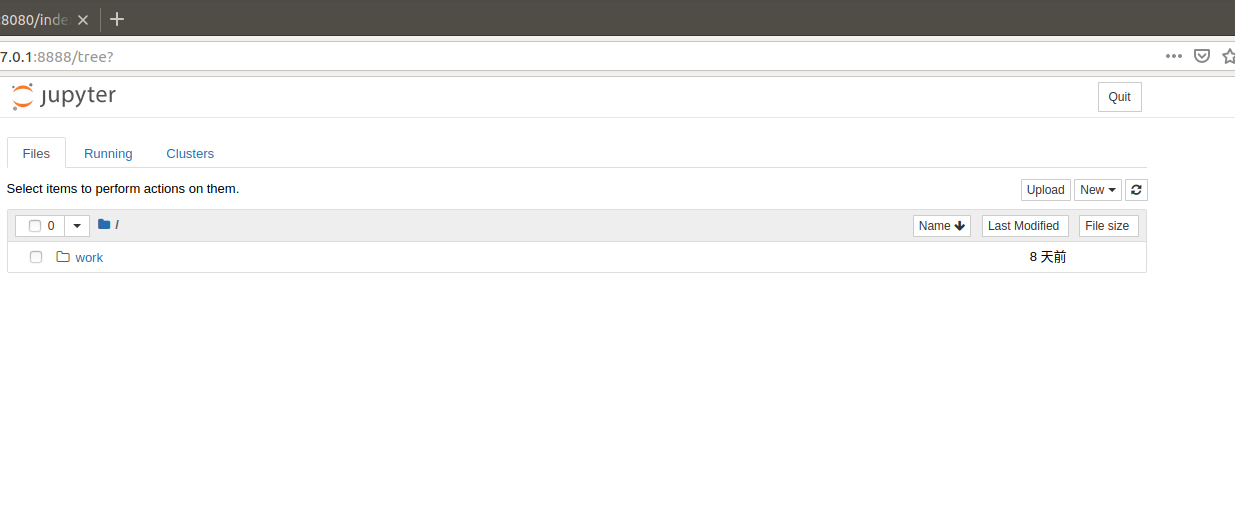
启动项目中的docker容器。
docker run --name unauthenticated-jupyter-notebook -p 8888:8888 -d jupyter/base-notebook start-notebook.sh --NotebookApp.token=''
访问主机的8888端口,可以看到notebook主界面,证明docker启动成功。
启动扫描器。这里为了方便,把启动命令写到一个shell文件中。

这里可以看到扫描器首先调用了nmap来查询目标有哪些端口开放,这里容器开启了22,80和8888端口。

之后这里加载的应该是根据插件对Web组件的漏洞扫描。
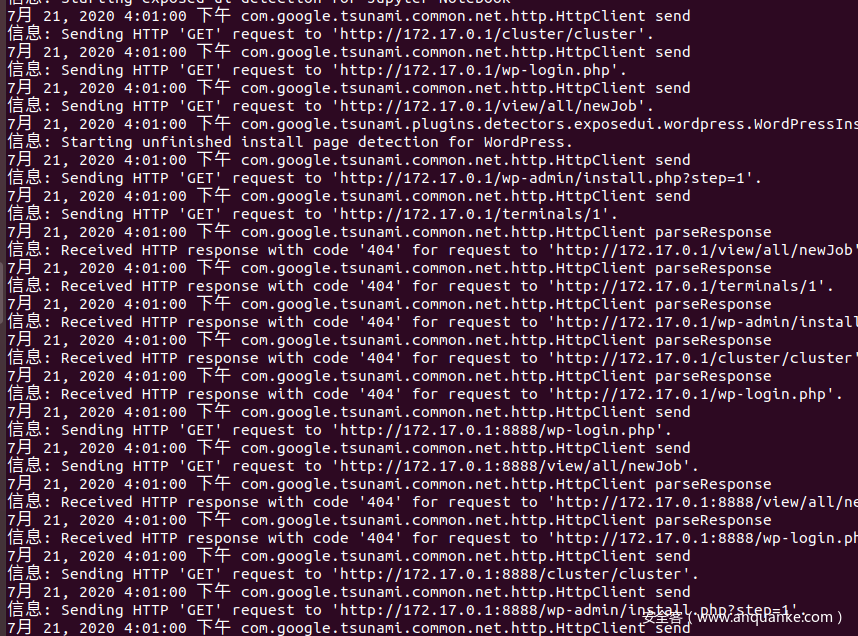
再往后就可以看到调用ncrack对ssh进行了top100的用户名密码爆破。

结束之后可以看到加载了五个插件,检测到一个漏洞。

0x03 报告分析
看一下检测出的详细报告。
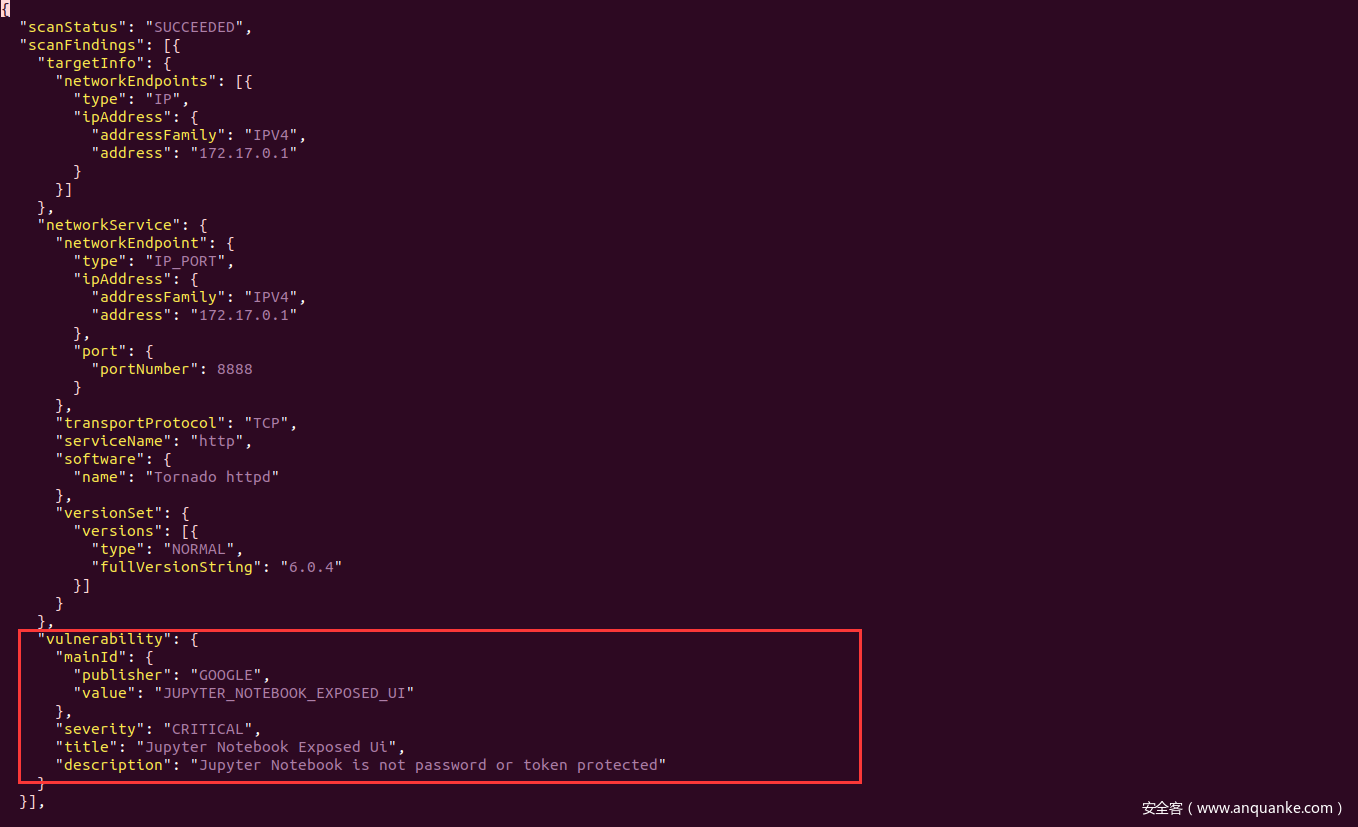
可以看到这里列出了扫描出来的漏洞详细信息,还有具体服务器的IP地址和端口。
0x04 关于插件
Google并没有发布相应的插件,只有少数的几个测试的插件。不过好在,可以研究插件的源码,而且给的example插件中也有一部分注释。这里截取部分进行简单说明。
ExampleVulnDetector.java
//关于插件的一些详细信息,包括插件名称、作者、插件开发版本等等。
@PluginInfo(
        // Which type of plugin this is.
        type = PluginType.VULN_DETECTION,
        // A human readable name of your plugin.
        name = "ExampleVulnDetector",
        // Current version of your plugin.
        version = "0.1",
        // Detailed description about what this plugin does.
        description = "This is an example plugin.",
        // Author of this plugin.
        author = "Alice (alice@company.com)",
        // How should Tsunami scanner bootstrap your plugin.
        bootstrapModule = ExampleVulnDetectorBootstrapModule.class)
....
//漏洞检测部分
@Override
      public DetectionReportList detect(
          TargetInfo targetInfo, ImmutableList<NetworkService> matchedServices) {
        logger.atInfo().log("ExampleVulnDetector starts detecting.");

        // An example implementation for a VulnDetector.
        return DetectionReportList.newBuilder()
            .addAllDetectionReports(
                matchedServices.stream()
                        // Check individual NetworkService whether it is vulnerable.
                        .filter(unused -> isServiceVulnerable())
                        // Build DetectionReport message for vulnerable services.
                        .map(networkService -> buildDetectionReport(targetInfo, networkService))
                    ::iterator)
            .build();
      }
//真正关于漏洞验证的逻辑实现,true为确认存在漏洞。
  private boolean isServiceVulnerable() {
        return true;
  }
//关于漏洞的详情各字段,返回到最终报告中
    private DetectionReport buildDetectionReport(
          TargetInfo targetInfo, NetworkService vulnerableNetworkService) {
        return DetectionReport.newBuilder()
            .setTargetInfo(targetInfo)
            .setNetworkService(vulnerableNetworkService)
            .setDetectionTimestamp(Timestamps.fromMillis(Instant.now(utcClock).toEpochMilli()))
            .setDetectionStatus(DetectionStatus.VULNERABILITY_VERIFIED)
            .setVulnerability(
                Vulnerability.newBuilder()
                    .setMainId(
                        VulnerabilityId.newBuilder()
                            .setPublisher("vulnerability_id_publisher")
                            .setValue("VULNERABILITY_ID"))
                    .setSeverity(Severity.CRITICAL)
                    .setTitle("Vulnerability Title")
                    .setDescription("Detailed description of the vulnerability")
                    .addAdditionalDetails(
                        AdditionalDetail.newBuilder()
                            .setTextData(
                                TextData.newBuilder().setText("Some additional technical details."))))
            .build();
      }
    }
ExampleVulnDetectorBootstrapModule.java
package com.google.tsunami.plugins.example;
import com.google.tsunami.plugin.PluginBootstrapModule;
public final class ExampleVulnDetectorBootstrapModule extends PluginBootstrapModule {

      @Override
      protected void configurePlugin() {
       //注册插件类
        registerPlugin(ExampleVulnDetector.class);
      }
    }
0x05 自制插件
根据现有的插件改了一些漏洞验证部分并生成为自制插件。
编译插件命令
./gradlew build
编译成功之后,会在build/libs/目录下生成一个jar包,拷贝到plugins目录下即可使用。
这次测试使用的是CVE-2012-1823的phpcgi漏洞,访问http://xxx/index.php?-s读到文件就可以证明有此漏洞。

同时启动两个docker进行扫描测试。可以看到这里加载了六个插件,检测到了两个漏洞。

0x06 总结
简单总结一下这个扫描器:
1. 扫描器提供了接口让使用者自己去开发解析yaml配置文件。具体可以参考https://github.com/google/tsunami-security-scanner/blob/master/docs/howto.md#configuration,这里不过多赘述,或者参考修改nmap_port_scanner源码。
2. 爆破太慢,只要检测到需要认证的服务就会调用ncrack插件进行爆破。如果检测不到认证服务就不会进行爆破,这时候速度还可以,不过插件和目标较少,也说明不了什么问题。如何不让扫描器去爆破认证服务比较重要,这个在配置文件中可以进行。修改yaml配置文件可以来修改nmap的扫描端口从而避免这个问题,如何加nmap配置也已经给出,修改对应的字段即可。当然也可以把plugins下的ncrack插件删掉,就不会调用。
plugins:
  google:
    port_scanner:
      nmap:
        nmap_binary_path: "/usr/local/bin/nmap"
        port_targets: "80,8080,15000-16000"
3. 对于生成的报告格式,bin模式生成的文件格式对于普通常见PC并不能进行解析。生成的json报告还是利于解析的。
4. 插件使用Java编写,插件有两种形式,一就是可以直接编写Poc,二是可以编写插件通过命令行来调用其他外部的Poc,比如Python或者可执行二进制文件等。https://github.com/google/tsunami-security-scanner-plugins/blob/master/example_calling_command/src/main/java/com/google/tsunami/plugins/example/ExampleCallingCommand.java。据说在未来的版本,插件会支持Python和Go。
  @Inject
  ExampleCallingCommand(
    @UtcClock Clock utcClock,
    @CommandExecutionThreadPool ListeningExecutorService commandExecutorService)
    throws IOException {
  // Create a temporary file for command output.
  this(utcClock, commandExecutorService, File.createTempFile("ExampleOutput", ".txt"));
      }

  ExampleCallingCommand(
    Clock utcClock, ListeningExecutorService commandExecutorService, File commandOutputFile) {
    this.utcClock = checkNotNull(utcClock);
    this.commandExecutorService = checkNotNull(commandExecutorService);
    this.commandOutputFile = checkNotNull(commandOutputFile);
  }
 ......
private boolean isServiceVulnerable(NetworkService networkService) {
  NetworkEndpoint targetEndpoint = networkService.getNetworkEndpoint();
  try {
    // We assume an example.py script exists which takes target address, target port and output
    // filename. Here we execution the script and wait for it to finish.
    CommandExecutorFactory.create(
                  "python3", "/scripts/example.py",
                  "--address", targetEndpoint.getIpAddress().getAddress(),
                  "--port", String.valueOf(targetEndpoint.getPort().getPortNumber()),
                  "--output", commandOutputFile.getAbsolutePath())
              .execute(commandExecutorService)
              .waitFor();

    // We read the output file of the script and determine whether the target is vulnerable. Here
    // we just check whether the content is empty or not, but you could generate additional
    // information in the output file and parse it here.
    String outputData = Files.asCharSource(commandOutputFile, UTF_8).read();
    return !Strings.isNullOrEmpty(outputData);
  } catch (IOException | InterruptedException | ExecutionException e) {
    logger.atWarning().withCause(e).log();
    return false;
  }
}
5. 可以对整个网段进行扫描
6. 目前只开放出扫描框架源码,未开放插件,需要使用者自行编写
7. 会保存nmap和ncrack的报告到/tmp/目录下
8. 支持Windows、Linux服务器多平台


发表评论
您还未登录,请先登录。
登录