

在编码过程中会不可避免地用到很多第三方类库组件,过时的组件库有的会存在安全漏洞,还有的会存在授权协议合规问题,所以需要使用对应的开源组件安全扫描(OSS)工具。
Dependency-Track 是一个智能的供应链组件分析平台,使组织能够识别和减少使用第三方和开源组件的风险。它通过利用软件物料清单(SBOM,Software Bill-of-Materials)的功能采取了独特且非常有益的方法。这种方法提供了传统软件组成分析(SCA)解决方案无法实现的功能。
Dependency-Track 监视产品组合中每个应用程序所有版本的组件使用情况,以便主动识别整个组织的风险。该平台采用API优先设计,非常适合在持续集成和持续交付(CI/CD)环境中使用。
Dependency-Track 官网:https://dependencytrack.org/
更多更详细的特性介绍可以去官网看一下文档,这里不再赘述了。下面开始介绍如何搭建和使用。
截止编辑本文档时为止,最新的正式版本是 v4.2.1 版本。
部署环境:CentOS 7.9
硬件配置需求:
最低:4 GB RAM 推荐:16 GB RAM
最低:2 CPU cores 推荐:4 CPU cores
其他需求和前置条件说明:
- 具有 sudo 权限的服务器账号。
- 服务器数据磁盘挂载到 “/data” 目录下。在本文档中,数据库服务和 Dependency-Track 服务的数据存储目录将设置在 “/data” 目录的子目录下。
- 在本文档中,程序将部署在 “/opt/dependency-track” 目录下,如果要部署到其他自定义目录,记得替换安装命令中的相应部分。
- 这里为了简化配置过程,对于 SELinux 和系统防火墙服务采取了简单的宽容模式和禁用操作。如果对这二者有需求的话,就需要自行研究如何配置它们了。
对两个可能产生疑惑的问题的说明:
问:为什么不用 Docker 来部署?
答:主要原因是对于 Dependency-Track 来说,我觉得使用 Docker 部署并没有明显的优势,自定义设置会变得更加复杂,硬件配置需求也更高,而且我对于 Docker 的操作也不够熟练,整体只会花费更多不必要的时间。
问:为什么不使用 MySQL 来作为数据库服务器?
答:简单来说就是至少到 v4.2.1 版本,对于 MySQL 数据库服务的支持是有问题的,使用 MySQL 的话程序无法成功运行起来,具体细节后面我会详细说明。
安装部署过程:
sudo yum -y install java-11-openjdk-devel lrzsz vim wget
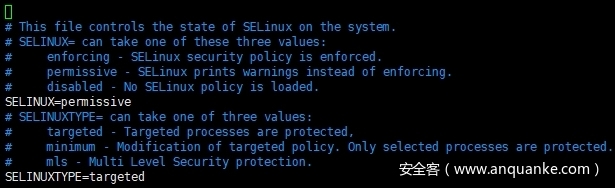
# 将SELinux设置为宽容模式
sudo setenforce Permissive
sudo vim /etc/selinux/config
# 关闭系统防火墙服务
sudo systemctl stop firewalld.service
sudo systemctl disable firewalld.service

# 安装PostgreSQL 10服务
sudo yum install -y https://download.postgresql.org/pub/repos/yum/reporpms/EL-7-x86_64/pgdg-redhat-repo-latest.noarch.rpm
sudo yum install -y postgresql10-server

# 自定义PostgreSQL 10服务数据目录
sudo mkdir -p /opt/var/lib/pgsql/10/data/
sudo mkdir /opt/var/lib/pgsql/10/backups/
sudo chown -R postgres:postgres /opt/var/lib/pgsql/
sudo chmod -R g-rx,o-rx /opt/var/lib/pgsql/
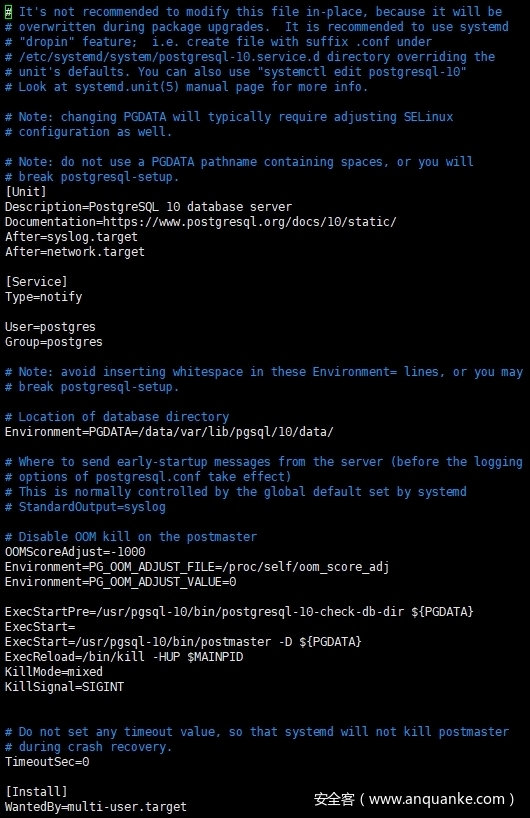
# 该命令会调用Vim建立名为 "override.conf" 的空文件,不需要输入任何内容,直接退出即可。
sudo systemctl edit postgresql-10.service
sudo cp /usr/lib/systemd/system/postgresql-10.service /etc/systemd/system/postgresql-10.service.d/override.conf
# 该命令会调用Vim编辑 "/etc/systemd/system/postgresql-10.service.d/override.conf" 文件。
sudo systemctl edit postgresql-10.service

# 请将 "Environment=PGDATA=/var/lib/pgsql/10/data/" 修改为 "Environment=PGDATA=/opt/var/lib/pgsql/10/data/"
# 并在 "ExecStart=/usr/pgsql-10/bin/postmaster -D ${PGDATA}" 行的上面添加一行,内容为 "ExecStart="
sudo su - postgres -c '/usr/pgsql-10/bin/initdb -A md5 -D /opt/var/lib/pgsql/10/data -W'

# 此处会提示为 "postgres" 角色设置新的超级用户口令。建议设置一个安全的口令,并记住它,因为后面还会用到。
sudo systemctl enable postgresql-10.service
sudo systemctl start postgresql-10.service
psql -U postgres
创建名为 “dtrack” 的角色,并为其设置一个安全的密码,此处为了演示方便设置了一个简单的密码。
创建属于 “dtrack” 角色的同名数据库。
CREATE ROLE dtrack LOGIN PASSWORD '************';
CREATE DATABASE dtrack OWNER dtrack;
退出 psql
\q
sudo mkdir /opt/dependency-track/
cd /opt/dependency-track/

sudo wget https://github.com/DependencyTrack/dependency-track/releases/download/4.2.1/dependency-track-bundled.war

# 该文件的MD5值应为:3cfb5ac926372112d95810de966c6774
md5sum dependency-track-bundled.war

sudo wget https://jdbc.postgresql.org/download/postgresql-42.2.19.jar

# 该文件的MD5值应为:a48d7793a7f1f726ce615e4d36b413e8
md5sum postgresql-42.2.19.jar

# 上传 "application.properties" 默认配置文件。
# 可以提前下载并解压缩 dependency-track-bundled.war 文件,然后在 "WEB-INF/classes/" 目录下找到该 "application.properties" 文件。
# 该文件的默认内容在下文展示。

sudo rz

# 编辑 "application.properties" 配置文件,修改以下配置项目,注意 "alpine.database.password" 配置项的值要填你自己设置的值。
# alpine.data.directory=/opt/dependency-track
# alpine.database.mode=external
# alpine.database.url=jdbc:postgresql://localhost:5432/dtrack
# alpine.database.driver=org.postgresql.Driver
# alpine.database.driver.path=/opt/dependency-track/postgresql-42.2.19.jar
# alpine.database.username=dtrack
# alpine.database.password=************

sudo vim application.properties
启动 dependency-track 程序。
# sudo java -Xmx16G -Dalpine.application.properties=application.properties -jar dependency-track-bundled.war -context / -host 0.0.0.0 -port 8090

sudo -b -E java -Xmx16G -Dalpine.application.properties=application.properties -jar dependency-track-bundled.war -context / -host 0.0.0.0 -port 8090 > /dev/null 2>&1
Dependency-Track 程序的配置文件 “application.properties” 默认内容:
############################ Alpine Configuration ###########################

# Required
# Defines the number of worker threads that the event subsystem will consume.
# Events occur asynchronously and are processed by the Event subsystem. This
# value should be large enough to handle most production situations without
# introducing much delay, yet small enough not to pose additional load on an
# already resource-constrained server.
# A value of 0 will instruct Alpine to allocate 1 thread per CPU core. This
# can further be tweaked using the alpine.worker.thread.multiplier property.
# Default value is 0.
alpine.worker.threads=0

# Required
# Defines a multiplier that is used to calculate the number of threads used
# by the event subsystem. This property is only used when alpine.worker.threads
# is set to 0. A machine with 4 cores and a multiplier of 4, will use (at most)
# 16 worker threads. Default value is 4.
alpine.worker.thread.multiplier=2

# Required
# Defines the path to the data directory. This directory will hold logs,
# keys, and any database or index files along with application-specific
# files or directories.
alpine.data.directory=~/.dependency-track

# Required
# Defines the interval (in seconds) to log general heath information.
# If value equals 0, watchdog logging will be disabled.
alpine.watchdog.logging.interval=0

# Required
# Defines the database mode of operation. Valid choices are:
# 'server', 'embedded', and 'external'.
# In server mode, the database will listen for connections from remote
# hosts. In embedded mode, the system will be more secure and slightly
# faster. External mode should be used when utilizing an external
# database server (i.e. mysql, postgresql, etc).
alpine.database.mode=embedded

# Optional
# Defines the TCP port to use when the database.mode is set to 'server'.
alpine.database.port=9092

# Required
# Specifies the JDBC URL to use when connecting to the database.
alpine.database.url=jdbc:h2:~/.dependency-track/db

# Required
# Specifies the JDBC driver class to use.
alpine.database.driver=org.h2.Driver

# Optional
# Specifies the path (including filename) to where the JDBC driver is located.
# alpine.database.driver.path=/path/to/dbdriver.jar

# Optional
# Specifies the username to use when authenticating to the database.
alpine.database.username=sa

# Optional
# Specifies the password to use when authenticating to the database.
# alpine.database.password=

# Optional
# Specifies if the database connection pool is enabled.
alpine.database.pool.enabled=true

# Optional
# This property controls the maximum size that the pool is allowed to reach,
# including both idle and in-use connections.
alpine.database.pool.max.size=20

# Optional
# This property controls the maximum amount of time that a connection is
# allowed to sit idle in the pool.
alpine.database.pool.idle.timeout=600000

# Optional
# This property controls the maximum lifetime of a connection in the pool.
# An in-use connection will never be retired, only when it is closed will
# it then be removed.
alpine.database.pool.max.lifetime=600000

# Optional
# When authentication is enforced, API keys are required for automation,
# and the user interface will prevent anonymous access by prompting for login
# credentials.
alpine.enforce.authentication=true

# Optional
# When authorization is enforced, team membership for both API keys and
# user accounts are restricted to what the team itself has access to.
# To enforce authorization, the enforce.authentication property (above)
# must be true.
alpine.enforce.authorization=true

# Required
# Specifies the number of bcrypt rounds to use when hashing a users password.
# The higher the number the more secure the password, at the expense of
# hardware resources and additional time to generate the hash.
alpine.bcrypt.rounds=14

# Required
# Defines if LDAP will be used for user authentication. If enabled,
# alpine.ldap.* properties should be set accordingly.
alpine.ldap.enabled=false

# Optional
# Specifies the LDAP server URL
# Example (Microsoft Active Directory):
#    alpine.ldap.server.url=ldap://ldap.example.com:3268
#    alpine.ldap.server.url=ldaps://ldap.example.com:3269
# Example (ApacheDS, Fedora 389 Directory, NetIQ/Novell eDirectory, etc):
#    alpine.ldap.server.url=ldap://ldap.example.com:389
#    alpine.ldap.server.url=ldaps://ldap.example.com:636
alpine.ldap.server.url=ldap://ldap.example.com:389

# Optional
# Specifies the base DN that all queries should search from
alpine.ldap.basedn=dc=example,dc=com

# Optional
# Specifies the LDAP security authentication level to use. Its value is one of
# the following strings: "none", "simple", "strong". If this property is empty
# or unspecified, the behaviour is determined by the service provider.
alpine.ldap.security.auth=simple

# Optional
# If anonymous access is not permitted, specify a username with limited access
# to the directory, just enough to perform searches. This should be the fully
# qualified DN of the user.
alpine.ldap.bind.username=

# Optional
# If anonymous access is not permitted, specify a password for the username
# used to bind.
alpine.ldap.bind.password=

# Optional
# Specifies if the username entered during login needs to be formatted prior
# to asserting credentials against the directory. For Active Directory, the
# userPrincipal attribute typically ends with the domain, whereas the
# samAccountName attribute and other directory server implementations do not.
# The %s variable will be substitued with the username asserted during login.
# Example (Microsoft Active Directory):
#    alpine.ldap.auth.username.format=%s@example.com
# Example (ApacheDS, Fedora 389 Directory, NetIQ/Novell eDirectory, etc):
#    alpine.ldap.auth.username.format=%s
alpine.ldap.auth.username.format=%s@example.com

# Optional
# Specifies the Attribute that identifies a users ID
# Example (Microsoft Active Directory):
#    alpine.ldap.attribute.name=userPrincipalName
# Example (ApacheDS, Fedora 389 Directory, NetIQ/Novell eDirectory, etc):
#    alpine.ldap.attribute.name=uid
alpine.ldap.attribute.name=userPrincipalName

# Optional
# Specifies the LDAP attribute used to store a users email address
alpine.ldap.attribute.mail=mail

# Optional
# Specifies the LDAP search filter used to retrieve all groups from the
# directory.
# Example (Microsoft Active Directory):
#    alpine.ldap.groups.filter=(&(objectClass=group)(objectCategory=Group))
# Example (ApacheDS, Fedora 389 Directory, NetIQ/Novell eDirectory, etc):
#    alpine.ldap.groups.filter=(&(objectClass=groupOfUniqueNames))
alpine.ldap.groups.filter=(&(objectClass=group)(objectCategory=Group))

# Optional
# Specifies the LDAP search filter to use to query a user and retrieve a list
# of groups the user is a member of. The {USER_DN} variable will be substituted
# with the actual value of the users DN at runtime.
# Example (Microsoft Active Directory):
#    alpine.ldap.user.groups.filter=(&(objectClass=group)(objectCategory=Group)(member={USER_DN}))
# Example (Microsoft Active Directory - with nested group support):
#    alpine.ldap.user.groups.filter=(member:1.2.840.113556.1.4.1941:={USER_DN})
# Example (ApacheDS, Fedora 389 Directory, NetIQ/Novell eDirectory, etc):
#    alpine.ldap.user.groups.filter=(&(objectClass=groupOfUniqueNames)(uniqueMember={USER_DN}))
alpine.ldap.user.groups.filter=(member:1.2.840.113556.1.4.1941:={USER_DN})

# Optional
# Specifies the LDAP search filter used to search for groups by their name.
# The {SEARCH_TERM} variable will be substituted at runtime.
# Example (Microsoft Active Directory):
#    alpine.ldap.groups.search.filter=(&(objectClass=group)(objectCategory=Group)(cn=*{SEARCH_TERM}*))
# Example (ApacheDS, Fedora 389 Directory, NetIQ/Novell eDirectory, etc):
#    alpine.ldap.groups.search.filter=(&(objectClass=groupOfUniqueNames)(cn=*{SEARCH_TERM}*))
alpine.ldap.groups.search.filter=(&(objectClass=group)(objectCategory=Group)(cn=*{SEARCH_TERM}*))

# Optional
# Specifies the LDAP search filter used to search for users by their name.
# The {SEARCH_TERM} variable will be substituted at runtime.
# Example (Microsoft Active Directory):
#    alpine.ldap.users.search.filter=(&(objectClass=group)(objectCategory=Group)(cn=*{SEARCH_TERM}*))
# Example (ApacheDS, Fedora 389 Directory, NetIQ/Novell eDirectory, etc):
#    alpine.ldap.users.search.filter=(&(objectClass=inetOrgPerson)(cn=*{SEARCH_TERM}*))
alpine.ldap.users.search.filter=(&(objectClass=user)(objectCategory=Person)(cn=*{SEARCH_TERM}*))

# Optional
# Specifies if mapped LDAP accounts are automatically created upon successful
# authentication. When a user logs in with valid credentials but an account has
# not been previously provisioned, an authentication failure will be returned.
# This allows admins to control specifically which ldap users can access the
# system and which users cannot. When this value is set to true, a local ldap
# user will be created and mapped to the ldap account automatically. This
# automatic provisioning only affects authentication, not authorization.
alpine.ldap.user.provisioning=false

# Optional
# This option will ensure that team memberships for LDAP users are dynamic and
# synchronized with membership of LDAP groups. When a team is mapped to an LDAP
# group, all local LDAP users will automatically be assigned to the team if
# they are a member of the group the team is mapped to. If the user is later
# removed from the LDAP group, they will also be removed from the team. This
# option provides the ability to dynamically control user permissions via an
# external directory.
alpine.ldap.team.synchronization=false

# Optional
# HTTP proxy. If the address is set, then the port must be set too.
# alpine.http.proxy.address=proxy.example.com
# alpine.http.proxy.port=8888
# alpine.http.proxy.username=
# alpine.http.proxy.password=
# alpine.no.proxy=localhost,127.0.0.1

# Optional
# Cross-Origin Resource Sharing (CORS) headers to include in REST responses.
# If 'alpine.cors.enabled' is true, CORS headers will be sent, if false, no
# CORS headers will be sent.
# See Also: https://developer.mozilla.org/en-US/docs/Web/HTTP/CORS
# The following are default values
# alpine.cors.enabled=true
# alpine.cors.allow.origin=*
# alpine.cors.allow.methods=GET POST PUT DELETE OPTIONS
# alpine.cors.allow.headers=Origin, Content-Type, Authorization, X-Requested-With, Content-Length, Accept, Origin, X-Api-Key, X-Total-Count, *
# alpine.cors.expose.headers=Origin, Content-Type, Authorization, X-Requested-With, Content-Length, Accept, Origin, X-Api-Key, X-Total-Count
# alpine.cors.allow.credentials=true
# alpine.cors.max.age=3600

# Required
# Defines if OpenID Connect will be used for user authentication.
# If enabled, alpine.oidc.* properties should be set accordingly.
alpine.oidc.enabled=false

# Optional
# Defines the issuer URL to be used for OpenID Connect.
# This issuer MUST support provider configuration via the /.well-known/openid-configuration endpoint.
# See also:
# - https://openid.net/specs/openid-connect-discovery-1_0.html#ProviderMetadata
# - https://openid.net/specs/openid-connect-discovery-1_0.html#ProviderConfig
alpine.oidc.issuer=

# Optional
# Defines the name of the claim that contains the username in the provider's userinfo endpoint.
# Common claims are "name", "username", "preferred_username" or "nickname".
# See also: https://openid.net/specs/openid-connect-core-1_0.html#UserInfoResponse
alpine.oidc.username.claim=name

# Optional
# Specifies if mapped OpenID Connect accounts are automatically created upon successful
# authentication. When a user logs in with a valid access token but an account has
# not been previously provisioned, an authentication failure will be returned.
# This allows admins to control specifically which OpenID Connect users can access the
# system and which users cannot. When this value is set to true, a local OpenID Connect
# user will be created and mapped to the OpenID Connect account automatically. This
# automatic provisioning only affects authentication, not authorization.
alpine.oidc.user.provisioning=false

# Optional
# This option will ensure that team memberships for OpenID Connect users are dynamic and
# synchronized with membership of OpenID Connect groups or assigned roles. When a team is
# mapped to an OpenID Connect group, all local OpenID Connect users will automatically be
# assigned to the team if they are a member of the group the team is mapped to. If the user
# is later removed from the OpenID Connect group, they will also be removed from the team. This
# option provides the ability to dynamically control user permissions via the identity provider.
# Note that team synchronization is only performed during user provisioning and after successful
# authentication.
alpine.oidc.team.synchronization=false

# Optional
# Defines the name of the claim that contains group memberships or role assignments in the provider's userinfo endpoint.
# The claim must be an array of strings. Most public identity providers do not support group or role management.
# When using a customizable / on-demand hosted identity provider, name, content, and inclusion in the userinfo endpoint
# will most likely need to be configured.
alpine.oidc.teams.claim=groups
初次启动:
首次启动 Dependency-Track 时,会发生多项任务,包括:
- 生成默认对象,例如用户,团队和权限。
- 生成用于 JWT 令牌创建和验证的密钥。
- 填充 CWE 和 SPDX 许可证数据。
- 初始化镜像所有受支持的漏洞数据源。
初始化镜像可能需要 10 到 30 分钟或更长时间。不要中断该过程。在关闭系统之前,请等待所有镜像任务的完成。可以通过查看 “dependency-track.log” 来监视这些任务。
默认凭证:
初次启动时,将使用以下凭据创建一个管理帐户:
- username: admin
- password: admin
首次登录时,会要求管理员用户更改密码。
关于不能使用 MySQL 作为数据库服务器的详情说明:
在官方文档的 “Database Support” 一节,说明了以下内容:
默认情况下 Dependency-Track 启用嵌入式 H2 数据库。该数据库的预期目的是对平台及其功能进行快速评估,测试和演示。不适用于生产用途。
除此之外,还支持以下数据库服务器:
- Microsoft SQL Server 2012 and higher
- MySQL 5.6 and 5.7
- PostgreSQL 9.0 and higher
首先,我没有考虑使用 SQL Server 来搞这个,所以就先尝试使用 MySQL 了。
当数据库的字符编码设置为 “utf8mb4” 的时候,启动 Dependency-Track 会报告以下错误信息:
ERROR [Datastore] An exception was thrown while adding/validating class(es) : Specified key was too long; max key length is 3072 bytes
当数据库的字符编码设置为 “latin1” 的时候,可以解决上述问题,但是又会报告另一个错误信息:
WARN [Persist] Insert of object "org.dependencytrack.model.License@3f702946" using statement "INSERT INTO "LICENSE" ("COMMENT","ISDEPRECATED","FSFLIBRE","HEADER","LICENSEID","NAME","ISOSIAPPROVED","SEEALSO","TEMPLATE","TEXT","UUID") VALUES (?,?,?,?,?,?,?,?,?,?,?)" failed : Incorrect string value: '\xE2\x88\x92";m...' for column 'TEMPLATE' at row 1
对此,官方文档给出了说明:
MySQL will erroneously report index key length violations (“Specified key was too long”), when infact the multi-byte key length is lower than the actual value. If UTF-8 support is required, do not use MySQL.
结论就是不能使用 MySQL 来搞,更多细节我没有深究,也没这个必要。
我最后是使用 PostgreSQL 10 来为 Dependency-Track 提供数据库服务的。
下面介绍下基本的使用流程:
首先登录 Dependency-Track 平台,依次点击 “Administration”, “Access Management”, “Teams”, “Create Team” 创建一个团队。

点击刚刚创建好的 “Security” 团队,再点击 “Permissions” 右侧的蓝色加号,为团队添加如下5项权限:
- BOM_UPLOAD
- POLICY_VIOLATION_ANALYSIS
- PROJECT_CREATION_UPLOAD
- VIEW_PORTFOLIO
- VULNERABILITY_ANALYSIS
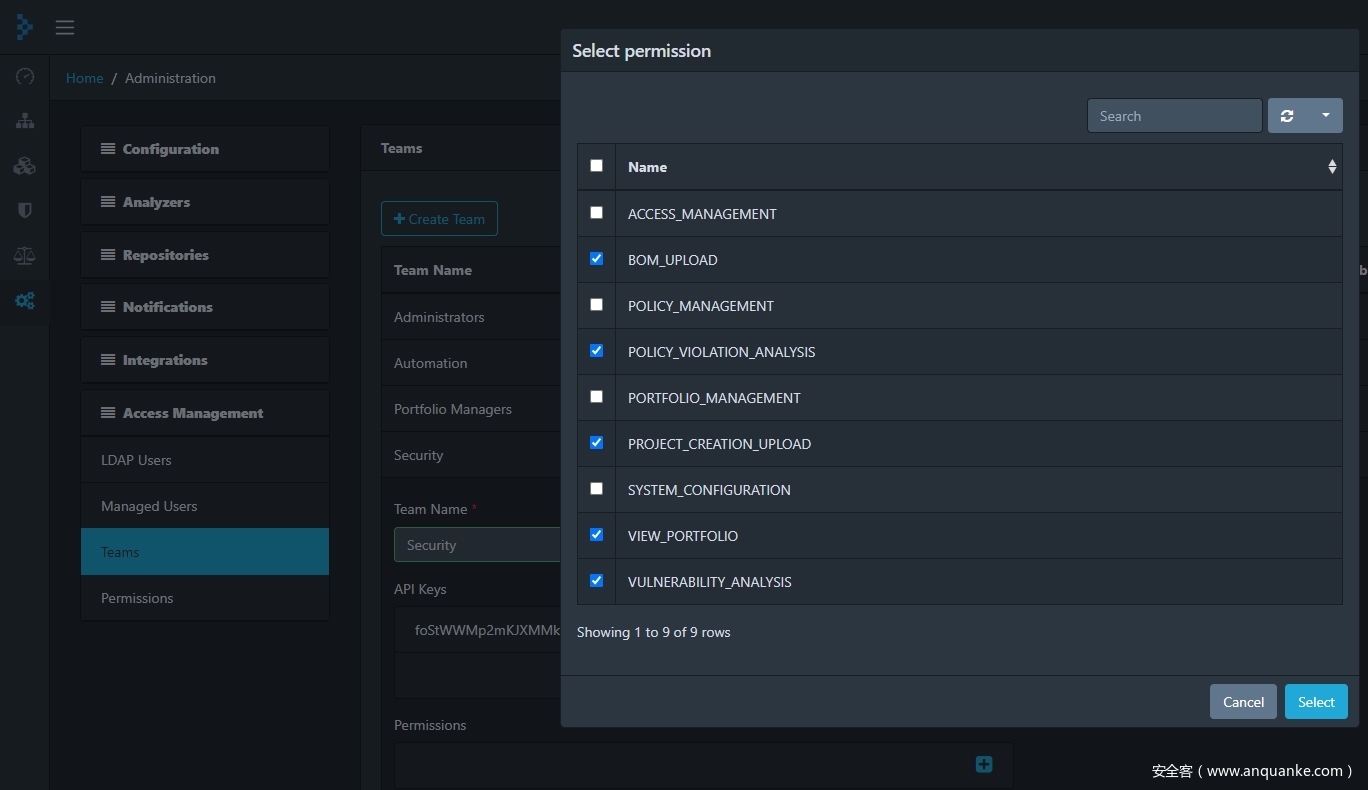
接着把 “API Keys” 的值复制下来留用。
目前我知道的使用方法主要有两种。
第一种是与 Jenkins 相结合,将 Dependency-Track 的检测任务作为持续集成过程的其中一个步骤来执行。当下互联网上为数不多的关于 Dependency-Track 的文章,讲的都是这一种。这种方式有它特定的优势,但是对我来说,却是增添了不必要的复杂性。
第二种是在命令行环境下,直接从代码库拉取项目代码,并针对项目配置文件进行一些预处理,通过接下来的本地编译过程,生成 Dependency-Track 需要的元数据文件,然后通过访问 Dependency-Track API 的方式来创建扫描任务。这个流程我通过 Shell 和 Python 脚本来自动化的完成。
与 Jenkins 相结合的方法:
登录 Jenkins 后台,依次点击 “Manage Jenkins”, “Manage Plugins” 搜索关键词 “Dependency-Track” 并安装插件。
依次点击 “Manage Jenkins”, “Configure System” 拉到最下面,对 Dependency-Track 插件进行全局配置。
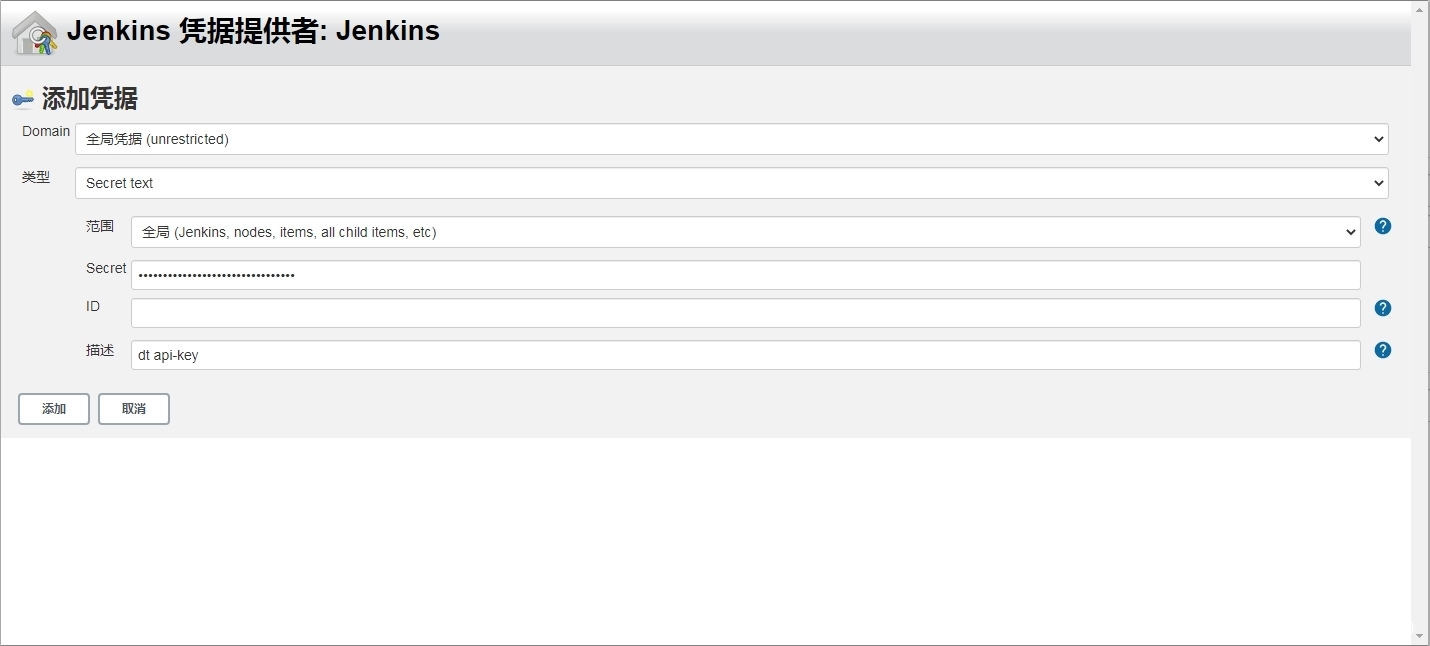
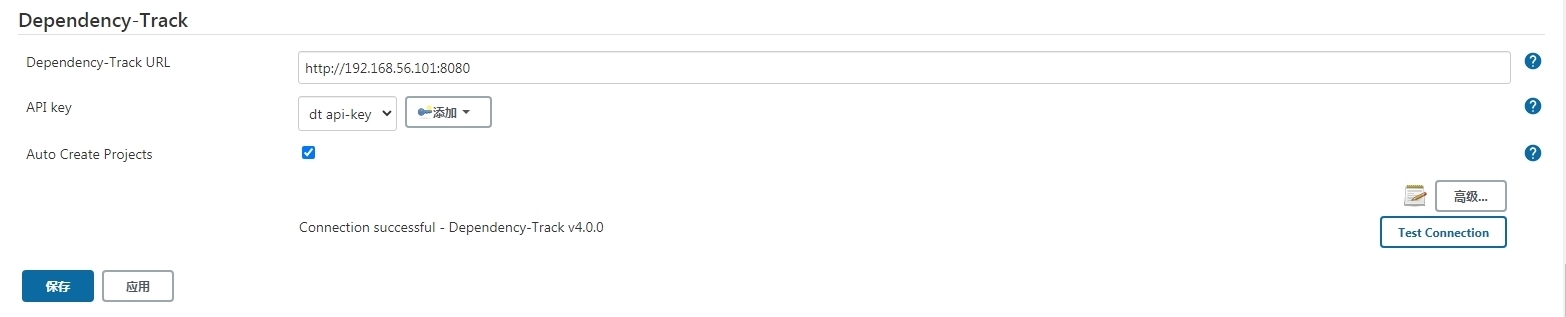
在 “Dependency-Track URL” 右侧输入平台地址,再点击 “API key” 右侧的 “添加” 按钮,点击 “Jenkins” 按钮。
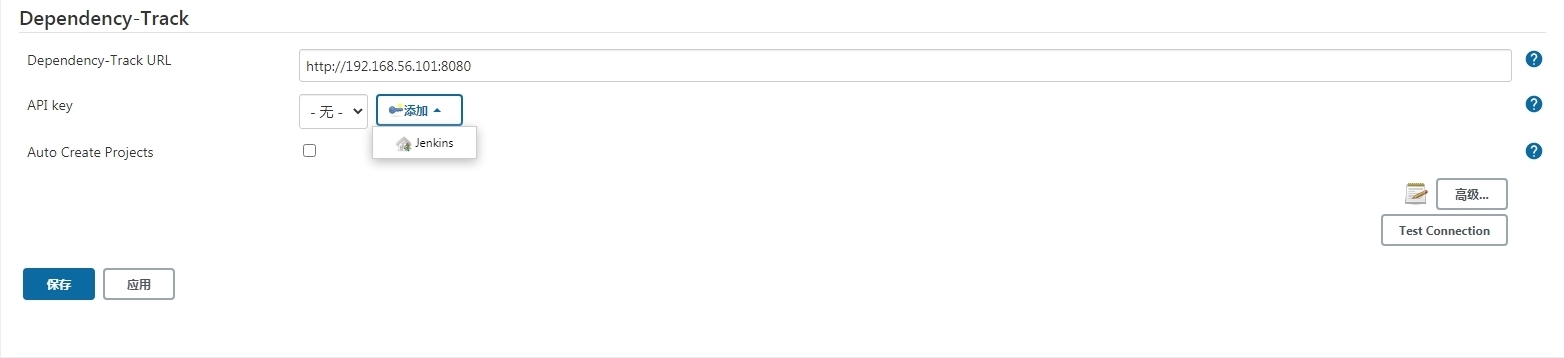
凭据类型选择 “Secret text” 并在 “Secret” 右侧输入刚刚复制的 “API Keys” 的值,”描述” 右侧输入自定义的标识字符串即可。
在 “API key” 右侧下拉框中选择刚刚创建好的凭据,勾选 “Auto Create Projects” 复选框。
再接着可以点击 “Test Connection” 按钮测试一下连接是否正常。
回到 Jenkins 主界面,我这里当前有3个项目。
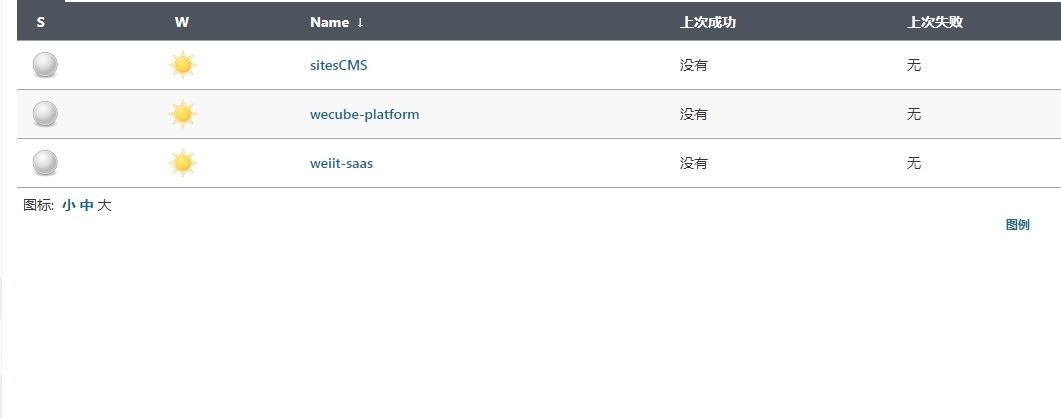
现在用其中一个举例,来介绍配置方法。
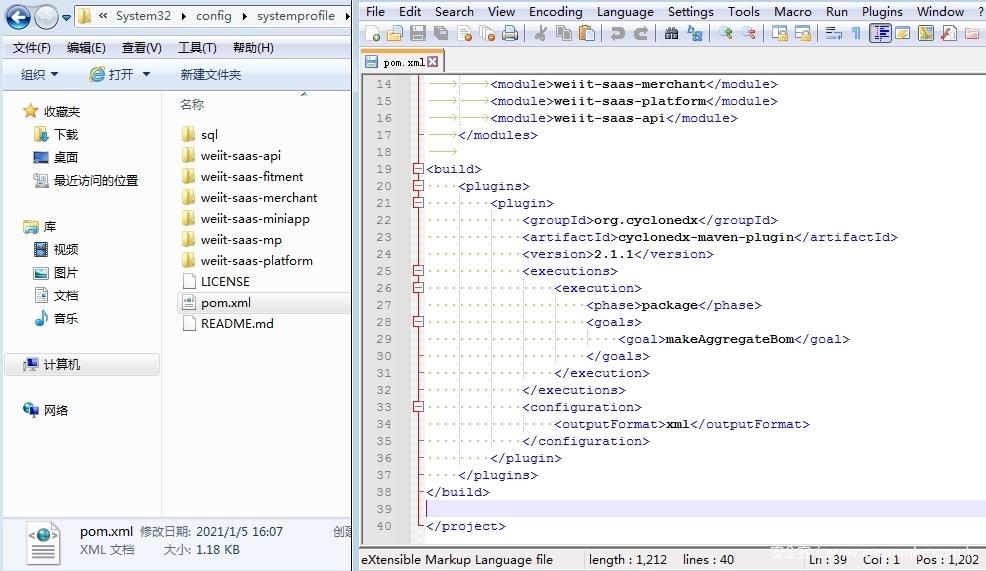
导航至项目根目录,在根目录下的 “pom.xml” 文件中添加如下插件配置:
<build>
    <plugins>
        <plugin>
            <groupId>org.cyclonedx</groupId>
            <artifactId>cyclonedx-maven-plugin</artifactId>
            <version>2.1.1</version>
            <executions>
                <execution>
                    <phase>compile</phase>
                    <goals>
                        <goal>makeAggregateBom</goal>
                    </goals>
                </execution>
            </executions>
            <configuration>
                <outputFormat>xml</outputFormat>
            </configuration>
        </plugin>
    </plugins>
</build>
有关 cyclonedx-maven-plugin 插件的详情,可以参考:https://github.com/CycloneDX/cyclonedx-maven-plugin
简单来说,它可以帮助 Maven 为项目生成 CycloneDX v1.2 标准的 SBOM 软件物料清单。
回到示例项目的配置页面,增加一项 “构建后操作” 步骤。

先设置一下 “Artifact” 的值,然后点击 “保存” 按钮。
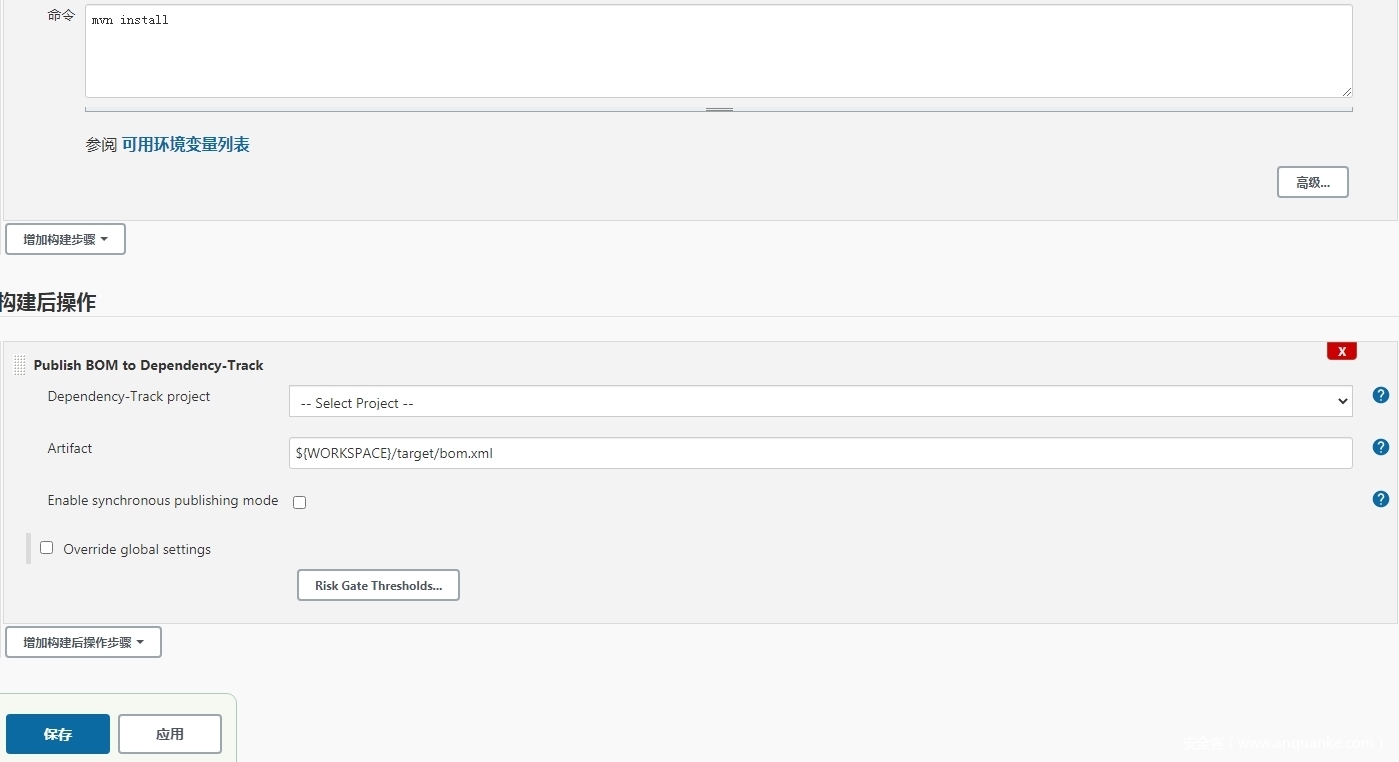
然后再通过 “配置” 回到 “Publish BOM to Dependency-Track” 这里,填写新出现的 “Dependency-Track project name” 和 “Dependency-Track project version” 选项,并保存配置。
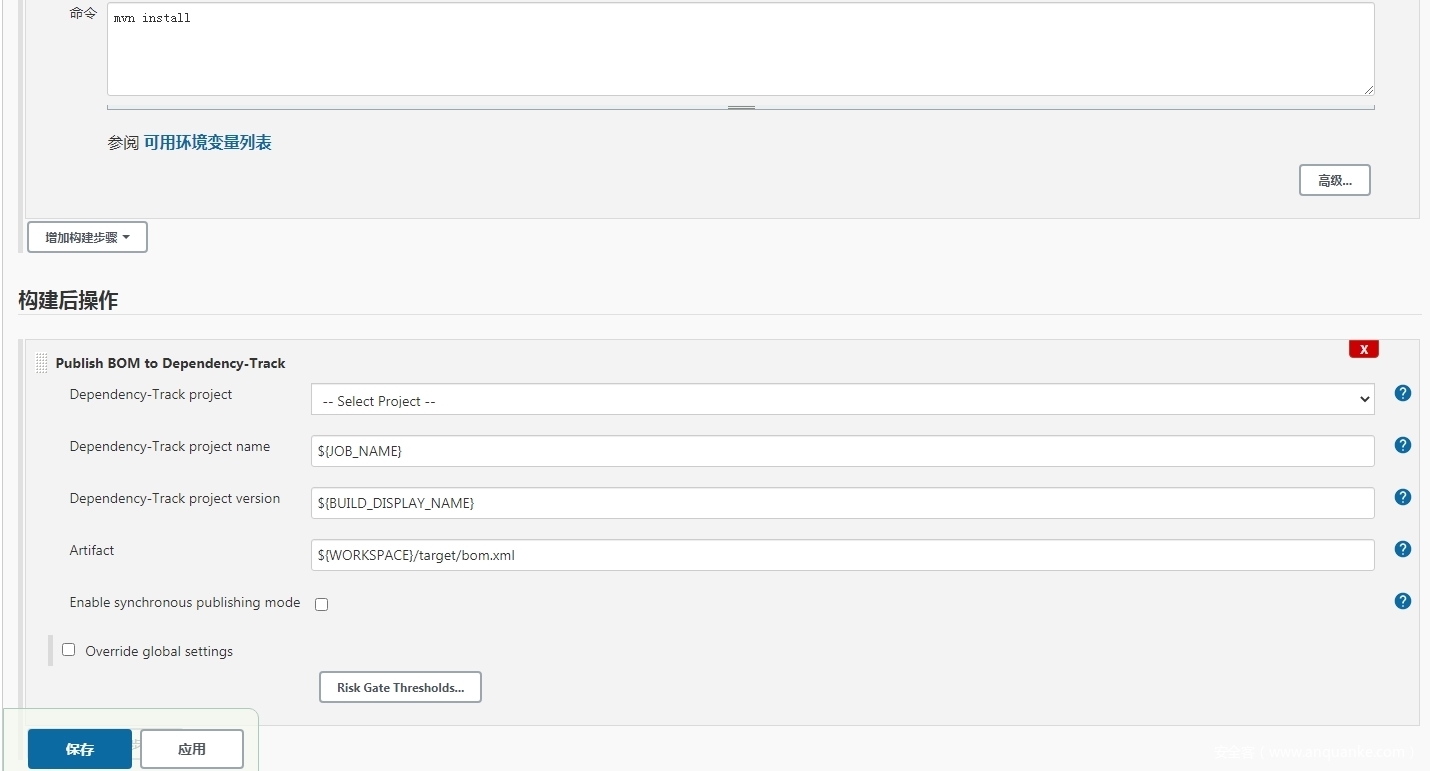
这里简单介绍一下这几个配置项。
“Dependency-Track project name” 和 “Dependency-Track project version” 的值组合在一起唯一标识了 Dependency-Track 平台中,”Projects” 板块下的一个分析项目。
它们的值可以是字符串常量,例如 “weiit-saas” 和 “2.0” ,也可以由 Jenkins 里的环境变量来指定。
“Artifact” 配置的是 Maven 和 cyclonedx-maven-plugin 为项目生成的 SBOM 文件的位置。
“Enable synchronous publishing mode” 默认是不勾选的,也就是说,默认情况下 Jenkins 将项目的 SBOM 文件发送到 Dependency-Track 平台之后,不会等待返回结果,也就不会根据返回结果做进一步的操作。而当勾选它的时候,可以通过下方的 “Risk Gate Thresholds” 选项来设置不同等级的安全漏洞的阈值,视情况决定是否将工作状态置为 “不稳定” 或者 “失败” 。
关于 “Publish BOM to Dependency-Track” 配置项的详情可以参考:https://plugins.jenkins.io/dependency-track/
关于 Jenkins 可用环境变量列表可以参考:${JENKINS_URL}/env-vars.html (例如在我的实验环境下是:http://192.168.56.102:8080/env-vars.html)
值得一提的是,理想状态下项目名称应该是软件包的名称,版本自然是相应的版本号,而我不清楚该用什么变量来设置这两个配置项的值能够完美适应各种不同的 Git 项目及 Jenkins Job 配置情况。
所以我使用一个本地示例项目进行演示,通过 Jenkins 环境变量 JOB_NAME 和 BUILD_DISPLAY_NAME 在 Dependency-Track 平台中唯一标识一个项目。
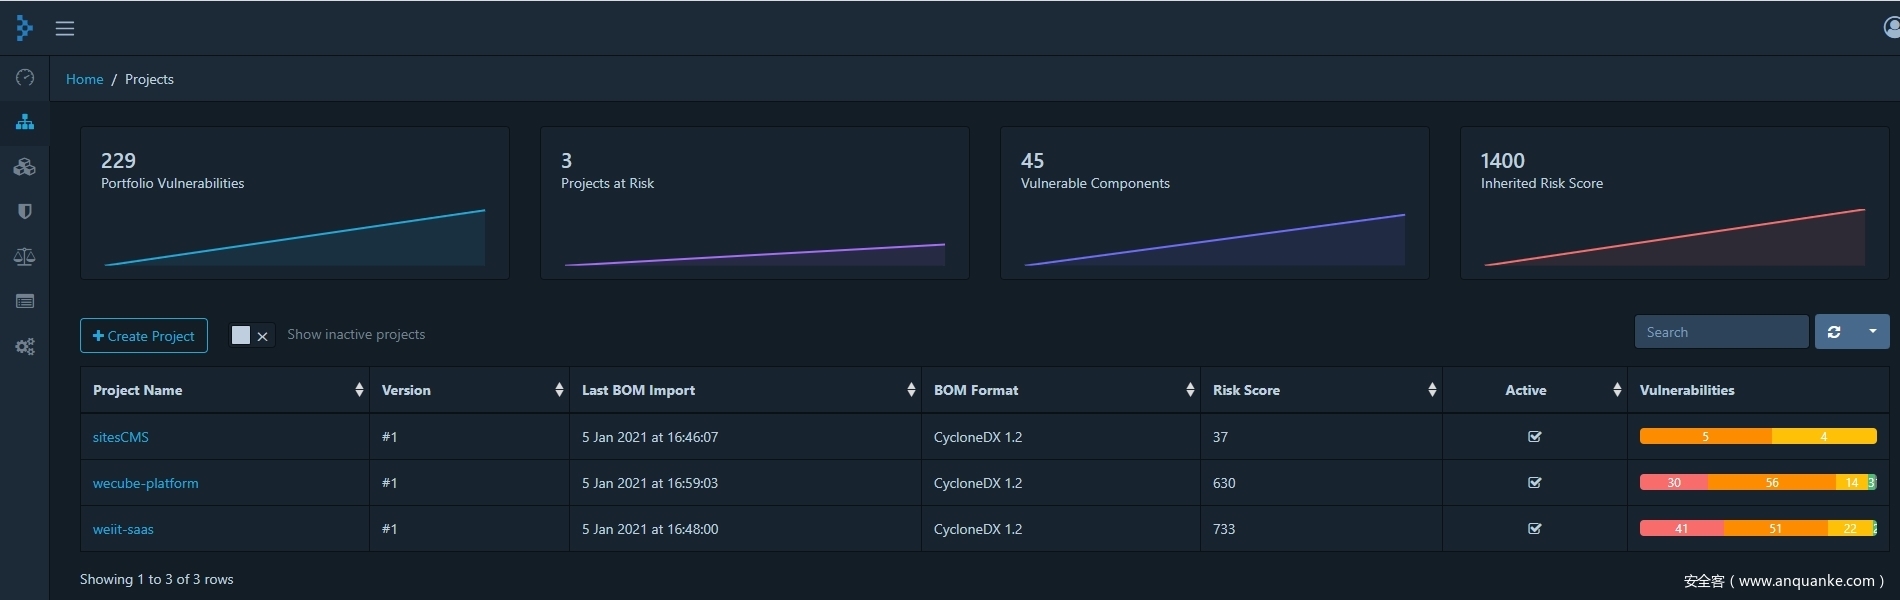
配置完成后,在示例项目中点击 “Build Now” 按钮,等待构建结束。然后转到 Dependency-Track 平台,稍等一会儿(视服务器性能和项目复杂程度的不同,从几秒钟到几分钟都有可能)就可以查看到分析结果了。
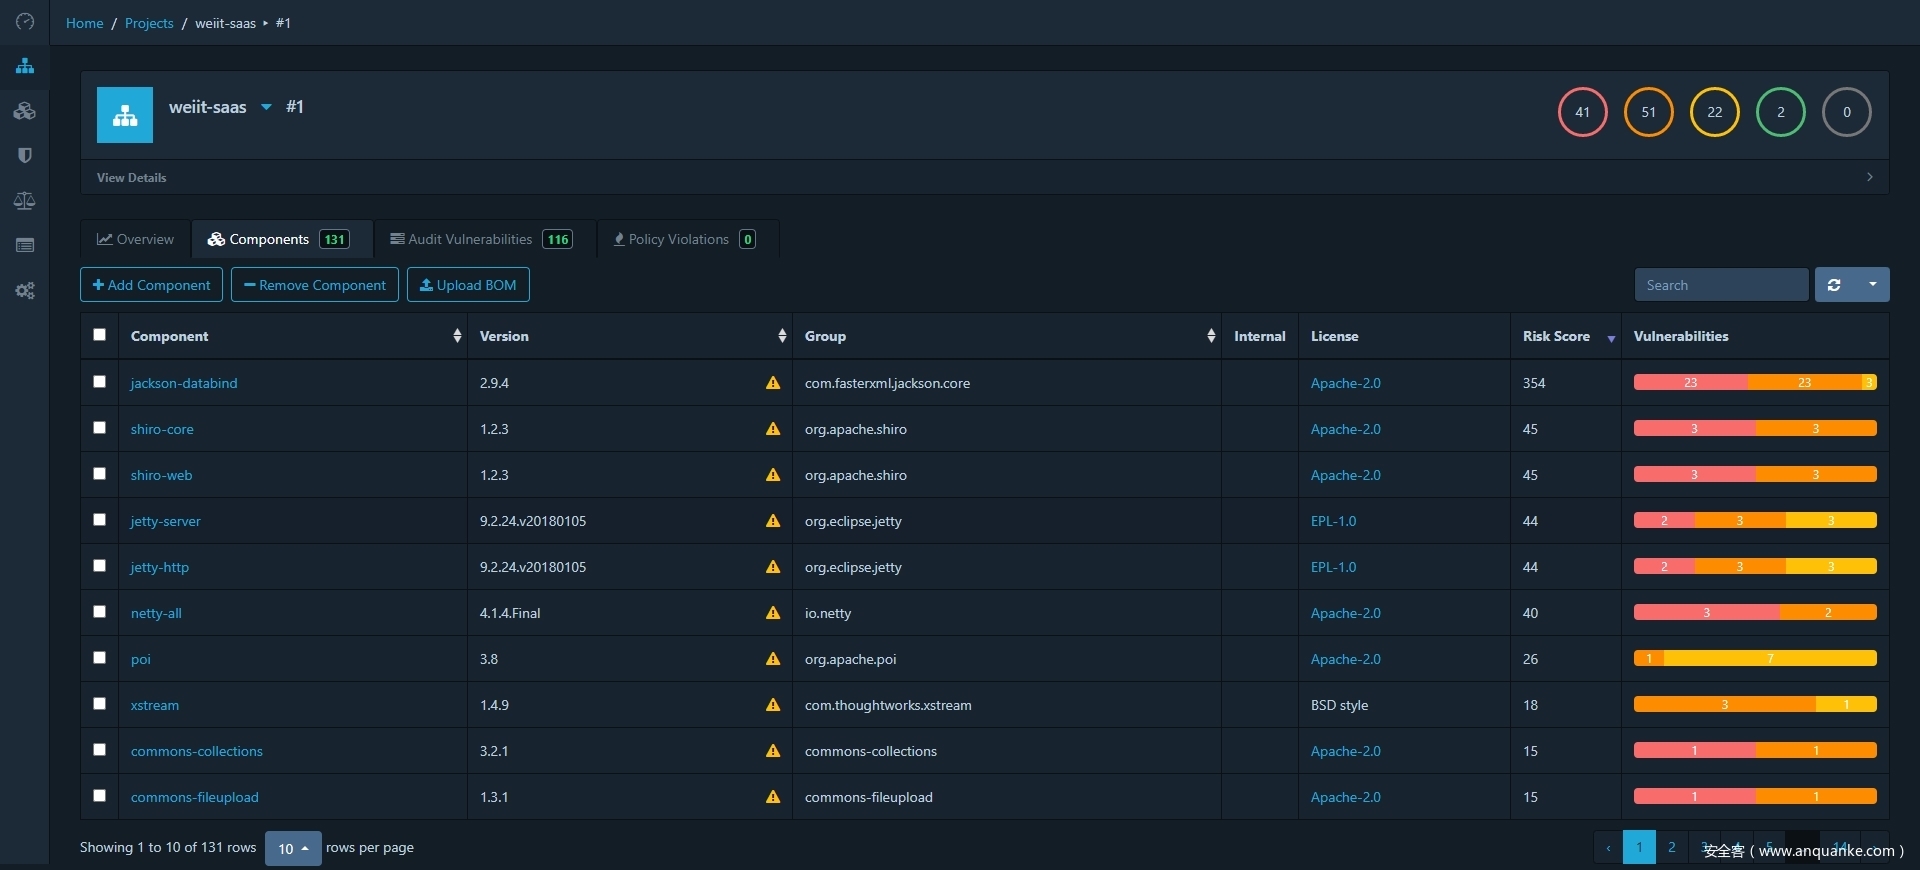
组件列表试图
漏洞列表试图
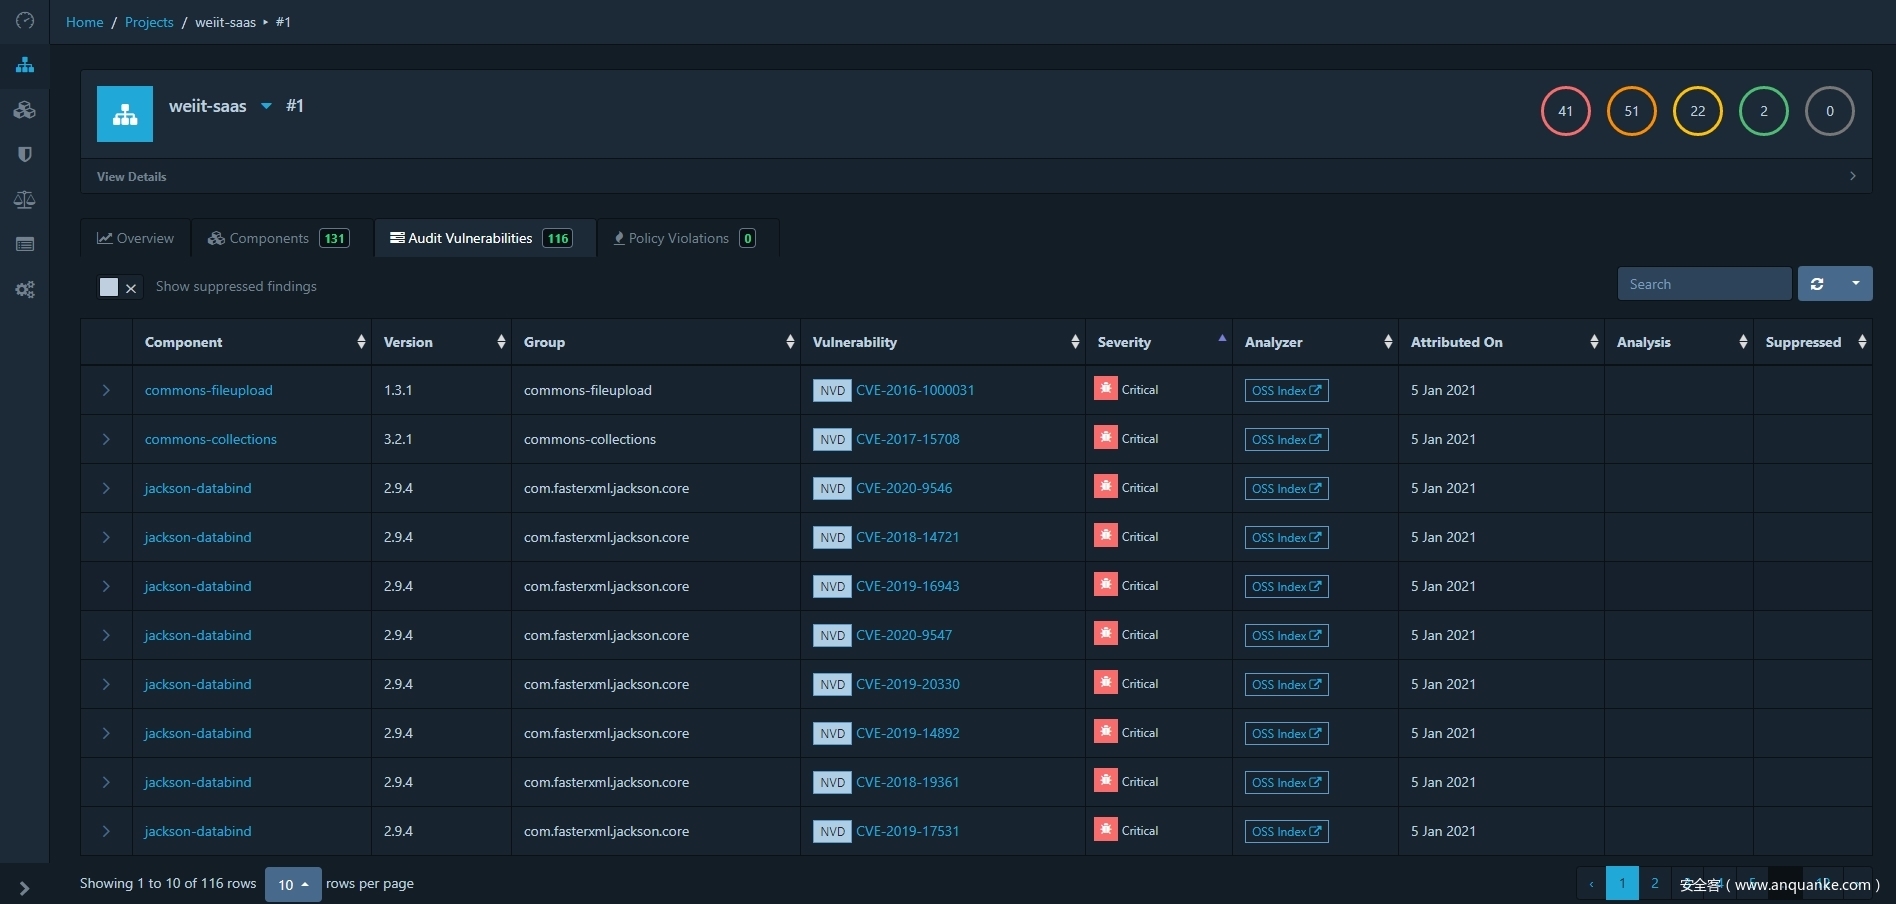
还可以查看特定组件及版本的漏洞情况

服务器硬件配置相关的重要问题
在文章开头部分,我标注了部署 Dependency-Track 所需要的两组硬件配置信息。
经过多次实验,这里将发现的两个重要问题记录一下。
当 SBOM 文件规模稍大一些,即目标项目稍复杂一些的情况下,如果使用 2 Core CPU & 4 GB RAM 的最低配置,会出现以下两个问题:
- 同一份 SBOM 文件,多次执行分析的结果,漏洞数目不一样。确切来说是后几次明显比第一次的结果少了近一半。
- 在 Jenkins 的 Publish BOM to Dependency-Track 中启用 Enable synchronous publishing mode 的话,会执行失败,报告以下错误:
ERROR: Step ‘Publish BOM to Dependency-Track’ failed: Polling Dependency-Track for results is taking longer than expected - polling limit exceeded
第一个问题,我还没有确定准确的原因。第二个问题,个人理解是因为在同步模式下 Dependency-Track 处理速度太慢,导致 Jenkins 没有在预计的时间范围内收到回复数据。
后来,在我将 Dependency-Track 服务器的配置改为 4 Core CPU & 16 GB RAM 的推荐配置之后,第一个问题再没有出现过。第二个问题虽然没有完全杜绝,但是出现的次数也明显减少了很多,算是得到了很大缓解。
因此得出结论,最好能够将服务器的硬件配置推高到推荐配置的程度或者更高,并且让 Dependency-Track 能够独占这些资源,不要同时运行其他资源消耗较大的服务。
关于 Dependency-Track 的部署以及配合 Jenkins 使用,核心的内容就是以上这些。还有一些其他的辅助功能和配置选项,大多集中在 “Administration” 里面,感兴趣的话可以自己尝试一下,都很简单。
脚本自动化的方法:
代码文件结构如下:
dependency_track_security
  │  repository_scan.sh
  │
  └─dt_assist
          generate_payload_java.py
          generate_payload_node.py
          process_pom.py
          requirements.txt
将整个 dependency_track_security 目录打包压缩为 dependency_track_security.tar.gz 文件,和以下部署脚本一同上传到服务器:
#! /bin/bash

tar -zxf dependency_track_security.tar.gz -C /opt

chmod -R 755 /opt/dependency_track_security
chmod 644 /opt/dependency_track_security/dt_assist/requirements.txt

cd /opt/dependency_track_security

python3 -m venv dt_assist
source dt_assist/bin/activate
pip3 install -r dt_assist/requirements.txt
deactivate

NODE_VERSION=v14.15.4
wget https://nodejs.org/dist/${NODE_VERSION}/node-${NODE_VERSION}-linux-x64.tar.xz
tar -xJvf node-${NODE_VERSION}-linux-x64.tar.xz
rm -rf node-${NODE_VERSION}-linux-x64.tar.xz

node-${NODE_VERSION}-linux-x64/bin/node node-${NODE_VERSION}-linux-x64/bin/npm install -g @cyclonedx/bom
为部署脚本赋予执行权限并执行之后,就部署好了。也可以在执行之前,自行根据需要调整修改路径。
接下来分别介绍 dependency_track_security 目录下几个文件的作用。
子目录 dt_assist 下的 process_pom.py 文件:
#!/usr/bin/env python
# -*- coding: utf-8 -*-

import os
import sys

from bs4 import BeautifulSoup

new_tag_plugin = BeautifulSoup('<plugin><groupId>org.cyclonedx</groupId><artifactId>cyclonedx-maven-plugin</artifactId><version>2.1.1</version><executions><execution><phase>compile</phase><goals><goal>makeAggregateBom</goal></goals></execution></executions><configuration><outputFormat>xml</outputFormat></configuration></plugin>', 'lxml-xml')
new_tag_plugins = BeautifulSoup('<plugins><plugin><groupId>org.cyclonedx</groupId><artifactId>cyclonedx-maven-plugin</artifactId><version>2.1.1</version><executions><execution><phase>compile</phase><goals><goal>makeAggregateBom</goal></goals></execution></executions><configuration><outputFormat>xml</outputFormat></configuration></plugin></plugins>', 'lxml-xml')

def main(path):
    path = os.path.normpath(path) + '/pom.xml'

    try:
        with open(path, 'r') as f:
            xml_doc = f.read()
    except Exception as e:
        print(e)
        print('Failed to read pom.xml file.')
        sys.exit(1)

    soup = BeautifulSoup(xml_doc, 'lxml-xml')

    if soup.find(string='cyclonedx-maven-plugin'):
        print('The cyclonedx-maven-plugin already exists.')
        sys.exit(0)
    elif soup.find(name='plugins'):
        print('The <plugins> tag already exists.')
        soup.plugins.append(new_tag_plugin)
        try:
            with open(path, 'w') as f:
                f.write(soup.prettify())
        except Exception as e:
            print(e)
            print('The cyclonedx-maven-plugin was added failed.')
            sys.exit(1)
        else:
            print('The cyclonedx-maven-plugin was added successfully.')
            sys.exit(0)
    elif soup.find(name='build'):
        print('The <build> tag already exists.')
        soup.build.append(new_tag_plugins)
        try:
            with open(path, 'w') as f:
                f.write(soup.prettify())
        except Exception as e:
            print(e)
            print('The cyclonedx-maven-plugin was added failed.')
            sys.exit(1)
        else:
            print('The cyclonedx-maven-plugin was added successfully.')
            sys.exit(0)
    else:
        print('The <build> tag does not exists.')
        print('The cyclonedx-maven-plugin was added failed.')
        sys.exit(1)

if __name__ == '__main__':
    try:
        path = sys.argv[1]
    except IndexError as e:
        print('Command line error.')
        sys.exit(1)
    else:
        main(path)
这个是用来处理 Java 项目的 pom.xml 文件的,它检查 pom.xml 的内容,如果不存在 cyclonedx-maven-plugin 就在适当的节点添加。
子目录 dt_assist 下的 generate_payload_java.py 文件:
#!/usr/bin/env python
# -*- coding: utf-8 -*-

import base64
import json
import os
import sys

from bs4 import BeautifulSoup

def main(branch, path):
    path_pom = os.path.normpath(path) + '/pom.xml'
    try:
        with open(path_pom, 'r') as f:
            xml_doc = f.read()
    except Exception as e:
        print(e)
        print('Failed to read pom.xml file.')
        sys.exit(1)

    soup = BeautifulSoup(xml_doc, 'lxml-xml')

    artifactId = soup.project.find(name='artifactId', recursive=False)
    if artifactId:
        # projectName = branch + '__' + artifactId.string
        projectName = branch + '__' + os.path.basename(os.path.normpath(path))
    else:
        projectName = branch + '__' + os.path.basename(os.path.normpath(path))

    version = soup.project.find(name='version', recursive=False)
    if version:
        projectVersion = version.string
    else:
        projectVersion = '-'

    path_bom = os.path.normpath(path) + '/target/bom.xml'
    try:
        with open(path_bom, 'r') as f:
            xml_doc = f.read()
    except Exception as e:
        print(e)
        print('Failed to read bom.xml file.')
        sys.exit(1)

    encoded_bom = (base64.b64encode(xml_doc.encode())).decode()
    payload = {"projectName": projectName, "projectVersion": projectVersion, "autoCreate": True, "bom": encoded_bom}

    path_payload = os.path.normpath(path) + '/target/payload.json'
    try:
        with open(path_payload, 'w') as f:
            json.dump(payload, f)
    except Exception as e:
        print(e)
        print('Failed to write payload.json file.')
        sys.exit(1)
    else:
        sys.exit(0)

if __name__ == '__main__':
    try:
        branch = sys.argv[1]
        path = sys.argv[2]
    except IndexError as e:
        print('Command line error.')
        sys.exit(1)
    else:
        main(branch, path)
这里有必要说一下,通过访问 Dependency-Track API 创建扫描任务时,需要向接口发送一个包含项目元信息的 json 格式的文件,这个文件需要包含的元素有:项目名称、项目版本号,以及作为字符串值出现的经过 BASE64 编码后的 SBOM 文件的内容。
之前我在某微信公众号讲解 Dependency-Track 的系列文章中,看到作者说在通过命令行 HTTP 客户端向 API 接口发送 BOM 文件时,总是不能成功,只有通过 Jenkins 插件才可以成功。经过我的试验,个人猜测有可能是没有对 BOM 文件进行 BASE64 编码的原因。
子目录 dt_assist 下的 generate_payload_node.py 文件:
#!/usr/bin/env python
# -*- coding: utf-8 -*-

import base64
import json
import os
import sys

def main(branch, path):
    path_package = os.path.normpath(path) + '/package.json'
    try:
        with open(path_package, 'r') as f:
            package_dict = json.load(f)
    except Exception as e:
        print(e)
        print('Failed to read package.json file.')
        sys.exit(1)

    if 'name' in package_dict.keys():
        # projectName = branch + '__' + package_dict['name']
        projectName = branch + '__' + os.path.basename(os.path.normpath(path))
    else:
        projectName = branch + '__' + os.path.basename(os.path.normpath(path))

    if 'version' in package_dict.keys():
        projectVersion = package_dict['version']
    else:
        projectVersion = '-'

    path_bom = os.path.normpath(path) + '/target/bom.xml'
    try:
        with open(path_bom, 'r') as f:
            xml_doc = f.read()
    except Exception as e:
        print(e)
        print('Failed to read bom.xml file.')
        sys.exit(1)

    encoded_bom = (base64.b64encode(xml_doc.encode())).decode()
    payload = {"projectName": projectName, "projectVersion": projectVersion, "autoCreate": True, "bom": encoded_bom}

    path_payload = os.path.normpath(path) + '/target/payload.json'
    try:
        with open(path_payload, 'w') as f:
            json.dump(payload, f)
    except Exception as e:
        print(e)
        print('Failed to write payload.json file.')
        sys.exit(1)
    else:
        sys.exit(0)

if __name__ == '__main__':
    try:
        branch = sys.argv[1]
        path = sys.argv[2]
    except IndexError as e:
        print('Command line error.')
        sys.exit(1)
    else:
        main(branch, path)
这个是处理 Node 项目的,但是结构和前一个大体相当。
文件 requirements.txt 的内容如下:
beautifulsoup4
lxml
最后是 repository_scan.sh 文件:
#! /bin/bash

DT_HOST='192.168.56.101:8080'
X_API_Key='********************************'

BRANCH=$1
PROJECT_NAME=$2
DATA_PATH='/opt/data/dependency_track'
REPO_PATH=${DATA_PATH}/repo

NODE_VERSION=v14.15.4
NODE_BIN=node-${NODE_VERSION}-linux-x64/bin

SELF=$(cd $(dirname $0);pwd)

if [ $# -eq 0 ] ; then
    echo "Please enter the branch and the repository."
    exit
fi

eval `ssh-agent -s`
ssh-add /root/.ssh/dependency_track_rsa

mkdir -p ${REPO_PATH}/${BRANCH}
cd ${REPO_PATH}/${BRANCH}

git clone 'ssh://dt666@192.168.56.102:9999/'${PROJECT_NAME}
cd ${PROJECT_NAME}
git checkout ${BRANCH}
git pull

cd ${SELF}

POM_FILE=${REPO_PATH}/${BRANCH}/${PROJECT_NAME}/pom.xml
PACKAGE_FILE=${REPO_PATH}/${BRANCH}/${PROJECT_NAME}/package.json

if [ -f ${POM_FILE} ] ; then
    source dt_assist/bin/activate
    python3 dt_assist/process_pom.py ${REPO_PATH}/${BRANCH}/${PROJECT_NAME}
    if [ $? -eq 0 ] ; then
        cd ${REPO_PATH}/${BRANCH}/${PROJECT_NAME}
        mvn compile -Dmaven.test.skip=ture
        cd ${SELF}
        python3 dt_assist/generate_payload_java.py ${BRANCH} ${REPO_PATH}/${BRANCH}/${PROJECT_NAME}
        if [ $? -eq 0 ] ; then
            curl -X PUT -H 'Content-Type: application/json' -H "X-API-Key: ${X_API_Key}" -d @${REPO_PATH}/${BRANCH}/${PROJECT_NAME}/target/payload.json http://${DT_HOST}/api/v1/bom
            rm -rf ${REPO_PATH}/${BRANCH}/${PROJECT_NAME}
        fi
    fi
elif [ -f ${PACKAGE_FILE} ] ; then
    cd ${REPO_PATH}/${BRANCH}/${PROJECT_NAME}
    ${SELF}/${NODE_BIN}/node ${SELF}/${NODE_BIN}/npm install ${REPO_PATH}/${BRANCH}/${PROJECT_NAME} --production --ignore-scripts
    if [ $? -eq 0 ] ; then
        cd ${SELF}
        mkdir ${REPO_PATH}/${BRANCH}/${PROJECT_NAME}/target
        ${NODE_BIN}/node ${NODE_BIN}/cyclonedx-bom -o ${REPO_PATH}/${BRANCH}/${PROJECT_NAME}/target/bom.xml ${REPO_PATH}/${BRANCH}/${PROJECT_NAME}
        source dt_assist/bin/activate
        python3 dt_assist/generate_payload_node.py ${BRANCH} ${REPO_PATH}/${BRANCH}/${PROJECT_NAME}
        if [ $? -eq 0 ] ; then
            curl -X PUT -H 'Content-Type: application/json' -H "X-API-Key: ${X_API_Key}" -d @${REPO_PATH}/${BRANCH}/${PROJECT_NAME}/target/payload.json http://${DT_HOST}/api/v1/bom
            rm -rf ${REPO_PATH}/${BRANCH}/${PROJECT_NAME}
        fi
    fi
else
    echo "Unsupported type."
fi
大致流程是,从代码库拉取项目代码到本地,判断项目的语言类型,目前只有 Java 和 Node 这两种。然后调用前面的几个 Python 脚本生成数据,最后发送给 Dependency-Track API 接口。
执行时,将分支名和项目名作为参数传递,例如:
./repository_scan.sh master xxCMS
这个也可以稍作修改,传递目标列表文件,引入循环来实现批量扫描很多项目。
除了 Java 和 Node 之外,还支持很多其他类型的项目,只要是能够生成符合标准的 SBOM 文件就可以,可以参考这个:https://cyclonedx.org/tool-center/
漏洞源、扫描触发机制、自定义许可证分析和 API 的利用
漏洞信息源有以下五个:
- https://nvd.nist.gov/vuln
- https://www.npmjs.com/advisories
- https://ossindex.sonatype.org/search
- https://vulndb.cyberriskanalytics.com
- “Private Vulnerability Repository”
前三个默认状态下就是可用状态(在 4.0 版本之前,第三个需要自定义 Key 现在已经不需要了)。
第四个,是一个收费源,可以通过企业邮箱发邮件申请试用账号,但是能否成功不一定。
第五个,是自定义漏洞库,可以用来配置前四个漏洞源里没有收录的漏洞。
这个功能大概是这样:
但是,现在这个功能暂时还不可用,官方文档里的说法是 “is not yet available in Dependency-Track v4.x” 我猜测是还没有开发完成吧。
针对一个已经存在的项目,当上传更新的 SBOM 文件时,将会触发即时扫描。而在 SBOM 文件没有变化的情况下,系统默认每6个小时重新扫描一次现有项目,以发现新入库的安全漏洞。
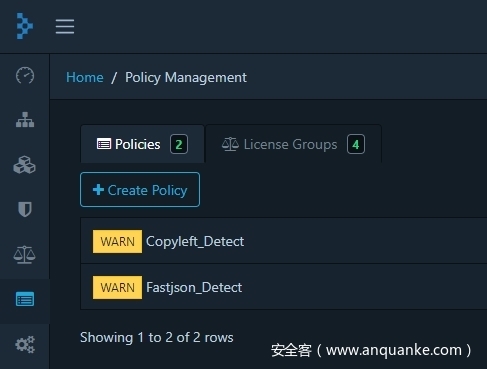
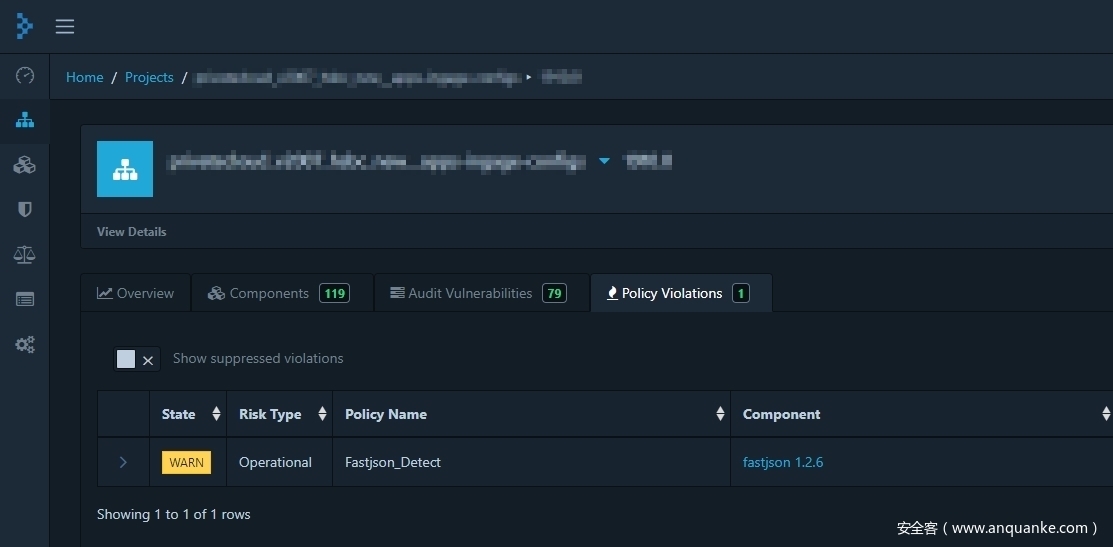
在 “Policy Management” 模块中,可以创建自定义的分析策略,比如当匹配/未匹配一个或多个组件、许可证、许可证组时触发警告等等,简单而又灵活。
在 Dependency-Track 的图形管理页面中,缺乏一些批量化操作的功能,比如结果导出,批量创建和删除等等。
好在,还有丰富的 API 存在,可以填补这方面的空缺。
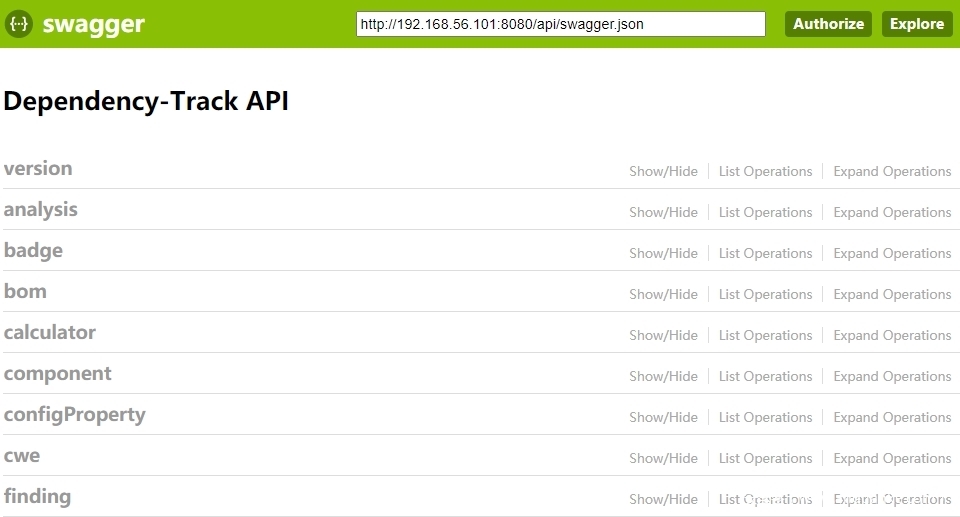
我利用一部分 API 接口,写了几个函数,基本能够满足使用需求了。
#!/usr/bin/env python
# -*- coding: utf-8 -*-

import requests

X_API_HOST = 'http://192.168.56.101:8080'
X_API_KEY = '********************************'

HEADERS = {'X-API-Key': X_API_KEY, 'Accept': 'application/json'}

def main():
    pass

# 输入 project 的 name, version 输出该 project 的 uuid
def project_lookup(name='', version=''):
    URL = X_API_HOST + '/api/v1/project/lookup'
    PARAMS = {'name': name, 'version': version}

    try:
        rh = requests.head(url=URL, params=PARAMS, headers=HEADERS)
    except Exception as e:
        print(e)
        return None

    if 'X-Total-Count' in rh.headers:
        PARAMS['page'] = '1'
        PARAMS['limit'] = rh.headers['X-Total-Count']

    try:
        rg = requests.get(url=URL, params=PARAMS, headers=HEADERS)
    except Exception as e:
        print(e)
        return None

    try:
        temp = rg.json()
    except ValueError as e:
        print(e)
        return None

    return temp['uuid']

# 输入 project 的 uuid 输出该 project 包含的 component 列表
def component_project_uuid(uuid):
    URL = X_API_HOST + '/api/v1/component/project/' + uuid
    PARAMS = {}

    try:
        rh = requests.head(url=URL, params=PARAMS, headers=HEADERS)
    except Exception as e:
        print(e)
        return None

    if 'X-Total-Count' in rh.headers:
        PARAMS['page'] = '1'
        PARAMS['limit'] = rh.headers['X-Total-Count']

    try:
        rg = requests.get(url=URL, params=PARAMS, headers=HEADERS)
    except Exception as e:
        print(e)
        return None

    try:
        temp = rg.json()
    except ValueError as e:
        print(e)
        return None

    result_list = []
    for i in temp:
        result_list.append(i['group'] + '/' + i['name'] + '/' + i['version'])
    return result_list

# 输入 component 的 group, name, version 输出包含该 component 的 project 列表
def component_identity_project(group='', name='', version=''):
    URL = X_API_HOST + '/api/v1/component/identity'
    PARAMS = {'group': group, 'name': name, 'version': version}

    try:
        rh = requests.head(url=URL, params=PARAMS, headers=HEADERS)
    except Exception as e:
        print(e)
        return None

    if 'X-Total-Count' in rh.headers:
        PARAMS['page'] = '1'
        PARAMS['limit'] = rh.headers['X-Total-Count']

    try:
        rg = requests.get(url=URL, params=PARAMS, headers=HEADERS)
    except Exception as e:
        print(e)
        return None

    try:
        temp = rg.json()
    except ValueError as e:
        print(e)
        return None

    result_list = []
    for i in temp:
        try:
            result_list.append(i['project']['name'] + '/' + i['project']['version'])
        except KeyError as e:
            result_list.append(i['uuid'] + '/' + '-')
    return result_list

# 输入 component 的 group, name, version 输出该 component 的 uuid 列表
def component_identity_component_uuid(group='', name='', version=''):
    URL = X_API_HOST + '/api/v1/component/identity'
    PARAMS = {'group': group, 'name': name, 'version': version}

    try:
        rh = requests.head(url=URL, params=PARAMS, headers=HEADERS)
    except Exception as e:
        print(e)
        return None

    if 'X-Total-Count' in rh.headers:
        PARAMS['page'] = '1'
        PARAMS['limit'] = rh.headers['X-Total-Count']

    try:
        rg = requests.get(url=URL, params=PARAMS, headers=HEADERS)
    except Exception as e:
        print(e)
        return None

    try:
        temp = rg.json()
    except ValueError as e:
        print(e)
        return None

    result_list = []
    for i in temp:
        result_list.append(i['uuid'])

    return result_list

# 输入 project 的 uuid 输出该 project 违反的 policy condition 列表
def violation_project_uuid(uuid):
    URL = X_API_HOST + '/api/v1/violation/project/' + uuid
    PARAMS = {'suppressed': 'true'}

    try:
        rh = requests.head(url=URL, params=PARAMS, headers=HEADERS)
    except Exception as e:
        print(e)
        return None

    if 'X-Total-Count' in rh.headers:
        PARAMS['page'] = '1'
        PARAMS['limit'] = rh.headers['X-Total-Count']

    try:
        rg = requests.get(url=URL, params=PARAMS, headers=HEADERS)
    except Exception as e:
        print(e)
        return None

    try:
        temp = rg.json()
    except ValueError as e:
        print(e)
        return None

    result_list = []
    for i in temp:
        result_list.append(i['component']['group'] + '/' + i['component']['name'] + '/' + i['component']['version'] + ',' + i['policyCondition']['policy']['name'])
    return result_list

# 输入 component 的 uuid 输出该 component 违反的 policy condition 列表
def violation_component_uuid(uuid):
    URL = X_API_HOST + '/api/v1/violation/component/' + uuid
    PARAMS = {'suppressed': 'true'}

    try:
        rh = requests.head(url=URL, params=PARAMS, headers=HEADERS)
    except Exception as e:
        print(e)
        return None

    if 'X-Total-Count' in rh.headers:
        PARAMS['page'] = '1'
        PARAMS['limit'] = rh.headers['X-Total-Count']

    try:
        rg = requests.get(url=URL, params=PARAMS, headers=HEADERS)
    except Exception as e:
        print(e)
        return None

    try:
        temp = rg.json()
    except ValueError as e:
        print(e)
        return None

    result_list = []
    for i in temp:
        result_list.append(i['policyCondition']['policy']['name'])
    return result_list

# 输入 component 的 uuid 输出该 component 的 vulnerability 列表
def vulnerability_component_uuid(uuid):
    URL = X_API_HOST + '/api/v1/vulnerability/component/' + uuid
    PARAMS = {'suppressed': 'true'}

    try:
        rh = requests.head(url=URL, params=PARAMS, headers=HEADERS)
    except Exception as e:
        print(e)
        return None

    if 'X-Total-Count' in rh.headers:
        PARAMS['page'] = '1'
        PARAMS['limit'] = rh.headers['X-Total-Count']

    try:
        rg = requests.get(url=URL, params=PARAMS, headers=HEADERS)
    except Exception as e:
        print(e)
        return None

    try:
        temp = rg.json()
    except ValueError as e:
        print(e)
        return None

    result_list = []
    for i in temp:
        result_list.append(i['uuid'] + ',' + i['vulnId'])
    return result_list

# 输入 project 的 uuid 输出该 project 的 vulnerability 列表
def vulnerability_project_uuid(uuid):
    URL = X_API_HOST + '/api/v1/vulnerability/project/' + uuid
    PARAMS = {'suppressed': 'true'}

    try:
        rh = requests.head(url=URL, params=PARAMS, headers=HEADERS)
    except Exception as e:
        print(e)
        return None

    if 'X-Total-Count' in rh.headers:
        PARAMS['page'] = '1'
        PARAMS['limit'] = rh.headers['X-Total-Count']

    try:
        rg = requests.get(url=URL, params=PARAMS, headers=HEADERS)
    except Exception as e:
        print(e)
        return None

    try:
        temp = rg.json()
    except ValueError as e:
        print(e)
        return None

    result_list = []
    for i in temp:
        result_list.append(i['uuid'] + ',' + i['vulnId'])
    return result_list

# 返回所有 project 的 uuid 列表
def get_all_project_uuid():
    URL = X_API_HOST + '/api/v1/project'
    PARAMS = {'excludeInactive': 'false'}

    try:
        rh = requests.head(url=URL, params=PARAMS, headers=HEADERS)
    except Exception as e:
        print(e)
        return None

    if 'X-Total-Count' in rh.headers:
        PARAMS['page'] = '1'
        PARAMS['limit'] = rh.headers['X-Total-Count']

    try:
        rg = requests.get(url=URL, params=PARAMS, headers=HEADERS)
    except Exception as e:
        print(e)
        return None

    try:
        temp = rg.json()
    except ValueError as e:
        print(e)
        return None

    result_list = []
    for i in temp:
        # result_list.append(i['name'] + '/' + i['version'])
        result_list.append(i['uuid'])
    return result_list

# 输入 project 的 uuid 删除该 project
def delete_project_uuid(uuid):
    URL = X_API_HOST + '/api/v1/project/' + uuid

    try:
        r = requests.delete(url=URL, headers=HEADERS)
    except Exception as e:
        print(e)
        return None

if __name__ == "__main__":
    main()
这个代码仅仅是函数堆砌而已,有不少冗余的地方,异常处理也不够完善,结构上仍然有很大的优化改进空间。不过作为演示已经够用了。
还是有一些功能和配置项没有讲到,感兴趣的朋友可以自己搭建一个亲自试验一下。


发表评论
您还未登录,请先登录。
登录