

一、简介
内核 CTF 入门,主要参考 CTF-Wiki。
二、环境配置
- 调试内核需要一个优秀的 gdb 插件,这里选用 gef。
根据其他师傅描述,peda 和 pwndbg 在调试内核时会有很多玄学问题。
pip3 install capstone unicorn keystone-engine ropper git clone https://github.com/hugsy/gef.git echo source `pwd`/gef/gef.py >> ~/.gdbinit - 去清华源下载 Linux kernel 压缩包并解压:
curl -O -L https://mirrors.tuna.tsinghua.edu.cn/kernel/v5.x/linux-5.9.8.tar.xz unxz linux-5.9.8.tar.xz tar -xf linux-5.9.8.tar - 进入项目文件夹,进行 makefile 配置
cd linux-5.9.8
make menuconfig
在其中勾选
Kernel hacking -> Compile-time checks and compiler options -> Compile the kernel with debug infoKernel hacking -> Generic Kernel Debugging Instruments -> KGDB: kernel debugger
之后保存配置并退出
- 开始编译内核(默认 32 位)
make -j 8 bzImage不推荐直接
make -j 8,因为它会编译很多很多大概率用不上的东西。这里有些小坑:
- 缺失依赖项。解决方法:根据 make 的报错信息来安装依赖项。
sudo apt-get install libelf-dev -
make[1]: *** No rule to make target 'debian/certs/debian-uefi-certs.pem', needed by 'certs/x509_certificate_list'. Stop.解决方法:将.config中的CONFIG_SYSTEM_TRUSTED_KEYS内容置空,然后重新 make。# # Certificates for signature checking # CONFIG_SYSTEM_TRUSTED_KEYS="" # 置空, 不要删除当前条目
等出现了以下信息后则编译完成:
Setup is 15420 bytes (padded to 15872 bytes). System is 5520 kB CRC 70701790 Kernel: arch/x86/boot/bzImage is ready (#2) - 缺失依赖项。解决方法:根据 make 的报错信息来安装依赖项。
- 最后在启动内核前,先构建一个文件系统,否则内核会因为没有文件系统而报错:
Kernel panic - not syncing: VFS: Unable to mount root fs on unknown-block(0,0)首先下载一下 busybox 源代码:
wget https://busybox.net/downloads/busybox-1.34.1.tar.bz2
tar -jxf busybox-1.34.1.tar.bz2
之后配置 makefile:
cd busybox-1.34.1
make menuconfig
make -j 8
在 menuconfig 页面中,
- Setttings 选中 Build static binary (no shared libs), 使其编译成静态链接的文件(因为 kernel 不提供 libc)需要注意的是,静态编译与链接需要额外安装一个依赖项
glibc-static。使用以下命令安装:# redhat/centos系列安装: sudo yum install glibc-static # debian/ubuntu系列安装 sudo apt-get install libc6-dev - 在 Linux System Utilities 中取消选中 Support mounting NFS file systems on Linux < 2.6.23 (NEW)
当前版本默认没有选中该项,因此可以跳过。
编译完成后,使用
make install命令,将生成文件夹_install,该目录将成为我们的 rootfs。接下来在
_install文件夹下执行以创建一系列文件:mkdir -p proc sys dev etc/init.d之后,在 rootfs 下(即
_install文件夹下)编写以下 init 挂载脚本:#!/bin/sh echo "INIT SCRIPT" mkdir /tmp mount -t proc none /proc mount -t sysfs none /sys mount -t devtmpfs none /dev mount -t debugfs none /sys/kernel/debug mount -t tmpfs none /tmp echo -e "Boot took $(cut -d' ' -f1 /proc/uptime) seconds" setsid /bin/cttyhack setuidgid 1000 /bin/sh最后设置 init 脚本的权限,并将 rootfs 打包:
chmod +x ./init
# 打包命令
find . | cpio -o --format=newc > ../../rootfs.img
# 解包命令
# cpio -idmv < rootfs.img
busybox的编译与安装在构建 rootfs 中不是必须的,但还是强烈建议构建 busybox,因为它提供了非常多的有用工具来辅助使用 kernel。
- Setttings 选中 Build static binary (no shared libs), 使其编译成静态链接的文件(因为 kernel 不提供 libc)需要注意的是,静态编译与链接需要额外安装一个依赖项
- 使用 qemu 启动内核。以下是 CTF wiki 推荐的启动参数:
#!/bin/sh
qemu-system-x86_64 \
    -m 64M \
    -nographic \
    -kernel ./arch/x86/boot/bzImage \
    -initrd  ./rootfs.img \
    -append "root=/dev/ram rw console=ttyS0 oops=panic panic=1 nokaslr" \
    -smp cores=2,threads=1 \
    -cpu kvm64
本着减少参数设置的目的,这是笔者的启动参数:
qemu-system-x86_64 \
  -kernel ./arch/x86/boot/bzImage \
  -initrd ./rootfs.img \
  -append "nokaslr"
减少启动的参数个数,可以让我们在入门时,暂时屏蔽掉一些不必要的细节。
这里只设置了三个参数,其中:
-
-kernel指定内核镜像文件 bzImage 路径 -
-initrd设置内核启动的内存文件系统 -
-append "nokaslr"关闭 Kernel ALSR 以便于调试内核注意:nokaslr可 千万千万千万别打成nokalsr了。就因为这个我调试了一个下午的 kernel……是的 CTF Wiki 上的 nokaslr 也是错的,它打成了 nokalsr (xs)
启动好后就可以使用内置的 shell 了。
-
三、内核驱动的编写与调试
1. 构建过程
这里我们在 linux kernel 项目包下新建了一个文件夹:
linux-5.9.8 $ mkdir mydrivers
之后在该文件夹下放入一个驱动代码ko_test.c,代码照搬的 CTF-wiki:
#include <linux/init.h>
#include <linux/module.h>
#include <linux/kernel.h>
MODULE_LICENSE("Dual BSD/GPL");
static int ko_test_init(void)
{
    printk("This is a test ko!\n");
    return 0;
}
static void ko_test_exit(void)
{
    printk("Bye Bye~\n");
}
module_init(ko_test_init);
module_exit(ko_test_exit);
代码编写完成后,放入一个 Makefile文件:
# 指定声称哪些 内核模块
obj-m += ko_test.o

# 指定内核项目路径
KDIR =/usr/class/kernel_pwn/linux-5.9.8

all:
        # -C 参数指定进入内核项目路径
        # -M 指定驱动源码的环境,使 Makefile 在构建模块之前返回到 驱动源码 目录,并在该目录中生成驱动模块
        $(MAKE) -C $(KDIR) M=$(PWD) modules

clean:
        rm -rf *.o *.ko *.mod.* *.symvers *.order
注意点:
- Makefile 文件名中的首字母
M一定是大写,否则会报以下错误:scripts/Makefile.build:44: /usr/class/kernel_pwn/linux-5.9.8/mydrivers/Makefile: No such file or directory make[2]: *** No rule to make target '/usr/class/kernel_pwn/linux-5.9.8/mydrivers/Makefile'. Stop.- Makefile 中
obj-m要与刚刚的驱动代码文件名所对应,否则会报以下错误:make[2]: *** No rule to make target '/usr/class/kernel_pwn/linux-5.9.8/mydrivers/ko_test.o', needed by '/usr/class/kernel_pwn/linux-5.9.8/mydrivers/ko_test.mod'. Stop.- 如果make时遇到以下错误:
makefile:6: *** missing separator. Stop.则使用 vim 打开 Makefile,键入
i以进入输入模式,然后替换掉 make 命令前的前导空格为 tab,最后键入:wq保存修改。
最后使用 make 即可编译驱动。完成后的目录内容如下所示:
这里我们只关注
ko_test.ko。
$ tree
.
├── ko_test.c
├── ko_test.ko
├── ko_test.mod
├── ko_test.mod.c
├── ko_test.mod.o
├── ko_test.o
├── Makefile
├── modules.order
└── Module.symvers

0 directories, 9 files
2. 运行过程
将新编译出来的 *.ko 文件复制进 rootfs 文件夹(busybox-1.34.1/_install)下,
之后修改 busybox-1.34.1/_install/init 脚本中的内容:
这里需要提权 /bin/sh, 目的是为了使用 root 权限启动 /bin/sh,使得拥有执行
dmesg命令的权限。
#!/bin/sh
echo "INIT SCRIPT"
mkdir /tmp
mount -t proc none /proc
mount -t sysfs none /sys
mount -t devtmpfs none /dev
mount -t debugfs none /sys/kernel/debug
mount -t tmpfs none /tmp
+ insmod /ko_test.ko # 挂载内核模块
echo -e "Boot took $(cut -d' ' -f1 /proc/uptime) seconds"
- setsid /bin/cttyhack setuidgid 1000 /bin/sh
+ setsid /bin/cttyhack setuidgid 0 /bin/sh # 修改 uid gid 为 0 以提权 /bin/sh 至 root。
+ poweroff -f # 设置 shell 退出后则关闭机器
重新打包 rootfs 并运行 qemu,之后键入 dmesg 命令即可看到 ko_test 模块已被成功加载:
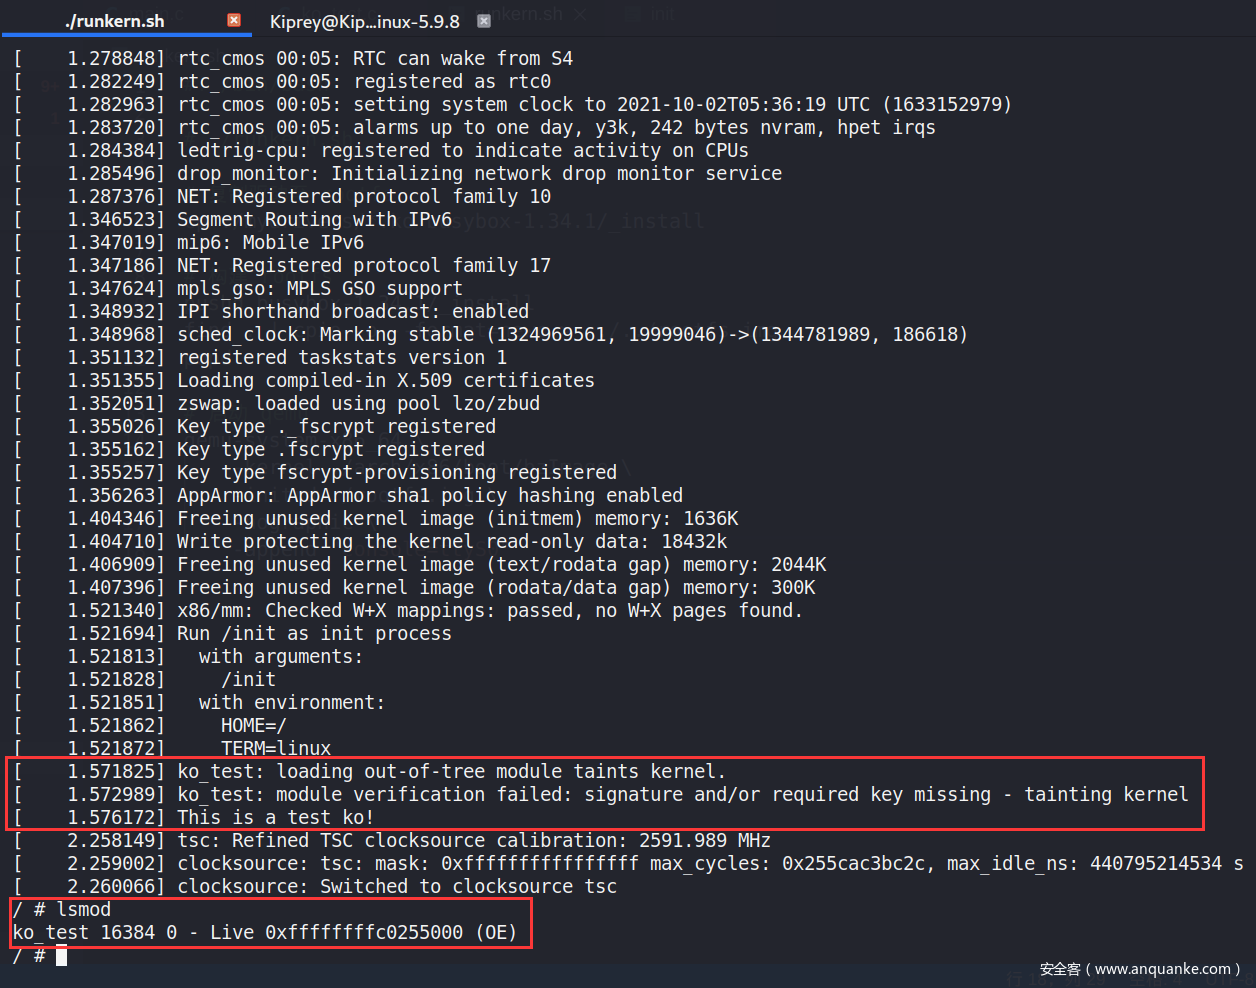
正常情况下,执行 qemu 会弹出一个小框 GUI。若想像上图一样将启动的界面变成当前终端,则需在 qemu 启动时额外指定参数:
-nographic-append "console=ttyS0"
3. 调试过程
a. attach qemu
调试时最好使用 root 权限执行 /bin/sh,相关修改方法已经在上面说明,此处暂且不表。
在启动 qemu 时,额外指定参数 -gdb tcp::1234 (或者等价的-s),之后 qemu 将做好 gdb attach 的准备。如果希望 qemu 启动后立即挂起,则必须附带 -S 参数。
同时,调试内核时,为了加载 vmlinux 符号表,必须额外指定 -append "nokaslr"以关闭 kernel ASLR。这样符号表才能正确的对应至内存中的指定位置,否则将无法给目标函数下断点。
qemu启动后,必须另起一个终端,键入 gdb -q -ex "target remote localhost:1234",即可 attach 至 qemu上。
gdb attach 上 qemu 后,可以加载 vmlinux 符号表、给特定函数下断点,并输入 continue 以执行至目标函数处。
# qemu 指定 -S 参数后挂起,此时在gdb键入以下命令
gef> add-symbol-file vmlinux
gef> b start_kernel
gef> continue

[Breakpoint 1, start_kernel () at init/main.c:837]
......
对于内核中的各个符号来说,我们也可以通过以下命令来查看一些符号在内存中的加载地址:
# grep <symbol_name> /proc/kalsyms
grep prepare_kernel_cred  /proc/kallsyms
grep commit_creds  /proc/kallsyms
grep ko_test_init  /proc/kallsyms
坑点1:之前笔者编写了以下 shell 脚本:
# 其他设置
[...]
# **后台** 启动 qemu
qemu-system-x86_64 [other args] &
# 直接在当前终端打开 GDB
gdb -q -ex "target remote localhost:1234"
但在执行脚本时,当笔者在 GDB 中键入 Ctrl+C 时, SIGINT 信号将直接终止 qemu 而不是挂起内部的 kernel。因此,gdb必须在另一个终端启动才可以正常处理 Ctrl+C。
正确的脚本如下:
# 其他设置
[...]
# **后台** 启动 qemu
qemu-system-x86_64 [other args] &
# 开启新终端,在新终端中打开 GDB
gnome-terminal -e 'gdb -q -ex "target remote localhost:1234"'
坑点2:对于 gdb gef 插件来说,最好不要使用常规的
target remote localhost:1234语句(无需root权限)来连接远程,否则会报以下错误:gef➤ target remote localhost:1234 Remote debugging using localhost:1234 warning: No executable has been specified and target does not support determining executable automatically. Try using the "file" command. 0x000000000000fff0 in ?? () [ Legend: Modified register | Code | Heap | Stack | String ] ──────────────────────────────────── registers ──────────────────────────────────── [!] Command 'context' failed to execute properly, reason: 'NoneType' object has no attribute 'all_registers'与之相对的,使用效果更好的
gef-remote命令(需要root权限)连接 qemu:# 一定要提前指定架构 set architecture i386:x86-64 gef-remote --qemu-mode localhost:1234坑点3:如果 qemu 断在
start_kernel时 gef 报错:[!] Command 'context' failed to execute properly, reason: max() arg is an empty sequence直接单步
ni一下即可。
b. attach drivers
1) 常规步骤
首先, 将目标驱动加载进内核中:
insmod <driver_module_name>
之后,通过以下命令查看 qemu 中内核驱动的 text 段的装载基地址:
# 查看装载驱动
lsmod
# 获取驱动加载的基地址
grep <target_module_name> /proc/modules
在 gdb 窗口中,键入 以下命令以加载调试符号:
add-symbol-file mydrivers/ko_test.ko <ko_test_base_addr> [-s <section1_name> <section1_addr>] ...
注,与 vmlinux 不同,使用 add-symbol-file 加载内核模块符号时,必须指定内核模块的 text 段基地址。
因为内核位于众所周知的虚拟地址(该地址与 vmlinux elf 文件的加载地址相同),但内核模块只是一个存档,不存在有效加载地址,只能等到内核加载器分配内存并决定在哪里加载此模块的每个可加载部分。因此在加载内核模块前,我们无法得知内核模块将会加载到哪块内存上。故将符号文件加载进 gdb 时,我们必须尽可能显式指定每个 section 的地址。
需要注意的是,加载符号文件时,越多指定每个 section 的地址越好。否则如果只单独指定了 .text 段的基地址,则有可能在给函数下断点时断不下来,非常影响调试。
如何查看目标内核模块的各个 section 加载首地址呢?请执行以下命令:
grep "0x" /sys/module/ko_test/sections/.*
2) 例子
一个小小例子:调试 ko_test.ko 的步骤如下:
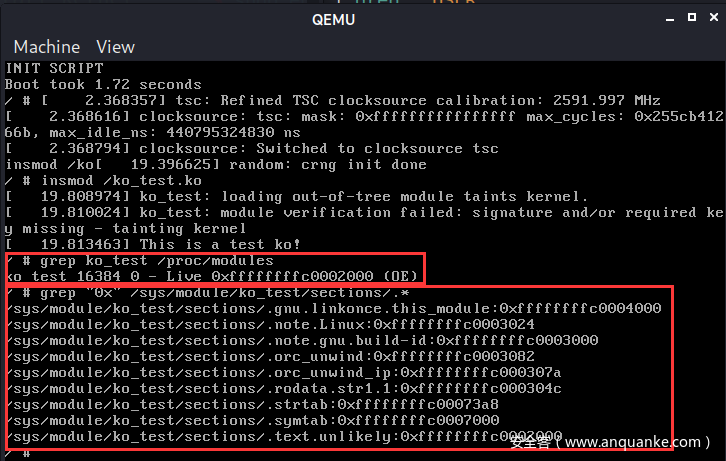
- 首先在 qemu 中的 kernel shell 执行以下命令
# 首先装载 ko_test 进内核中
insmod /ko_test.ko
# 查看当前 ko_test 装载的地址
grep ko_test /proc/modules
grep "0x" /sys/module/ko_test/sections/.*
输出如下:
![]()
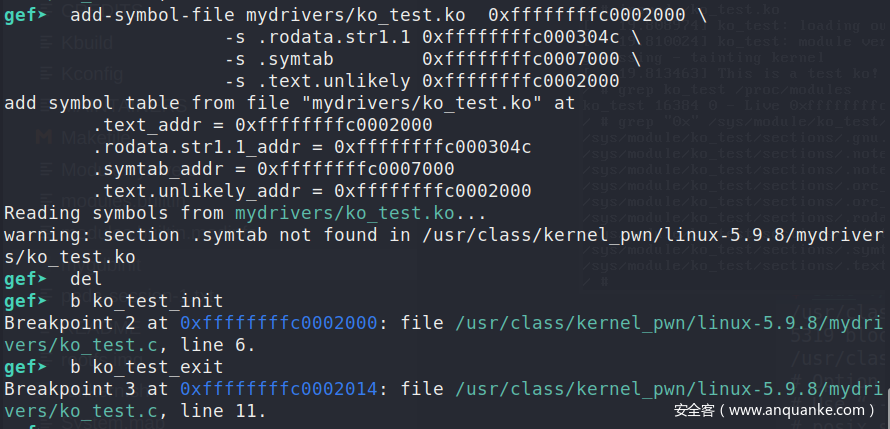
- 记录下这些地址,之后进入 gdb 中,先按下 Ctrl+C 断下 kernel,然后键入以下命令:
# 将对应符号加载至该地址处 add-symbol-file mydrivers/ko_test.ko 0xffffffffc0002000 \ -s .rodata.str1.1 0xffffffffc000304c \ -s .symtab 0xffffffffc0007000 \ -s .text.unlikely 0xffffffffc0002000 # 下断点 b ko_test_init b ko_test_exit # 使其继续执行 continue![]()
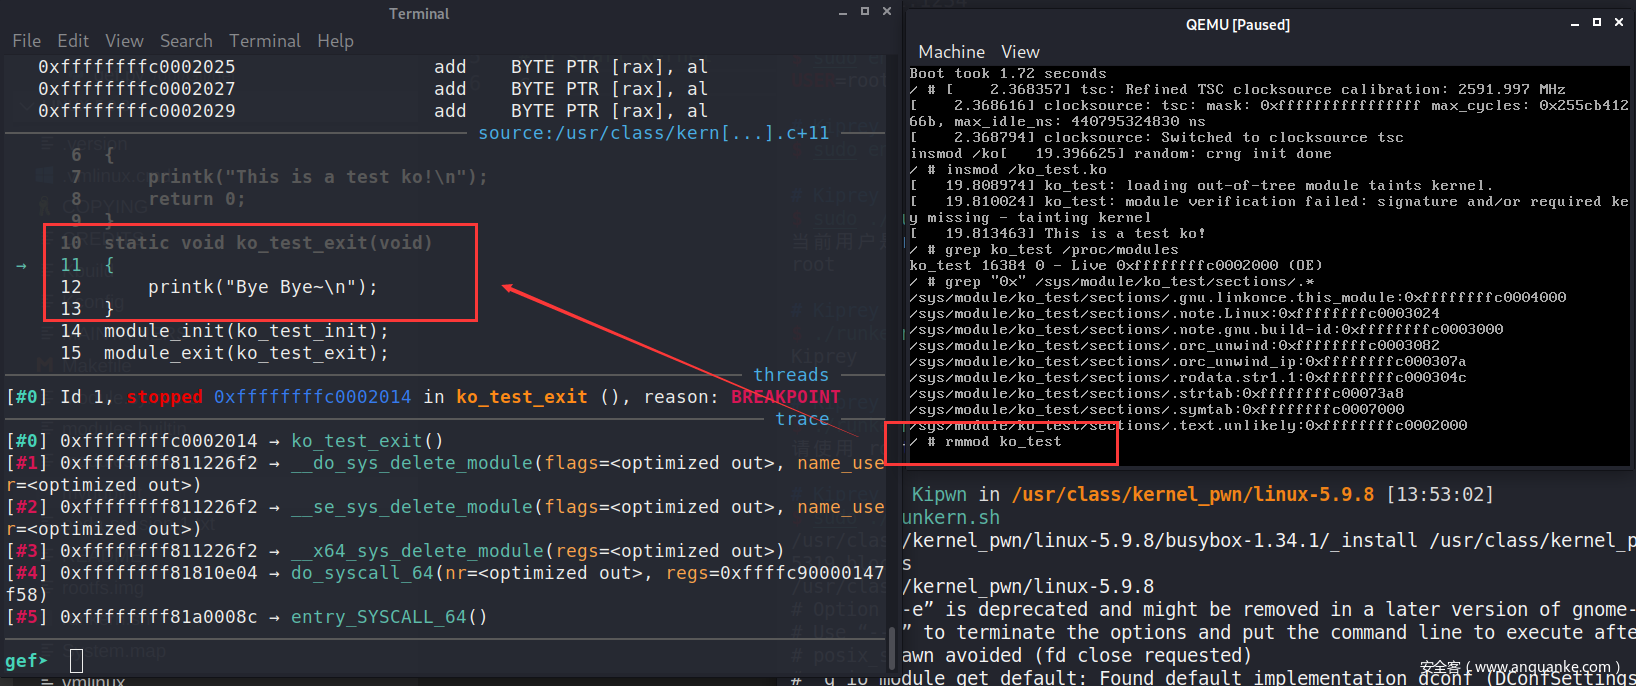
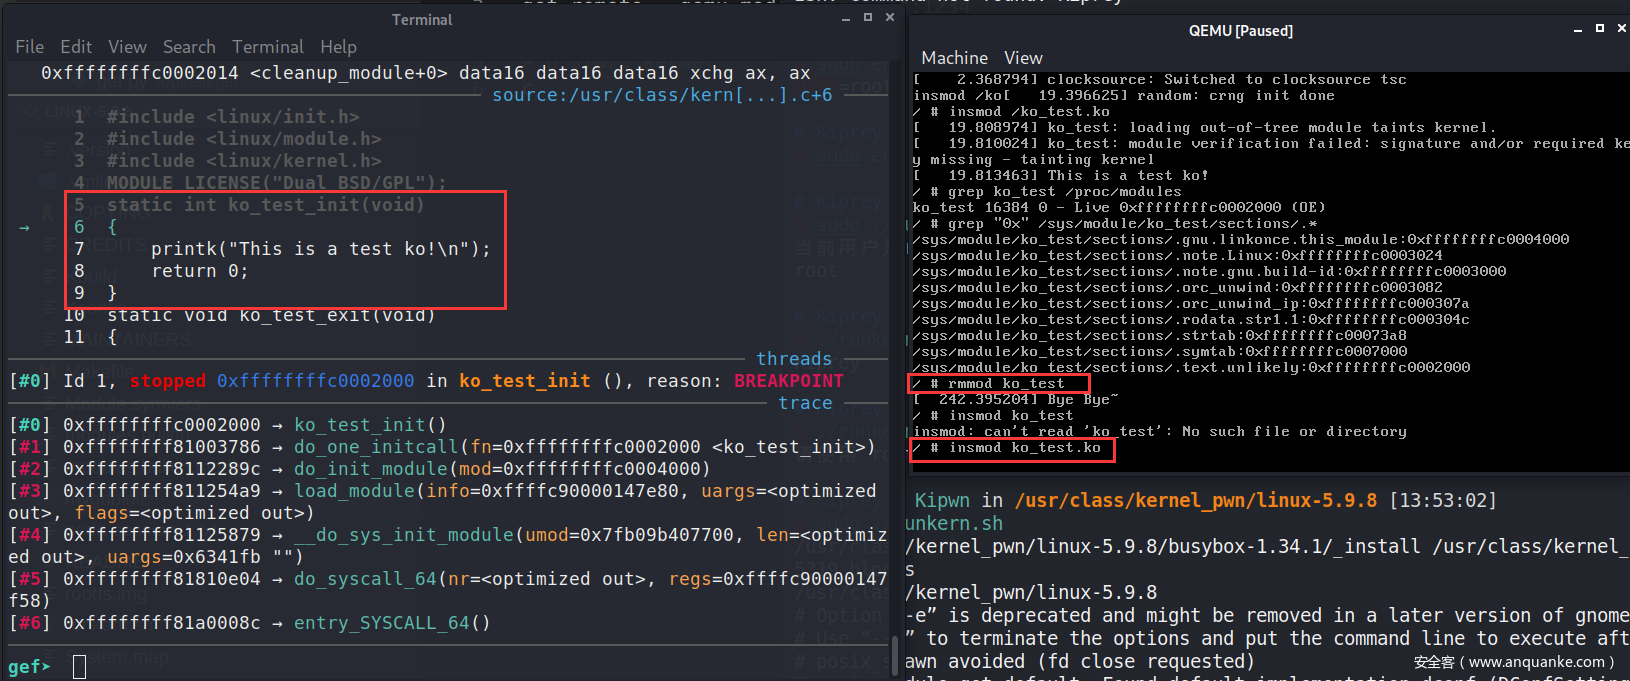
- 最后回到 qemu 中,在 kernel shell 中执行以下命令:
# 卸载 ko_test
rmmod ko_tes
此时 gdb 会断到 ko_test_exit 中:
![]()
如果在卸载了ko_test后,又重新加载 ko_test,
insmod ko_test则 gdb 会立即断到 ko_test_init 中:
![]()
这可能是因为指定了 nokaslr,使得相同驱动多次加载的基地址是一致的。
上面调试 kernel module 的 init 函数方法算是一个小 trick,它利用了 noaslr 环境下相同驱动重新加载的基地址一致 的原理来下断。但最为正确的调试 init 函数的方式,还是得跟踪 do_init_module 函数的控制流来获取基地址。以下是一系列相关操作步骤:
跟踪
do_init_module函数是因为它在load_module函数中被调用。load_module函数将在完成大量的内存加载工作后,最后进入do_init_module函数中执行内核模块的 init 函数,并在其中进行善后工作。
load_module函数将被作为 SYSCALL 函数的init_module调用。
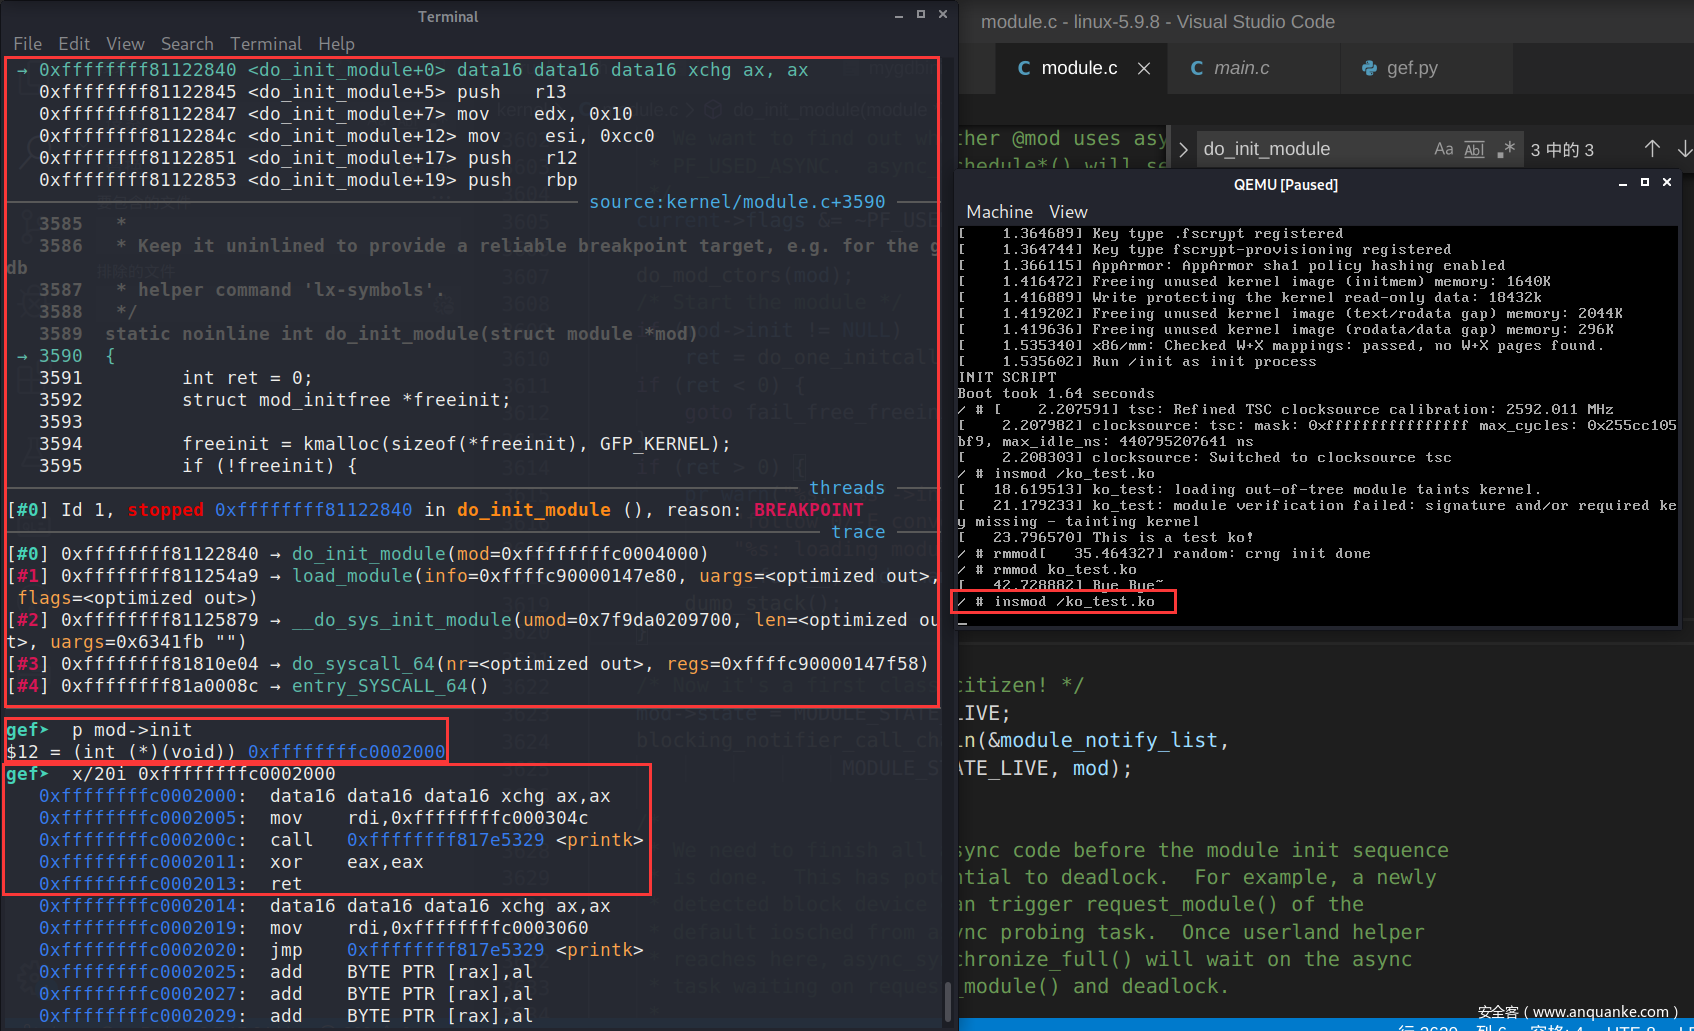
- 首先让 kernel 跑飞,等到 kernel 加载完成,shell 界面显示后,gdb 按下 ctrl + C 断下,给
do_init_module函数下断。该函数的前半部分将会执行 内核模块的 init 函数:/* * This is where the real work happens. * * Keep it uninlined to provide a reliable breakpoint target, e.g. for the gdb * helper command 'lx-symbols'. */ static noinline int do_init_module(struct module *mod) { [...] /* Start the module */ if (mod->init != NULL) ret = do_one_initcall(mod->init); // <- 此处执行 ko_test_init 函数 if (ret < 0) { goto fail_free_freeinit; } [...] } - gdb 键入
continue再让 kernel 跑飞。之后kernel shell 中输入insmod /ko_test.ko装载内核模块,此时gdb会断下。在 gdb 中查看mod->init成员即可查看到 kernel module init 函数的首地址。![]()
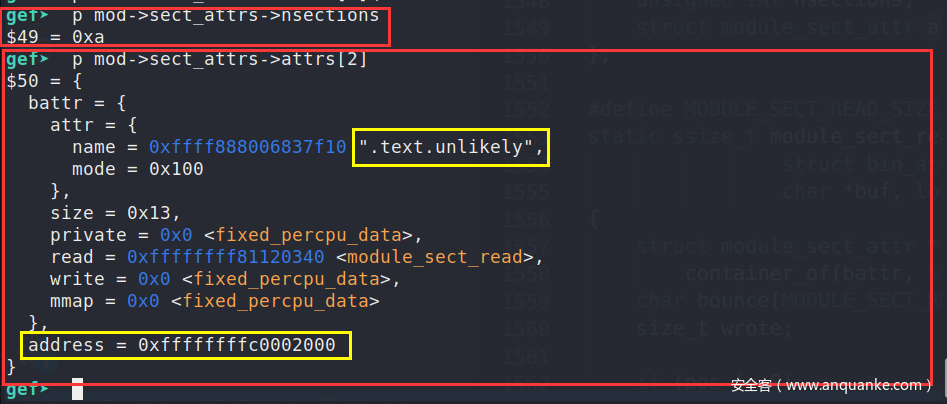
- 要想看到当前 kernel module 的全部 section 地址,可以在 gdb 中键入以下命令
# 查看当前 module 的 sections 个数 p mod->sect_attrs->nsections # 查看第 3 个 section 信息 p mod->sect_attrs->attrs[2]![]()
有了当前内核模块的全部 section 名称与基地址后,就可以按照之前的方法来加载符号文件了。
c. 启动脚本
配环境真是一件麻烦到极点的事情,不过目前就到此为止了 🙂
笔者将一系列启动命令整合成了一个 shell 脚本,方便一键运行:
#! /bin/bash

# 判断当前权限是否为 root,需要高权限以执行 gef-remote --qemu-mode
user=$(env | grep "^USER" | cut -d "=" -f 2)
if [ "$user" != "root"  ]
  then
    echo "请使用 root 权限执行"
    exit
fi

# 复制驱动至 rootfs
cp ./mydrivers/*.ko busybox-1.34.1/_install

# 构建 rootfs
pushd busybox-1.34.1/_install
find . | cpio -o --format=newc > ../../rootfs.img
popd

# 启动 qemu
qemu-system-x86_64 \
    -kernel ./arch/x86/boot/bzImage \
    -initrd ./rootfs.img \
    -append "nokaslr" \
    -s  \
    -S&

    # -s : 等价于 -gdb tcp::1234, 指定 qemu 的调试链接
    # -S :指定 qemu 启动后立即挂起

    # -nographic                # 关闭 QEMU 图形界面
    # -append "console=ttyS0"   # 和 -nographic 一起使用,启动的界面就变成了当前终端

gnome-terminal -e 'gdb -x mygdbinit'
gdbinit 内容如下:
set architecture i386:x86-64
add-symbol-file vmlinux
gef-remote --qemu-mode localhost:1234

b start_kernel
c


发表评论
您还未登录,请先登录。
登录