

摸鱼摸了一段时间,跑去弄大创和信安作品赛去了,现在重新回来填坑,抱歉 ><,大三还得准备研究生的事情
一、neuzz.c
大致得框架结构我们先来看一看
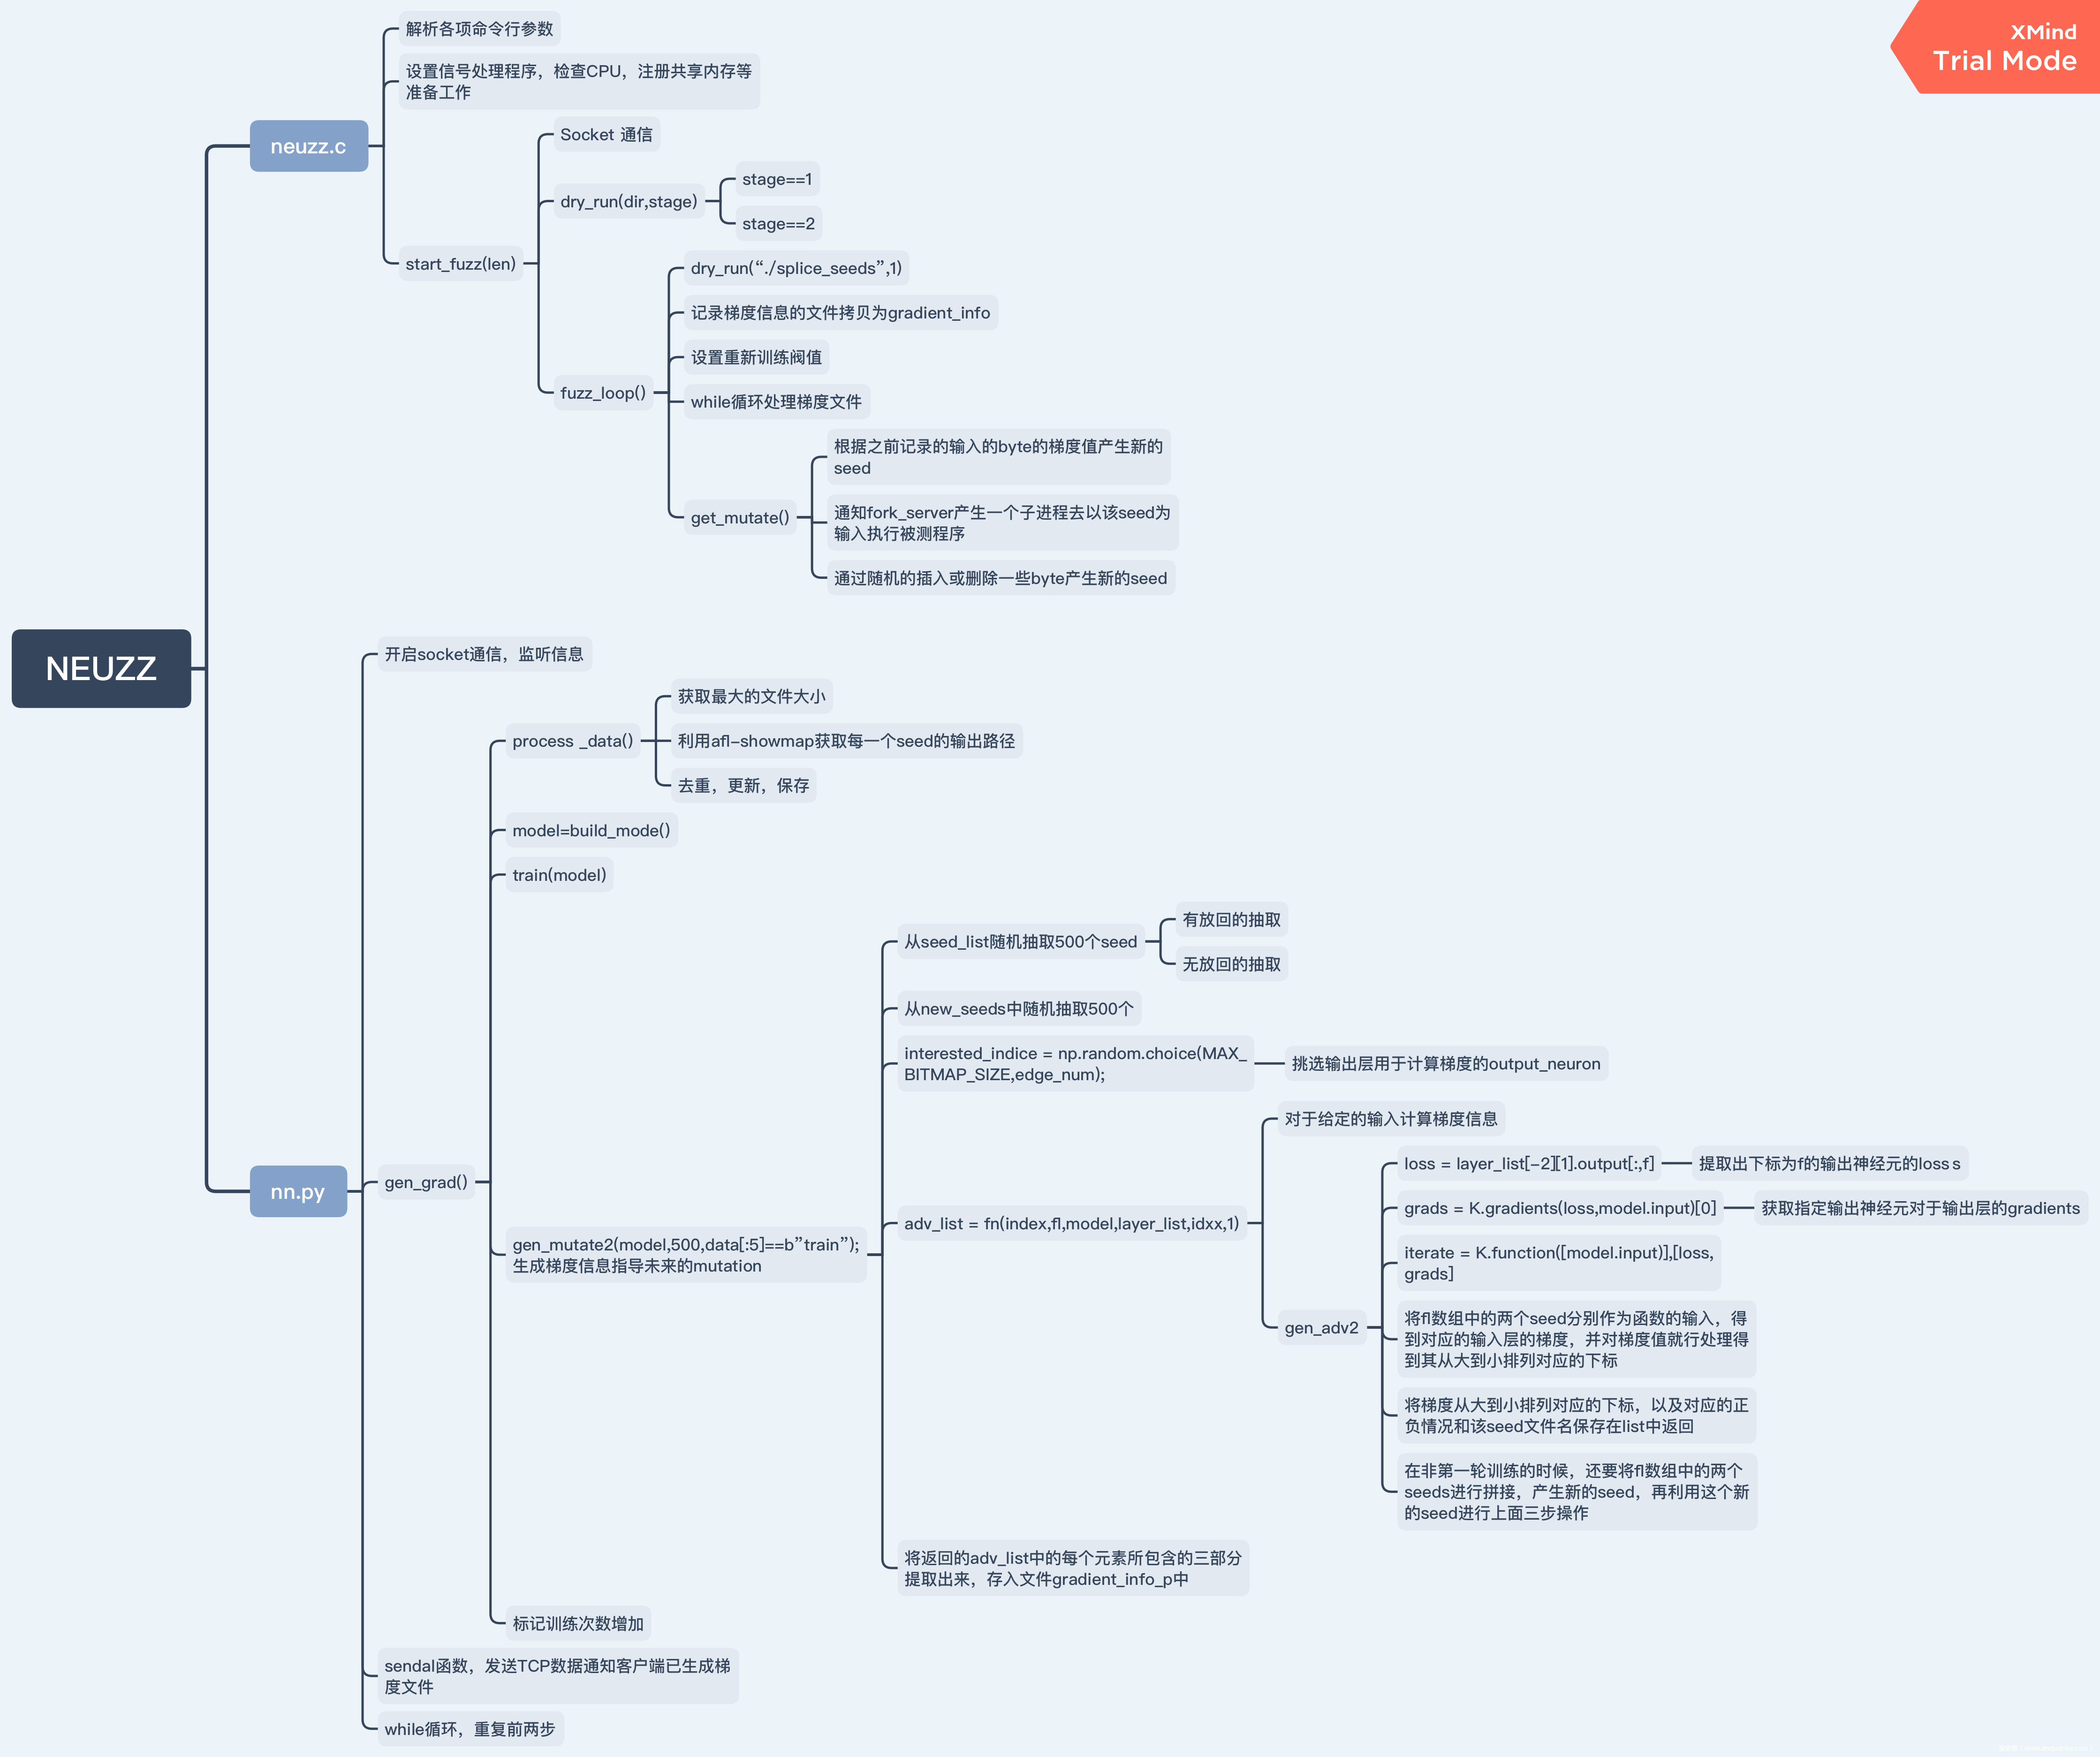
整个NEUZZ的结构图如下,高清图片地址:
https://gitee.com/zeroaone/viking-fuzz/raw/master/%E7%BB%93%E6%9E%84%E5%9B%BE.png
其大致结构与AFL中的代码结构类似
1.1 main
void main(int argc, char*argv[]){
    int opt;
    while ((opt = getopt(argc, argv, "+i:o:l:")) > 0)

    switch (opt) {

      case 'i': /* input dir */

        if (in_dir) perror("Multiple -i options not supported");
        in_dir = optarg;

        break;

      case 'o': /* output dir */

        if (out_dir) perror("Multiple -o options not supported");
        out_dir = optarg;
        break;

      case 'l': /* file len */
         sscanf (optarg,"%ld",&len);
         /* change num_index and havoc_blk_* according to file len */
         if(len > 7000)
         {
             num_index[13] = (len - 1);
             havoc_blk_large = (len - 1);
         }
         else if (len > 4000)
         {
             num_index[13] = (len - 1);
             num_index[12] = 3072;
             havoc_blk_large = (len - 1);
             havoc_blk_medium = 2048;
             havoc_blk_small = 1024;
         }
         printf("num_index %d %d small %d medium %d large %d\n", num_index[12], num_index[13], havoc_blk_small, havoc_blk_medium, havoc_blk_large);
         printf("mutation len: %ld\n", len);
         break;

    default:
        printf("no manual...");
    }
    setup_signal_handlers();
    check_cpu_governor();
    get_core_count();
    bind_to_free_cpu();
    setup_shm();
    init_count_class16();
    setup_dirs_fds();
    if (!out_file) setup_stdio_file();
    detect_file_args(argv + optind + 1);
    setup_targetpath(argv[optind]);
    copy_seeds(in_dir, out_dir);
    init_forkserver(argv+optind);
    start_fuzz(len);
    printf("total execs %ld edge coverage %d.\n", total_execs, count_non_255_bytes(virgin_bits));
    return;
}
这里main函数一开始就是在解析命令行,基本上和AFL里面有的参数概念一致
-
-i:设定输入种子文件夹 -
-o:输出文件夹也就是造成Crash的输入保存文件夹 -
-l:设定待测文件的大小,文件len由neuzz_in中的最大文件镜像头获得,可以使用如下命令获得ls -lS neuzz_in|head
我们先看看启动neuzz.c的命令行指令
#./neuzz -i in_dir -o out_dir -l mutation_len [program path [arguments]] @@
$ ./neuzz -i neuzz_in -o seeds -l 7506 ./readelf -a @@
-
neuzz_in:是nn.py生成的新测试样例 -
seeds:是neuzz输出的能产生Crash的输入供给nn.py进行训练
1.1.1 num_index
然后这里我们重点看一下-l选项
case 'l': /* file len */
    sscanf (optarg,"%ld",&len);
    /* change num_index and havoc_blk_* according to file len */
    if(len > 7000)
    {
        num_index[13] = (len - 1);
        havoc_blk_large = (len - 1);
    }
    else if (len > 4000)
    {
        num_index[13] = (len - 1);
        num_index[12] = 3072;
        havoc_blk_large = (len - 1);
        havoc_blk_medium = 2048;
        havoc_blk_small = 1024;
    }
    printf("num_index %d %d small %d medium %d large %d\n", num_index[12], num_index[13], havoc_blk_small, havoc_blk_medium, havoc_blk_large);
    printf("mutation len: %ld\n", len);
    break;
这里主要是程序需要根据程序的大小去修改num_index和havoc_blk_*两个变量,那么这两个变量是什么东西呢
其中num_index定义在
/* more fined grined mutation can have better results but slower*/
//细化的变异可以产生更好的结果,但速度较慢
//int num_index[23] = {0,2,4,8,16,32,64,128,256,512,1024,1536,2048,2560,3072, 3584,4096,4608,5120, 5632,6144,6656,7103};
/* default setting, will be change according to different file length */
//默认设置,将根据不同的文件长度进行更改
int num_index[14] = {0,2,4,8,16,32,64,128,256,512,1024,2048,4096,8192};
这些应该是选择需要种子变异的位置,这里14个就是代表有14种位置可以选择变异,细化变异就是指提供更多不同的位置,然后这个index也是将根据不同的文件长度进行更改,具体规则就是
- 如果文件长度大于7000:index[13]最后一位变为文件长度-1
- 如果文件长度大于4000小于7000:index[13]最后一位变为文件长度-1,且index[12] = 3072
其实num_index是为了实现AFL中的bitflip变异操作,拿到一个原始文件,打头阵的就是bitflip,而且还会根据翻转量/步长进行多种不同的翻转
1.1.2 havoc_blk
这里看完了num_index我们来看看havoc_blk_*这个变量是什么意思,这个变量定义是在
/* Caps on block sizes for inserion and deletion operations. The set of numbers are adaptive to file length and the defalut max file length is 10000. */
/* default setting, will be changed later accroding to file len */
int havoc_blk_small = 2048;
int havoc_blk_medium = 4096;
int havoc_blk_large = 8192;
#define HAVOC_BLK_SMALL     2048
#define HAVOC_BLK_MEDIUM    4096
#define HAVOC_BLK_LARGE     7402
这里需要引入AFL中变异的概念,总的来讲,AFL维护了一个队列(queue),每次从这个队列中取出一个文件,对其进行大量变异,并检查运行后是否会引起目标崩溃、发现新路径等结果。AFL其中一种变异方式就叫做havoc,中文意思是“大破坏”,此阶段会对原文件进行大量变异
havoc,顾名思义,是充满了各种随机生成的变异,是对原文件的“大破坏”。具体来说,havoc包含了对原文件的多轮变异,每一轮都是将多种方式组合(stacked)而成:
- 随机选取某个bit进行翻转
- 随机选取某个byte,将其设置为随机的interesting value
- 随机选取某个word,并随机选取大、小端序,将其设置为随机的interesting value
- 随机选取某个dword,并随机选取大、小端序,将其设置为随机的interesting value
- 随机选取某个byte,对其减去一个随机数
- 随机选取某个byte,对其加上一个随机数
- 随机选取某个word,并随机选取大、小端序,对其减去一个随机数
- 随机选取某个word,并随机选取大、小端序,对其加上一个随机数
- 随机选取某个dword,并随机选取大、小端序,对其减去一个随机数
- 随机选取某个dword,并随机选取大、小端序,对其加上一个随机数
- 随机选取某个byte,将其设置为随机数
- 随机删除一段bytes
- 随机选取一个位置,插入一段随机长度的内容,其中75%的概率是插入原文中随机位置的内容,25%的概率是插入一段随机选取的数
- 随机选取一个位置,替换为一段随机长度的内容,其中75%的概率是替换成原文中随机位置的内容,25%的概率是替换成一段随机选取的数
- 随机选取一个位置,用随机选取的token(用户提供的或自动生成的)替换
- 随机选取一个位置,用随机选取的token(用户提供的或自动生成的)插入
这里NEUZZ这是提供了一个限制havoc操作的大小,限制插入和删除操作的块大小,默认最大文件长度为10000。然后也会根据文件的长度做出相应的调整
1.2 初始环境配置
这里其实和AFL的结构是几乎一致的,主要是为了给还没阅读过AFL源码的朋友再过一遍
1.2.1 setup_signal_handlers
顾名思义设置信号量参数,注册必要的信号处理函数,设置信号句柄
/* Set up signal handlers. More complicated that needs to be, because libc on
   Solaris doesn't resume interrupted reads(), sets SA_RESETHAND when you call
   siginterrupt(), and does other stupid things. */

void setup_signal_handlers(void) {

  struct sigaction sa;

  sa.sa_handler   = NULL;
  sa.sa_flags     = SA_RESTART;
  sa.sa_sigaction = NULL;

  sigemptyset(&sa.sa_mask);

  /* Various ways of saying "stop". */

  sa.sa_handler = handle_stop_sig;
  sigaction(SIGHUP, &sa, NULL);
  sigaction(SIGINT, &sa, NULL);
  sigaction(SIGTERM, &sa, NULL);

  /* Exec timeout notifications. */

  sa.sa_handler = handle_timeout;
  sigaction(SIGALRM, &sa, NULL);

  /* Things we don't care about. */

  sa.sa_handler = SIG_IGN;
  sigaction(SIGTSTP, &sa, NULL);
  sigaction(SIGPIPE, &sa, NULL);

}
- SIGHUP/SIGINT/SIGTERM
- hangup/interrupt/software termination signal from kill
- 主要是”stop”的处理函数
- handle_stop_sig
- 设置stop_soon为1
- 如果child_pid存在,向其发送SIGKILL终止信号,从而被系统杀死。
- 如果forksrv_pid存在,向其发送SIGKILL终止信号
- SIGALRM
- alarm clock
- 处理超时的情况
- handle_timeout
- 如果child_pid>0,则设置child_timed_out为1,并kill掉child_pid
- 如果child_pid==-1,且forksrv_pid>0,则设置child_timed_out为1,并kill掉forksrv_pid
- SIGWINCH
- Window resize
- 处理窗口大小的变化信号
- handle_resize
- 设置clear_screen=1
- SIGUSR1
- user defined signal 1,这个是留给用户自定义的信号
- 这里定义成skip request (SIGUSR1)
- handle_skipreq
- 设置skip_requested=1
- SIGTSTP/SIGPIPE
- stop signal from tty/write on a pipe with no one to read it
- 不关心的一些信号
- SIG_IGN
1.2.2 check_cpu_governor
这里就主要是在检测CPU的环境配置,检查CPU的管理者
/* Check CPU governor. */
static void check_cpu_governor(void) {
  FILE* f;
  u8 tmp[128];
  u64 min = 0, max = 0;
  if (getenv("AFL_SKIP_CPUFREQ")) return;
  f = fopen("/sys/devices/system/cpu/cpu0/cpufreq/scaling_governor", "r");
  if (!f) return;
  printf("Checking CPU scaling governor...\n");
  if (!fgets(tmp, 128, f)) perror("fgets() failed");
  fclose(f);
  if (!strncmp(tmp, "perf", 4)) return;
  f = fopen("/sys/devices/system/cpu/cpu0/cpufreq/scaling_min_freq", "r");
  if (f) {
    if (fscanf(f, "%llu", &min) != 1) min = 0;
    fclose(f);
  }
  f = fopen("/sys/devices/system/cpu/cpu0/cpufreq/scaling_max_freq", "r");
  if (f) {
    if (fscanf(f, "%llu", &max) != 1) max = 0;
    fclose(f);
  }
  if (min == max) return;
  printf("Err: Suboptimal CPU scaling governor\n");
}
这里NEUZZ已经简化了相关的CPU检查函数,如果是AF的话,会有一系列CPU检查相关的函数,主要是包括以下几个:
-
static void get_core_count(void):获取核心数量 -
static void bind_to_free_cpu(void):构建绑定到特定核心的进程列表。如果什么也找不到,返回-1。假设一个4k cpu的上限 -
check_crash_handling():确保核心转储不会进入程序 -
check_cpu_governor():检查CPU管理者
1.2.3 get_core_count
顾名思义,检查CPU核心数
/* Count the number of logical CPU cores. */
static void get_core_count(void) {
  u32 cur_runnable = 0;
#if defined(__APPLE__) || defined(__FreeBSD__) || defined (__OpenBSD__)
  size_t s = sizeof(cpu_core_count);
  /* On *BSD systems, we can just use a sysctl to get the number of CPUs. */
#ifdef __APPLE__
  if (sysctlbyname("hw.logicalcpu", &cpu_core_count, &s, NULL, 0) < 0)
    return;
#else
  int s_name[2] = { CTL_HW, HW_NCPU };
  if (sysctl(s_name, 2, &cpu_core_count, &s, NULL, 0) < 0) return;
#endif /* ^__APPLE__ */
#else
#ifdef HAVE_AFFINITY
  cpu_core_count = sysconf(_SC_NPROCESSORS_ONLN);
#else
  FILE* f = fopen("/proc/stat", "r");
  u8 tmp[1024];
  if (!f) return;
  while (fgets(tmp, sizeof(tmp), f))
    if (!strncmp(tmp, "cpu", 3) && isdigit(tmp[3])) cpu_core_count++;
  fclose(f);
#endif /* ^HAVE_AFFINITY */
#endif /* ^(__APPLE__ || __FreeBSD__ || __OpenBSD__) */
  if (cpu_core_count > 0) {
    cur_runnable = (u32)get_runnable_processes();
#if defined(__APPLE__) || defined(__FreeBSD__) || defined (__OpenBSD__)
    /* Add ourselves, since the 1-minute average doesn't include that yet. */
    cur_runnable++;
#endif /* __APPLE__ || __FreeBSD__ || __OpenBSD__ */
    printf("You have %u CPU core%s and %u runnable tasks (utilization: %0.0f%%).\n",
        cpu_core_count, cpu_core_count > 1 ? "s" : "",
        cur_runnable, cur_runnable * 100.0 / cpu_core_count);
    if (cpu_core_count > 1) {
      if (cur_runnable > cpu_core_count * 1.5) {
        printf("System under apparent load, performance may be spotty.\n");
      }
    }
  } else {
    cpu_core_count = 0;
    printf("Unable to figure out the number of CPU cores.\n");
  }
}
1.2.4 bind_to_free_cpu
这一段就是照抄AFL源码的,构建绑定到特定核心的进程列表。如果什么也找不到,返回-1。假设一个4k cpu的上限
/* Build a list of processes bound to specific cores. Returns -1 if nothing
   can be found. Assumes an upper bound of 4k CPUs. */
static void bind_to_free_cpu(void) {
  DIR* d;
  struct dirent* de;
  cpu_set_t c;
  u8 cpu_used[4096] = { 0 };
  u32 i;
  if (cpu_core_count < 2) return;
  if (getenv("AFL_NO_AFFINITY")) {
    perror("Not binding to a CPU core (AFL_NO_AFFINITY set).");
    return;
  }
  d = opendir("/proc");
  if (!d) {
    perror("Unable to access /proc - can't scan for free CPU cores.");
    return;
  }
  printf("Checking CPU core loadout...\n");
  /* Introduce some jitter, in case multiple AFL tasks are doing the same
     thing at the same time... */
  usleep(R(1000) * 250);
  /* Scan all /proc/<pid>/status entries, checking for Cpus_allowed_list.
     Flag all processes bound to a specific CPU using cpu_used[]. This will
     fail for some exotic binding setups, but is likely good enough in almost
     all real-world use cases. */
  while ((de = readdir(d))) {
    u8* fn;
    FILE* f;
    u8 tmp[MAX_LINE];
    u8 has_vmsize = 0;
    if (!isdigit(de->d_name[0])) continue;
    fn = alloc_printf("/proc/%s/status", de->d_name);
    if (!(f = fopen(fn, "r"))) {
      free(fn);
      continue;
    }
    while (fgets(tmp, MAX_LINE, f)) {
      u32 hval;
      /* Processes without VmSize are probably kernel tasks. */
      if (!strncmp(tmp, "VmSize:\t", 8)) has_vmsize = 1;
      if (!strncmp(tmp, "Cpus_allowed_list:\t", 19) &&
          !strchr(tmp, '-') && !strchr(tmp, ',') &&
          sscanf(tmp + 19, "%u", &hval) == 1 && hval < sizeof(cpu_used) &&
          has_vmsize) {

        cpu_used[hval] = 1;
        break;

      }

    }
    free(fn);
    fclose(f);
  }
  closedir(d);
  for (i = 0; i < cpu_core_count; i++) if (!cpu_used[i]) break;
  if (i == cpu_core_count) {
    printf("No more free CPU cores\n");

  }
  printf("Found a free CPU core, binding to #%u.\n", i);
  cpu_aff = i;
  CPU_ZERO(&c);
  CPU_SET(i, &c);
  if (sched_setaffinity(0, sizeof(c), &c))
    perror("sched_setaffinity failed\n");
}
1.2.5 setup_shm
配置共享内存和virgin_bits,AFL其最大特点就是会对target进行插桩,以辅助mutated input的生成。具体地,插桩后的target,会记录执行过程中的分支信息;随后,fuzzer便可以根据这些信息,判断这次执行的整体流程和代码覆盖情况。AFL使用共享内存,来完成以上信息在fuzzer和target之间的传递
而NEUZZ也是继承了AFL的这一机制,具体地,NEUZZ在启动时,会执行setup_shm()方法进行配置。其首先调用shemget()分配一块共享内存,大小MAP_SIZE为64K:
shm_id = shmget(IPC_PRIVATE, MAP_SIZE, IPC_CREAT | IPC_EXCL | 0600);
分配成功后,该共享内存的标志符会被设置到环境变量中,从而之后fork()得到的子进程可以通过该环境变量,得到这块共享内存的标志符
shm_str = alloc_printf("%d", shm_id);
if (!dumb_mode) setenv(SHM_ENV_VAR, shm_str, 1);
NEUZZ本身,会使用变量trace_bits来保存共享内存的地址:
trace_bits = shmat(shm_id, NULL, 0);
在每次target执行之前,fuzzer首先将该共享内容清零:
memset(trace_bits, 0, MAP_SIZE);
1.2.6 init_count_class16
这其实是因为trace_bits是用一个字节来记录是否到达这个路径,和这个路径被命中了多少次的,而这个次数在0-255之间,但比如一个循环,它循环5次和循环6次可能是完全一样的效果,为了避免被当成不同的路径,或者说尽可能减少因为命中次数导致的区别,在每次去计算是否发现了新路径之前,先把这个路径命中数进行规整
而count_class_lookup16,是因为AFL在后面实际进行规整的时候,是一次读两个字节去处理的,为了提高效率,这只是出于效率的考量,实际效果和之前一致
/* Destructively classify execution counts in a trace. This is used as a
   preprocessing step for any newly acquired traces. Called on every exec,
   must be fast. */
/*这里的意思就是
命中0次认为就是0次
命中1次认为就是1次
命中2次认为就是2次
命中3次认为就是3次
命中4~7次统一认为就是4次
命中8~15次统一认为就是8次
以此类推
*/
static const u8 count_class_lookup8[256] = {

  [0]           = 0,
  [1]           = 1,
  [2]           = 2,
  [3]           = 4,
  [4 ... 7]     = 8,
  [8 ... 15]    = 16,
  [16 ... 31]   = 32,
  [32 ... 127]  = 64,
  [128 ... 255] = 128

};
static u16 count_class_lookup16[65536];
void init_count_class16(void) {
  u32 b1, b2;
  for (b1 = 0; b1 < 256; b1++)
    for (b2 = 0; b2 < 256; b2++)
      count_class_lookup16[(b1 << 8) + b2] =
        (count_class_lookup8[b1] << 8) |
        count_class_lookup8[b2];
}
1.2.7 setup_dirs_fds
这里主要就是设置输出目录和文件描述符
void setup_dirs_fds(void) {
  char* tmp;
  int fd;
  printf("Setting up output directories...");
  if (mkdir(out_dir, 0700)) {
    if (errno != EEXIST) fprintf(stderr,"Unable to create %s\n", out_dir);
  }
  /* Generally useful file descriptors. */
  dev_null_fd = open("/dev/null", O_RDWR);
  if (dev_null_fd < 0) perror("Unable to open /dev/null");
  dev_urandom_fd = open("/dev/urandom", O_RDONLY);
  if (dev_urandom_fd < 0) perror("Unable to open /dev/urandom");
}
1.2.8 setup_stdio_file
如果out_file为NULL,如果没有使用-f,就删除原本的out_dir/.cur_input,创建一个新的out_dir/.cur_input,保存其文件描述符在out_fd中
/* Spin up fork server (instrumented mode only). The idea is explained here:
   http://lcamtuf.blogspot.com/2014/10/fuzzing-binaries-without-execve.html
   In essence, the instrumentation allows us to skip execve(), and just keep
   cloning a stopped child. So, we just execute once, and then send commands
   through a pipe. The other part of this logic is in afl-as.h. */
void setup_stdio_file(void) {
  char* fn = alloc_printf("%s/.cur_input", out_dir);
  unlink(fn); /* Ignore errors */
  out_fd = open(fn, O_RDWR | O_CREAT | O_EXCL, 0600);
  if (out_fd < 0) perror("Unable to create .cur_input");
  free(fn);
}
1.2.9 detect_file_args
这个函数其实就是识别参数里面有没有@@,如果有就替换为out_dir/.cur_input,如果没有就返回
/* Detect @@ in args. */
void detect_file_args(char** argv) {
  int i = 0;
  char* cwd = getcwd(NULL, 0);
  if (!cwd) perror("getcwd() failed");
  while (argv[i]) {
    char* aa_loc = strstr(argv[i], "@@");
    if (aa_loc) {
      char *aa_subst, *n_arg;
      /* If we don't have a file name chosen yet, use a safe default. */
      if (!out_file)
        out_file = alloc_printf("%s/.cur_input", out_dir);
      /* Be sure that we're always using fully-qualified paths. */
      if (out_file[0] == '/') aa_subst = out_file;
      else aa_subst = alloc_printf("%s/%s", cwd, out_file);
      /* Construct a replacement argv value. */
      *aa_loc = 0;
      n_arg = alloc_printf("%s%s%s", argv[i], aa_subst, aa_loc + 2);
      argv[i] = n_arg;
      *aa_loc = '@';
      if (out_file[0] != '/') free(aa_subst);
    }
    i++;
  }
  free(cwd); /* not tracked */
}
1.2.10 setup_targetpath
这个就很简单了,设置需要fuzz的目标路径,并组合执行参数
/* set up target path */
void setup_targetpath(char * argvs){
    char* cwd = getcwd(NULL, 0);
    target_path = alloc_printf("%s/%s", cwd, argvs);
    argvs = target_path;
}
1.2.11 copy_seeds
这里就是将用输入的种子直接挪到输出文件夹,供nn.py下一次训练
/* copy seeds from in_idr to out_dir */
void copy_seeds(char * in_dir, char * out_dir){
    struct dirent *de;
    DIR *dp;
    if((dp = opendir(in_dir)) == NULL) {
        fprintf(stderr,"cannot open directory: %s\n", in_dir);
        return;
    }
    char src[128], dst[128];
    while((de = readdir(dp)) != NULL){
         if(strcmp(".",de->d_name) == 0 || strcmp("..",de->d_name) == 0)
            continue;
        sprintf(src, "%s/%s", in_dir, de->d_name);
        sprintf(dst, "%s/%s", out_dir, de->d_name);
        copy_file(src, dst);
    }
    closedir(dp);
    return ;
}
1.2.12 init_forkserver
编译target完成后,就可以通过afl-fuzz开始fuzzing了。其大致思路是,对输入的seed文件不断地变化,并将这些mutated input喂给target执行,检查是否会造成崩溃。因此,fuzzing涉及到大量的fork和执行target的过程
为了更高效地进行上述过程,AFL实现了一套fork server机制。其基本思路是:启动target进程后,target会运行一个fork server;fuzzer并不负责fork子进程,而是与这个fork server通信,并由fork server来完成fork及继续执行目标的操作。这样设计的最大好处,就是不需要调用execve(),从而节省了载入目标文件和库、解析符号地址等重复性工作
fuzzer执行fork()得到父进程和子进程,这里的父进程仍然为fuzzer,子进程则为target进程,即将来的fork server
forksrv_pid = fork();
而父子进程之间,是通过管道进行通信。具体使用了2个管道,一个用于传递状态,另一个用于传递命令:
int st_pipe[2], ctl_pipe[2];
对于子进程(fork server),会进行一系列设置,其中包括将上述两个管道分配到预先指定的fd,并最终执行target:
  if (!forksrv_pid) {
...
    if (dup2(ctl_pipe[0], FORKSRV_FD) < 0) PFATAL("dup2() failed");
    if (dup2(st_pipe[1], FORKSRV_FD + 1) < 0) PFATAL("dup2() failed");
...
    execv(target_path, argv);
对于父进程(fuzzer),则会读取状态管道的信息,如果一切正常,则说明fork server创建完成。
fsrv_st_fd  = st_pipe[0];
...
rlen = read(fsrv_st_fd, &status, 4);
...
/* If we have a four-byte "hello" message from the server, we're all set.
Otherwise, try to figure out what went wrong. */

if (rlen == 4) {
    OKF("All right - fork server is up.");
    return;
}
1.3 开始Fuzz
这里从start_fuzz函数看起
1.3.1 start_fuzz
这个主要是利用nn.py训练得到的模型提取出梯度指导信息从而指导fuzz
首先就是建立Socket通信
struct sockaddr_in address;
int sock = 0;
struct sockaddr_in serv_addr;
if ((sock = socket(AF_INET, SOCK_STREAM, 0)) < 0){
    perror("Socket creation error");
    exit(0);
}
memset(&serv_addr, '0', sizeof(serv_addr));
serv_addr.sin_family = AF_INET;
serv_addr.sin_port = htons(PORT);
if(inet_pton(AF_INET, "127.0.0.1", &serv_addr.sin_addr)<=0){
    perror("Invalid address/ Address not supported");
    exit(0);
}
if (connect(sock, (struct sockaddr *)&serv_addr, sizeof(serv_addr)) < 0){
    perror("Connection Failed");
    exit(0);
}
之后主要就是设置一些缓冲区
/* set up buffer */
out_buf = malloc(10000);
if(!out_buf)
    perror("malloc failed");
out_buf1 = malloc(10000);
if(!out_buf1)
    perror("malloc failed");
out_buf2 = malloc(10000);
if(!out_buf2)
    perror("malloc failed");
out_buf3 = malloc(20000);
if(!out_buf3)
    perror("malloc failed");
len = f_len;
1.3.2 dry_run
执行input文件夹下的预先准备的所有testcase(perform_dry_run),生成初始化的queue和bitmap。这只对初始输入执行一次,所以叫:dry run。也就是将所有测试样例都跑一遍,保证没有问题。但是如果一开始的样例就能产生崩溃,程序就不会运行。一般会有以下问题,需要针对性修改testcase
- Timeout_given : testcase造成程序timeout的错误,可能来自逻辑错误的语法。
- Crash :testcase造成程序崩溃,原因有二
- 样本本身能够造成程序crash
- 程序运行的内存过小造成crash
再NEUZZ中,如果状态为1则会保存感兴趣的种子到输出文件夹里,如果状态为2则会计算平均执行时间
这里第一次运行dry_run的时候就只是检查所有的测试样例是否会有问题
1.3.3 fuzz_lop
这里主要就是在监听nn.py是否已经通过训练得到所需的权重模型,当接收到已经产生权重模型的信号,就开始执行fuzz_loop
void fuzz_lop(char * grad_file, int sock){
    dry_run("./splice_seeds/", 1);
    copy_file("gradient_info_p", grad_file);
    FILE *stream = fopen(grad_file, "r");
    char *line = NULL;
    size_t llen = 0;
    ssize_t nread;
    if (stream == NULL) {
        perror("fopen");
        exit(EXIT_FAILURE);
    }
    int line_cnt=0;

    int retrain_interval = 1000;
    if(round_cnt == 0)
        retrain_interval = 750;
首先会运行一次dry_run测试运行放在splice_seed的样例,而splice也是AFL的变异手段,中文意思是“绞接”,此阶段会将两个文件拼接起来得到一个新的文件。具体地,AFL在seed文件队列中随机选取一个,与当前的seed文件做对比。如果两者差别不大,就再重新随机选一个;如果两者相差比较明显,那么就随机选取一个位置,将两者都分割为头部和尾部。最后,将当前文件的头部与随机文件的尾部拼接起来,就得到了新的文件。在这里,AFL还会过滤掉拼接文件未发生变化的情况
然后就是将记录梯度信息的文件拷贝为gradient_info,并将梯度信息文件打开为stream,并重新设置训练阈值
然后这while循环开始循环处理权重文件,一行一行的读取梯度信息文件
while ((nread = getline(&line, &llen, stream)) != -1)
然后这里开始处理梯度信息
char* loc_str = strtok(line,"|");
char* sign_str = strtok(NULL,"|");
char* fn = strtok(strtok(NULL,"|"),"\n");
parse_array(loc_str,loc);
parse_array(sign_str,sign);
这里看一下两个变量的定义
int loc[10000];                         /* Array to store critical bytes locations*/
//用于存储关键字节位置的数组,也就是我们样例对应的BITMAP
int sign[10000];                        /* Array to store sign of critical bytes  */
//数组来存储关键字节的符号,也就是我们的测试样例
char virgin_bits[MAP_SIZE];             /* Regions yet untouched by fuzzing */
//尚未被模糊影响的区域
然后就是输出前十个文件的覆盖率
/* print edge coverage per 10 files*/
if((line_cnt % 10) == 0){
    printf("$$$$&&&& fuzz %s line_cnt %d\n",fn, line_cnt);
    printf("edge num %d\n",count_non_255_bytes(virgin_bits));
    fflush(stdout);
}
然后就是将种子读入内存中
/* read seed into mem */
int fn_fd = open(fn,O_RDONLY);
if(fn_fd == -1){
    perror("open failed");
    exit(0);
}
struct stat st;
int ret = fstat(fn_fd,&st);
int file_len = st.st_size;
memset(out_buf1,0,len);
memset(out_buf2,0,len);
memset(out_buf,0, len);
memset(out_buf3,0, 20000);
ck_read(fn_fd, out_buf, file_len, fn);
紧接着就是产生突变后的种子
 /* generate mutation */
if(stage_num == 1)
    gen_mutate();
else
    gen_mutate_slow();
close(fn_fd);
这里我们之前设置的训练阈值retrain_interval就是用来控制变异的种子个数,当到达训练阈值的时候,系统又会通知nn.py开始收集新的信息进行模型训练
/* send message to python module */
if(line_cnt == retrain_interval){
    round_cnt++;
    now = count_non_255_bytes(virgin_bits);
    edge_gain = now - old;
    old = now;
    if((edge_gain > 30) || (fast == 0)){
        send(sock,"train", 5,0);
        fast = 1;
        printf("fast stage\n");
    }
    else{
        send(sock,"sloww",5,0);
        fast = 0;
        printf("slow stage\n");
}
1.3.4 parse_array
这个就是将梯度文件中的一行转化为数组
/* parse one line of gradient string into array */
void parse_array(char * str, int * array){
    int i=0;
    char* token = strtok(str,",");
    while(token != NULL){
        array[i]=atoi(token);
        i++;
        token = strtok(NULL, ",");
    }
    return;
}
1.3.5 gen_mutate
这里就是根据梯度指导信息进行突变产生新的测试样例种子
我们可以发现NEUZZ实现的第一种变异操作就是flip,在14次迭代中翻转有趣的位置
/* flip interesting locations within 14 iterations */
for(int iter=0 ;iter<13; iter=iter+1){
    memcpy(out_buf1, out_buf, len);
    memcpy(out_buf2, out_buf, len);
然后就是开始设置找到每次迭代的突变范围,首先设置了最低变异位置和最高变异位置
int low_index = num_index[iter];
int up_index = num_index[iter+1];
根据num_index的信息,假设我们迭代到8的位置,这下限为,上限为16
int num_index[14] = {0,2,4,8,16,32,64,128,256,512,1024,2048,4096,8192};
然后还初始化了变异步长,根据这段代码,不难看出变异步长是决定了将要变异的比特位数
u8 up_step = 0;
u8 low_step = 0;

for (int index = low_index; index < up_index; index = index + 1)
梯度指引:
接下来的代码时体现了NEUZZ的梯度指引核心思想的关键代码:
for (int index = low_index; index < up_index; index = index + 1)
{
    int cur_up_step = 0;
    int cur_low_step = 0;
    if (sign[index] == 1)
    {
        cur_up_step = (255 - (u8)out_buf[loc[index]]);
        if (cur_up_step > up_step)
            up_step = cur_up_step;
        cur_low_step = (u8)(out_buf[loc[index]]);
        if (cur_low_step > low_step)
            low_step = cur_low_step;
    }
    else
    {
        cur_up_step = (u8)out_buf[loc[index]];
        if (cur_up_step > up_step)
            up_step = cur_up_step;
        cur_low_step = (255 - (u8)out_buf[loc[index]]);
        if (cur_low_step > low_step)
            low_step = cur_low_step;
    }
}
首先时定义了初始化了目前现在的cur_up_step与cur_low_step游标的值,然后体现梯度指引最关键的一行代码就是:
if (sign[index] == 1)
{
    cur_up_step = (255 - (u8)out_buf[loc[index]]);
    if (cur_up_step > up_step)
        up_step = cur_up_step;
    cur_low_step = (u8)(out_buf[loc[index]]);
    if (cur_low_step > low_step)
        low_step = cur_low_step;
}
sign就是我们获得的梯度信息,因为我们之前在模型的最后一层采用的是sigmoid激活函数,sigmoid函数因为输出范围(0,1),所以二分类的概率常常用这个函数。然后我们的num_classes = MAX_BITMAP_SIZE,最后的分类情况是根据MAX_BITMAP_SIZE来分类的,就可以表示某个BITMAP的重要性
如果原来的测试样例sign[index] == 1,意思就是这个位置根据模型判定变异这个位置的重要性特别大,就对这个位置的输入字符就行变异,变异的具体操作就是
cur_up_step = (255 - (u8)out_buf[loc[index]]);
之后还有一个变异也是根据模型判定进行类似于AFL的arithmetic变化,在AFL中arithmetic就是整数加/减算术运算,在bitflip变异全部进行完成后,便进入下一个阶段:arithmetic
for (int step = 0; step < up_step; step = step + 1)
{
    int mut_val;
    for (int index = low_index; index < up_index; index = index + 1)
    {
        mut_val = ((u8)out_buf1[loc[index]] + sign[index]);
        if (mut_val < 0)
          out_buf1[loc[index]] = 0;
        else if (mut_val > 255)
          out_buf1[loc[index]] = 255;
        else
          out_buf1[loc[index]] = mut_val;
    }
然后就是将产生的新种子写入待测样例中,通知fork_server产生一个子进程去以该seed为输入执行被测程序,具体而言是使用run_target函数,然后将能够产生新Crash和提高边缘覆盖率的测试样例保存下来
接下来是去实现了AFL变异操作中的interest,这里就是通过随机的插入或删除一些byte产生新的seed,
  /* random insertion/deletion */
  int cut_len = 0;
  int del_loc = 0;
  int rand_loc = 0;
  for (int del_count = 0; del_count < 1024; del_count = del_count + 1)
  {
    del_loc = loc[del_count];
    if ((len - del_loc) <= 2)
      continue;
    cut_len = choose_block_len(len - 1 - del_loc);

    /* random deletion at a critical offset */
    memcpy(out_buf1, out_buf, del_loc);
    memcpy(out_buf1 + del_loc, out_buf + del_loc + cut_len, len - del_loc - cut_len);

    write_to_testcase(out_buf1, len - cut_len);

    int fault = run_target(exec_tmout);
    if (fault != 0)
    {
      if (fault == FAULT_CRASH)
      {
        char *mut_fn = alloc_printf("%s/crash_%d_%06d", "./crashes", round_cnt, mut_cnt);
        int mut_fd = open(mut_fn, O_WRONLY | O_CREAT | O_EXCL, 0600);
        ck_write(mut_fd, out_buf1, len - cut_len, mut_fn);
        free(mut_fn);
        close(mut_fd);
        mut_cnt = mut_cnt + 1;
      }
      else if ((fault = FAULT_TMOUT) && (tmout_cnt < 20))
      {
        tmout_cnt = tmout_cnt + 1;
        fault = run_target(1000);
        if (fault == FAULT_CRASH)
        {
          char *mut_fn = alloc_printf("%s/crash_%d_%06d", "./crashes", round_cnt, mut_cnt);
          int mut_fd = open(mut_fn, O_WRONLY | O_CREAT | O_EXCL, 0600);
          ck_write(mut_fd, out_buf1, len - cut_len, mut_fn);
          free(mut_fn);
          close(mut_fd);
          mut_cnt = mut_cnt + 1;
        }
      }
    }
1.3.6 write_to_testcase
将修改后的数据写入文件以进行测试。如果设置了out_file,则旧文件取消链接并创建一个新的链接。否则,将倒退out_fd并被截断
static void write_to_testcase(void *mem, u32 len)
{
  int fd = out_fd;
  unlink(out_file); /* Ignore errors. */
  fd = open(out_file, O_WRONLY | O_CREAT | O_EXCL, 0600);
  if (fd < 0)
    perror("Unable to create file");
  ck_write(fd, mem, len, out_file);
  close(fd);
}


发表评论
您还未登录,请先登录。
登录