翻译:houjingyi233
预估稿费:200RMB
投稿方式:发送邮件至linwei#360.cn,或登陆网页版在线投稿
传送门
这篇文章详细介绍了解决OWASP的Bernhard Mueller发布的Android crackme中的UnCrackable-Level3.apk的几种方法。我们的主要目标是从一个被保护的APK中提取隐藏的字符串。
UnCrackable Level3中的安全机制
APK中实施了反破解技术,主要是为了延长逆向分析人员所需的时间。冷静一下,因为现在我们必须处理所有的保护措施。
我们在该APP中检测到以下保护措施。
Java层反调试
Java层完整性检查
Java层root检查
Native层反DBI(动态二进制插桩)
Native层反调试
Native层对Dalvik字节码的完整性检查
Native层混淆(只删除了一些符号信息并使用了一个函数来保护秘密信息)
在该APP中没有检测到以下保护措施。
Java层反DBI
Java层混淆
Native层root检查
Native层对Native代码自身的完整性检查
开始之前
首先在分析APK之前,先明确以下几点。
Android手机需要root。
在Java和Native层有反DBI,反调试,防篡改和root检查。我们不需要绕过它们,只需要提取我们需要的秘密信息。
Native层是执行重要代码的位置。不要在Dalvik字节码上纠缠。
我的解决方案只是解决这个问题的一种方式。也许很快就会出现更好更聪明的解法。
可能的解决方案
这个问题可以用很多方法解决。首先,我们需要知道应用程序到底在做什么。应用程序是通过比较用户输入和Java层与Native层的secret异或的结果来实现验证的。通过JNI将Java层的secret发送到native库后,验证在native层完成。事实上,验证是对用户输入的一个简单的strncmp的和对两个secret的xor操作。验证的伪代码如下(函数名由我给出)。
strncmp_with_xor(user_input_native, native_secret, java_secret) == 24;因此,我们需要提取这两个secret来确定显示成功消息的正确的用户输入。通过反编译APK,可以很简单地恢复Java层的secret。然而,native层的函数通过混淆隐藏了secret使其不容易恢复,只通过静态的方法可能相当乏味耗时。hook或符号执行可能是一个聪明的想法。为了提取这些信息,我的解决方案是通过Frida。这个工具是一个注入JavaScript探索Windows,MacOS,Linux,iOS,Android和QNX上的应用程序的框架,并且这个工具还在不断改进中。Frida用于执行动态分析,hex-rays用于反编译native层代码,BytecodeViewer(Procyon)用于反编译Java层代码。使用hex-rays是因为它的ARM代码反编译出来的结果很可靠。Radare2加上开源的反编译器也可以做得很好。
提取隐藏的secret
这篇文章的结构分为四个部分。
逆向Dalvik字节码。
逆向native层的代码。
使用Frida插桩Dalvik字节码。
使用Frida插桩native层的代码。
1.逆向Dalvik字节码(classes.dex)
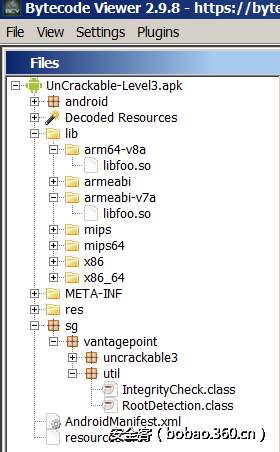
首先需要解压APK得到几个文件,以便稍后进行逆向。为了做到这一点,你可以使用apktool或7zip。一旦APK被打包,下面这两个文件在这篇文章中是非常重要的。
./classes.dex包含Dalvik字节码。
./lib/arm64-v8a/libfoo.so是一个包含ARM64汇编代码的native库。在这篇文章中讨论native代码时,我们会参考这一点(如果需要,请随意使用x86/ARM32代码)。当我在Nexus5X中运行应用程序时,对应的需要逆向的是为ARM64架构编译的库。
下面显示的MainActivity的代码片段是通过反编译UnCrackable app Level3的main class获得的。有一些有趣的问题需要讨论。
(String xorkey = "pizzapizzapizzapizzapizz")中的硬编码的key。
加载native库libfoo.so和两种native方法的声明:将通过JNI调用的init()和baz()。请注意,一个方法是用xorkey初始化的。
追踪变量和类,以防在运行时检测到任何篡改。
public class MainActivity extends AppCompatActivity {
    private static final String TAG = "UnCrackable3";
    private CodeCheck check;
    Map crc;
    static int tampered = 0;
    private static final String xorkey = "pizzapizzapizzapizzapizz";

    static {
        MainActivity.tampered = 0;
        System.loadLibrary("foo");
    }

    public MainActivity() {
        super();
    }

    private native long baz();

    private native void init(byte[] xorkey) {
    }
    //<REDACTED>
 }
当应用程序启动时,main activity的onCreate()方法被执行,该方法在Java层执行以下操作。
通过计算CRC校验和来验证native库的完整性。请注意,native库的签名没有用到任何加密方法。
初始化native库,并通过JNI调用将Java secret("pizzapizzapizzapizzapizz")发送到native代码。
执行root,调试和篡改检测。如果检测到任何一个,则应用程序中止。
反编译代码如下。
protected void onCreate(Bundle savedInstanceState) {
    this.verifyLibs();
    this.init("pizzapizzapizzapizzapizz".getBytes());
    new AsyncTask() {
        protected Object doInBackground(Object[] arg2) {
            return this.doInBackground(((Void[])arg2));
        }

        protected String doInBackground(Void[] params) {
            while(!Debug.isDebuggerConnected()) {
                SystemClock.sleep(100);
            }

            return null;
        }

        protected void onPostExecute(Object arg1) {
            this.onPostExecute(((String)arg1));
        }

        protected void onPostExecute(String msg) {
            MainActivity.this.showDialog("Debugger detected!");
            System.exit(0);
        }
    }.execute(new Void[]{null, null, null});
    if((RootDetection.checkRoot1()) || (RootDetection.checkRoot2()) || (RootDetection.checkRoot3())
             || (IntegrityCheck.isDebuggable(this.getApplicationContext())) || MainActivity.tampered
             != 0) {
        this.showDialog("Rooting or tampering detected.");
    }

    this.check = new CodeCheck();
    super.onCreate(savedInstanceState);
    this.setContentView(0x7F04001B);
}
一旦观察到应用程序的主要流程,我们现在来描述找到的安全机制。
完整性检查:如上所述,verifyLibs在保护native库和Dalvik字节码的功能中使用了完整性检查。请注意,由于使用了较弱的CRC校验和,重新打包Dalvik字节码和native代码可能仍然可行。通过patch Dalvik字节码中的verifyLibs函数和native库中的baz函数,攻击者可以绕过所有的完整性检查,然后继续篡改app。负责验证库的函数反编译如下。
private void verifyLibs() {
    (this.crc = new HashMap<String, Long>()).put("armeabi", Long.parseLong(this.getResources().getString(2131099684)));
    this.crc.put("mips", Long.parseLong(this.getResources().getString(2131099689)));
    this.crc.put("armeabi-v7a", Long.parseLong(this.getResources().getString(2131099685)));
    this.crc.put("arm64-v8a", Long.parseLong(this.getResources().getString(2131099683)));
    this.crc.put("mips64", Long.parseLong(this.getResources().getString(2131099690)));
    this.crc.put("x86", Long.parseLong(this.getResources().getString(2131099691)));
    this.crc.put("x86_64", Long.parseLong(this.getResources().getString(2131099692)));
    ZipFile zipFile = null;
    Label_0419: {
        try {
            zipFile = new ZipFile(this.getPackageCodePath());
            for (final Map.Entry<String, Long> entry : this.crc.entrySet()) {
                final String string = "lib/" + entry.getKey() + "/libfoo.so";
                final ZipEntry entry2 = zipFile.getEntry(string);
                Log.v("UnCrackable3", "CRC[" + string + "] = " + entry2.getCrc());
                if (entry2.getCrc() != entry.getValue()) {
                    MainActivity.tampered = 31337;
                    Log.v("UnCrackable3", string + ": Invalid checksum = " + entry2.getCrc() + ", supposed to be " + entry.getValue());
                }
            }
            break Label_0419;
        }
        catch (IOException ex) {
            Log.v("UnCrackable3", "Exception");
            System.exit(0);
        }
        return;
    }
    final ZipEntry entry3 = zipFile.getEntry("classes.dex");
    Log.v("UnCrackable3", "CRC[" + "classes.dex" + "] = " + entry3.getCrc());
    if (entry3.getCrc() != this.baz()) {
        MainActivity.tampered = 31337;
        Log.v("UnCrackable3", "classes.dex" + ": crc = " + entry3.getCrc() + ", supposed to be " + this.baz());
    }
}
在这些完整性检查之上,我们还观察到,类IntegrityCheck还验证了应用程序没有被篡改,因此不包含可调试标志。这个类被反编译如下。
package sg.vantagepoint.util;

import android.content.*;

public class IntegrityCheck
{
    public static boolean isDebuggable(final Context context) {
        return (0x2 & context.getApplicationContext().getApplicationInfo().flags) != 0x0;
    }
}
阅读ADB日志,我们还可以跟踪运行APP时执行的计算。运行时这些检查的一个例子如下。
05-06 16:58:39.353  9623 10651 I ActivityManager: Start proc 15027:sg.vantagepoint.uncrackable3/u0a92 for activity sg.vantagepoint.uncrackable3/.MainActivity
05-06 16:58:40.096 15027 15027 V UnCrackable3: CRC[lib/armeabi/libfoo.so] = 1285790320
05-06 16:58:40.096 15027 15027 V UnCrackable3: CRC[lib/mips/libfoo.so] = 839666376
05-06 16:58:40.096 15027 15027 V UnCrackable3: CRC[lib/armeabi-v7a/libfoo.so] = 2238279083
05-06 16:58:40.096 15027 15027 V UnCrackable3: CRC[lib/arm64-v8a/libfoo.so] = 2185392167
05-06 16:58:40.096 15027 15027 V UnCrackable3: CRC[lib/mips64/libfoo.so] = 2232215089
05-06 16:58:40.096 15027 15027 V UnCrackable3: CRC[lib/x86_64/libfoo.so] = 1653680883
05-06 16:58:40.097 15027 15027 V UnCrackable3: CRC[lib/x86/libfoo.so] = 1546037721
05-06 16:58:40.097 15027 15027 V UnCrackable3: CRC[classes.dex] = 2378563664
因为我们不想patch二进制代码,所以我们不会深入这些检查。
Root检查:Java包sg.vantagepoint.util有一个称为RootDetection的类,最多可执行三次检查,以检测运行该应用程序的设备是否已经root。
checkRoot1()检查文件系统中是否存在二进制文件su。
checkRoot2()检查BUILD标签test-keys。默认情况下,来自Google的ROM是使用release-keys标签构建的。如果test-keys存在,这可能意味着在设备上构建的Android是测试版或非Google官方发布的。
checkRoot3()检查危险的root应用程序、配置文件和守护程序的存在。
负责执行root检查的Java代码如下。
package sg.vantagepoint.util;

import android.os.Build;
import java.io.File;

public class RootDetection {
    public RootDetection() {
        super();
    }

    public static boolean checkRoot1() {
        boolean bool = false;
        String[] array_string = System.getenv("PATH").split(":");
        int i = array_string.length;
        int i1 = 0;
        while(i1 < i) {
            if(new File(array_string[i1], "su").exists()) {
                bool = true;
            }
            else {
                ++i1;
                continue;
            }

            return bool;
        }

        return bool;
    }

    public static boolean checkRoot2() {
        String string0 = Build.TAGS;
        boolean bool = string0 == null || !string0.contains("test-keys") ? false : true;
        return bool;
    }

    public static boolean checkRoot3() {
        boolean bool = true;
        String[] array_string = new String[]{"/system/app/Superuser.apk", "/system/xbin/daemonsu", "/system/etc/init.d/99SuperSUDaemon",
                "/system/bin/.ext/.su", "/system/etc/.has_su_daemon", "/system/etc/.installed_su_daemon",
                "/dev/com.koushikdutta.superuser.daemon/"};
        int i = array_string.length;
        int i1 = 0;
        while(true) {
            if(i1 >= i) {
                return false;
            }
            else if(!new File(array_string[i1]).exists()) {
                ++i1;
                continue;
            }

            return bool;
        }

        return false;
    }
}
2.逆向native代码(libfoo.so)
Java(Dalvik)和native代码通过JNI调用进行通信。当Java代码启动时将加载native代码,并使用包含Java密钥的一堆字节对其进行初始化。除了保护secret的函数之外,native代码不会被混淆。此外,它删除一些符号并且不是静态编译的。重要的是IDA Pro可能不会将JNI回调检测为函数。为了解决这个问题,只需转到exports窗口在导出的Java_sg_vantagepoint_uncrackable3_MainActivity_*按下P键。之后,您还需要在其函数声明处按Y键重新定义函数参数。您可以定义JNIEnv*对象以获得更好的反编译结果,如本节中所示的类C代码。
native构造函数:ELF二进制文件包含一个称为.init_array的部分,它保存了当程序启动时将执行的函数的指针。如果我们观察在其构造函数中的ARM共享对象,那么我们可以在偏移0x19cb0处看到函数指针sub_73D0:(在IDA Pro中使用快捷键ctrl+s显示sections)。
.init_array:0000000000019CB0                   ; ==================================================
.init_array:0000000000019CB0
.init_array:0000000000019CB0                   ; Segment type: Pure data
.init_array:0000000000019CB0                                   AREA .init_array, DATA,
.init_array:0000000000019CB0                                   ; ORG 0x19CB0
.init_array:0000000000019CB0 D0 73 00 00 00 00+                DCQ sub_73D0
.init_array:0000000000019CB8 00 00 00 00 00 00+                ALIGN 0x20
.init_array:0000000000019CB8 00 00                   ; .init_array   ends
.init_array:0000000000019CB8
.fini_array:0000000000019CC0                   ; ==================================================
Radare2最近也支持JNI init方法的识别。感谢@pancake和@alvaro_fe,他们在radare2快速实现了支持JNI入口点。如果您正在使用radare2,只需使用命令ie即可显示入口点。
构造函数sub_73D0()执行以下操作。
①pthread_create()函数创建一个新线程执行monitor_frida_xposed函数。此函数已被重命名为这个名称,因为Frida和Xposed这两个框架不间断地被检查,以避免hook操作。
②在从Java secret初始化之前,xorkey_native的内存被清除。
③codecheck变量是确定完整性的计数器。之后,在计算native secret之前会检查它。因此,我们需要这个函数结束之后获得正确的codecheck值以进入最终的验证。
sub_73D0()(重命名为init)的反编译代码如下。
int init()
{
  int result; // r0@1
  pthread_t newthread; // [sp+10h] [bp-10h]@1

  result = pthread_create(&newthread, 0, (void *(*)(void *))monitor_frida_xposed, 0);
  byte_9034 = 0;
  dword_9030 = 0;
  dword_902C = 0;
  dword_9028 = 0;
  dword_9024 = 0;
  dword_9020 = 0;
  xorkey_native = 0;
  ++codecheck;
  return result;
}
native反hook检查:monitor_frida_xposed函数执行几个安全检查,以避免人们使用DBI框架。如果我们仔细观察以下反编译代码,那么可以看到几个DBI框架被列入黑名单。这种检查在无限循环中进行一遍又一遍,如果检测到任何DBI框架,则调用goodbye函数并且应用程序崩溃。该函数的反编译代码如下。
void __fastcall __noreturn monitor_frida_xposed(int a1)
{
  FILE *stream; // [sp+2Ch] [bp-214h]@1
  char s; // [sp+30h] [bp-210h]@2

  while ( 1 )
  {
    stream = fopen("/proc/self/maps", "r");
    if ( !stream )
      break;
    while ( fgets(&s, 512, stream) )
    {
      if ( strstr(&s, "frida") || strstr(&s, "xposed") )
      {
        _android_log_print(2, "UnCrackable3", "Tampering detected! Terminating...");
        goodbye();
      }
    }
    fclose(stream);
    usleep(500u);
  }
  _android_log_print(2, "UnCrackable3", "Error opening /proc/self/maps! Terminating...");
  goodbye();
}
下面显示了篡改检测的示例,其中应用程序使用信号SIGABRT(6)中止。
ActivityManager: Start proc 7098:sg.vantagepoint.uncrackable3/u0a92 for activity sg.vantagepoint.uncrackable3/.MainActivity
UnCrackable3: Tampering detected! Terminating...
libc    : Fatal signal 6 (SIGABRT), code -6 in tid 7112 (nt.uncrackable3)
        : debuggerd: handling request: pid=7098 uid=10092 gid=10092 tid=7112
DEBUG   : *** *** *** *** *** *** *** *** *** *** *** *** *** *** *** ***
DEBUG   : Build fingerprint: 'google/bullhead/bullhead:7.1.1/N4F26O/3582057:user/release-keys'
DEBUG   : Revision: 'rev_1.0'
DEBUG   : ABI: 'arm64'
DEBUG   : pid: 7098, tid: 7112, name: nt.uncrackable3  >>> sg.vantagepoint.uncrackable3 <<<
DEBUG   : signal 6 (SIGABRT), code -6 (SI_TKILL), fault addr --------
DEBUG   :  x0   0000000000000000  x1   0000000000001bc8  x2   0000000000000006  x3   0000000000000003
DEBUG   :  x4   0000000000000000  x5   0000000000000000  x6   00000074378cc000  x7   0000000000000000
DEBUG   :  x8   0000000000000083  x9   0000000000000031  x10  00000074323d5c20  x11  0000000000000023
DEBUG   :  x12  0000000000000018  x13  0000000000000000  x14  0000000000000000  x15  003687eda0f93200
DEBUG   :  x16  0000007436453ee0  x17  00000074363fdb24  x18  000000006ff29a18  x19  00000074323d64f8
DEBUG   :  x20  0000000000000006  x21  00000074323d6450  x22  0000000000000000  x23  e9e946d86ea1f14f
DEBUG   :  x24  00000074323d64d0  x25  00000000000fd000  x26  e9e946d86ea1f14f  x27  00000074323de2f8
DEBUG   :  x28  0000000000000000  x29  00000074323d6140  x30  00000074363faf50
DEBUG   :  sp   00000074323d6120  pc   00000074363fdb2c  pstate 0000000060000000
DEBUG   :
DEBUG   : backtrace:
DEBUG   :     #00 pc 000000000004fb2c  /system/lib64/libc.so (offset 0x1c000)
DEBUG   :     #01 pc 000000000004cf4c  /system/lib64/libc.so (offset 0x1c000)
在DBI部分我们将通过以不同的方式插桩,了解如何绕过这些检查。使用Frida绕过反frida检查那将是最好不过了。
native反调试检查:Java_sg_vantagepoint_uncrackable3_MainActivity_init先执行anti_debug函数,如果反调试检查正确完成那么复制xorkey到全局变量中并将全局计数器codecheck递增以用来稍后检测。该变量的值在验证时需要等于2,因为这将意味着反DBI和反调试检查正确完成。这个JNI调用被反编译如下。
int *__fastcall Java_sg_vantagepoint_uncrackable3_MainActivity_init(JNIEnv *env, jobject this, char *xorkey)
{
  const char *xorkey_jni; // ST18_4@1
  int *result; // r0@1

  anti_debug();
  xorkey_jni = (const char *)_JNIEnv::GetByteArrayElements(env, xorkey, 0);
  strncpy((char *)&xorkey_native, xorkey_jni, 24u);
  _JNIEnv::ReleaseByteArrayElements(env, xorkey, xorkey_jni, 2);
  result = &codecheck;
  ++codecheck;
  return result;
}
研究anti_debug函数得到如下所示的代码(函数名称和变量由我重新命名)。
int anti_debug()
{
  __pid_t pid; // [sp+28h] [bp-18h]@2
  pthread_t newthread; // [sp+2Ch] [bp-14h]@8
  int stat_loc; // [sp+30h] [bp-10h]@3

  ::pid = fork();
  if ( ::pid )
  {
    pthread_create(&newthread, 0, (void *(*)(void *))monitor_pid, 0);
  }
  else
  {
    pid = getppid();
    if ( !ptrace(PTRACE_ATTACH, pid, 0, 0) )
    {
      waitpid(pid, &stat_loc, 0);
      ptrace(PTRACE_CONT, pid, 0, 0);
      while ( waitpid(pid, &stat_loc, 0) )
      {
        if ( (stat_loc & 127) != 127 )
          exit(0);
        ptrace(PTRACE_CONT, pid);
      }
    }
  }
  return _stack_chk_guard;
}这个crackme的作者写了一篇很棒的文章,解释了如何执行自调试技术。这利用了一个事实,即只有一个调试器可以随时附加到进程。想深入研究的话请仔细看看他的博客,因为我不会在这里重新解释。实际上,如果我们运行附带调试器的应用程序,那么我们可以看到启动了两个线程并且应用程序崩溃。
bullhead:/ # ps|grep uncrack
u0_a92    7593  563   1633840 76644 SyS_epoll_ 7f99a8fb6c S sg.vantagepoint.uncrackable3
u0_a92    7614  7593  1585956 37604 ptrace_sto 7f99b37e3c t sg.vantagepoint.uncrackable3
3.用Frida hook java层代码
现在,我们需要隐藏我们的手机是root过的这一事实。用Frida绕过这些检查的通常方法将是为这些功能编写hook。hook MainActivity的onCreate()的方法上时,出现了一个问题。Frida基本上无法在正确的时候截获方法onCreate()。更多信息可以在frida-Java issue #29找到。我们可以想到其它的方法来绕过这些检查。如果我们接管系统调用的exit()呢?这样做可以让我们不花时间绕过Java安全机制,并且在hook exit方法之后,我们可以继续与应用程序进行交互,就好像没有启动任何检查一样。以下hook是有效的。
Java.perform(function () {
    send("Placing Java hooks...");

    var sys = Java.use("java.lang.System");
    sys.exit.overload("int").implementation = function(var_0) {
        send("java.lang.System.exit(I)V  // We avoid exiting the application  :)");
    };

    send("Done Java hooks installed.");
});
一旦我们放置这个hook并启动应用程序,我们就可以输入了。然而,native层检查也需要被绕过。
4.使用Frida hook native层代码
如逆向native代码部分所示,有几个libc函数(例如strstr)执行一些关于Frida和Xposed检查。此外,该应用程序还创建线程来循环检查调试器或附加到应用程序的DBI框架。在这个阶段,我们可以考虑如何绕过这些检查。我想到了hook strstr和hook pthread_create。我们将尝试这两种方法,并将向您展示无论选择哪种方法都能达到相同的效果。请注意,在这两种情况下,应用程序都需要重启,因为Frida将代理注入到程序的地址空间中,然后才会取消附加。因此,反调试检查不是一个大问题。
解决方案1:hook strstr并禁用反frida检查
我们想干扰这一行反编译代码的行为。
if ( strstr(&s, "frida") || strstr(&s, "xposed") )
{
    _android_log_print(2, "UnCrackable3", "Tampering detected! Terminating...");
    goodbye();
}
为了hook这个libc函数,我们可以编写一个native hook来检查传递给该函数的字符串是否是Frida或者Xposed然后返回null指针,就像这个字符串没有被发现一样。在Frida中,我们可以使用如下所示的Interceptor附加native hook:(如果要观察整个行为,请取消最后的注释)。
// char *strstr(const char *haystack, const char *needle);
Interceptor.attach(Module.findExportByName("libc.so", "strstr"), {

    onEnter: function (args) {

        this.haystack = args[0];
        this.needle   = args[1];
        this.frida    = Boolean(0);

        haystack = Memory.readUtf8String(this.haystack);
        needle   = Memory.readUtf8String(this.needle);

        if ( haystack.indexOf("frida") != -1 || haystack.indexOf("xposed") != -1 ) {
            this.frida = Boolean(1);
        }
    },

    onLeave: function (retval) {

        if (this.frida) {
            //send("strstr(frida) was patched!! :) " + haystack);
            retval.replace(0);
        }

        return retval;
    }
});
下面是hook strstr之后的输出。
[20:15 edu@ubuntu hooks] > python run_usb_spawn.py
pid: 7846
[*] Intercepting ...
[!] Received: [Placing native hooks....]
[!] Received: [arch: arm64]
[!] Received: [Done with native hooks....]
[!] Received: [strstr(frida) was patched!! 77e5d48000-77e6cfb000 r-xp 00000000 fd:00 752205    /data/local/tmp/re.frida.server/frida-agent-64.so]
[!] Received: [strstr(frida) was patched!! 77e5d48000-77e6cfb000 r-xp 00000000 fd:00 752205    /data/local/tmp/re.frida.server/frida-agent-64.so]
[!] Received: [strstr(frida) was patched!! 77e6cfc000-77e6d8e000 r--p 00fb3000 fd:00 752205    /data/local/tmp/re.frida.server/frida-agent-64.so]
[!] Received: [strstr(frida) was patched!! 77e6cfc000-77e6d8e000 r--p 00fb3000 fd:00 752205    /data/local/tmp/re.frida.server/frida-agent-64.so]
[!] Received: [strstr(frida) was patched!! 77e6d8e000-77e6def000 rw-p 01045000 fd:00 752205    /data/local/tmp/re.frida.server/frida-agent-64.so]
[!] Received: [strstr(frida) was patched!! 77e6d8e000-77e6def000 rw-p 01045000 fd:00 752205    /data/local/tmp/re.frida.server/frida-agent-64.so]
[!] Received: [strstr(frida) was patched!! 77ff497000-77ff567000 r-xp 00000000 fd:00 752212    /data/local/tmp/re.frida.server/frida-loader-64.so]
[!] Received: [strstr(frida) was patched!! 77ff497000-77ff567000 r-xp 00000000 fd:00 752212    /data/local/tmp/re.frida.server/frida-loader-64.so]
[!] Received: [strstr(frida) was patched!! 77ff568000-77ff596000 r--p 000d0000 fd:00 752212    /data/local/tmp/re.frida.server/frida-loader-64.so]
[!] Received: [strstr(frida) was patched!! 77ff568000-77ff596000 r--p 000d0000 fd:00 752212    /data/local/tmp/re.frida.server/frida-loader-64.so]
[!] Received: [strstr(frida) was patched!! 77ff596000-77ff5f0000 rw-p 000fe000 fd:00 752212    /data/local/tmp/re.frida.server/frida-loader-64.so]
[!] Received: [strstr(frida) was patched!! 77ff596000-77ff5f0000 rw-p 000fe000 fd:00 752212    /data/local/tmp/re.frida.server/frida-loader-64.so]
[!] Received: [strstr(frida) was patched!! 77e5d48000-77e6cfb000 r-xp 00000000 fd:00 752205    /data/local/tmp/re.frida.server/frida-agent-64.so]
应用程序现在检测不到我们,我们可以在DBI阶段更进一步了。你想到下一次hook哪个函数了吗?之后,我们将hook通过strncmp和xor执行验证的函数。
解决方案2:替换native函数pthread_create并禁用安全线程
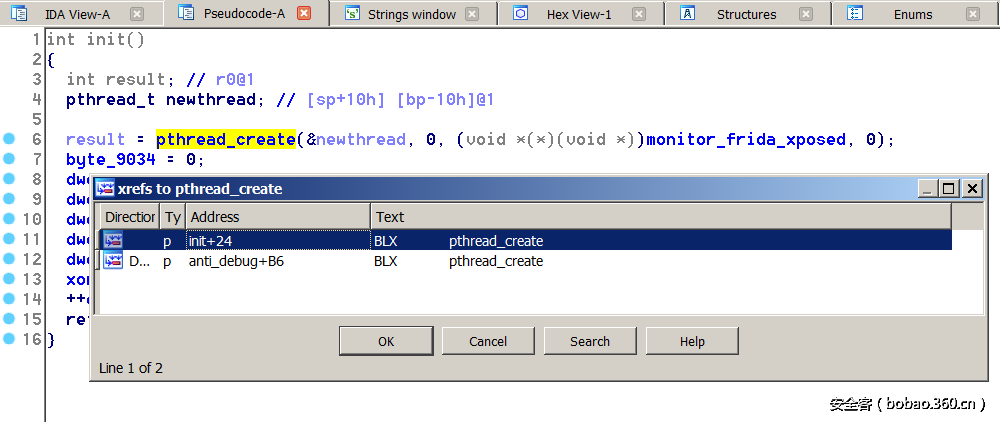
如果我们看看pthread_create的交叉引用,那么我们意识到所有的引用都是我们想要影响的回调。请参见下图。
请注意,这两个线程有一些共同点。看着它们,我们观察到第一个和第三个参数都是0,如下所示。
pthread_create(&newthread, 0, (void *(*)(void *))monitor_pid, 0);
pthread_create(&newthread, 0, (void *(*)(void *))monitor_frida_xposed, 0);
为了避免调用这些线程,策略如下。
①从libc函数获取native指针pthread_create。
②使用此指针创建native函数。
③定义native回调并重载此方法。
④使用Interceptor与replace模式注入。
⑤如果我们检测到pthread_create想要检测我们,那么我们将假冒回调并且将始终返回0,模拟Frida不在进程的地址空间中。
以下代码代替native功能pthread_create。
// int pthread_create(pthread_t *thread, const pthread_attr_t *attr, void *(*start_routine) (void *), void *arg);
var p_pthread_create = Module.findExportByName("libc.so", "pthread_create");
var pthread_create = new NativeFunction( p_pthread_create, "int", ["pointer", "pointer", "pointer", "pointer"]);
send("NativeFunction pthread_create() replaced @ " + pthread_create);

Interceptor.replace( p_pthread_create, new NativeCallback(function (ptr0, ptr1, ptr2, ptr3) {
    send("pthread_create() overloaded");
    var ret = ptr(0);
    if (ptr1.isNull() && ptr3.isNull()) {
        send("loading fake pthread_create because ptr1 and ptr3 are equal to 0!");
    } else {
        send("loading real pthread_create()");
        ret = pthread_create(ptr0,ptr1,ptr2,ptr3);
    }

    do_native_hooks_libfoo();

    send("ret: " + ret);

}, "int", ["pointer", "pointer", "pointer", "pointer"]));
让我们运行这个脚本看看会发生什么事情。请注意,两个native调用pthread_create被hook,因此我们绕过了安全检查(init和anti_debug函数)。还要注意,我们希望在第一个和第三个参数被设置为0时避免pthread_create被调用并在应用程序中留下其它正常的线程。
[20:07 edu@ubuntu hooks] > python run_usb_spawn.py
pid: 11075
[*] Intercepting ...
[!] Received: [Placing native hooks....]
[!] Received: [arch: arm64]
[!] Received: [NativeFunction pthread_create() replaced @ 0x7ef5b63170]
[!] Received: [Done with native hooks....]
[!] Received: [pthread_create() overloaded]
[!] Received: [loading real pthread_create()]
[!] Received: [p_foo is null (libfoo.so). Returning now...]
[!] Received: [ret: 0]
[!] Received: [pthread_create() overloaded]
[!] Received: [loading fake pthread_create because ptr1 and ptr3 are equal to 0!]
[!] Received: [ret: 0x0]
[!] Received: [pthread_create() overloaded]
[!] Received: [loading fake pthread_create because ptr1 and ptr3 are equal to 0!]
[!] Received: [ret: 0x0]
[!] Received: [pthread_create() overloaded]
[!] Received: [loading real pthread_create()]
[!] Received: [ret: 0]
[!] Received: [pthread_create() overloaded]
[!] Received: [loading real pthread_create()]
[!] Received: [ret: 0]
或者,如果你想要更多地使用Frida的话,那么你可能会首先想要调用pthread_create观察行为。为此,您可以使用下面的hook。
// int pthread_create(pthread_t *thread, const pthread_attr_t *attr, void *(*start_routine) (void *), void *arg);
var p_pthread_create = Module.findExportByName("libc.so","pthread_create");
Interceptor.attach(ptr(p_pthread_create), {
    onEnter: function (args) {
        this.thread        = args[0];
        this.attr          = args[1];
        this.start_routine = args[2];
        this.arg           = args[3];
        this.fakeRet       = Boolean(0);
        send("onEnter() pthread_create(" + this.thread.toString() + ", " + this.attr.toString() + ", "
            + this.start_routine.toString() + ", " + this.arg.toString() + ");");

        if (parseInt(this.attr) == 0 && parseInt(this.arg) == 0)
            this.fakeRet = Boolean(1);

    },
    onLeave: function (retval) {
        send(retval);
        send("onLeave() pthread_create");
        if (this.fakeRet == 1) {
            var fakeRet = ptr(0);
            send("pthread_create real ret: " + retval);
            send("pthread_create fake ret: " + fakeRet);
            return fakeRet;
        }
        return retval;
    }
});
Hook secret:一旦抵达这里,我们几乎准备好进行最后一步了。下一个native hook将包含拦截与用户输入进行比较的参数。在下面的C代码中,我们已经把一个函数重命名为protect_secret。这个函数在一堆经过混淆的操作之后生成secret。一旦生成了这个secret,它就在strncmp_with_xor函数中与用户输入进行比较。如果我们hook这个函数的参数呢?
验证的代码被反编译如下:(名称由我重命名)。
bool __fastcall Java_sg_vantagepoint_uncrackable3_CodeCheck_bar(JNIEnv *env, jobject this, jbyte *user_input)
{
  bool result; // r0@6
  int user_input_native; // [sp+1Ch] [bp-3Ch]@2
  bool ret; // [sp+2Fh] [bp-29h]@4
  int secret; // [sp+30h] [bp-28h]@1
  int v9; // [sp+34h] [bp-24h]@1
  int v10; // [sp+38h] [bp-20h]@1
  int v11; // [sp+3Ch] [bp-1Ch]@1
  int v12; // [sp+40h] [bp-18h]@1
  int v13; // [sp+44h] [bp-14h]@1
  char v14; // [sp+48h] [bp-10h]@1
  int cookie; // [sp+4Ch] [bp-Ch]@6

  v14 = 0;
  v13 = 0;
  v12 = 0;
  v11 = 0;
  v10 = 0;
  v9 = 0;
  secret = 0;
  ret = codecheck == 2
     && (protect_secret(&secret),
         user_input_native = _JNIEnv::GetByteArrayElements(env, user_input, 0),
         _JNIEnv::GetArrayLength(env, user_input) == 24)
     && strncmp_with_xor(user_input_native, (int)&secret, (int)&xorkey_native) == 24;
  result = ret;
  if ( _stack_chk_guard == cookie )
    result = ret;
  return result;
}
为了准备hook strncmp_with_xor,我们需要在反汇编代码中获得某些偏移量,还要获得libc的基址,并在运行时重新计算最终的指针。可以通过调用Interceptor来附加到native指针。请注意,使用native指针p_protect_secret的hook不需要恢复secret。因此,您可以在脚本中跳过它。
var offset_anti_debug_x64   = 0x000075f0;
var offset_protect_secret64 = 0x0000779c;
var offset_strncmp_xor64    = 0x000077ec;

function do_native_hooks_libfoo(){

    var p_foo = Module.findBaseAddress("libfoo.so");
    if (!p_foo) {
        send("p_foo is null (libfoo.so). Returning now...");
        return 0;
    }
    var p_protect_secret = p_foo.add(offset_protect_secret64);
    var p_strncmp_xor64  = p_foo.add(offset_strncmp_xor64);
    send("libfoo.so          @ " + p_foo.toString());
    send("ptr_protect_secret @ " + p_protect_secret.toString());
    send("ptr_strncmp_xor64  @ " + p_strncmp_xor64.toString());


    Interceptor.attach( p_protect_secret, {
        onEnter: function (args) {
            send("onEnter() p_protect_secret");
            send("args[0]: " + args[0]);
        },

        onLeave: function (retval) {
            send("onLeave() p_protect_secret");
         }
    });

    Interceptor.attach( p_strncmp_xor64, {
        onEnter: function (args) {
            send("onEnter() p_strncmp_xor64");
            send("args[0]: " + args[0]);
            send(hexdump(args[0], {
                offset: 0,
                length: 24,
                header: false,
                ansi: true
            }));

            send("args[1]: " + args[1]);
            var secret = hexdump(args[1], {
                offset: 0,
                length: 24,
                header: false,
                ansi: true
            })
            send(secret);
传送门


发表评论
您还未登录,请先登录。
登录