翻译:shan66
预估稿费:130RMB
投稿方式:发送邮件至linwei#360.cn,或登陆网页版在线投稿
概述
在本系列的前一篇文章中,我们讨论了如何将Cydia底层扩展写入Android应用程序。 在本文中,我们将为大家介绍如何使用AndBug分析Android应用程序。 根据其文档,“AndBug是Android Dalvik虚拟机的逆向工程调试器,它采用Java调试线协议(JDWP)与Android应用程序进行交互,并且无需源代码。”AndBug具有丰富的功能,可以考察应用程序运行过程中加载特定类/方法时到底发生了什么事情。这个工具最大的优点就是用起来超级简单。
搭建环境
AndBug可以从以下链接下载:
https://github.com/swdunlop/AndBug
下载后,可以使用以下命令完成AndBug的解压和安装。需要注意的是,在执行该操作之前,请确保已安装了Python。
$ unzip AndBug-master.zip
$
$cd AndBug-master
$
$ ls
CONTRIBUTORS    Makefile    andbug        info        pylint.rc    tests
LICENSE        README.rst    build        lib        setup.py
$
$ sudo python setup.py install
$
完成安装后,您可以按照下面的提示运行AndBug,以判断安装是否成功。
$ ./andbug
## AndBug (C) 2011 Scott W. Dunlop <swdunlop@gmail.com>
AndBug is a reverse-engineering debugger for the Android Dalvik virtual machine employing the Java Debug Wire Protocol (JDWP) to interact with Android applications without the need for source code. The majority of AndBug’s commands require the context of a connected Android device and a specific Android process to target, which should be specified using the -d and -p options.
The debugger offers two modes — interactive and noninteractive, and a comprehensive Python API for writing debugging scripts. The interactive mode is
accessed using:
$ andbug shell [-d <device>] -p <process>.
The device specification, if omitted, defaults in an identical fashion to the ADB debugging bridge command, which AndBug uses heavily. The process
specification is either the PID of the process to debug, or the name of the process, as found in “adb shell ps.”
AndBug is NOT intended for a piracy tool or other illegal purposes, but as a tool for researchers and developers to gain insight into the implementation
of Android applications. Use of AndBug is at your own risk, like most open source tools, and no guarantee of fitness or safety is made or implied.
## Options:
— -p, –pid <opt>
the process to be debugged, by pid or name
— -d, –dev <opt>
the device or emulator to be debugged (see adb)
— -s, –src <opt>
adds a directory where .java or .smali files could be found
## Commands:
— class-trace | ct | ctrace <class-path>
reports calls to dalvik methods associated with a class
— classes [<partial class name>]
lists loaded classes. if no partial class name supplied, list all classes.
— dump <class-path> [<method-query>]
dumps methods using original sources or apktool sources
— help [<command>]
information about how to use andbug
— inspect <object-id>
inspect an object
— methods <class-path> [<method-query>]
lists the methods of a class
— shell
starts the andbug shell with the specified process
— source <src-dir>
adds a source directory for finding files
— statics <class-path>
lists the methods of a class
— thread-trace | tt | ttrace <thread-name>
reports calls to specific thread in the process
— threads [<name>] [verbose=<verbose level>]
lists threads in the process. verbosity: 0 (thread), (1 methods), (2 vars), (3 vars data)
— version | v
Send version request.
## Examples:
— andbug classes -p com.ioactive.decoy
— andbug methods -p com.ioactive.decoy com.ioactive.decoy.DecoyActivity onInit
现在,您需要启动一个模拟器,并验证是否可以通过adb访问该模拟器,具体命令如下所示。
$ adb devices
List of devices attached
emulator-5554    device
$
如您所见,仿真器正在运行。 现在,我们需要一个应用来测试和观察相关的调试效果。 我专门为这篇文章开发了一个简单的应用程序。这个目标应用程序可以从本文的下载部分下载。 该应用程序使用一个公开的包装器AESCrypt来加密用户输入的卡号。 请注意,用于生成密钥的密码是硬编码在应用程序中的。
您可以使用以下命令来安装该应用程序。
$ adb install andbug.apk
分析目标应用程序
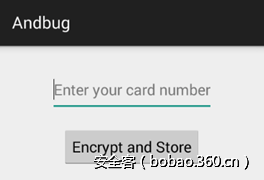
现在我们已经完成了相关的环境搭设工作。接下来,我们开始使用AndBug来分析目标应用程序。应用程序启动后,看起来如下所示。
接下来,让我们使用adb找出这个目标应用程序的进程ID。这里,我们可以先运行ps命令,然后通过grep字符串andbug来完成这项任务。
$ adb shell ps | grep -i ‘andbug’
u0_a69 1090 57 199052 23260 ffffffff b6ec35cc S com.androidpentesting.andbug
$
上面的命令结果显示,在本例中andbug的进程标识是1090。
下面,让我们通过AndBug“钩住”这个进程并获得一个shell与其进行交互, 具体命令如下所示。
$ andbug shell -p 1090
## AndBug (C) 2011 Scott W. Dunlop <swdunlop@gmail.com>
>>
这样的话,我们就可以利用这个shell来做各种有趣的事情了。首先,让我们找出已经加载的类。这项任务可以通过下列命令来完成。
>>  classes andbug
## Loaded Classes
— com.androidpentesting.andbug.MainActivity
— com.androidpentesting.andbug.MainActivity$1
>>
您可能已经注意到了,我们正在使用“ugbug”这个词来寻找类。其中,这里有两个加载的类与这个查询相匹配。除此之外,您也可以使用完整的软件包名称进行搜索。
现在,让我们来识别com.androidpentesting.andbug.MainActivity类中已加载的方法。实际上,这项任务可以通过下列命令来完成。
> > methods com.androidpentesting.andbug.MainActivity
## Methods Lcom/androidpentesting/andbug/MainActivity;
— com.androidpentesting.andbug.MainActivity.<init>()V
— com.androidpentesting.andbug.MainActivity.access$000(Lcom/androidpentesting/andbug/MainActivity;Ljava/lang/String;Ljava/lang/String;)V
— com.androidpentesting.andbug.MainActivity.encryptandSave(Ljava/lang/String;Ljava/lang/String;)V
— com.androidpentesting.andbug.MainActivity.onCreate(Landroid/os/Bundle;)V
>>
正如你在上面所看到的那样,encryptandSave()是这个类中让我们感兴趣的一个方法。
重要的是,我们可以使用method-trace命令“钩住”这些方法,并在应用程序运行时监视它们的行为。如果想分析类中的所有方法的话,只要运行ct命令即可,它是class-trace的缩写。
此外,我们还可以对com.androidpentesting.andbug.MainActivity类运行ct命令,具体如下图所示。
>> ct com.androidpentesting.andbug.MainActivity
## Setting Hooks
— Hooked com.androidpentesting.andbug.MainActivity
>>
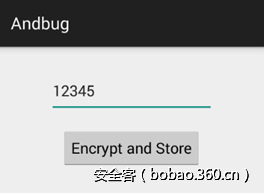
正如你在上面看到的那样,指定的类已被“钩住”了。 现在,让我们回到应用程序并输入一个数字,然后点击“Encrypt and Store”按钮。
单击这个按钮时,应用程序将接收用户输入,并使用AES 256对输入内容进行加密,然后将加密的字符串存储在SharedPreferences中,如下图所示。
$ adb shell
root@generic:/ # cd data/data/com.androidpentesting.andbug
root@generic:/data/data/com.androidpentesting.andbug # ls
cache
lib
shared_prefs
root@generic:/data/data/com.androidpentesting.andbug # cd shared_prefs
root@generic:/data/data/com.androidpentesting.andbug/shared_prefs # ls
bankdetails.xml
ankdetails.xml <
<?xml version=’1.0′ encoding=’utf-8′ standalone=’yes’ ?>
<map>
<string name=”accountnumber”>789W4Kw6WOtAmY6fKasj3g==</string>
</map>
root@generic:/data/data/com.androidpentesting.andbug/shared_prefs #
正如你在上面看到的那样,这个字符串已经被加密和存储了。
但是,让我们再来看看AndBug shell中发生了什么。
>> ct com.androidpentesting.andbug.MainActivity
## Setting Hooks
— Hooked com.androidpentesting.andbug.MainActivity
>> ## trace thread <1> main (running suspended)
— com.androidpentesting.andbug.MainActivity.access$000
(Lcom/androidpentesting/andbug/MainActivity;Ljava/lang/String;Ljava/lang/String;)V:0
— com.androidpentesting.andbug.MainActivity$1.onClick(Landroid/view/View;)V:25
— this=Lcom/androidpentesting/andbug/MainActivity$1; <831945677304>
— accountnumber=12345
— v=Landroid/widget/Button; <831945630640>
— android.view.View.performClick()Z:18
— this=Landroid/widget/Button; <831945630640>
— li=Landroid/view/View$ListenerInfo; <831945677320>
— android.view.View$PerformClick.run()V:2
— this=Landroid/view/View$PerformClick; <831945498576>
com.androidpentesting.andbug.MainActivity.access$000
(Lcom/androidpentesting/andbug/MainActivity;Ljava/lang/String;Ljava/lang/String;)V:6
— x2=superstrongsecretkey
— x0=Lcom/androidpentesting/andbug/MainActivity; <831945423976>
— x1=12345
— com.androidpentesting.andbug.MainActivity$1.onClick(Landroid/view/View;)V:25
— this=Lcom/androidpentesting/andbug/MainActivity$1; <831945677304>
— accountnumber=12345
— v=Landroid/widget/Button; <831945630640>
— android.view.View.performClick()Z:18
— this=Landroid/widget/Button; <831945630640>
— li=Landroid/view/View$ListenerInfo; <831945677320>
太有趣啦!我们竟然可以看到用于生成加密密钥的密码。这是因为当调用特定方法时,AndBug能够显示其参数,如上所示。这在渗透测试期间的各种场景中是非常方便的。 在上述情况下,输出被截获,同时AndBug会显示指定类的所有方法和参数。 如前所述,您可以使用method-trace或mt命令挂接到特定方法上面。
AndBug工具不仅有趣,而且非常有用,我们建议您不妨将其收入到Android应用程序黑箱评估的工具箱中。我敢保证,只要您使用一次,肯定会喜欢上这个工具的。
传送门
安卓 Hacking Part 2:Content Provider攻防(连载)
安卓 Hacking Part 3:Broadcast Receivers攻防(连载)
安卓 Hacking Part 4:非预期的信息泄露(边信道信息泄露)
安卓 Hacking Part 5:使用JDB调试Java应用
安卓 Hacking Part 9:不安全的本地存储:Shared Preferences
安卓 Hacking Part 11:使用Introspy进行黑盒测试
安卓 Hacking Part 12:使用第三方库加固Shared Preferences
安卓 Hacking Part 13:使用Drozer进行安全测试
安卓 Hacking Part 14:在没有root的设备上检测并导出app特定的数据
安卓 Hacking Part 15:使用备份技术黑掉安卓应用
安卓 Hacking Part 17:破解Android应用
安卓 Hacking Part 19:NoSQL数据库不安全的数据存储
安卓Hacking Part 20:使用GDB在Android模拟器上调试应用程序
安卓Hacking Part 22:基于Cydia Substrate扩展的Android应用的钩子和补丁技术


发表评论
您还未登录,请先登录。
登录