

前言
KLEE是基于LLVM的符号执行工具,发表于2008年的OSDI会议上,至今已被引用3000多次,基于该工作的研究也有150多篇,其中有30多个是开源工作。本文从KLEE源码入手,希望能让读者了解klee工作的基本原理。
1. klee 基本框架
KLEE是EXE工作的重新设计。从高层面来说,KLEE像一个符号化进程的操作系统和解释器。程序源码被LLVM编译为类似RISC的虚拟指令集,KLEE直接解释指令,并将指令映射为约束条件。
KLEE的核心是一个解释器,循环地从状态池里选择状态,并在那个状态下符号化地执行每条指令。直到状态池里没有状态了,或者时间超过了用户设定的。
符号执行引擎存储的状态的寄存器、栈或者堆对象,都是表达式形式的,而非普通进程里的具体值。表达式的叶子节点是符号化的变量或者常量。还可以是LLVM中间层语言操作(算术运算、比较、内存访问)的内部节点。
符号执行大部分的指令都很直接。比如要符号执行一个LLVM加法运算。
%dst = add i32 %src0, %src1
KLEE直接从src0和src1里取出加数,并且写一个新的表达式Add(%src0,%src1)到dst寄存器里。如果操作数都是具体值,就直接加好,返回一个常数表达式。
条件分支是布尔表达式,并且会根据条件为真或假改变状态的指令指针。KLEE去查询约束求解器来确定当前路径上的分支条件是否恒为真或假。如果恒为真或假,就更新指令指针到预计的位置。反之两种分支都有可能。然后KLEE就会去复制当前状态,这样就可以同时探索两条路径,并且同时更新指令指针和路径条件。
潜在的危险操作也会生成一个分支。比如一个除法操作就会生成一个分支去检测除数是不是0。这些分支的工作方式和普通分支是一样的。当检查成功,即检测出错误的时候,会继续执行条件为假的路径,也就是添加相反的约束,比如使得除数不为0的约束。此外,还会为错误生成测试样例,并且终止检测出错误的状态。
至于其他的危险操作,比如load和store指令,也会去检查。这些例子里,就会去检查地址是不是在合法内存对象里。然而,store和load指令需要额外的编译。最直接的表示内存的方式是flat byte array。这种情况下,load和store就会分别简单地映射为数组读和写表达式。
然而,KLEE使用的约束求解器不能解决这种约束。于是,KLEE将每个要检查代码的内存对象映射到一个单独的STP数组里。这种方式提高了性能,因为这让STP无视了表达式没有引用的数组。
许多操作比如边界检查,对象级的copy-on-write)需要对象特定的信息。如果一个指针指向很多对象,这些操作就很难实现。为了简化实现,KLEE用以下方式回避了这个问题。当一个解引用的指针p指向N个对象时,KLEE复制当前状态N次。在每个状态,KLEE限制指针p在其对象的边界内,然后实现读或写操作。虽然这个方法对于有很大points-to 集合的指针的开销很大,但实际情况中,大部分的符号指针只指向1个对象,所以这个优化还是可以的。
2. klee代码架构
从klee官网的开发者指南,我们可以知道klee源码的大致结构如下:
|-- include //包含公共的头文件
|-- tools //所有KLEE的二进制的main都在这里,有些是python脚本
|-- lib //包含大部分的源码
|   |-- Core //包含解释和执行LLVM字节码和KLEE内存模型。
|   |-- Expr // klee的表达式库
|   |-- Module //包含在执行LLVM字节码前的一些操作代码。比如链接POSIX运行函数等等。
|   |-- Solver//包含所有求解器
|-- runtime//包含各种KLEE的运行时支持。
|-- test//包含一些小的C程序和LLVM的字节码,用来给KLEE做回归测试
由上面的结构可以知道,如果要修改KLEE的话,基本上是在lib/core目录下进行修改。现在看看lib/core目录下都有哪些代码。
|-- AddressSpace.cpp
|-- AddressSpace.h
|-- CallPathManager.cpp
|-- CallPathManager.h
|-- Context.cpp
|-- Context.h
|-- CoreStats.cpp
|-- CoreStats.h
|-- ExecutionState.cpp
|-- ExecutionState.h
|-- Executor.cpp
|-- Executor.h
|-- ExecutorUtil.cpp
|-- ExternalDispatcher.cpp
|-- ExternalDispatcher.h
|-- GetElementPtrTypeIterator.h
|-- ImpliedValue.cpp
|-- ImpliedValue.h
|-- Memory.cpp
|-- Memory.h
|-- MemoryManager.cpp
|-- MemoryManager.h
|-- MergeHandler.cpp
|-- MergeHandler.h
|-- PTree.cpp
|-- PTree.h
|-- Searcher.cpp
|-- Searcher.h
|-- SeedInfo.cpp
|-- SeedInfo.h
|-- SpecialFunctionHandler.cpp
|-- SpecialFunctionHandler.h
|-- StatsTracker.cpp
|-- StatsTracker.h
|-- TimingSolver.cpp
|-- TimingSolver.h
|-- UserSearcher.cpp
|-- UserSearcher.h
咋看上去有一点多。去掉头文件就少一半,大概将近二十个代码。这里我们就先从Executor.cpp这里开始看,这里也是解释器的主循环所在的代码。
3. klee的执行器Executor
解释器的主循环代码位于Executor.cpp的run函数里。
void Executor::run(ExecutionState &initialState) {
  bindModuleConstants();

  // Delay init till now so that ticks don't accrue during optimization and such.
  timers.reset();

  states.insert(&initialState);

  if (usingSeeds) {
    ...
  }
  searcher = constructUserSearcher(*this);

  std::vector<ExecutionState *> newStates(states.begin(), states.end());
  searcher->update(0, newStates, std::vector<ExecutionState *>());

  // main interpreter loop
  while (!states.empty() && !haltExecution) {
    ExecutionState &state = searcher->selectState();
    KInstruction *ki = state.pc;
    stepInstruction(state);

    executeInstruction(state, ki);
    timers.invoke();
    if (::dumpStates) dumpStates();
    if (::dumpPTree) dumpPTree();

    updateStates(&state);

    if (!checkMemoryUsage()) {
      // update searchers when states were terminated early due to memory pressure
      updateStates(nullptr);
    }
  }
    ...
}
从代码注释//main interpreter loop往下看,代码的逻辑基本和前面说的差不多,由搜索器searcher选择一个状态,然后执行指令,并且更新状态。下面我们来看组成这个循环的四个主要函数。
selectState();
stepInstruction(state);
executeInstruction(state, ki);
updateStates(&state);
将run函数的大致流程可以用下图表示。
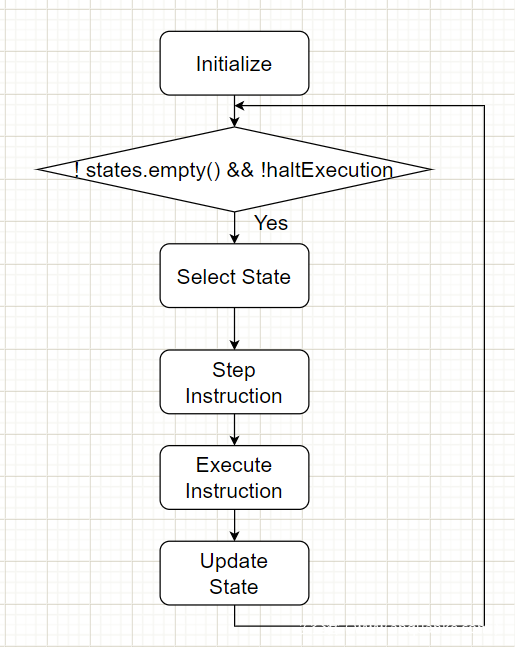
selectState函数在Searcher.cpp里,并且每种search的选择状态实现也不一样。比如DFSSearcer就直接返回状态池的最后一个状态。
ExecutionState &DFSSearcher::selectState() {
  return *states.back();
}
BFSSearcher返回第一个状态。
ExecutionState &BFSSearcher::selectState() {
  return *states.front();
}
KLEE还实现了很多Searcher,感兴趣地可以去Searcher.cpp代码里看。
下面的代码是stepInstruction,逻辑比较简单,主要就是将PC+1。并且判断一下如果指令数量到达最大指令数量,就将haltExecution标志位置为真。为什么不直接将这个逻辑整合到执行指令里去呢?除了要判断指令的数目这点外,也是为了更好地扩展。实际上就有工作在stepInstuction和executeInstruction之间做了扩展,比如基于klee扩展的一个工作BovInspector就在此处加了一个验证函数BFO_Check函数来验证缓冲区溢出漏洞。
void Executor::stepInstruction(ExecutionState &state) {
  printDebugInstructions(state);
  if (statsTracker)
    statsTracker->stepInstruction(state);

  ++stats::instructions;
  ++state.steppedInstructions;
  state.prevPC = state.pc;
  ++state.pc;

  if (stats::instructions == MaxInstructions)
    haltExecution = true;
}
然后是executeInstruction()函数,这个函数代码量比较大,核心就是一个很大的switch语句,对于不同的指令,设置了不同的执行方式。下图展示了KLEE建模的指令。
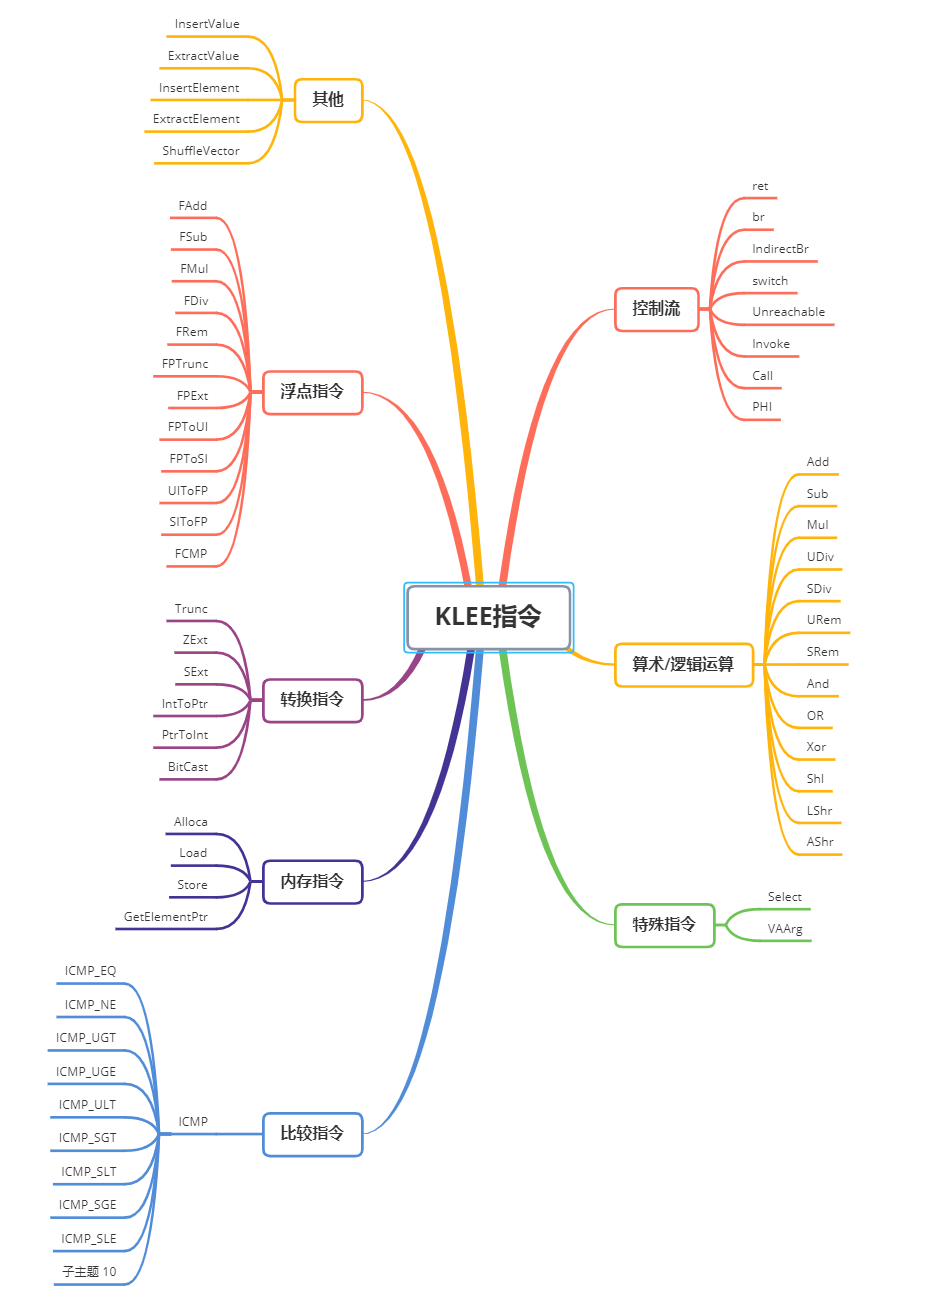
下面代码节选了内存指令的实现。eval函数的作用是求解表达式。对angr有了解的,可能会发现angr里也有eval这个接口。这部分对指令的建模代码看起来有点晦涩,但大体上可以看出klee对IR层的每条指令都做了细致的处理。
void Executor::executeInstruction(ExecutionState &state, KInstruction *ki) {
  Instruction *i = ki->inst;
  switch (i->getOpcode()) {
  ...
   case Instruction::Alloca: {
    AllocaInst *ai = cast<AllocaInst>(i);
    unsigned elementSize =
      kmodule->targetData->getTypeStoreSize(ai->getAllocatedType());
    ref<Expr> size = Expr::createPointer(elementSize);
    if (ai->isArrayAllocation()) {
      ref<Expr> count = eval(ki, 0, state).value;
      count = Expr::createZExtToPointerWidth(count);
      size = MulExpr::create(size, count);
    }
    executeAlloc(state, size, true, ki);
    break;
  }

  case Instruction::Load: {
    ref<Expr> base = eval(ki, 0, state).value;
    executeMemoryOperation(state, false, base, 0, ki);
    break;
  }
  case Instruction::Store: {
    ref<Expr> base = eval(ki, 1, state).value;
    ref<Expr> value = eval(ki, 0, state).value;
    executeMemoryOperation(state, true, base, value, 0);
    break;
  }
  ...
接下来看更新状态的代码。主要逻辑就是把addedStates的状态加到状态池里,removedStates的状态移出状态池里。
void Executor::updateStates(ExecutionState *current) {
  if (searcher) {
    searcher->update(current, addedStates, removedStates);
  }

  states.insert(addedStates.begin(), addedStates.end());
  addedStates.clear();

  for (std::vector<ExecutionState *>::iterator it = removedStates.begin(),
                                               ie = removedStates.end();
       it != ie; ++it) {
    ExecutionState *es = *it;
    std::set<ExecutionState*>::iterator it2 = states.find(es);
    assert(it2!=states.end());
    states.erase(it2);
    std::map<ExecutionState*, std::vector<SeedInfo> >::iterator it3 =
      seedMap.find(es);
    if (it3 != seedMap.end())
      seedMap.erase(it3);
    processTree->remove(es->ptreeNode);
    delete es;
  }
  removedStates.clear();
}
4. klee的状态
从Executor.cpp的代码里,我们可以发现,klee里一个很重要的概念就是state。解释器里的几个重要流程的操作对象都是状态。接下来看看klee的状态都有哪些部分组成。这部分代码在ExecutionState.cpp。从下面的代码中,可以发现状态里包含了很多信息,包括pc,栈约束条件等等。
ExecutionState::ExecutionState(const ExecutionState& state):
    pc(state.pc),
    prevPC(state.prevPC),
    stack(state.stack),
    incomingBBIndex(state.incomingBBIndex),
    depth(state.depth),
    addressSpace(state.addressSpace),
    constraints(state.constraints),
    pathOS(state.pathOS),
    symPathOS(state.symPathOS),
    coveredLines(state.coveredLines),
    symbolics(state.symbolics),
    arrayNames(state.arrayNames),
    openMergeStack(state.openMergeStack),
    steppedInstructions(state.steppedInstructions),
    instsSinceCovNew(state.instsSinceCovNew),
    unwindingInformation(state.unwindingInformation
                             ? state.unwindingInformation->clone()
                             : nullptr),
    coveredNew(state.coveredNew),
    forkDisabled(state.forkDisabled) {
  for (const auto &cur_mergehandler: openMergeStack)
    cur_mergehandler->addOpenState(this);
}
关于state的操作有以下几种,这部分里主要还是merge的逻辑比较复杂。
branch // 处理分支情况,实际就是复制条件为false的状态
pushFrame
popFrame
addSymbolic
merge //合并状态
dumpStack
addConstraint //调用约束管理器添加约束
5. KLEE内存模型
klee里还有个很重要的概念就是内存模型。在Memory.h里,我们可以看见有memory object的定义,可以知道memory object有以下属性,包括id,地址,内存对象的大小等等
  MemoryObject(uint64_t _address, unsigned _size,
               bool _isLocal, bool _isGlobal, bool _isFixed,
               const llvm::Value *_allocSite,
               MemoryManager *_parent)
    : id(counter++),
      address(_address),
      size(_size),
      name("unnamed"),
      isLocal(_isLocal),
      isGlobal(_isGlobal),
      isFixed(_isFixed),
      isUserSpecified(false),
      parent(_parent),
      allocSite(_allocSite) {
  }
而这些内存对象由memory manager来进行管理,在MemoryManager.h里可以看到memory manger负责分配内存、释放内存等等。
public:
  MemoryManager(ArrayCache *arrayCache);
  ~MemoryManager();

  /**
   * Returns memory object which contains a handle to real virtual process
   * memory.
   */
  MemoryObject *allocate(uint64_t size, bool isLocal, bool isGlobal,
                         const llvm::Value *allocSite, size_t alignment);
  MemoryObject *allocateFixed(uint64_t address, uint64_t size,
                              const llvm::Value *allocSite);
  void deallocate(const MemoryObject *mo);
  void markFreed(MemoryObject *mo);
  ArrayCache *getArrayCache() const { return arrayCache; }

  /*
   * Returns the size used by deterministic allocation in bytes
   */
  size_t getUsedDeterministicSize();
};
前面提到的基于KLEE的工作BovInspector就在Memory.h里建立缓冲区的模型。下面代码就是BovInspector建立的缓冲区的模型。这也告诉我们,如果想要对什么对象建立模型,可以将代码写在Memory.h里。
class BufferObject {
private:
    uint64_t startAddr;
    uint64_t size;

public:
    MemoryObject * mo;
    uint64_t getStartAddr();
    uint64_t getSize();

    void setStartAddr(uint64_t addr);
    void setSize(unsigned size);
    BufferObject(MemoryObject * mo);
};
}
6. 总结
klee和angr都是符号执行工具,但两者不同的是,angr更像是一个框架,你可以利用框架实现你想要的功能,而klee则是封装比较好的一个工具,可以直接输入命令使用的。另外一个不同点是angr是针对二进制程序操作的,而klee是在LLVM字节码上弄的。
之前对于klee的了解仅仅停留在论文和官方文档,几条命令反复使用。但最近需要修改klee实现想要的功能时,仅仅停留在论文和官方文档就有点不够用了。尝试去看了代码,感觉收益颇丰,看的时候不禁恍然大悟,原来也有我看得懂的地方。
总的来说,klee是基于LLVM的一个很优秀的开源符号执行工具,十几年来都还在更新代码,目前来看功能应该比较完善了,但仍然有可扩展的空间,比如和别的静态分析技术结合,例如SVF(https://github.com/SVF-tools/SVF)。
klee的代码比较复杂,单看klee还是比较迷糊,可以去找基于klee扩展的工作对照klee来看,这样从找不同中,看代码也不会没有目标。基于klee的工作,在官网这里有列出来,可以拿来学习的开源工具还是相当多的:http://klee.github.io/publications/
限于本人能力,写的比较粗糙,希望大家能从这篇文章有所收获。
7. 参考资料
0x1. klee官网:http://klee.github.io/
0x2. Cadar C, Dunbar D, Engler D R. Klee: unassisted and automatic generation of high-coverage tests for complex systems programs[C]//OSDI. 2008, 8: 209-224.
0x3. klee源码:https://github.com/klee/klee
0x4. BovInspector : https://github.com/BovInspectorTool1/project


发表评论
您还未登录,请先登录。
登录